How to add a Settings screen in an Android App Android 12.04.2018
Including settings in your app gives your users the power to control some of the functionality of your app. This will provide a better user experience for your users.
Build an app's settings using various subclasses of the Preference class rather than using View objects.
Each Preference appears as an item in a list. Direct subclasses provide containers for layouts involving multiple settings. For example:
PreferenceGroup: Represents a group of settings (Preference objects).PreferenceCategory: Provides a disabled title above a group as a section divider.PreferenceScreen: Represents a top-level Preference that is the root of a Preference hierarchy. Use a PreferenceScreen in a layout at the top of each screen of settings.
Other Preference subclasses for settings provide the appropriate UI for users to change the setting. For example:
CheckBoxPreference: Creates a list item that shows a checkbox for a setting that is either enabled or disabled. The saved value is a boolean (true if it's checked).ListPreference: Creates an item that opens a dialog with a list of radio buttons.SwitchPreference: Creates a two-state toggleable option (such as on/off or true/false).EditTextPreference: Creates an item that opens a dialog with an EditText widget. The saved value is a String.RingtonePreference: Lets the user to choose a ringtone from those available on the device.
To be able to follow this tutorial, you'll need:
- A basic understanding of some Android APIs (such as SharedPreferences)
- Android Studio 3.0 or higher
- Kotlin plugin 1.1.51 or higher
To support API Level 11 (Honeycomb) and above, we can use the PreferenceFragment. This class is simply a Fragment that shows a hierarchy of Preference objects as lists.
class SettingsActivity : AppCompatActivity() {
    override fun onCreate(savedInstanceState: Bundle?) {
        super.onCreate(savedInstanceState)

        if (fragmentManager.findFragmentById(android.R.id.content) == null) {
            fragmentManager.beginTransaction()
                    .add(android.R.id.content, SettingsFragment()).commit()
        }
    }

    class SettingsFragment : PreferenceFragment() {
        override fun onCreate(savedInstanceState: Bundle?) {
            super.onCreate(savedInstanceState)
            addPreferencesFromResource(R.xml.preferences)
        }
    }
}
In the code above, we created a nested class SettingsFragment inside SettingsActivity. Note that our class SettingsFragment extends the PreferenceFragment superclass and has a method addPrerenceFromResource inside onCreate(). In this method, we gave it a resource ID R.xml.preference of the preference XML to launch - when the Fragment is loaded. Finally, we host the Fragment to the activity by simply using the FragmentTransaction to add it to the UI-inside onCreate() of SettingsActivity.
Create preferences.xml file in res/xml directory. Note that you can give this file any name, but it's highly recommended to stick with the conventional name "preferences". Also, you typically should have only one such file in an app project.
<?xml version="1.0" encoding="utf-8"?>
<PreferenceScreen xmlns:android="http://schemas.android.com/apk/res/android">
    <CheckBoxPreference
        android:key="checkbox"
        android:summary="Tap to check if on or off"
        android:title="Checkbox Preference" />
    <RingtonePreference
        android:key="ringtone"
        android:showDefault="true"
        android:showSilent="true"
        android:summary="Pick a ringtone you like"
        android:title="Ringtone Preference" />
    <EditTextPreference
        android:dialogTitle="Enter a text"
        android:key="text"
        android:summary="Click to show a text entry dialog"
        android:title="EditText Preference" />
    <ListPreference
        android:dialogTitle="Select duration"
        android:entries="@array/settings_list_preference_titles"
        android:entryValues="@array/settings_list_preference_values"
        android:key="list"
        android:summary="Click to show a list to choose from"
        android:title="List Preference" />
    <SwitchPreference
        android:key="switch"
        android:title="Switch Preference"
        android:summary="Click to switch on or off"
        android:defaultValue="true"/>
</PreferenceScreen>
The root node for our preferences.xml file should be a PreferenceScreen element. Inside this root element, we now have our individual Preference. Here are the common attributes associated with a Preference:
android:key: this attribute is used to get the value in theSharedPreferencesobject.android:title: sets the title for thePreference. This is the bold text.android:summary: sets the summary for thePreference(this is not required). This is the faded text below the title.android:defaultValue: sets the default value for thePreference.
Let's now see how to update the preference summary with the value selected by the user.
class SettingsActivity : AppCompatActivity() {
    companion object {
        private val sBindPreferenceSummaryToValueListener = Preference.OnPreferenceChangeListener {
                  preference, value ->
            val stringValue = value.toString()

            if (preference is ListPreference) {
                // For list preferences, look up the correct display value in
                // the preference's 'entries' list.
                val listPreference = preference
                val index = listPreference.findIndexOfValue(stringValue)

                // Set the summary to reflect the new value.
                preference.setSummary(
                        if (index >= 0)
                            listPreference.entries[index]
                        else
                            null)

            } else if (preference is RingtonePreference) {
                // For ringtone preferences, look up the correct display value
                // using RingtoneManager.
                if (TextUtils.isEmpty(stringValue)) {
                    // Empty values correspond to 'silent' (no ringtone).
                    preference.setSummary("Silent")
                } else {
                    val ringtone = RingtoneManager.getRingtone(
                            preference.getContext(), Uri.parse(stringValue))

                    if (ringtone == null) {
                        // Clear the summary if there was a lookup error.
                        preference.setSummary(null)
                    } else {
                        // Set the summary to reflect the new ringtone display name.
                        val name = ringtone.getTitle(preference.getContext())
                        preference.setSummary(name)
                    }
                }
            }
            else {
                // For all other preferences, set the summary to the value's
                // simple string representation.
                preference.summary = stringValue
            }
            true
        }

        private fun bindPreferenceSummaryToValue(preference: Preference) {
            // Set the listener to watch for value changes.
            preference.onPreferenceChangeListener = sBindPreferenceSummaryToValueListener

            // Trigger the listener immediately with the preference's
            // current value.
            sBindPreferenceSummaryToValueListener.onPreferenceChange(preference,
                    PreferenceManager
                            .getDefaultSharedPreferences(preference.context)
                            .getString(preference.key, ""))
        }
    }

    class SettingsFragment : PreferenceFragment() {
        override fun onCreate(savedInstanceState: Bundle?) {
            super.onCreate(savedInstanceState)
            addPreferencesFromResource(R.xml.preferences)

            bindPreferenceSummaryToValue(findPreference("ringtone"))
            bindPreferenceSummaryToValue(findPreference("text"))
            bindPreferenceSummaryToValue(findPreference("list"))
        }
    }

    override fun onCreate(savedInstanceState: Bundle?) {
        super.onCreate(savedInstanceState)

        if (fragmentManager.findFragmentById(android.R.id.content) == null) {
            fragmentManager.beginTransaction()
                    .add(android.R.id.content, SettingsFragment()).commit()
        }
    }
}
In this class, we created a helper method called bindPreferenceSummaryToValue(), which is inside our companion object, to update the preference summary text with the value the user has selected. We passed it a Preference object as an argument. The findPreference() will return a Preference using the Preference's key.
We have a variable sBindPreferenceSummaryToValueListener that is an instance of Preference.OnPreferenceChangeListener. This is simply a preference change listener that will help us update the preference summary to the value the user has selected. We check for special cases, like when the selected preference is a RingtonePreference or a ListPreference. For those preference types, we do some special handling to get the summary string. If the preference is neither (like an EditTextPreference), we just set the summary to the preference's string value.
Inside the bindPreferenceSummaryToValue(), we set the preference change listener by calling onPreferenceChangeListener (in Java, it's setOnPreferenceChangeListener instead) on the Preference object.
There are several reasons why you might want to set up a listener for a specific setting:
- If a change to the value of a setting also requires changing the summary of the setting, you can listen for the change, and then change the summary with the new setting value.
- If the setting requires several more options, you may want to listen for the change and immediately respond by displaying the options.
- If the setting makes another setting obsolete or inappropriate, you may want to listen for the change and immediately respond by disabling the other setting.
To listen to a setting, use the Preference.OnPreferenceChangeListener interface, which includes the onPreferenceChange() method that returns the new value of the setting.
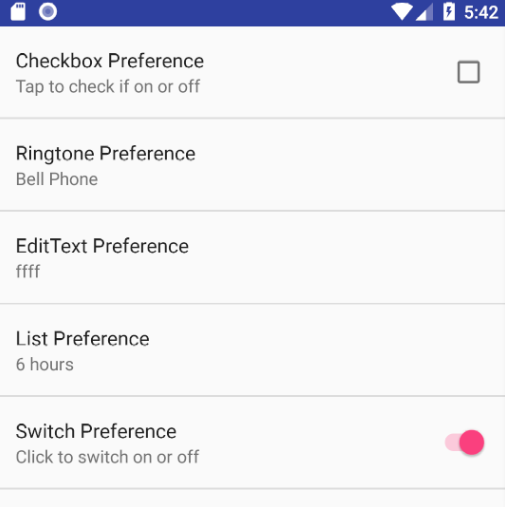
Result
Retrieving Preference Values
To start getting preference values for the settings screen, we call getDefaultSharedPreference() which is inside the PreferenceManager class - passing it a Context object of the preferences whose values are wanted. Note that we get the values from the default SharedPreferences for our application.
val prefs = PreferenceManager.getDefaultSharedPreferences(this)
prefs.getBoolean("checkbox", false).toString()
prefs.getString("ringtone", "<unset>")
prefs.getString("text", "<unset>")
prefs.getString("list", "<unset>")
You call the corresponding getter method for the type we want to retrieve the value from in SharedPreferences. You pass it the key as the first argument, and the default value is the second argument.
Now, let's go through each of the Preference entities we have.
Checkbox Preference
A CheckBoxPreference is simply a CheckBox widget that's included in the preference screen. This Preference returns the value "true" if checked or "false" otherwise. In other words, it returns a boolean depending on the state of the widget.
<CheckBoxPreference
    android:key="checkbox"
    android:summary="Tap to check if on or off"
    android:title="Checkbox Preference" />
Other attributes you can add to a CheckBoxPreference are:
android:summaryOff: sets the summary for thePreferencein a preference screen when it's unchecked.android:summaryOn: sets the summary for thePreferencein a preference screen when it's checked.android:disableDependentsState: The state (true for on, or false for off) that causes dependents to be disabled. May be a boolean value, such as "true" or "false".
Switch Preference
SwitchPreference performs similar functionality to the CheckBoxPreference. It provides a two-state ("on" or "off") toggleable option. This uses a Switch widget that allows the user to slide left ("off") and right ("on"). This Preference also includes the attributes described for the CheckBoxPreference above. In addition, it has the following attributes:
android:switchTextOff: sets the text used on the switch itself when in the "off" state.android:switchTextOn: sets the text used on the switch itself when in the "on" state.
<SwitchPreference
    android:key="switch"
    android:title="Switch Preference"
    android:summary="Click to switch on or off"
    android:defaultValue="true"/>
EditText Preference
This Preference, when clicked, shows a dialog for the user to enter an input text. It uses the EditText widget - including all the attributes of that widget that you're already familiar with.
<EditTextPreference
    android:dialogTitle="Enter a text"
    android:key="text"
    android:summary="Click to show a text entry dialog"
    android:title="EditText Preference"
    android:inputType="text"/>
Note that the value stored in the SharedPreferences is a string.
List Preference
This kind of Preference will display a list of entries in a dialog when tapped. Here, you can specify a pair of string-array resources in your preference XML. This string-array resource simply contains a collection of strings. This resource is located at res/values/arrays.xml.
<?xml version="1.0" encoding="utf-8"?>
<resources>
    <string-array name="settings_list_preference_titles">
        <item>15 minutes</item>
        <item>30 minutes</item>
        <item>1 hour</item>
        <item>3 hours</item>
        <item>6 hours</item>
        <item>Never</item>
    </string-array>
    <string-array name="settings_list_preference_values">
        <item>15</item>
        <item>30</item>
        <item>60</item>
        <item>180</item>
        <item>360</item>
        <item>-1</item>
    </string-array>
</resources>
Here is our sample ListPreference using this resource.
<ListPreference
    android:dialogTitle="Select duration"
    android:entries="@array/settings_list_preference_titles"
    android:entryValues="@array/settings_list_preference_values"
    android:key="list"
    android:summary="Click to show a list to choose from"
    android:title="List Preference" />
We set the entries and entry values using the android:entries and android:entryValues attributes respectively.
android:entries: the human-readable array to present as a list.android:entryValues: the array to find the value to save for a preference when an entry from entries is selected.
MultiSelect List Preference
This one is similar to ListPreference but instead of having radio buttons, we have check boxes. In other words, the user can select multiple items in the dialog. Note that the result is stored in a "string set" in the SharedPreferences. This can be retrieved using getStringSet().
<MultiSelectListPreference
    android:dialogTitle="Dialog title"
    android:entries="@array/settings_multi_select_list_preference_titles"
    android:entryValues="@array/settings_multi_select_list_preference_values"
    android:key="multi_select_list"
    android:title="Multiselect title" />
Creating Setting Groups
It becomes a problem when you have a long list of preferences or settings, because users may have some trouble scanning or understanding them. To solve this problem, we can group our preferences.
<?xml version="1.0" encoding="utf-8"?>
<PreferenceScreen xmlns:android="http://schemas.android.com/apk/res/android">

    <PreferenceCategory android:title="Basic Settings">
        <CheckBoxPreference
                android:key="checkbox"
                android:summary="Tap to check if on or off"
                android:title="Checkbox Preference"/>
        ...
    </PreferenceCategory>

    <PreferenceCategory android:title="Advanced Settings">
        <ListPreference
                android:dialogTitle="Select duration"
                android:entries="@array/settings_list_preference_titles"
                android:entryValues="@array/settings_list_preference_values"
                android:key="list"
                android:summary="Click to show a list to choose from"
                android:title="List Preference"/>
        ...
    </PreferenceCategory>
</PreferenceScreen>
We simply surround the preferences we want to group in a PreferenceCategory tag and give each group a title using the android:title attribute.
Starting an Intent
Note that's it's possible to open an activity by just clicking a preference item from the settings screen. This can come in handy when you want to open a web page. Here's the code to do that:
<Preference
    android:summary="Click to start an activity"
    android:title="Preference">
    <intent
        android:action="me.proft.preferencedemo.SETTING_START_ACTIVITY"
        android:targetClass="me.proft.preferencedemo.MyActivity"
        android:targetPackage="me.proft.preferencedemo" />
</Preference>
Here, we added a <intent> element inside the Preference element.
android:action: sets the action for theIntent(this is similar to callingsetAction()on anIntentobject).android:targetClass: sets the class part of the component name (same as callingsetComponent()on anIntentobject).android:targetPackage: sets the package part of the component name.android:data: sets the data to assign (same as callingsetData()on anIntentobject).
To open a web page, for example, you could use the following:
<Preference android:title="@string/prefs_web_page" >
    <intent android:action="android.intent.action.VIEW"
            android:data="http://www.example.com" />
</Preference>
Quote
Categories
- Android
- AngularJS
- Databases
- Development
- Django
- iOS
- Java
- JavaScript
- LaTex
- Linux
- Meteor JS
- Python
- Science
Archive ↓
- September 2024
- December 2023
- November 2023
- October 2023
- March 2022
- February 2022
- January 2022
- July 2021
- June 2021
- May 2021
- April 2021
- August 2020
- July 2020
- May 2020
- April 2020
- March 2020
- February 2020
- January 2020
- December 2019
- November 2019
- October 2019
- September 2019
- August 2019
- July 2019
- February 2019
- January 2019
- December 2018
- November 2018
- August 2018
- July 2018
- June 2018
- May 2018
- April 2018
- March 2018
- February 2018
- January 2018
- December 2017
- November 2017
- October 2017
- September 2017
- August 2017
- July 2017
- June 2017
- May 2017
- April 2017
- March 2017
- February 2017
- January 2017
- December 2016
- November 2016
- October 2016
- September 2016
- August 2016
- July 2016
- June 2016
- May 2016
- April 2016
- March 2016
- February 2016
- January 2016
- December 2015
- November 2015
- October 2015
- September 2015
- August 2015
- July 2015
- June 2015
- February 2015
- January 2015
- December 2014
- November 2014
- October 2014
- September 2014
- August 2014
- July 2014
- June 2014
- May 2014
- April 2014
- March 2014
- February 2014
- January 2014
- December 2013
- November 2013
- October 2013