In short about Android Fragments Android 29.04.2014
Introduction
A fragment is a self-contained, modular section of an application’s user interface and corresponding behavior that can be embedded within an activity. Fragments can be assembled to create an activity during the application design phase, and added to, or removed from an activity during application runtime to create a dynamically changing user interface
The primary advantage of Fragments is the ease with which you can create dynamic and flexible UI designs that can be adapted to suite a range of screen sizes — from small-screen smartphones to tablets. Each Fragment is an independent module that is tightly bound to the Activity into which it is placed. Fragments can be reused within multiple activities, as well as laid out in a variety of combinations to suit multipane tablet UIs and added to, removed from, and exchanged within a running Activity to help build dynamic UIs.
Following are important points about fragment:
- A fragment has its own layout and its own behavior with its own lifecycle callbacks.
- You can add or remove fragments in an activity while the activity is running.
- You can combine multiple fragments in a single activity to build a multi-pane UI.
- A fragment can be used in multiple activities.
- Fragment life cycle is closely related to the lifecycle of its host activity which means when the activity is paused, all the fragments available in the acivity will also be stopped.
- A fragment can implement a behavior that has no user interface component.
- Fragments were added to the Android API in Honeycomb version of Android which API version 11.
Fragment can provide:
- Modularity: dividing complex activity code across fragments for better organization and maintenance.
- Reusability: placing behavior or UI parts into fragments that can be shared across multiple activities.
- Adaptability: representing sections of a UI as different fragments and utilizing different layouts depending on screen orientation and size.
You create fragments by extending Fragment class and you can insert a fragment into your activity layout by declaring the fragment in the activity's layout file, as a <fragment/> element.
Following is a typical example of how two UI modules defined by fragments can be combined into one activity for a tablet design, but separated for a handset design.
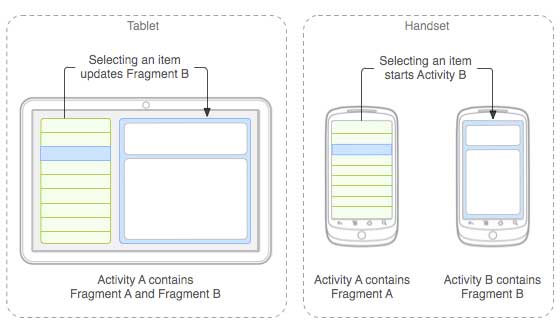
The application can embed two fragments in Activity A, when running on a tablet-sized device. However, on a handset-sized screen, there's not enough room for both fragments, so Activity A includes only the fragment for the list of articles, and when the user selects an article, it starts Activity B, which includes the second fragment to read the article.
There are three main types of Fragments:
- Static Fragments, which are placed in an Activity layout and never change.
- Dynamic framework Fragments.
- Dynamic support Fragments from the v4 support library, which work with AppCompatActivities
Android applications use one of the following classes for Fragments:
android.app.Fragment. The base class for all fragment definitions.android.app.FragmentManager. The class for interacting with fragment objects inside an activity.android.app.FragmentTransaction. The class for performing an atomic set of fragment operations.
You can create a Fragment programmatically or you can define a Fragment in an XML layout file (which is also true of other UI components). If a Fragment component is defined in an XML layout file, the android:name attribute specifies the corresponding class. In the former case, you define a Fragment by extending one of the following classes that are in the package android.app:
- Fragment
- ListFragment
- DialogFragment
- PreferenceFragment
- WebViewFragment
Unlike Activities, Fragments don’t need to be registered in your manifest. This is because Fragments can exist only when embedded into an Activity, with their lifecycles dependent on that of the Activity to which they’ve been added.
Fragments are stored in the form of XML layout files and may be added to an activity either by placing appropriate <fragment> elements in the activity’s layout file, or directly through code within the activity’s class implementation.
Before starting to use Fragments in an Android application, it is important to be aware that Fragments were not introduced to Android until version 3.0 of the Android SDK. An application that uses Fragments must, therefore, make use of the android-support-v4 Android Support Library in order to be compatible with older Android versions.
Fragment Life Cycle
Android fragments have their own life cycle very similar to an android activity.
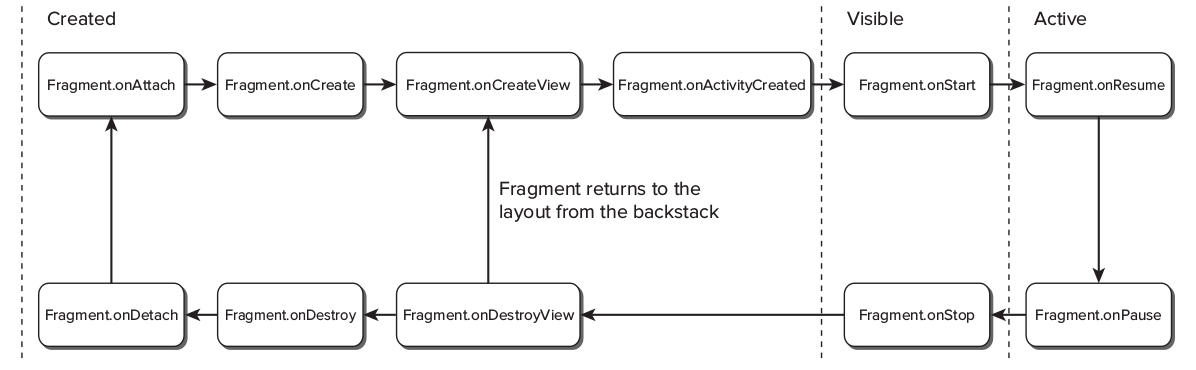
Phase I: When a fragment gets created, it goes through the following states:
onAttach(): when the fragment attaches to its host activity.onCreate(): when a new fragment instance initializes, which always happens after it attaches to the host — fragments are a bit like viruses.onCreateView(): when a fragment creates its portion of the view hierarchy, which is added to its activity’s view hierarchy.onActivityCreated(): when the fragment’s activity has finished its ownonCreateevent.
Phase II: When the fragment becomes visible, it goes through these states:
onStart(): when the fragment is visible; a fragment starts only after its activity starts and often starts immediately after its activity does.onResume(): when the fragment is visible and interactable; a fragment resumes only after its activity resumes and often resumes immediately after the activity does.
Phase III: When the fragment goes into the background mode, it goes through these states:
onPaused(): when the fragment is no longer interactable; this occurs when either the fragment is about to be removed or replaced or when the fragment’s activity pauses.onStop(): when the fragment is no longer visible; this occurs either after the fragment is about to be removed or replaced or when the fragment’s activity stops.
Phase IV: When the fragment is destroyed, it goes through the following states:
onPaused()onStop()onDestroyView(): when the view and related resources created in onCreateView are removed from the activity’s view hierarchy and destroyedonDestroy(): when the fragment does its final clean up.onDetach(): when the fragment is detached from its activity.
Source: Professional Android TM 4 Application Development by Reto Meier.
When to use Fragments
Fragments make it easy to re-use components in different layouts, e.g. you can build single-pane layouts for handsets (phones) and multi-pane layouts for tablets. This is not limited to tablets; for example you can use Fragments also to support different layout for landscape and portrait orientation. But as tablets offer significantly more space you typically include more views into the layout and Fragments makes that easier.
The typical example is a list of items in an Activity. On a tablet you see the details immediately on the same screen on the right hand side if you click on item. On a handset you jump to a new detail screen. The following discussion will assume that you have two Fragments (main and detail) but you can also have more. We will also have one main activity and one detailed activity. On a tablet the main activity contains both Fragments in its layout, on a handheld it only contains the main fragment.
To check for an fragment you can use the FragmentManager.
DetailFragment fragmentDetail = (DetailFragment) getFragmentManager().
    findFragmentById(R.id.detail_fragment);

if (fragment == null || !fragment.isInLayout()) {
    // start new Activity
} else {
    fragment.update(...);
}
Communication between Fragment and Activity
Once one or more fragments are embedded within an activity, the chances are good that some form of communication will need to take place both between the fragments and the activity and between one fragment and another. In fact, fragments should not communicate directly with each other. All communication should take place via the encapsulating activity.
In order for an activity to communicate with a fragment, the activity must identify the fragment object via the ID assigned to it using the findViewById() method. Once this reference has been obtained, the activity can simply call the public methods of the fragment object.
Communicating in the other direction (from fragment to activity) is a little more complicated. In the first instance, the fragment must define a listener interface, which is then implemented within the activity class. For example, the following code declares an interface named ButtonClickListener on a fragment class named DetailFragment. The code also declares a variable in which a reference to the activity will later be stored:
public class DetailFragment extends Fragment {
    ButtonClickListener activityCallback;

    public interface ButtonClickListener {
        public void onButtonClick(int position, String text);
    }
}
The above code dictates that any class that implements the ButtonClickListener interface must also implement a callback method named onButtonClick which, in turn, accepts an int and a String as arguments.
Next, the onAttach() method of the fragment class needs to be overridden and implemented. This method is called automatically by the Android system when the fragment has been initialized and associated with an activity. The method is passed a reference to the activity in which the fragment is contained. The method must store a local reference to this activity and verify that it implements the ButtonClickListener interface:
@Override
public void onAttach(Activity activity) {
    super.onAttach(activity);

    try {
        activityCallback = (ButtonClickListener) activity;
    } catch (ClassCastException e) {
        throw new ClassCastException(activity.toString() + " must implement ButtonClickListener");
    }
}
Upon execution of this example, a reference to the activity will be stored in the local activityCallback variable, and an exception will be thrown if that activity does not implement the ButtonClickListener interface.
The next step is to call the callback method of the activity from within the fragment. When and how this happens is entirely dependent on the circumstances under which the activity needs to be contacted by the fragment. For the sake of an example, the following code calls the callback method on the activity when a button is clicked:
public void buttonClicked (View view) {
   activityCallback.onButtonClick(arg1, arg2);
}
All that remains is to modify the activity class so that it implements the ButtonClickListener interface. For example:
public class MainActivity extends FragmentActivity implements
    DetailFragment.ButtonClickListener {

    public void onButtonClick(String arg1, int arg2) {
        // implement code for callback method
    }
}
As we can see from the above code, the activity declares that it implements the ButtonClickListener interface of the DetailFragment class and then proceeds to implement the onButtonClick() method as required by the interface.
How to instantiate Fragment with arguments
There are some ways to instantiate and pass data to fragments in android development. The most recommended way of instantiate fragments with arguments is to have factory methods for this task.
public class PlanetDetailFragment extends Fragment {
    private String planet;
    private String PLANET_TITLE = "title";

    private TextView tvPlanet;

    public static PlanetDetailFragment newInstance(String planet) {
        Bundle bundle = new Bundle();
        bundle.putString(PLANET_TITLE, planet);

        PlanetDetailFragment fragment = new PlanetDetailFragment();
        fragment.setArguments(bundle);

        return fragment;
    }

    private void readBundle(Bundle bundle) {
        if (bundle != null) {
            planet = bundle.getString(PLANET_TITLE);
        }
    }

    @Override
    public View onCreateView(LayoutInflater inflater, ViewGroup container, Bundle savedInstanceState) {
        View view = inflater.inflate(R.layout.fragment_detail, container, false);
        tvPlanet = (TextView) view.findViewById(R.id.tvPlanet);

        readBundle(getArguments());
        tvPlanet.setText(planet);
        return view;
    }
}
In this example, to instantiate PlanetDetailFragment you need to call;
PlanetDetailFragment fragment = PlanetDetailFragment.newInstance("Earth");
If android decides to recreate your activity and fragment, it is going to call no-argument constructor and the system guarantees to pass the arguments bundle to it.
Using DialogFragment
DialogFragment is a specialized Fragment used when you want to display an overlay modal window within an activity that floats on top of the rest of the content.
This is typically used for displaying an alert dialog, a confirm dialog, or prompting the user for information within an overlay without having to switch to another Activity.
DialogFragment is now the canonical way to display overlays; using Dialog directly is considered bad practice.
The Dialog class is the base class for implementing a dialog. Android provides several standard dialog implementation, AlertDialog, ProgressDialog, DatePickerDialog or TimePickerDialog. Your DialogFragment can implement the onCreateDialog method and return such a Dialog implementation.
The minimum that must be implemented when creating a DialogFragment is either the onCreateView method or the onCreateDialog method. Use onCreateView when the entire view of the dialog is going to be defined via custom XML. Use onCreateDialog when you just need to construct and configure a standard Dialog class (such as AlertDialog) to display.
// file MyAlertDialogFragment.java
public class MyAlertDialogFragment extends DialogFragment {
    @Override
    public Dialog onCreateDialog(Bundle savedInstanceState) {
        return new AlertDialog.Builder(getActivity())
            .setIcon(android.R.drawable.ic_dialog_alert)
            .setTitle("Alert dialog fragment example")
            .setMessage("This is a message")
            .setPositiveButton("OK", new DialogInterface.OnClickListener() {
                public void onClick(DialogInterface dialog, int which) {
                    Toast.makeText(getActivity(), "Pressed OK", Toast.LENGTH_SHORT).show();
                }
            })
            .setNegativeButton("Cancel", new DialogInterface.OnClickListener() {
                public void onClick(DialogInterface dialog, int which) {
                    Toast.makeText(getActivity(), "Cancel", Toast.LENGTH_SHORT).show();
                }
            }).create();
    }
}

// file MainActivity.java
public class MainActivity extends AppCompatActivity {
    @Override
    protected void onCreate(Bundle savedInstanceState) {
        super.onCreate(savedInstanceState);
        setContentView(R.layout.activity_main);

        MyAlertDialogFragment dlg = new MyAlertDialogFragment();
        dlg.show(getSupportFragmentManager(), "dlg_tag");
    }
}
You may also read about OnEditorActionListener interface at Using DialogFragments.
How to pass value from DialogFragment to Activity
First, add OnValueChange interface with onValueChange method to DialogFragment. Second, call onValueChange method and pass the value.
// file MyAlertDialogFragment.java
public class MyAlertDialogFragment extends DialogFragment {
    public interface OnValueChange {
        void onValueChange (int value);
    }

    @Override
    public Dialog onCreateDialog(Bundle savedInstanceState) {
        int value = 1;

        return new AlertDialog.Builder(getActivity())
            .setIcon(android.R.drawable.ic_dialog_alert)
            .setTitle("Alert dialog fragment example")
            .setMessage("This is a message")
            .setPositiveButton("OK", new DialogInterface.OnClickListener() {
                public void onClick(DialogInterface dialog, int which) {
                    OnValueChange activity = (OnValueChange) getActivity();
                    activity.onValueChange(value);
                    Toast.makeText(getActivity(), "Pressed OK", Toast.LENGTH_SHORT).show();
                }
            })
            .setNegativeButton("Cancel", new DialogInterface.OnClickListener() {
                public void onClick(DialogInterface dialog, int which) {
                    Toast.makeText(getActivity(), "Cancel", Toast.LENGTH_SHORT).show();
                }
            }).create();
    }
}
Third, implement OnValueChange interface and override onValueChange method.
// file MainActivity.java
public class MainActivity extends AppCompatActivity implements MyAlertDialogFragment.OnValueChange {
    @Override
    protected void onCreate(Bundle savedInstanceState) {
        super.onCreate(savedInstanceState);
        setContentView(R.layout.activity_main);

        MyAlertDialogFragment dlg = new MyAlertDialogFragment();
        dlg.show(getSupportFragmentManager(), "dlg_tag");
    }

    @Override
    public void onValueChange(int value) {
        Toast.makeText(this, "Received " + value, Toast.LENGTH_SHORT).show();
    }
}
Example
There is a standard sequence of steps when adding a fragment to an activity using code. These steps are as follows:
- Create an instance of the fragment’s class.
- Pass any additional intent arguments through to the class.
- Obtain a reference to the fragment manager instance.
- Call the
beginTransaction()method on the fragment manager instance. This returns a fragment transaction instance. - Call the
add()method of the fragment transaction instance, passing through as arguments the resource id of the view that is to contain the fragment and the fragment class instance. - Call the
commit()method of the fragment transaction.
Each Activity includes a Fragment Manager to manage the Fragments it contains. You can access the Fragment Manager using the getFragmentManager method:
FragmentManager fragmentManager = getFragmentManager();
The Fragment Manager provides the methods used to access the Fragments currently added to the Activity, and to perform Fragment Transaction to add, remove, and replace Fragments.
The simplest way to add a Fragment to an Activity is by including it within the Activity’s layout using the fragment tag, as shown in following example.
<?xml version="1.0" encoding="utf-8"?>
<LinearLayout xmlns:android="http://schemas.android.com/apk/res/android"
android:orientation="horizontal"
android:layout_width="match_parent"
android:layout_height="match_parent">

<fragment android:name="me.proft.planers.PlanetsListFragment"
android:id="@+id/planets_list_fragment"
android:layout_width="match_parent"
android:layout_height="match_parent"
android:layout_weight="1"
/>

<fragment android:name="me.proft.planets.PlanetsDetailFragment"
android:id="@+id/planets_detail_fragment"
android:layout_width="match_parent"
android:layout_height="match_parent"
android:layout_weight="3"
/>
</LinearLayout>
This technique works well when you use Fragments to define a set of static layouts based on various screen sizes. If you plan to dynamically modify your layouts by adding, removing, and replacing Fragments at run time, a better approach is to create layouts that use container Views into which Fragments can be placed at runtime, based on the current application state. Following example shows an XML snippet that you could use to support this latter approach.
<?xml version="1.0" encoding="utf-8"?>
<LinearLayout xmlns:android="http://schemas.android.com/apk/res/android"
android:orientation="horizontal"
android:layout_width="match_parent"
android:layout_height="match_parent">
<FrameLayout
android:id="@+id/planets_list_fragment"
android:layout_width="match_parent"
android:layout_height="match_parent"
android:layout_weight="1"
/>
<FrameLayout
android:id="@+id/planets_detail_fragment"
android:layout_width="match_parent"
android:layout_height="match_parent"
android:layout_weight="3"
/>
</LinearLayout>
You then need to create and add the corresponding Fragments to their appropriate parent containers within the onCreate handler of your Activity using Fragment Transactions.
Fragment Transactions can be used to add, remove, and replace Fragments within an Activity at run time. Using Fragment Transactions, you can make your layouts dynamic — that is, they will adapt and change based on user interactions and application state.
A new Fragment Transaction is created using the beginTransaction method from the Activity's Fragment Manager. Modify the layout using the add, remove, and replace methods. When you are ready to execute the change, call commit to add the transaction to the UI queue.
FragmentTransaction fragmentTransaction = fragmentManager.beginTransaction();

// add fragment
fragmentTransaction.add(R.id.planets_list_fragment, new PlanetsListFragment());

// remove fragment
Fragment fragment = fragmentManager.findFragmentById(R.id.planet_detail_fragment);
fragmentTransaction.remove(fragment);

// replace fragment
fragmentTransaction.replace(R.id.planet_detail_fragment, new PlanetDetailFragment(selected_index));

fragmentTransaction.commit();
Following shows the skeleton code used to populate an Activity’s layout with Fragments at run time.
public void onCreate(Bundle savedInstanceState) {
    super.onCreate(savedInstanceState);

    // inflate the layout containing the Fragment containers
    setContentView(R.layout.activity_main);

    FragmentManager fm = getFragmentManager();
    // check to see if the Fragment back stack has been populated
    // if not, create and populate the layout.
    PlanetDetailFragment detailFragment = (PlanetDetailFragment)fm.findFragmentById(
        R.id.planet_detail_fragment);

    if (detailFragment == null) {
        FragmentTransaction ft = fm.beginTransaction();
        ft.add(R.id.planet_detail_fragment, new PlanetDetailFragment());
        ft.add(R.id.planets_list_fragment, new PlanetsListFragment());
        ft.commit();
    }
}
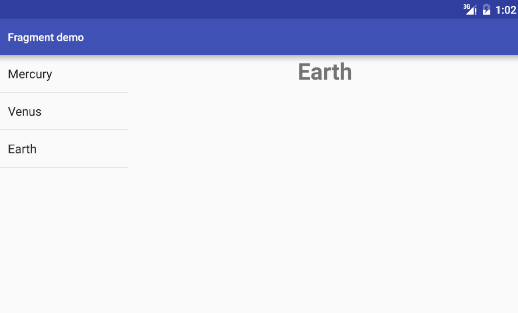
The following example demonstrates how to use Fragments. The entry Activity (called MainActivity) will use different layouts for portrait and for landscape mode.
In portrait mode MainActivity will show one Fragment with a list of names. If the user touches an item in the list, a second Activity called DetailActivity will start and show the selected text.
In landscape mode MainActivity will show two Fragments. The first is again the Fragments which shows the list of names. The second Fragment shows the text of the current selected item. This is similar to the portrait mode, but the whole information will be shown on one screen.
Below is MainActivity.java.
public class MainActivity extends AppCompatActivity {
    @Override
    protected void onCreate(Bundle savedInstanceState) {
        super.onCreate(savedInstanceState);
        setContentView(R.layout.activity_main);
    }
}
The next step we have to do is creating our layout. As we said we need two different layout one for portrait and one for landscape. So we have to create two xml file under res/layout (for portrait mode) and one under res/layout-land (for landscape mode).
Layout for portrait mode
<?xml version="1.0" encoding="utf-8"?>
<RelativeLayout xmlns:android="http://schemas.android.com/apk/res/android"
    xmlns:tools="http://schemas.android.com/tools"
    android:layout_width="match_parent"
    android:layout_height="match_parent">

    <fragment android:id="@+id/fragmentList"
        android:layout_width="wrap_content"
        android:layout_height="wrap_content"
        class="me.proft.sandbox.PlanetsListFragment"
        />

</RelativeLayout>
Layout for landscape mode
<?xml version="1.0" encoding="utf-8"?>
<LinearLayout xmlns:android="http://schemas.android.com/apk/res/android"
    android:orientation="horizontal"
    android:layout_width="match_parent"
    android:layout_height="match_parent">

    <fragment class="me.proft.sandbox.PlanetsListFragment"
        android:layout_width="match_parent"
        android:layout_height="match_parent"
        android:layout_weight="3"
        android:id="@+id/fragmentList"
        />

    <fragment class="me.proft.sandbox.PlanetDetailFragment"
        android:id="@+id/fragment_detail"
        android:layout_width="match_parent"
        android:layout_height="match_parent"
        android:layout_weight="1" />

</LinearLayout>
Following is a fragment for list of planets.
public class PlanetsListFragment extends ListFragment {
    @Override
    public void onActivityCreated(Bundle savedInstanceState) {
        super.onActivityCreated(savedInstanceState);
        String[] values = new String[] {
                "Mercury",
                "Venus",
                "Earth"};

        ArrayAdapter adapter = new ArrayAdapter(getActivity(),
            android.R.layout.simple_list_item_1, values);

        setListAdapter(adapter);
    }

    @Override
    public void onListItemClick(ListView l, View v, int position, long id) {
        String item = (String) getListAdapter().getItem(position);
        PlanetDetailFragment fragment = (PlanetDetailFragment)getFragmentManager().
            findFragmentById(R.id.fragment_detail);

        if (fragment != null && fragment.isInLayout()) {
            fragment.setText(item);
        } else {
            Intent intent = new Intent(getActivity().getApplicationContext(), PlanetDetailActivity.class);
            intent.putExtra(PlanetDetailFragment.ARG_ITEM_ID, item);
            startActivity(intent);
        }
    }
}
Following is a fragment for detail information for selected planet.
public class PlanetDetailFragment extends Fragment {
    public static final String ARG_ITEM_ID = "item";
    private String planet;
    TextView tvPlanet;

//    public static PlanetDetailFragment newInstance(String title) {
//        final Bundle args = new Bundle();
//        args.putString(ARGUMENT_TITLE, title);
//        final PlanetDetailFragment fragment = new PlanetDetailFragment();
//        fragment.setArguments(args);
//        return fragment;
//    }

    @Override
    public void onCreate(Bundle savedInstanceState) {
        super.onCreate(savedInstanceState);

//        if (getArguments().containsKey(ARG_ITEM_ID)) {
//            planet = getArguments().getString(ARG_ITEM_ID);
//        }
    }

    @Override
    public View onCreateView(LayoutInflater inflater, ViewGroup container, Bundle savedInstanceState) {
        View view = inflater.inflate(R.layout.fragment_detail, container, false);

//        if (point != null) {
//            tvPlanet = (TextView)view.findViewById(R.id.tvPlanet);
//            tvPlanet.setText(planet);
//        }

        return view;
    }

    public void setText(String item){
        tvPlanet = (TextView)getView().findViewById(R.id.tvPlanet);
        tvPlanet.setText(item);
    }
}
Below is layout for fragment with details
<?xml version="1.0" encoding="utf-8"?>
<LinearLayout xmlns:android="http://schemas.android.com/apk/res/android"
    android:orientation="vertical"
    android:layout_width="match_parent"
    android:layout_height="match_parent">

    <TextView
        android:id="@+id/tvPlanet"
        android:layout_width="wrap_content"
        android:layout_height="wrap_content"
        android:text="Select planet"
        android:textStyle="bold"
        android:textSize="16dip"
        />
</LinearLayout>
Following is activity for planet's details
public class PlanetDetailActivity extends FragmentActivity {
    @Override
    protected void onCreate(Bundle savedInstanceState) {
        super.onCreate(savedInstanceState);

        if (getResources().getConfiguration().orientation == Configuration.ORIENTATION_LANDSCAPE) {
            finish();
            return;
        }

        setContentView(R.layout.fragment_detail);

//        if (savedInstanceState == null) {
//            Bundle arguments = new Bundle();
//            String point = getIntent().getStringExtra(PointDetailFragment.ARG_ITEM_ID);
//            arguments.putString(PointDetailFragment.ARG_ITEM_ID, point);
//
//            PlanetDetailFragment fragment = new PlanetDetailFragment();
//            fragment.setArguments(arguments);
//            getSupportFragmentManager().beginTransaction().
//                add(android.R.id.fragment_detail, fragment).commit();
//            fragment.setText(s);
//        }

        Intent i = this.getIntent();
        String s = i.getExtras().getString(PlanetDetailFragment.ARG_ITEM_ID);

        TextView tvPlanet = (TextView) findViewById(R.id.tvPlanet);
        tvPlanet.setText(s);
    }
}
Fragment Transitions
You can add animation to fragment transitions. Fragment allows you to add animation for enter and exit transitions. To add enter transition, you need to call setEnterTransition() method on the Fragment object passing animation object to it. To add exist transition, call setExitTransition() method on the Fragment object.
You can create transition object by instantiating one of the transition classes such as Fade, Slide and Explode and setting required properties.
Fragment enter transition example
FragmentManager fm = getSupportFragmentManager();
FragmentTransaction ft = fm.beginTransaction();
Fragment f = new SampleFragment();

Slide slide = new Slide();
slide.setDuration(500);
slide.setInterpolator(new DecelerateInterpolator());
f.setEnterTransition(slide);

ft.replace(R.id.wrapper, f);
ft.commit();
Fragment exit transition example
FragmentManager fm = getSupportFragmentManager();
FragmentTransaction ft = fm.beginTransaction();
Fragment f = new SampleFragment();

Explode e = new Explode();
e.setDuration(800);
e.setMode(Explode.MODE_OUT);
e.setPropagation(new CircularPropagation());
e.setInterpolator(new AccelerateInterpolator());
f.setExitTransition(e);

ft.replace(R.id.wrapper, f);
ft.addToBackStack(null);
ft.commit();
Useful links
Quote
Categories
- Android
- AngularJS
- Databases
- Development
- Django
- iOS
- Java
- JavaScript
- LaTex
- Linux
- Meteor JS
- Python
- Science
Archive ↓
- September 2024
- December 2023
- November 2023
- October 2023
- March 2022
- February 2022
- January 2022
- July 2021
- June 2021
- May 2021
- April 2021
- August 2020
- July 2020
- May 2020
- April 2020
- March 2020
- February 2020
- January 2020
- December 2019
- November 2019
- October 2019
- September 2019
- August 2019
- July 2019
- February 2019
- January 2019
- December 2018
- November 2018
- August 2018
- July 2018
- June 2018
- May 2018
- April 2018
- March 2018
- February 2018
- January 2018
- December 2017
- November 2017
- October 2017
- September 2017
- August 2017
- July 2017
- June 2017
- May 2017
- April 2017
- March 2017
- February 2017
- January 2017
- December 2016
- November 2016
- October 2016
- September 2016
- August 2016
- July 2016
- June 2016
- May 2016
- April 2016
- March 2016
- February 2016
- January 2016
- December 2015
- November 2015
- October 2015
- September 2015
- August 2015
- July 2015
- June 2015
- February 2015
- January 2015
- December 2014
- November 2014
- October 2014
- September 2014
- August 2014
- July 2014
- June 2014
- May 2014
- April 2014
- March 2014
- February 2014
- January 2014
- December 2013
- November 2013
- October 2013