How to add Swipe and Drag&drop support to RecyclerView Android 14.12.2017

The RecyclerView class, delivered as part of the v7 support library suite, is an improved version of the ListView and the GridView classes provided by the Android framework.
With the help of ItemTouchHelper class you can add swipe to dismiss, drag & drop support to RecyclerView. Swiping the row will remove the row from the RecyclerView, but it won’t refresh the data. You can see an empty row displayed on swiping the row. You have to take care of refreshing the list by removing the item from the adapter dataset.
ItemTouchHelper is a utility class added in Android Support Library V7. This class helps to add swipe to dismiss and drag & drop support to RecyclerView.
ItemTouchHelper class extends RecyclerView.ItemDecoration and implements RecyclerView.OnChildAttachStateChangeListener. In order to use ItemTouchHelper, you need to create ItemTouchHelper.Callback. This class lets you control the touch event like swipe and move by providing a callback for the same. It also provides the callback to override the default animation.
It has a SimpleCallback class which configures what type of interactions are enabled and also receives events when user performs these actions (like swipe and drag).
ItemTouchHelper.SimpleCallback provides certain callback methods like onMove(), onChildDraw(), onSwiped() when the row is swiped. Showing the background view, removing the item from adapter can be done using these callback methods.
To implement Swipe to Dismiss behaviour in RecyclerView we have to override following methods of ItemTouchHelper.Callback.
- getMovementFlags(RecyclerView, ViewHolder)
- onMove(RecyclerVIew, ViewHolder, ViewHolder)
- onSwiped(ViewHolder, int)
The first method we are going to discuss is getMovementFlags(RecyclerView, ViewHolder).
It takes parameters:
RecyclerView: theRecyclerViewto whichItemTouchHelperis attached.ViewHolder: theViewHolderfor which the movement information is necessary.
and returns
flagsspecifying which movements are allowed on thisViewHolder.
@Override
public int getMovementFlags(RecyclerView recyclerView,
        RecyclerView.ViewHolder viewHolder) {

    int swipeFlags = Direction.RIGHT;
    return makeMovementFlags(0, swipeFlags);
}
To specify in which direction you want to swipe, you have to override this method. makeMovementFlag(int, int) method provides convenience to create Movement flag.
The second method we are going to discuss is onMove(RecyclerView, ViewHolder, ViewHolder).
It takes parameters
RecyclerView: theRecyclerViewto whichItemTouchHelperis attached to.ViewHolder: theViewHolderwhich is being dragged by the user.ViewHolder: theViewHolderover which the currently active item is being dragged.
and returns
trueif theViewHolderhas been moved to the adapter position of the target.
If you want to make any changes during dragging the RecyclerView item then you have to override this method. If this method returns true, ItemTouchHelper assumes item has been moved to the adapter position of target place.
The final and important method for the swipe to dismiss is onSwiped(ViewHolder, int).
It takes parameters
ViewHolder: theViewHolderwhich has been swiped by the user.int(direction): the direction to which theViewHolderis swiped. It is one of UP, DOWN, LEFT or RIGHT. If yourgetMovementFlags(RecyclerView, ViewHolder)method returned relative flags instead of LEFT; RIGHT direction will be relative as well (START or END).
Layouts and Resources
I'm going to use Vector Asset for ic_add.xml, ic_edit.xml and ic_delete.xml resources.
For example, here is my ic_add.xml
<vector xmlns:android="http://schemas.android.com/apk/res/android"
        android:width="24dp"
        android:height="24dp"
        android:viewportWidth="24.0"
        android:viewportHeight="24.0">
    <path
        android:fillColor="#FFFFFFFF"
        android:pathData="M19,13h-6v6h-2v-6H5v-2h6V5h2v6h6v2z"/>
</vector>
The main layout (activity_main.xml) has a RecyclerView with a FAB in CoordinatorLayout. The FAB is used to add items to RecyclerView list.
<?xml version="1.0" encoding="utf-8"?>
<android.support.design.widget.CoordinatorLayout xmlns:android="http://schemas.android.com/apk/res/android"
    xmlns:tools="http://schemas.android.com/tools"
    android:layout_width="match_parent"
    android:layout_height="match_parent"
    android:fitsSystemWindows="true">

    <android.support.v7.widget.RecyclerView
        android:id="@+id/rvItems"
        android:scrollbars="vertical"
        android:layout_width="match_parent"
        android:layout_height="match_parent"/>

    <android.support.design.widget.FloatingActionButton
        android:id="@+id/fab"
        android:layout_width="wrap_content"
        android:layout_height="wrap_content"
        android:layout_gravity="bottom|end"
        android:layout_margin="@dimen/fab_margin"
        android:src="@drawable/ic_add" />

</android.support.design.widget.CoordinatorLayout>
The next layout is for RecyclerView list item (row_layout.xml). It has only a TextView to display item name.
<?xml version="1.0" encoding="utf-8"?>
<LinearLayout xmlns:android="http://schemas.android.com/apk/res/android"
    android:orientation="vertical"
    android:layout_marginBottom="1dp"
    android:layout_width="match_parent"
    android:layout_height="wrap_content">

    <TextView
        android:id="@+id/tvItem"
        android:layout_marginTop="15dp"
        android:layout_marginBottom="15dp"
        android:layout_gravity="center"
        android:textSize="18sp"
        android:layout_width="wrap_content"
        android:layout_height="wrap_content"
        android:textStyle="bold" />

</LinearLayout>
The following snippet is a RecyclerView.Adapter. I added two methods addItem() and removeItem() to add and remove data from RecyclerView. The notifyItemInserted() notify the adapter that a new data is inserted. Similarly notifyItemRemoved() notify about removal of data. And notifyItemRangeChanged() is for range change.
public class DataAdapter extends RecyclerView.Adapter<DataAdapter.ViewHolder> {
    private ArrayList<String> items;

    public DataAdapter(ArrayList items) {
        this.items = items;
    }

    @Override
    public DataAdapter.ViewHolder onCreateViewHolder(ViewGroup viewGroup, int i) {
        View view = LayoutInflater.from(viewGroup.getContext())
            .inflate(R.layout.row_layout, viewGroup, false);
        return new ViewHolder(view);
    }

    @Override
    public void onBindViewHolder(ViewHolder viewHolder, int i) {
        viewHolder.tvItem.setText(items.get(i));
    }

    @Override
    public int getItemCount() {
        return items.size();
    }

    public void addItem() {
        int rnd = new Random().nextInt(100);
        String item = "Item " + rnd;
        items.add(item);
        notifyItemInserted(items.indexOf(item));
    }

    public void removeItem(int position) {
        items.remove(position);
        notifyItemRemoved(position);
        notifyItemRangeChanged(position, items.size());
    }

    public void moveItem(int oldPos, int newPos) {
        String item = items.get(oldPos);
        items.remove(oldPos);
        items.add(newPos, item);
        notifyItemMoved(oldPos, newPos);
    }

    public class ViewHolder extends RecyclerView.ViewHolder{
        public TextView tvItem;

        public ViewHolder(View view) {
            super(view);
            tvItem = (TextView)view.findViewById(R.id.tvItem);
        }
    }
}
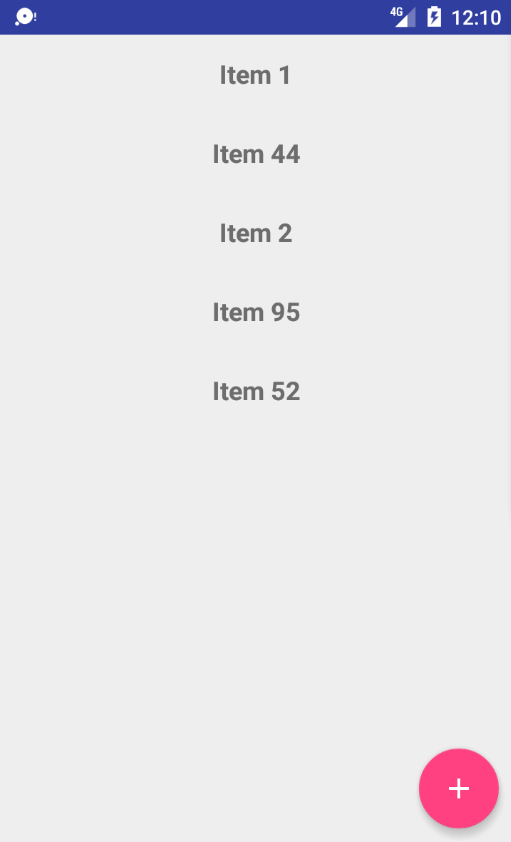
Simple swipe and drag n drop
The following activity implements simple example of swipe and drag n drop.
public class MainActivity extends AppCompatActivity implements View.OnClickListener{

    private ArrayList<String> items =  new ArrayList<>();
    private DataAdapter adapter;
    private RecyclerView recyclerView;
    private Activity activity = MainActivity.this;

    @Override
    protected void onCreate(Bundle savedInstanceState) {
        super.onCreate(savedInstanceState);
        setContentView(R.layout.activity_main);

        FloatingActionButton fab = (FloatingActionButton) findViewById(R.id.fab);
        fab.setOnClickListener(this);

        recyclerView = (RecyclerView)findViewById(R.id.rvItems);
        recyclerView.setHasFixedSize(true);
        RecyclerView.LayoutManager layoutManager = new LinearLayoutManager(getApplicationContext());
        recyclerView.setLayoutManager(layoutManager);
        adapter = new DataAdapter(items);
        recyclerView.setAdapter(adapter);

        items.add("Item 1");
        items.add("Item 2");
        items.add("Item 3");
        adapter.notifyDataSetChanged();

        ItemTouchHelper itemTouchHelper = new ItemTouchHelper(createItemTouchHelper());
        itemTouchHelper.attachToRecyclerView(recyclerView);
    }

    private ItemTouchHelper.Callback createItemTouchHelper() {
        ItemTouchHelper.Callback simpleCallback = new ItemTouchHelper.SimpleCallback(ItemTouchHelper.UP | ItemTouchHelper.DOWN, ItemTouchHelper.LEFT | ItemTouchHelper.RIGHT) {
            @Override
            public boolean onMove(RecyclerView recyclerView, RecyclerView.ViewHolder viewHolder, RecyclerView.ViewHolder target) {
                adapter.moveItem(viewHolder.getAdapterPosition(), target.getAdapterPosition());
                return true;
            }

            @Override
            public void onSwiped(RecyclerView.ViewHolder viewHolder, int direction) {
                adapter.removeItem(viewHolder.getAdapterPosition());
            }

            @Override
            public void onChildDraw(Canvas c, RecyclerView recyclerView, RecyclerView.ViewHolder viewHolder, float dX, float dY, int actionState, boolean isCurrentlyActive) {
                if (actionState == ItemTouchHelper.ACTION_STATE_SWIPE) {
                    float alpha = 1 - (Math.abs(dX) / recyclerView.getWidth());
                    viewHolder.itemView.setAlpha(alpha);
                }
                super.onChildDraw(c, recyclerView, viewHolder, dX, dY, actionState, isCurrentlyActive);
            }
        };
        return simpleCallback;
    }

    @Override
    public void onClick(View v) {
        switch (v.getId()){
            case R.id.fab:
                adapter.addItem();
                break;
        }
    }
}
Result

Custom view for swipe
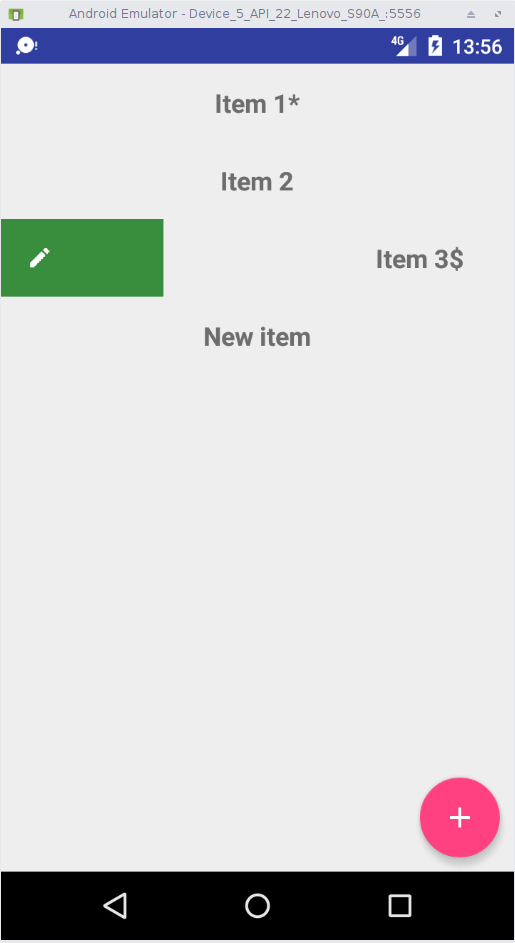
In this section we'll build extended reaction to swipe (see screenshot below). In our Activity the AlertDialog is initialized using initDialog() method. Then we implement the custom Swipe view using the ItemTouchHelper.SimpleCallback class.
Following is the layout (dialog_layout.xml) for Alert Dialog which is used to get input data to add and edit data. It has only a EditText widget.
<?xml version="1.0" encoding="utf-8"?>
<LinearLayout xmlns:android="http://schemas.android.com/apk/res/android"
    android:orientation="vertical"
    android:layout_width="match_parent"
    android:layout_height="match_parent">

    <EditText
        android:id="@+id/etItem"
        android:layout_marginLeft="10dp"
        android:layout_marginRight="10dp"
        android:layout_marginTop="10dp"
        android:layout_marginBottom="10dp"
        android:layout_width="match_parent"
        android:layout_height="wrap_content" />
</LinearLayout>
In following snippet the onChildDraw() method is used to draw custom view under the RecyclerView list item when swiped. Then we obtain the View object itemView from the RecyclerView.ViewHolder object. We can obtain the coordinates of top, bottom, right, left as float points using getTop(), getBottom(), getRight(), getLeft() methods. First we draw a rectange on Canvas which covers the whole item view in prefered color. Then we draw a VectorDrawable icon over that in specified location. The two vector asset are ic_edit.xml and ic_delete.xml.
If swiped left you will see red background with delete icon. If swiped right you will see green background with edit icon. On left swipe the adapter removeItem() method is called. On right swipe the AlertDialog is displayed to edit the data. Similarly when the FAB is pressed the AlertDialog is displayed to add data to RecyclerView list. These swipe process is defined in initSwipe() method. The ItemTouchHelper is attached to RecyclerView using the attachToRecyclerView() method.
The AlertDialog layout is inflated using LayoutInflator. If the dialog is displayed for second time the existing view is removed using the removeView() method.
public class MainActivity extends AppCompatActivity implements View.OnClickListener{
    private ArrayList<String> items =  new ArrayList<>();
    private DataAdapter adapter;
    private RecyclerView recyclerView;
    private AlertDialog.Builder alertDialog;
    private EditText etItem;
    private int editPosition;
    private View view;
    private boolean add = false;
    private Paint p = new Paint();
    private Activity activity = MainActivity.this;

    @Override
    protected void onCreate(Bundle savedInstanceState) {
        super.onCreate(savedInstanceState);
        setContentView(R.layout.activity_main);

        initViews();
        initDialog();
    }

    private void initViews(){
        FloatingActionButton fab = (FloatingActionButton) findViewById(R.id.fab);
        fab.setOnClickListener(this);

        recyclerView = (RecyclerView)findViewById(R.id.rvItems);
        recyclerView.setHasFixedSize(true);
        RecyclerView.LayoutManager layoutManager = new LinearLayoutManager(getApplicationContext());
        recyclerView.setLayoutManager(layoutManager);

        adapter = new DataAdapter(items);
        recyclerView.setAdapter(adapter);
        items.add("Item 1");
        items.add("Item 2");
        items.add("Item 3");
        adapter.notifyDataSetChanged();
        initSwipe();
    }

    private void initSwipe(){
        ItemTouchHelper.SimpleCallback simpleItemTouchCallback = new ItemTouchHelper.SimpleCallback(0, ItemTouchHelper.LEFT | ItemTouchHelper.RIGHT) {

            @Override
            public boolean onMove(RecyclerView recyclerView, RecyclerView.ViewHolder viewHolder, RecyclerView.ViewHolder target) {
                return false;
            }

            @Override
            public void onSwiped(RecyclerView.ViewHolder viewHolder, int direction) {
                int position = viewHolder.getAdapterPosition();

                if (direction == ItemTouchHelper.LEFT){
                    adapter.removeItem(position);
                } else {
                    removeView();
                    editPosition = position;
                    alertDialog.setTitle("Edit item");
                    etItem.setText(items.get(position));
                    alertDialog.show();
                }
            }

            @Override
            public void onChildDraw(Canvas c, RecyclerView recyclerView, RecyclerView.ViewHolder viewHolder, float dX, float dY, int actionState, boolean isCurrentlyActive) {
                Bitmap icon;
                if(actionState == ItemTouchHelper.ACTION_STATE_SWIPE){

                    View itemView = viewHolder.itemView;
                    float height = (float) itemView.getBottom() - (float) itemView.getTop();
                    float width = height / 3;

                    if(dX > 0){
                        p.setColor(Color.parseColor("#388E3C"));
                        RectF background = new RectF((float) itemView.getLeft(), (float) itemView.getTop(), dX,(float) itemView.getBottom());
                        c.drawRect(background,p);
                        //icon = BitmapFactory.decodeResource(getResources(), R.drawable.ic_edit);

                        float left = (float) itemView.getLeft() + width;
                        float top = (float) itemView.getTop() + width;
                        float right = (float) itemView.getLeft() + 2 * width;
                        float bottom = (float)itemView.getBottom() - width;

                        icon = getBitmapFromVectorDrawable(activity, R.drawable.ic_edit);
                        RectF iconDest = new RectF(left, top, right, bottom);

                        c.drawBitmap(icon,null,iconDest,p);
                    } else if (dX < 0) {
                        p.setColor(Color.parseColor("#D32F2F"));
                        RectF background = new RectF((float) itemView.getRight() + dX, (float) itemView.getTop(),(float) itemView.getRight(), (float) itemView.getBottom());
                        c.drawRect(background,p);
                        //icon = BitmapFactory.decodeResource(getResources(), R.drawable.ic_delete);
                        icon = getBitmapFromVectorDrawable(activity, R.drawable.ic_delete);

                        float left = (float) itemView.getRight() - 2*width;
                        float top = (float) itemView.getTop() + width;
                        float right = (float) itemView.getRight() - width;
                        float bottom = (float)itemView.getBottom() - width;
                        RectF iconDest = new RectF(left, top, right,bottom);

                        c.drawBitmap(icon,null,iconDest,p);
                    }
                }
                super.onChildDraw(c, recyclerView, viewHolder, dX, dY, actionState, isCurrentlyActive);
            }
        };
        ItemTouchHelper itemTouchHelper = new ItemTouchHelper(simpleItemTouchCallback);
        itemTouchHelper.attachToRecyclerView(recyclerView);
    }

    private void removeView(){
        if(view.getParent()!=null) {
            ((ViewGroup) view.getParent()).removeView(view);
        }
    }

    private void initDialog(){
        alertDialog = new AlertDialog.Builder(this);
        view = getLayoutInflater().inflate(R.layout.dialog_layout,null);
        alertDialog.setView(view);
        alertDialog.setPositiveButton("Save", new DialogInterface.OnClickListener() {
            @Override
            public void onClick(DialogInterface dialog, int which) {
                if(add) {
                    add = false;
                    adapter.addItem(etItem.getText().toString());
                    dialog.dismiss();
                } else {
                    items.set(editPosition, etItem.getText().toString());
                    adapter.notifyDataSetChanged();
                    dialog.dismiss();
                }
            }
        });
        etItem = (EditText) view.findViewById(R.id.etItem);
    }

    @Override
    public void onClick(View v) {
        switch (v.getId()){
            case R.id.fab:
                removeView();
                add = true;
                alertDialog.setTitle("Add item");
                etItem.setText("");
                alertDialog.show();
                break;
        }
    }

    public static Bitmap getBitmapFromVectorDrawable(Context context, int drawableId) {
        Drawable drawable = ContextCompat.getDrawable(context, drawableId);
        if (Build.VERSION.SDK_INT < Build.VERSION_CODES.LOLLIPOP) {
            drawable = (DrawableCompat.wrap(drawable)).mutate();
        }

        Bitmap bitmap = Bitmap.createBitmap(drawable.getIntrinsicWidth(),
                drawable.getIntrinsicHeight(), Bitmap.Config.ARGB_8888);
        Canvas canvas = new Canvas(bitmap);
        drawable.setBounds(0, 0, canvas.getWidth(), canvas.getHeight());
        drawable.draw(canvas);

        return bitmap;
    }
}

Quote
Categories
- Android
- AngularJS
- Databases
- Development
- Django
- iOS
- Java
- JavaScript
- LaTex
- Linux
- Meteor JS
- Python
- Science
Archive ↓
- September 2024
- December 2023
- November 2023
- October 2023
- March 2022
- February 2022
- January 2022
- July 2021
- June 2021
- May 2021
- April 2021
- August 2020
- July 2020
- May 2020
- April 2020
- March 2020
- February 2020
- January 2020
- December 2019
- November 2019
- October 2019
- September 2019
- August 2019
- July 2019
- February 2019
- January 2019
- December 2018
- November 2018
- August 2018
- July 2018
- June 2018
- May 2018
- April 2018
- March 2018
- February 2018
- January 2018
- December 2017
- November 2017
- October 2017
- September 2017
- August 2017
- July 2017
- June 2017
- May 2017
- April 2017
- March 2017
- February 2017
- January 2017
- December 2016
- November 2016
- October 2016
- September 2016
- August 2016
- July 2016
- June 2016
- May 2016
- April 2016
- March 2016
- February 2016
- January 2016
- December 2015
- November 2015
- October 2015
- September 2015
- August 2015
- July 2015
- June 2015
- February 2015
- January 2015
- December 2014
- November 2014
- October 2014
- September 2014
- August 2014
- July 2014
- June 2014
- May 2014
- April 2014
- March 2014
- February 2014
- January 2014
- December 2013
- November 2013
- October 2013