Android Google Places API tutorial Android 18.05.2017

Introduction
In March of 2015, Google released the Places API for Android as a part of Google's Play Services. This API allows developers to access a wealth of information from Google to provide users with an experience tailored to their current location by using the names and information of places, rather than a set of coordinates.
Google Places API for Android includes six new features:
- Place Picker UI widget. A great new UI control, which gives the flexibility of selecting a place from nearby places.
- Current Place. An API method though which nearby places can be retrieved.
- Place Autocomplete. An API method, designed to give suggestions in the AutocompleteTextView.
- Place Add. An API method for adding places in the Google Places database.
- Place Report. An API method for reviewing places by creating a place report.
- Place Details. One of the most basic methods, used to retrieve place details by its ID.
If you don't already have an Android public API key, you will need to create a public Google API key for Android applications. You can do this by visiting the Google's Developers Console. Instructions for creating a key based on your signing certificate and package name are available in Google's documentation.
When you've created a key, search for the Places API and set it to enabled. Some calls to the Places API are limited in how many requests can be sent per 24 hour period. At the time of writing, an account without a billing profile can send up to 1,000 requests while an account with a billing profile can send 150,000 requests. If you require more, you can submit a request to have this limit increased as described in the Usage Limits documentation.
With the API key ready to use, it is time to start working on the demo project. Create a project in Android Studio and set the minimum supported SDK version to at least 9. This is the minimum requirement for using Google's Play Services.
Open the build.gradle file and, under the dependencies node, add the required dependency of Play Services 10.2.4. This is the latest at the time of writing, but you can verify the latest version by checking Google's documentation.
dependencies {
    ...
    // for real device
    // compile 'com.google.android.gms:play-services:10.2.4'

    // for emulator
    compile 'com.google.android.gms:play-services:8+'
}
Next, open AndroidManifest.xml, add the required permissions for the project, and state that OpenGL version 2 is required by the application.
<uses-feature
    android:glEsVersion="0x00020000"
    android:required="true" />

<uses-permission android:name="android.permission.INTERNET" />
<uses-permission android:name="android.permission.ACCESS_FINE_LOCATION" />

<application>
...
</application>
The last thing you will need to do in the manifest is adding <meta-data> tag to set the API key for the app within the <application> tag.
<meta-data android:name="com.google.android.geo.API_KEY" android:value="@string/google_api_key" />
When you're done with the manifest, you are ready to start writing code. As this is a component from Play Services, you will need to initialize your GoogleApiClient and connect/disconnect it during your Activity's life cycle. We do this in the onCreate, onStart, and onStop methods of the Activity class.
GoogleApiClient gac;

@Override
protected void onCreate(Bundle savedInstanceState) {
    super.onCreate(savedInstanceState);
    setContentView(R.layout.activity_main);

    tvPlace = (TextView) findViewById(R.id.tvPlace);

    gac = new GoogleApiClient
        .Builder(this)
        .addApi(Places.GEO_DATA_API)
        .addApi(Places.PLACE_DETECTION_API)
        .enableAutoManage(this, this)
        .addConnectionCallbacks(this)
        .addOnConnectionFailedListener(this)
        .build();
}

@Override
protected void onStart() {
    super.onStart();
    if (gac != null)
        gac.connect();
}

@Override
protected void onStop() {
    if (gac != null && gac.isConnected()) {
        gac.disconnect();
    }
    super.onStop();
}
Place Picker
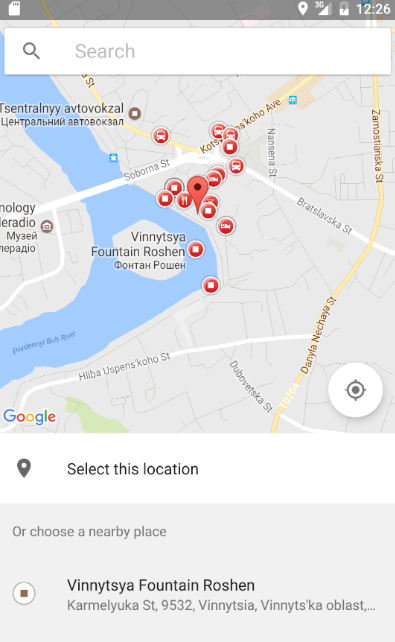
The PlacePicker widget is a user interface component provided by Play Services that allows the user to see a map of their surrounding area. The component includes a list of nearby places that can be used by your app. By using this component, you are able to follow a standard design that your users will know how to interact with while being able to save on development time.
To use the PlacePicker, you need to create an intent and listen for the Activity result to retrieve the Place selected by the user. The following method shows how you would launch this Activity.
public void getPlace(View v) {
    if(gac == null || !gac.isConnected())
        return;

    PlacePicker.IntentBuilder builder = new PlacePicker.IntentBuilder();

    try {
        startActivityForResult(builder.build(this), PLACE_PICKER_REQUEST);
    } catch ( GooglePlayServicesRepairableException e) {
        Log.d(TAG, "GooglePlayServicesRepairableException thrown");
    } catch ( GooglePlayServicesNotAvailableException e) {
        Log.d(TAG, "GooglePlayServicesNotAvailableException thrown");
    }
}
The PlacePicker.IntentBuilder is used to create the Intent that will be used to launch the PlacePicker. It also has an method available, setLatLngBounds(), that lets you place a geographic boundary from a southwest corner to a northeast corner to control the search area.
The Intent can be built using the build method from PlacePicker.IntentBuilder and launched using the startActivityForResult() method from your Activity. It should be noted that using the build method does have the possibility of throwing a GooglePlayServicesRepairableException or a GooglePlayServicesNotAvailableException exception, so those should be checked for using a standard try/catch block and handled gracefully if they occur.
If the user selects a location from the place picker list, that Place object is packaged into an Intent and sent back to the calling Activity. Using the PlacePicker.getPlace method, you can extract the Place data from the returned Intent.
protected void onActivityResult(int requestCode, int resultCode, Intent data) {
    if (requestCode == PLACE_PICKER_REQUEST && resultCode == RESULT_OK) {
        displayPlace(PlacePicker.getPlace( data, this ));
    }
}
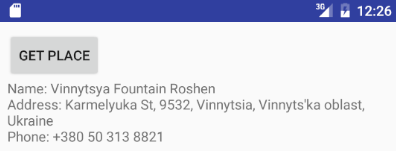
Once the Place object is extracted, it can be treated as a model object to display or use within your app.
private void displayPlace(Place place) {
    if (place == null)
        return;

    StringBuilder builder = new StringBuilder();

    if(!TextUtils.isEmpty(place.getName())) {
        builder.append("Name: " + place.getName() + "\n");
    }
    if(!TextUtils.isEmpty(place.getAddress())) {
        builder.append("Address: " + place.getAddress() + "\n");
    }
    if(!TextUtils.isEmpty(place.getPhoneNumber())) {
        builder.append("Phone: " + place.getPhoneNumber());
    }

    tvPlace.setText(builder.toString());
}
Full code of MainActivity.java is below.
public class MainActivity extends AppCompatActivity implements
        GoogleApiClient.OnConnectionFailedListener,
        GoogleApiClient.ConnectionCallbacks {

    int PLACE_PICKER_REQUEST = 1;
    String TAG = "GPLACES";

    GoogleApiClient gac;
    TextView tvPlace;

    @Override
    protected void onCreate(Bundle savedInstanceState) {
        super.onCreate(savedInstanceState);
        setContentView(R.layout.activity_main);

        tvPlace = (TextView) findViewById(R.id.tvPlace);

        gac = new GoogleApiClient
                .Builder(this)
                .addApi(Places.GEO_DATA_API)
                .addApi(Places.PLACE_DETECTION_API)
                .enableAutoManage(this, this)
                .addConnectionCallbacks(this)
                .addOnConnectionFailedListener(this)
                .build();
    }

    public void getPlace(View v) {
        if(gac == null || !gac.isConnected())
            return;

        PlacePicker.IntentBuilder builder = new PlacePicker.IntentBuilder();

        try {
            startActivityForResult(builder.build(this), PLACE_PICKER_REQUEST);
        } catch ( GooglePlayServicesRepairableException e) {
            Log.d(TAG, "GooglePlayServicesRepairableException thrown");
        } catch ( GooglePlayServicesNotAvailableException e) {
            Log.d(TAG, "GooglePlayServicesNotAvailableException thrown");
        }
    }

    protected void onActivityResult(int requestCode, int resultCode, Intent data) {
        if (requestCode == PLACE_PICKER_REQUEST && resultCode == RESULT_OK) {
            displayPlace(PlacePicker.getPlace( data, this ));
        }
    }

    private void displayPlace(Place place) {
        if (place == null)
            return;

        StringBuilder builder = new StringBuilder();

        if(!TextUtils.isEmpty(place.getName())) {
            builder.append("Name: " + place.getName() + "\n");
        }
        if(!TextUtils.isEmpty( place.getAddress())) {
            builder.append("Address: " + place.getAddress() + "\n");
        }
        if(!TextUtils.isEmpty( place.getPhoneNumber())) {
            builder.append("Phone: " + place.getPhoneNumber());
        }

        tvPlace.setText(builder.toString());
    }

    @Override
    public void onConnected(@Nullable Bundle bundle) {
        if (ContextCompat.checkSelfPermission(this, android.Manifest.permission.ACCESS_COARSE_LOCATION )
                != PackageManager.PERMISSION_GRANTED) {
            Toast.makeText(ThirdActivity.this, "Please allow ACCESS_COARSE_LOCATION persmission.",
                    Toast.LENGTH_LONG).show();
            return;
        }
    }

    @Override
    protected void onStart() {
        super.onStart();
        if (gac != null)
            gac.connect();
    }

    @Override
    protected void onStop() {
        if (gac != null && gac.isConnected()) {
            gac.disconnect();
        }
        super.onStop();
    }

    @Override
    public void onConnectionFailed(@NonNull ConnectionResult connectionResult) {}

    @Override
    public void onConnectionSuspended(int i) {}
}
Layout of activity_main.xml is below.
<LinearLayout xmlns:android="http://schemas.android.com/apk/res/android"
    android:layout_width="match_parent"
    android:layout_height="match_parent"
    android:paddingLeft="@dimen/activity_horizontal_margin"
    android:paddingRight="@dimen/activity_horizontal_margin"
    android:paddingTop="@dimen/activity_vertical_margin"
    android:paddingBottom="@dimen/activity_vertical_margin"
    android:orientation="vertical">

    <Button
        android:text="Get place"
        android:layout_width="wrap_content"
        android:layout_height="wrap_content"
        android:onClick="getPlace"/>

    <TextView
        android:id="@+id/tvPlace"
        android:layout_width="wrap_content"
        android:layout_height="wrap_content" />

</LinearLayout>
 |
 |
Place Autocomplete
The autocomplete service in the Google Places API for Android returns place predictions in response to user search queries. As the user types, the autocomplete service returns suggestions for places such as businesses, addresses and points of interest.
You can add autocomplete to your app in the following ways:
- Add an autocomplete widget to save development time and ensure a consistent user experience.
- Get place predictions programmatically to create a customized user experience.
Add an autocomplete widget
The autocomplete widget is a search dialog with built-in autocomplete functionality. As a user enters search terms, the widget presents a list of predicted places to choose from. When the user makes a selection, a Place instance is returned, which your app can then use to get details about the selected place.
There are two options for adding the autocomplete widget to your app:
- Option 1: Embed a PlaceAutocompleteFragment.
- Option 2: Use an intent to launch the autocomplete activity.
You can launch autocomplete by using an Intent when user click on icon or any other widget. To launch the autocomplete widget using an intent, follow these steps:
- Use PlaceAutocomplete.IntentBuilder to create an intent, passing the desired
PlaceAutocompletemode. The intent must callstartActivityForResult, passing in a request code that identifies your intent. - Override the
onActivityResultcallback to receive the selected place.
The Layout and MainActivity is the same like in previous example. Just update getPlace() and onActivityResult() methods.
The example below shows using PlaceAutocomplete.IntentBuilder to create an intent to launch the autocomplete widget as an intent.
public void getPlace(View v) {
    if(gac == null || !gac.isConnected())
        return;

    try {
        PlaceAutocomplete.IntentBuilder builder = new PlaceAutocomplete.
             IntentBuilder(PlaceAutocomplete.MODE_OVERLAY);
        Intent intent = builder.build(this);
        startActivityForResult(intent, PLACE_PICKER_REQUEST);
    } catch ( GooglePlayServicesRepairableException e) {
        Log.d(TAG, "GooglePlayServicesRepairableException thrown");
    } catch ( GooglePlayServicesNotAvailableException e) {
        Log.d(TAG, "GooglePlayServicesNotAvailableException thrown");
    }
}
When using an intent to launch the autocomplete widget, you can choose from overlay or full-screen display modes.
To receive notification when a user has selected a place, your app should override the activity's onActivityResult(), checking for the request code you have passed for your intent, as shown in the following example.
protected void onActivityResult(int requestCode, int resultCode, Intent data) {
    if (requestCode == PLACE_PICKER_REQUEST && resultCode == RESULT_OK) {
        displayPlace(PlaceAutocomplete.getPlace(this, data));
    } else if (resultCode == PlaceAutocomplete.RESULT_ERROR) {
        Status status = PlaceAutocomplete.getStatus(this, data);
        Log.e(TAG, status.getStatusMessage());
    } else if (resultCode == RESULT_CANCELED) {
        // the user canceled the operation.
    }
}
You can set the autocomplete widget to bias results to a specific geographic region, and/or filter the results to one or more place types.
To bias autocomplete results to a specific geographic region call setBoundsBias() off your IntentBuilder instance and pass a LatLngBounds.
builder.setBoundsBias(new LatLngBounds(
        new LatLng(-33.880490, 151.184363),
        new LatLng(-33.858754, 151.229596)));
You may restrict results from a Place Autocomplete request to be of a certain type by passing a types parameter, call AutocompleteFilter.Builder to create a new AutocompleteFilter, calling setTypeFilter() to set the filter to use. Then, pass the filter to a intent.
AutocompleteFilter typeFilter = new AutocompleteFilter.Builder()
        .setTypeFilter(AutocompleteFilter.TYPE_FILTER_ADDRESS)
        .build();

Intent intent = builder.setFilter(typeFilter).build(this);
To filter autocomplete results to a specific country, call AutocompleteFilter.Builder to create a new AutocompleteFilter, calling setCountry() to set the country code. Then, pass the filter to a Intent.
Adding PlaceAutoCompleteFragment in Activity
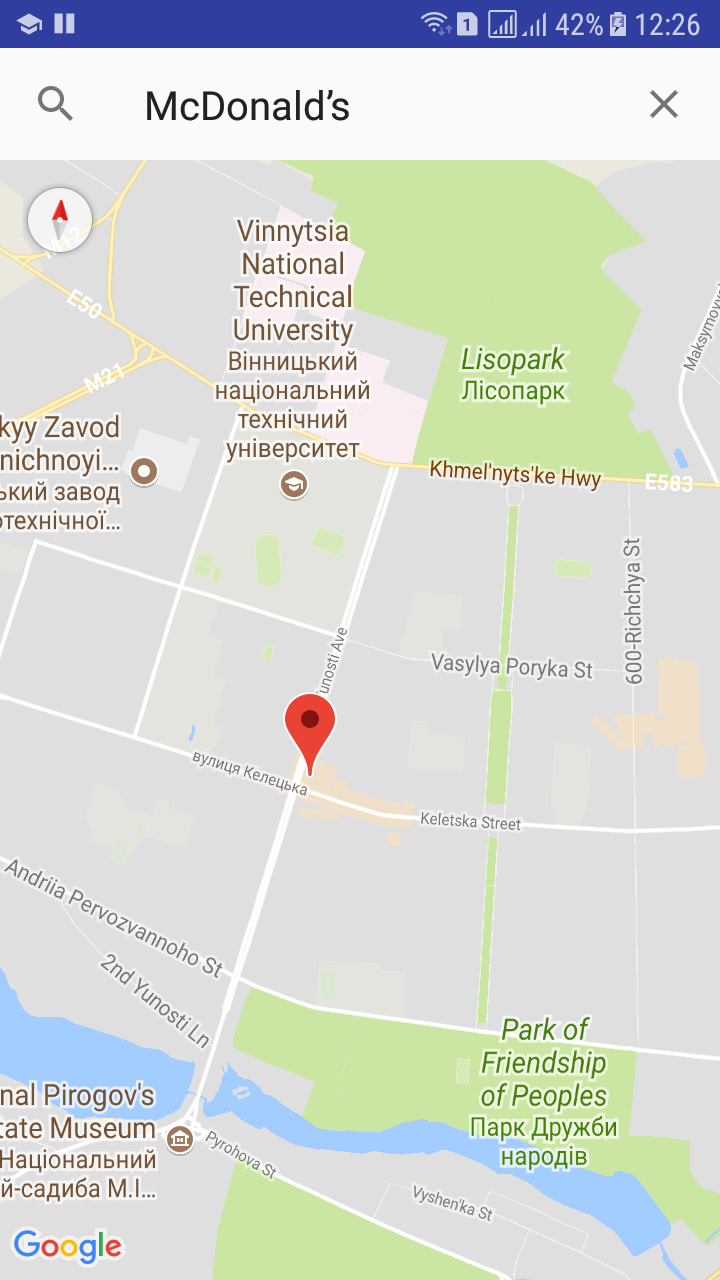
You might require searching locations on google map. So we will display map, the user can search a location on the map, and then we will show the marker at the searched location on the map.
Go to your app level build.gradle file and make sure the following dependencies are added.
dependencies {
    ...
    implementation 'com.google.android.gms:play-services-maps:12.0.1'
    implementation 'com.google.android.gms:play-services-places:12.0.1'
}
Now come inside the file activity_main.xml. You need to modify your code as shown below.
<?xml version="1.0" encoding="utf-8"?>
<RelativeLayout xmlns:android="http://schemas.android.com/apk/res/android"
    android:name="com.google.android.gms.maps.SupportMapFragment"
    android:layout_width="match_parent"
    android:layout_height="match_parent">

    <fragment
        android:id="@+id/place_autocomplete_fragment"
        android:name="com.google.android.gms.location.places.ui.PlaceAutocompleteFragment"
        android:layout_width="match_parent"
        android:layout_height="wrap_content" />

    <fragment xmlns:android="http://schemas.android.com/apk/res/android"
        android:id="@+id/map"
        android:name="com.google.android.gms.maps.SupportMapFragment"
        android:layout_width="match_parent"
        android:layout_height="match_parent"
        android:layout_below="@id/place_autocomplete_fragment" />
</RelativeLayout>
Enabling Places API
- You also need to enable Google Places API to make it work. So go to this link.
- You need to do the same thing, click on GET A KEY on the top, and then select the same project that you selected while creating the API Key for Google Map. It will enable Google Places API and will give you another KEY. You can use this key as well, but it is not necessary as we already have the key.
Now go to MapsActivity.java and here you will find the below code that is available by default.
public class MapActivity extends AppCompatActivity implements OnMapReadyCallback {
    private GoogleMap map;

    @Override
    protected void onCreate(Bundle savedInstanceState) {
        super.onCreate(savedInstanceState);
        setContentView(R.layout.activity_map);

        SupportMapFragment mapFragment = (SupportMapFragment) getSupportFragmentManager()
                .findFragmentById(R.id.map);
        mapFragment.getMapAsync(this);

        PlaceAutocompleteFragment autocompleteFragment = (PlaceAutocompleteFragment)
                getFragmentManager().findFragmentById(R.id.place_autocomplete_fragment);

        autocompleteFragment.setOnPlaceSelectedListener(new PlaceSelectionListener() {
            @Override
            public void onPlaceSelected(Place place) {
                map.clear();
                map.addMarker(new MarkerOptions().position(place.getLatLng()).title(place.getName().toString()));
                map.moveCamera(CameraUpdateFactory.newLatLng(place.getLatLng()));
                map.animateCamera(CameraUpdateFactory.newLatLngZoom(place.getLatLng(), 12.0f));
            }

            @Override
            public void onError(Status status) {}
        });
    }

    @Override
    public void onMapReady(GoogleMap googleMap) {
        map = googleMap;

        LatLng sydney = new LatLng(49.2400, 28.4811);
        map.addMarker(new MarkerOptions().position(sydney).title("Vinnytsia"));
        map.moveCamera(CameraUpdateFactory.newLatLng(sydney));
    }
}
Now thats it, run your application.
Searching for a Place by ID
This section covers finding a Place object based on its ID. This works similarly to the other API calls by creating a PendingIntent and interacting with a returned buffer to retrieve the place. The PlaceBuffer must call release to avoid any memory leaks.
private void findPlaceById(String id) {
    if (TextUtils.isEmpty(id) || gac == null || !gac.isConnected())
        return;

    Places.GeoDataApi.getPlaceById(gac, id).setResultCallback(new ResultCallback<PlaceBuffer>() {
        @Override
        public void onResult(PlaceBuffer places) {
            if(places.getStatus().isSuccess()) {
                Place place = places.get(0);
                displayPlace(place);
            }

           // release the PlaceBuffer to prevent a memory leak
           places.release();
        }
    });
}
Get photos by Place ID
Places.GeoDataApi.getPlacePhotos(gac, id).setResultCallback(new ResultCallback<PlacePhotoMetadataResult>() {
    @Override
    public void onResult(@NonNull PlacePhotoMetadataResult placePhotoMetadataResult) {
        if (placePhotoMetadataResult.getStatus().isSuccess()) {
            PlacePhotoMetadataBuffer photoMetadataBuffer = placePhotoMetadataResult.getPhotoMetadata();

            PlacePhotoMetadata photoMetadata = photoMetadataBuffer.get(0);
            photoMetadata.getPhoto(gac).setResultCallback(new ResultCallback<PlacePhotoResult>() {
                @Override
                public void onResult(@NonNull PlacePhotoResult placePhotoResult) {
                    Bitmap photo = placePhotoResult.getBitmap();
                }
            });
        }
    }
});
AutoCompleteTextView
You maybe know that there are several Google Places services that we can request via HTTP:
- Place Search allows you to query for place information on a variety of categories, such as: establishments, prominent points of interest, geographic locations, and more. You can search for places either by proximity or a text string. A Place Search returns a list of places along with summary information about each place; additional information is available via a Place Details query.
- Place Autocomplete service is a web service that returns place predictions in response to an HTTP request. The request specifies a textual search string and optional geographic bounds. The service can be used to provide autocomplete functionality for text-based geographic searches, by returning places such as businesses, addresses and points of interest as a user types.
- Place Details. Once you have a
place_idor areferencefrom a Place Search, you can request more details about a particular establishment or point of interest by initiating a Place Details request. A Place Details request returns more comprehensive information about the indicated place such as its complete address, phone number, user rating and reviews. - Place Photos service, part of the Google Places API Web Service, is a read-only API that allows you to add high quality photographic content to your application. The Place Photo service gives you access to the millions of photos stored in the Places and Google+ Local database.
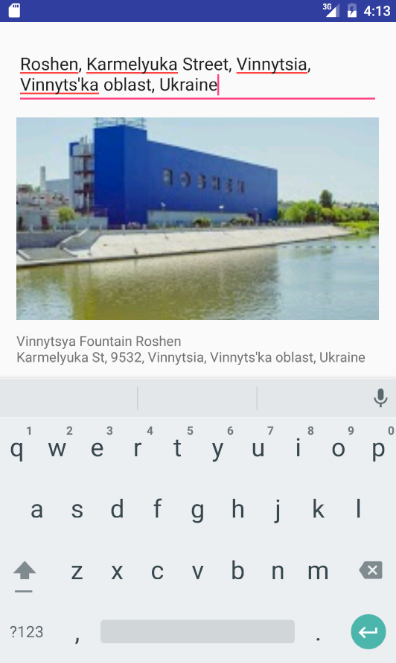
In this section we'll use AutoCompleteTextView, Retrofit and Place Autocomplete to search nearest places.
You should go through the Place Autocomplete service documentation where you can learn everything about the requests and responses. Basically you’ll have to make a request to /https://maps.googleapis.com/maps/api/place/autocomplete/output?parameters* where output can be either json or xml indicating the type of expected response. There are 2 required GET parameters which are input that should contain the string (that the user will type) to use as the search term and key which should contain your API key. So then the URL will look something like this:
https://maps.googleapis.com/maps/api/place/autocomplete/json?input=Fountain&key=API_KEY
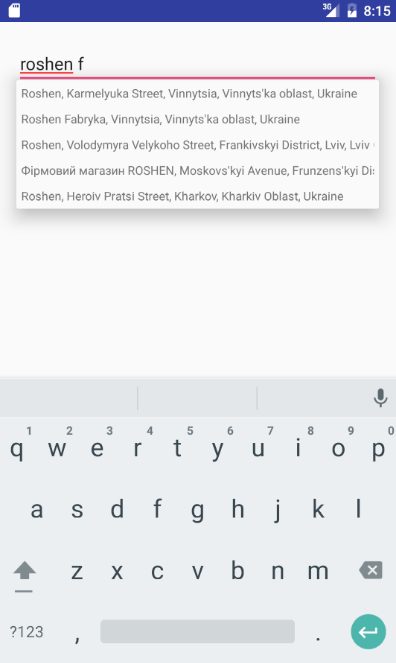
Adding Place Autocomplete to an Android app is fairly easy. All we have to do is issue search requests to the Place API over HTTP and parse the JSON/XML response to display the results in an AutoCompleteTextView. The requests issued are just like any other request from any type of client like a web browser or a server-side programming language.
As the user types something inside the AutoCompleteTextView, the filter() method on the Filter object returned by getFilter() will be called that'll trigger performFiltering() (asynchronously in a background thread). This method calls the getItems() method which makes the HTTP calls to the Places API returning results for the string/text entered by the user. The API does a substring match against its database of places and returns a result containing predictions which are basically a list of the places found. The predictions are stored in an ArrayList which are then used to populate the AutoCompleteTextView internally by the getView() method of ArrayAdapter.
When an item from the AutoCompleteTextView's list is selected, we can get the data associated with that list item, i.e., the selection made (from the ArrayList used as the data source by the adapter).
Have a look at the layout:
<?xml version="1.0" encoding="utf-8"?>
<LinearLayout xmlns:android="http://schemas.android.com/apk/res/android"
    android:layout_width="match_parent"
    android:layout_height="match_parent"
    android:orientation="vertical"
    android:padding="20dp" >

    <AutoCompleteTextView
        android:id="@+id/autoCompleteTextView"
        android:layout_width="match_parent"
        android:layout_height="wrap_content"
        android:ems="10"
        android:hint="Please enter your place" >

        <requestFocus />
    </AutoCompleteTextView>

    <ImageView
        android:id="@+id/ivPhoto"
        android:layout_width="wrap_content"
        android:layout_height="wrap_content" />

    <TextView
        android:id="@+id/tvPlace"
        android:layout_width="wrap_content"
        android:layout_height="wrap_content" />

</LinearLayout>
Also create another layout file (res/layout/autocomplete_list_item.xml) that'll hold the views representing each entry inside the AutoCompleteTextView:
<?xml version="1.0" encoding="utf-8"?>
<TextView xmlns:android="http://schemas.android.com/apk/res/android"
    android:layout_width="match_parent"
    android:layout_height="wrap_content"
    android:padding="10dp"
    android:id="@+id/autocompleteText" />
Following is the MainActivity.java file.
public class MainActivity extends AppCompatActivity implements AdapterView.OnItemClickListener {
    String TAG = "PLACE";
    PlaceAutocompleteAPI.ApiInterface api;
    List<PlaceSerializer.Place> places = new ArrayList<>();
    TextView tvPlace;
    ImageView ivPhoto;

    @Override
    protected void onCreate(Bundle savedInstanceState) {
        super.onCreate(savedInstanceState);
        setContentView(R.layout.activity_main);

        api = PlaceAutocompleteAPI.getClient().create(PlaceAutocompleteAPI.ApiInterface.class);

        tvPlace = (TextView) findViewById(R.id.tvPlace);
        ivPhoto = (ImageView) findViewById(R.id.ivPhoto);

        AutoCompleteTextView autoCompView =
             (AutoCompleteTextView) findViewById(R.id.autoCompleteTextView);
        autoCompView.setAdapter(new
              GooglePlacesAutocompleteAdapter(this, R.layout.autocomplete_list_item));
        autoCompView.setOnItemClickListener(this);
    }

    public void onItemClick(AdapterView adapterView, View view, int position, long id) {
        String key = PlaceAutocompleteAPI.KEY;
        PlaceSerializer.Place place = places.get(position);
        Call<PlaceDetailSerializer> callPlace = api.getPlace(key, place.getPlaceID());

        callPlace.enqueue(new Callback<PlaceDetailSerializer>() {
            @Override
            public void onResponse(Call<PlaceDetailSerializer> call, Response<PlaceDetailSerializer> response) {
                Log.e(TAG, "onResponse");

                if (response.isSuccessful()) {
                    PlaceDetailSerializer data = response.body();
                    PlaceDetailSerializer.Place placeDetail = data.getPlace();

                    tvPlace.setText(placeDetail.getName() + "\n" + placeDetail.getAddress());
                    Glide.with(ThirdActivity.this).load(placeDetail.getPhotoURL(200)).into(ivPhoto);
                }
            }

            @Override
            public void onFailure(Call<PlaceDetailSerializer> call, Throwable t) {
                Log.e(TAG, "onFailure");
                Log.e(TAG, t.toString());
            }
        });

        String str = (String) adapterView.getItemAtPosition(position);
        Toast.makeText(this, str, Toast.LENGTH_SHORT).show();
    }

    class GooglePlacesAutocompleteAdapter extends ArrayAdapter implements Filterable {
        private ArrayList<String> resultList = new ArrayList<>();

        public GooglePlacesAutocompleteAdapter(Context context, int textViewResourceId) {
            super(context, textViewResourceId);
        }

        @Override
        public int getCount() {
            return resultList.size();
        }

        @Override
        public String getItem(int index) {
            return resultList.get(index);
        }

        @Override
        public Filter getFilter() {
            Log.d(TAG, "getFilter");
            Filter filter = new Filter() {
                @Override
                protected FilterResults performFiltering(CharSequence constraint) {
                    FilterResults filterResults = new FilterResults();
                    if (constraint != null) {
                        // Retrieve the autocomplete results.
                        if (constraint.length() > 2)
                            resultList = getItems(constraint.toString());

                        // Assign the data to the FilterResults
                        filterResults.values = resultList;
                        filterResults.count = resultList.size();
                    }
                    return filterResults;
                }

                @Override
                protected void publishResults(CharSequence constraint, FilterResults results) {
                    if (results != null && results.count > 0) {
                        notifyDataSetChanged();
                    } else {
                        notifyDataSetInvalidated();
                    }
                }
            };
            return filter;
        }

        public ArrayList<String> getItems(String input) {
            ArrayList<String> resultList = new ArrayList<String>();
            String key = PlaceAutocompleteAPI.KEY;
            Call<PlaceSerializer> callPlaces = api.getPredictions(key, input);

            // show url
            Log.d(TAG, callPlaces.request().url().toString());

            try {
                PlaceSerializer predictions = callPlaces.execute().body();
                places = predictions.getPlaces();
                if (!places.isEmpty()) {
                    resultList = new ArrayList<>();
                    for (PlaceSerializer.Place place : places) {
                        resultList.add(place.getDescription());
                        Log.d(TAG, place.getDescription());
                    }
                }
            } catch (IOException e) {
                Log.e(TAG, "Error connecting to Places API", e);
                return resultList;
            }

            return resultList;
        }
    }
}
In following PlaceAutocompleteAPI class we define entry url for list and detail of Place API.
public class PlaceAutocompleteAPI {
    public static String KEY = "*****";
    public static final String BASE_URL = "https://maps.googleapis.com/maps/api/place/";
    private static Retrofit retrofit = null;

    public interface ApiInterface {
        @GET("autocomplete/json")
        Call<PlaceSerializer> getPredictions(
                @Query("key") String key,
                @Query("input") String input
        );

        @GET("details/json")
        Call<PlaceDetailSerializer> getPlace(
                @Query("key") String key,
                @Query("placeid") String placeid
        );
    }

    public static Retrofit getClient() {
        if (retrofit == null) {
            retrofit = new Retrofit.Builder()
                    .baseUrl(BASE_URL)
                    .addConverterFactory(GsonConverterFactory.create())
                    .build();
        }
        return retrofit;
    }
}
We need class that describe list of places.
public class PlaceSerializer {
    public class Place {
        @SerializedName("place_id")
        private String placeID;

        @SerializedName("description")
        private String description;

        @SerializedName("types")
        private String[] types;

        public Place(String placeID, String description, String[] types) {
            this.placeID = placeID;
            this.description = description;
            this.types = types;
        }

        public String getPlaceID() {
            return placeID;
        }

        public String getDescription() {
            return description;
        }

        public String[] getTypes() {
            return types;
        }

        @Override
        public String toString() {
            return "Place{" +
                    "description='" + description + '\'' +
                    '}';
        }
    }

    @SerializedName("predictions")
    private List<Place> predictions;

    @SerializedName("status")
    private String status;

    public List<Place> getPlaces() {
        return predictions;
    }

    public String getStatus() {
        return status;
    }
}
Also we need class that describe details of place.
public class PlaceDetailSerializer {
    public class Geometry {
        public class Location {
            Double lat;
            Double lng;
        }
        Location location;
    }

    public class AddressComponent {
        String long_name;
        String short_name;
        String[] types;
    }

    public class Photo {
        int height;
        int width;
        String photo_reference;
    }

    public class Place {
        @SerializedName("place_id")
        private String place_id;

        @SerializedName("name")
        private String name;

        @SerializedName("address_components")
        private List<AddressComponent> address_components;

        @SerializedName("formatted_address")
        private String formatted_address;

        @SerializedName("international_phone_number")
        private String phone_number;

        @SerializedName("photos")
        private List<Photo> photos;

        @SerializedName("geometry")
        private Geometry geometry;

        @SerializedName("icon")
        private String icon;

        @SerializedName("rating")
        Double rating;

        @SerializedName("types")
        private String[] types;

        @SerializedName("url")
        private String url;

        @SerializedName("vicinity")
        private String vicinity;

        @SerializedName("website")
        private String website;

        public String getID() {
            return place_id;
        }

        public String getName() {
            return name;
        }

        public String getAddress() {
            return formatted_address;
        }

        public List<Photo> getPhotos() {
            return photos;
        }

        public String getPhotoURL(int maxwidth) {
            if (!photos.isEmpty()) {
                String key = PlaceAutocompleteAPI.KEY;
                Photo photo = photos.get(0);
                String ref = photo.photo_reference;
                String url = String.format("https://maps.googleapis.com/maps/api/place/
                    photo?maxwidth=%d&photoreference=%s&key=%s", maxwidth, ref, key);
                return url;
            }
            return null;
        }

        @Override
        public String toString() {
            return "Place{" +
                    "name='" + name + '\'' +
                    '}';
        }
    }

    @SerializedName("result")
    private Place result;

    @SerializedName("status")
    private String status;


    public Place getPlace() {
        return result;
    }
}
 |
 |
Java Client for Google Maps Services
We can use google-maps-services-java for nearby search.
GeoApiContext geoApiContext = new GeoApiContext.Builder()
        .apiKey(KEY)
        .build();

NearbySearchRequest reqNearby = new NearbySearchRequest(geoApiContext);
reqNearby.location(new LatLng(49.2258522,28.4129088));
reqNearby.radius(100);

try {
    PlacesSearchResponse respNearby = reqNearby.await();
    PlacesSearchResult[] items = respNearby.results;

    for (PlacesSearchResult item : items) {
        Log.d(TAG, "Place: " + item.name + ", " + item.rating + ", " + Arrays.asList(types));
    }

} catch (ApiException e) {
    e.printStackTrace();
} catch (InterruptedException e) {
    e.printStackTrace();
} catch (IOException e) {
    e.printStackTrace();
}
Also we can see place on Google map via following url https://www.google.com/maps/place/?q=place_id:ChIJBwLpy6NcLUcRsGyvbGx-waA.
Useful links
Quote
Categories
- Android
- AngularJS
- Databases
- Development
- Django
- iOS
- Java
- JavaScript
- LaTex
- Linux
- Meteor JS
- Python
- Science
Archive ↓
- September 2024
- December 2023
- November 2023
- October 2023
- March 2022
- February 2022
- January 2022
- July 2021
- June 2021
- May 2021
- April 2021
- August 2020
- July 2020
- May 2020
- April 2020
- March 2020
- February 2020
- January 2020
- December 2019
- November 2019
- October 2019
- September 2019
- August 2019
- July 2019
- February 2019
- January 2019
- December 2018
- November 2018
- August 2018
- July 2018
- June 2018
- May 2018
- April 2018
- March 2018
- February 2018
- January 2018
- December 2017
- November 2017
- October 2017
- September 2017
- August 2017
- July 2017
- June 2017
- May 2017
- April 2017
- March 2017
- February 2017
- January 2017
- December 2016
- November 2016
- October 2016
- September 2016
- August 2016
- July 2016
- June 2016
- May 2016
- April 2016
- March 2016
- February 2016
- January 2016
- December 2015
- November 2015
- October 2015
- September 2015
- August 2015
- July 2015
- June 2015
- February 2015
- January 2015
- December 2014
- November 2014
- October 2014
- September 2014
- August 2014
- July 2014
- June 2014
- May 2014
- April 2014
- March 2014
- February 2014
- January 2014
- December 2013
- November 2013
- October 2013