Firebase for Android: Database tutorial Android 17.03.2017
 Introduction
With Firebase, you can store and sync data to a NoSQL cloud database. The data is stored as JSON, synced to all connected clients in realtime, and available when your app goes offline. It offers APIs that enable you to authenticate users with email and password, Facebook, Twitter, GitHub, Google, anonymous auth, or to integrate with existing authentication system. Other than the Realtime Database and Authentication, it offers a myriad of other services including Cloud Messaging, Storage, Hosting, Remote Config, Test Lab, Crash Reporting, Notification, App Indexing, Dynamic Links, Invites, AdWords, AdMob.
In this tutorial, you'll create a simple ToDo app that will show how to save and retrieve data from Firebase, how to authenticate users, set read/write permissions on the data and validate the data on the server.
Suppose we have to store an Item to our reference then we will create a model class as below.
public class Item {
    private String title;
    public Item() {}
    public Item(String title) {
        this.title = title;
    }
    public String getTitle() {
        return title;
    }
    public void setTitle(String title) {
        this.title = title;
    }
}
Firebase stores data in JSON format. In our database, each user will have an array of to-do items named items. Each item will have a title.
Let's look at basic operations. First we need to get the Firebase Database Reference. You can use DatabaseReference to get the reference.
private DatabaseReference db;
db = FirebaseDatabase.getInstance().getReference("path");
The data is stored in the JSON Tree form so you need to get the reference of an specified path.
We can do write operations by setValue() method. It will take a model java class object that will hold all the variables to be stored in the reference. The same method will be used to update the values at it overwrites the data of the specified reference.
Now to save the Item we will use setValue() method.
Item item = new Item(title);
db.child(id).setValue(item);
To get a unique id use push().getKey() method
String id = db.push().getKey();
Use following snippet for update the Item
// getting the specified item reference
DatabaseReference db = FirebaseDatabase.getInstance().getReference().child(id);

// updating item
Item item = new Item(title);
db.setValue(item);
Firebase utilizes listeners to watch for changes in a specified node (read the Item). It is similar to an event handler in the sense that a code is triggered based on a certain circumstance. In our case, whenever changes in that node's data occur, the listener automatically provides the application updated data, called a snapshot. The application can then use information from the snapshot to update the UI.
There are several types of listeners for Firebase, and each listener type has a different kind of callback that is triggered when the listener is activated. There are two types of listeners: ValueEventListener and ChildEventListener.
A ValueEventListener listens for data changes to a specific location in your database - i.e a node. ValueEventListener has one event callback method, onDataChange() to read a static snapshot of the contents at a given path, as they existed at the time of the event. This method is triggered once when the listener is attached and again every time the data, including children, changes. The event callback is passed a snapshot containing all data at that location, including child data. If there is no data, the snapshot returned is null. If the Event can not be completed, a second callback method, onCancelled() is called.
A ChildEventListener listens for changes to the children of a specific database reference, for example the root node of a database. It has the following callback methods:
onCancelled(DatabaseError error). This method will be triggered in the event that this listener either failed at the server, or is removed as a result of the security and Firebase rules.onChildAdded(DataSnapshot snapshot, String previousChildName). This method will be triggered when a new child is added to the location to which this listener was added.onChildChanged(DataSnapshot snapshot, String previousChildName). This method will be triggered when the data at a child location has changed.onChildMoved(DataSnapshot snapshot, String previousChildName). This method will be triggered when a child location's priority changes.onChildRemoved(DataSnapshot snapshot). This method will be triggered when a child is removed from the location to which this listener was added.
For read operation we will attache a ValueEventListener to the reference.
db.addValueEventListener(new ValueEventListener() {
    @Override
    public void onDataChange(DataSnapshot dataSnapshot) {
        Item item = dataSnapshot.getValue(Item.class);
        System.out.println(item);
    }

    @Override
    public void onCancelled(DatabaseError databaseError) {
        System.out.println("The read failed: " + databaseError.getCode());
    }
});
Whenever you will change something in the database the method onDataChange() will be executed. It contains all the data inside the specified path in the reference. We can use the DataSnapshot object to read all the data inside the reference. If some error occurres onCancelled() method will be called. onDataChange() method will also called once after the app launch and hence you can read the data at starting as well.
To query the Item we can use Query class. Listeners are attached, and they will be triggered when the corresponding data changes. Instances of Query are obtained by calling startAt(), endAt(), or limit() on a DatabaseReference.
private void findItem(String title) {
    Query query = db.orderByChild("title").equalTo(title);
    query.addChildEventListener(new ChildEventListener() {
        @Override
        public void onChildAdded(DataSnapshot dataSnapshot, String s) {
            // do something
        }

        @Override
        public void onChildChanged(DataSnapshot dataSnapshot, String s) {}

        @Override
        public void onChildRemoved(DataSnapshot dataSnapshot) {}

        @Override
        public void onChildMoved(DataSnapshot dataSnapshot, String s) {}

        @Override
        public void onCancelled(DatabaseError databaseError) {
            Log.d(TAG, "Item not found: this item is not in the list");
        }
    });
}
To delete the Item we can use removeValue() method. More about CRUD operation you can read here.
To get started, create a new project named ToDo. Set Minimum SDK as API 15 in the next window and select Empty Activity in the next. Click Finish on the last window, leaving the settings at their default.
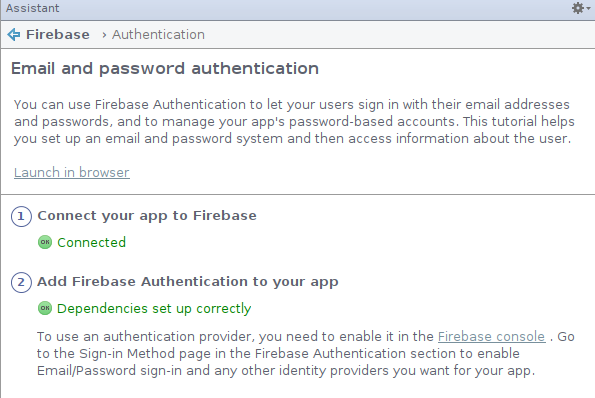
To configure the project to use the Firebase platform, open the Firebase Assistant window by clicking on Tools > Firebase. Now from the assistant go to Authentication and click Email and password aithentication. Next, press the Connect to Firebase button and make sure that the Create new Firebase project option is selected. Finaly, click Add Firebase Authentication.
Repeat the same steps for Realtime Database.
Now you have connected Firebase platform with Authentication and Realtime Database. Also you can manage your Firebase data from Firebase console.
Example of Authentication and Realtime database
Create an empty activity by selecting the File -> New -> Activity -> Empty Activity menu item and name it LogInActivity. Create another and name it SignUpActivity.
Change the contents of the activity_log_in.xml layout file to:
<?xml version="1.0" encoding="utf-8"?>
<RelativeLayout xmlns:android="http://schemas.android.com/apk/res/android"
    xmlns:app="http://schemas.android.com/apk/res-auto"
    xmlns:tools="http://schemas.android.com/tools"
    android:layout_width="match_parent"
    android:layout_height="match_parent"
    tools:context="me.proft.todofirebase.LogInActivity">

    <EditText
        android:id="@+id/etEmail"
        android:layout_width="match_parent"
        android:layout_height="wrap_content"
        android:layout_alignParentLeft="true"
        android:layout_alignParentTop="true"
        android:ems="10"
        android:inputType="textEmailAddress"
        android:hint="@string/email_hint" >

        <requestFocus />
    </EditText>

    <EditText
        android:id="@+id/etPassword"
        android:layout_width="match_parent"
        android:layout_height="wrap_content"
        android:layout_alignLeft="@+id/etEmail"
        android:layout_below="@+id/etEmail"
        android:ems="10"
        android:hint="@string/password_hint"
        android:inputType="textPassword" />

    <Button
        android:id="@+id/btnLogin"
        android:layout_width="match_parent"
        android:layout_height="wrap_content"
        android:layout_alignLeft="@+id/etPassword"
        android:layout_below="@+id/etPassword"
        android:text="@string/login_button_label" />

    <TextView
        android:id="@+id/tvSignUp"
        android:layout_width="wrap_content"
        android:layout_height="wrap_content"
        android:layout_below="@+id/btnLogin"
        android:layout_centerHorizontal="true"
        android:layout_marginTop="69dp"
        android:text="@string/sign_up_text" />

</RelativeLayout>
Change the contents of the activity_sign_up.xml layout file to:
<?xml version="1.0" encoding="utf-8"?>
<RelativeLayout xmlns:android="http://schemas.android.com/apk/res/android"
    xmlns:app="http://schemas.android.com/apk/res-auto"
    xmlns:tools="http://schemas.android.com/tools"
    android:layout_width="match_parent"
    android:layout_height="match_parent"
    tools:context="me.proft.todofirebase.SignUpActivity">

    <EditText
        android:id="@+id/etEmail"
        android:layout_width="match_parent"
        android:layout_height="wrap_content"
        android:layout_alignParentLeft="true"
        android:layout_alignParentTop="true"
        android:ems="10"
        android:inputType="textEmailAddress"
        android:hint="@string/email_hint" >

        <requestFocus />
    </EditText>

    <EditText
        android:id="@+id/etPassword"
        android:layout_width="match_parent"
        android:layout_height="wrap_content"
        android:layout_alignLeft="@+id/etEmail"
        android:layout_below="@+id/etEmail"
        android:ems="10"
        android:inputType="textPassword"
        android:hint="@string/password_hint" />

    <Button
        android:id="@+id/btnSignup"
        android:layout_width="match_parent"
        android:layout_height="wrap_content"
        android:layout_alignLeft="@+id/etPassword"
        android:layout_below="@+id/etPassword"
        android:text="@string/sign_up_button_label" />
</RelativeLayout>
These layouts are for the Login and SignUp views.

Add the following to values/strings.xml.
<string name="password_hint">Password</string>
<string name="email_hint">Email</string>
<string name="sign_up_button_label">Sign Up</string>
<string name="signup_error_message">Please make sure you enter an email address and password!</string>
<string name="signup_error_title">Error!</string>
<string name="signup_success">Account successfully created! You can now Login.</string>
<string name="login_error_message">Please make sure you enter an email address and password!</string>
<string name="login_error_title">Error!</string>
<string name="login_button_label">Login</string>
<string name="sign_up_text">Sign Up!</string>
<string name="title_activity_login">Sign in</string>
<string name="add_item">Add New Item</string>
<string name="action_logout">Logout</string>
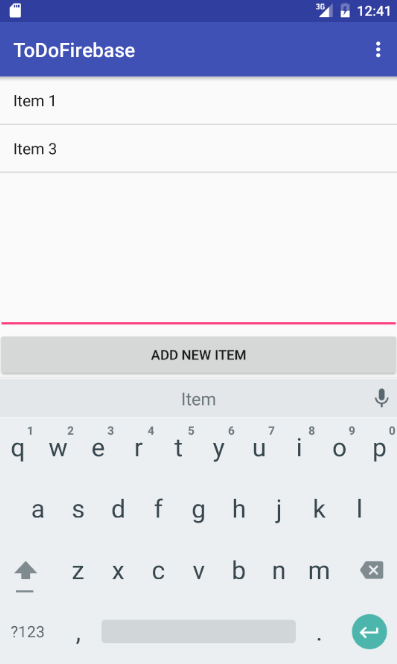
The app will display the ToDo items in a list view that will occupy most of the screen. At the bottom of the screen, will be an edit text field and a button to add items to the list. So, change activity_main.xml to the below:
<?xml version="1.0" encoding="utf-8"?>
<LinearLayout xmlns:android="http://schemas.android.com/apk/res/android"
    xmlns:app="http://schemas.android.com/apk/res-auto"
    xmlns:tools="http://schemas.android.com/tools"
    android:orientation="vertical"
    android:layout_width="match_parent"
    android:layout_height="match_parent"
    tools:context=".MainActivity">

    <ListView
        android:id="@+id/lvItems"
        android:layout_width="match_parent"
        android:layout_height="0dp"
        android:layout_weight="1">
    </ListView>

    <LinearLayout
        android:layout_width="match_parent"
        android:layout_height="wrap_content"
        android:orientation="vertical"
        android:layout_gravity="bottom">
        <EditText
            android:id="@+id/etTitle"
            android:layout_width="match_parent"
            android:layout_height="wrap_content"/>
        <Button
            android:id="@+id/btnAdd"
            android:layout_width="match_parent"
            android:layout_height="wrap_content"
            android:text="@string/add_item"/>
    </LinearLayout>
</LinearLayout>
Before retrieving and saving data from the Firebase server, you need to set up authentication and add rules that restrict access to data and validate user input before it’s saved.
The Firebase API has built-in methods for email/password, Facebook, Twitter, GitHub, Google and anonymous authentication. We will use email and password authentication.
Head over to the Firebase console and open your project’s Dashboard by clicking on the project. If you select Database from the left panel, you will be able to see project’s data that is in JSON format.
Firebase stores all database data as JSON objects. There are no tables or records. When you add data to the JSON tree, it becomes a key in the existing JSON structure.
At the moment you can only see the root node.
From the left panel, click on Authentication and then select the Sign In Method tab on the right. Enable Email/Password authentication from the given providers.
In Android Studio, add the following method to MainActivity.
private void loadLogInView() {
    Intent intent = new Intent(this, LogInActivity.class);
    intent.addFlags(Intent.FLAG_ACTIVITY_NEW_TASK);
    intent.addFlags(Intent.FLAG_ACTIVITY_CLEAR_TASK);
    startActivity(intent);
}
This navigates to the Login view and clears the activity stack. This prevents the user going back to the main activity when they press the Back button from the Login view.
Add the following variables to the class.
private FirebaseAuth auth;
private FirebaseUser user;
Then add the following to the bottom of onCreate().
// initialize Firebase Auth
auth = FirebaseAuth.getInstance();
user = auth.getCurrentUser();

if (user == null) {
    // not logged in, launch the Log In activity
    loadLogInView();
}
Here you check for the logged in user. If the user isn’t logged in, getCurrentUser() will return null, otherwise it will return a FirebaseUser object which will contain details of the logged in user. If the user isn’t logged in, loadLogInView() is called which redirects the user to the Login view.
Modify LogInActivity.
public class LogInActivity extends AppCompatActivity {
    protected EditText etEmail;
    protected EditText etPassword;
    protected Button btnLogin;
    protected TextView tvSignUp;
    private FirebaseAuth auth;

    @Override
    protected void onCreate(Bundle savedInstanceState) {
        super.onCreate(savedInstanceState);
        setContentView(R.layout.activity_log_in);

        // initialize FirebaseAuth
        auth = FirebaseAuth.getInstance();

        if (auth.getCurrentUser() != null) {
            Intent intent = new Intent(LogInActivity.this, MainActivity.class);
            startActivity(intent);
        }

        tvSignUp = (TextView) findViewById(R.id.tvSignUp);
        etEmail = (EditText) findViewById(R.id.etEmail);
        etPassword = (EditText) findViewById(R.id.etPassword);
        btnLogin = (Button) findViewById(R.id.btnLogin);

        tvSignUp.setOnClickListener(new View.OnClickListener() {
            @Override
            public void onClick(View v) {
                Intent intent = new Intent(LogInActivity.this, SignUpActivity.class);
                startActivity(intent);
            }
        });

        btnLogin.setOnClickListener(new View.OnClickListener() {
            @Override
            public void onClick(View v) {
                String email = etEmail.getText().toString().trim();
                String password = etPassword.getText().toString().trim();

                if (email.isEmpty() || password.isEmpty()) {
                    AlertDialog.Builder builder = new AlertDialog.Builder(LogInActivity.this);
                    builder.setMessage(R.string.login_error_message)
                            .setTitle(R.string.login_error_title)
                            .setPositiveButton(android.R.string.ok, null);
                    AlertDialog dialog = builder.create();
                    dialog.show();
                } else {
                    auth.signInWithEmailAndPassword(email, password)
                            .addOnCompleteListener(LogInActivity.this, new OnCompleteListener<AuthResult>() {
                                @Override
                                public void onComplete(@NonNull Task<AuthResult> task) {
                                    if (task.isSuccessful()) {
                                        Intent intent = new Intent(LogInActivity.this, MainActivity.class);
                                        intent.addFlags(Intent.FLAG_ACTIVITY_NEW_TASK);
                                        intent.addFlags(Intent.FLAG_ACTIVITY_CLEAR_TASK);
                                        startActivity(intent);
                                    } else {
                                        AlertDialog.Builder builder = new AlertDialog.Builder(LogInActivity.this);
                                        builder.setMessage(task.getException().getMessage())
                                                .setTitle(R.string.login_error_title)
                                                .setPositiveButton(android.R.string.ok, null);
                                        AlertDialog dialog = builder.create();
                                        dialog.show();
                                    }
                                }
                            });
                }
            }
        });
    }
}
This initiates the view elements and the FirebaseAuth object, which is the entry point of the Firebase Authentication SDK. An event listener is added to the SignUp text view that will open the SignUp activity when tapped. Another event listener on the Login button performs validation on the user input, ensuring the user entered text for both fields. It then calls the Firebase server with signInWithEmailAndPassword(). The function takes the user email and password and returns a Task of AuthResult. You check if the Task is successful and redirect the user to the MainActivity, otherwise show them an error message.
Apart from signInWithEmailAndPassword(), you can use the following to log in the user:
signInWithCredential(AuthCredential)method tries to sign in a user with the given AuthCredential. Use this method to sign in a user into your Firebase Authentication system. First retrieve the credential either directly from the user, in case of EmailAuthCredential, or from a supported authentication SDK, such as Google Sign-In or Facebook.signInAnonymously()method signs in the user anonymously without requiring any credential. This method creates a new account in your Firebase Authentication system, except in the case where there was already an anonymous user signed in into this app.signInWithCustomToken(String)metod tries to sign in a user with a given Custom Token. Use this method after you retrieve a Firebase Auth Custom Token from your server, to sign in a user into your Firebase Authentication system.
With the Login functionality done, let’s set up Sign Up.
Modify SignUpActivity as shown.
public class SignUpActivity extends AppCompatActivity {
    protected EditText etPassword;
    protected EditText etEmail;
    protected Button btnSignup;
    private FirebaseAuth auth;

    @Override
    protected void onCreate(Bundle savedInstanceState) {
        super.onCreate(savedInstanceState);
        setContentView(R.layout.activity_sign_up);

        // initialize FirebaseAuth
        auth = FirebaseAuth.getInstance();

        etPassword = (EditText)findViewById(R.id.etPassword);
        etEmail = (EditText)findViewById(R.id.etEmail);
        btnSignup = (Button)findViewById(R.id.btnSignup);

        btnSignup.setOnClickListener(new View.OnClickListener() {
            @Override
            public void onClick(View v) {
                String password = etPassword.getText().toString().trim();
                String email = etEmail.getText().toString().trim();

                if (password.isEmpty() || email.isEmpty()) {
                    AlertDialog.Builder builder = new AlertDialog.Builder(SignUpActivity.this);
                    builder.setMessage(R.string.signup_error_message)
                            .setTitle(R.string.signup_error_title)
                            .setPositiveButton(android.R.string.ok, null);
                    AlertDialog dialog = builder.create();
                    dialog.show();
                } else {
                    auth.createUserWithEmailAndPassword(email, password)
                            .addOnCompleteListener(SignUpActivity.this, new OnCompleteListener<AuthResult>() {
                                @Override
                                public void onComplete(@NonNull Task<AuthResult> task) {
                                    if (task.isSuccessful()) {
                                        Intent intent = new Intent(SignUpActivity.this, MainActivity.class);
                                        intent.addFlags(Intent.FLAG_ACTIVITY_NEW_TASK);
                                        intent.addFlags(Intent.FLAG_ACTIVITY_CLEAR_TASK);
                                        startActivity(intent);
                                    } else {
                                        AlertDialog.Builder builder = new AlertDialog.Builder(SignUpActivity.this);
                                        builder.setMessage(task.getException().getMessage())
                                                .setTitle(R.string.login_error_title)
                                                .setPositiveButton(android.R.string.ok, null);
                                        AlertDialog dialog = builder.create();
                                        dialog.show();
                                    }
                                }
                            });
                }
            }
        });
    }
}
The createUserWithEmailAndPassword() method tries to create a new user account with the given email address and password. If successful, it also signs the user into the app. A Task of AuthResult is returned with the result of the operation. You check to see if registration was successful and redirect the user to MainActivity, otherwise show them an error message. In your app, you can check for the exception thrown to decide on the error message you will show to your users. The following are the possible exceptions thrown in case of an error in creating an account.
- FirebaseAuthWeakPasswordException thrown if the password is not strong enough
- FirebaseAuthInvalidCredentialsException thrown if the email address is malformed
- FirebaseAuthUserCollisionException thrown if there already exists an account with the given email
If registration is successful, you will be directed to the MainActivity. If you look at the Firebase console, you should be able to see the created user under Auth > Users.
The Firebase team built an open source library called FirebaseUI that simplifies the process of adding Authentication and connecting common UI elements to the Firebase database. Read the documentation to learn more about the library.
Authorization and Data Validation
Identifying your user is only one part of security. Once you know who they are, you need a way to control their access to data in your Firebase database.
Firebase has a declarative language for specifying rules that live on the Firebase servers and determine the security of your app. You can edit them on the Database > Rules tab.
The Security rules allow you to control access to each part of your database. By default, Firebase has security rules that require users to be authenticated.
{
  "rules": {
    ".read": "auth != null",
    ".write": "auth != null"
  }
}
Firebase Database Rules have a JavaScript-like syntax and come in four types:
.readdescribes if and when data is allowed to be read by users..writedescribes if and when data is allowed to be written..validatedefines what a correctly formatted value will look like, whether it has child attributes, and the data type..indexOnspecifies a child to index to support ordering and querying.
.read and .write rules cascade, so the following ruleset grants read access to any data at path /foo/ (can also refer to it as the node foo) as well as any deeper paths such as /foo/bar/baz. Note that .read and .write rules shallower in the database override deeper rules, so read access to /foo/bar/baz would still be granted in this example even if a rule at the path /foo/bar/baz evaluated to false. .validate rules do not cascade.
Modify the rules as shown and hit Publish.
{
  "rules": {
    "users": {
      "$uid": {
        ".read": "auth != null && auth.uid == $uid",
        ".write": "auth != null && auth.uid == $uid",
        "items": {
          "$item_id": {
            "title": {
              ".validate": "newData.isString() && newData.val().length > 0"
            }
          }
        }
      }
    }
  }
}
In the above rules, auth != null && auth.uid == $uid restricts read and write permission of data on the users node (as well as its child nodes) to the user whose uid matches the id of the logged in user (auth.uid). The $uid is a variable that holds the value at that node and not the name of the node itself. With this rule, not only will the user need to be authenticated to read or write any data to the node and its children, but they will also only have access to their own data.
The Firebase Database Rules include built-in variables and functions that allow you to refer to other paths, server-side timestamps, authentication information, and more.
Validation rules are great but they shouldn’t replace data validation code in your app. You should still validate input in you app to improve performance.
Saving and Retrieving Data
Modify MainActivity as shown.
public class MainActivity extends AppCompatActivity {
    private FirebaseAuth auth;
    private FirebaseUser user;
    private DatabaseReference db;

    @Override
    protected void onCreate(Bundle savedInstanceState) {
        super.onCreate(savedInstanceState);
        setContentView(R.layout.activity_main);

        // initialize Firebase Auth
        auth = FirebaseAuth.getInstance();
        user = auth.getCurrentUser();
        db = FirebaseDatabase.getInstance().getReference();

        if (user == null) {
            // not logged in, launch the Log In activity
            loadLogInView();
        } else {
            final EditText etTitle = (EditText) findViewById(R.id.etTitle);
            final Button btnAdd = (Button) findViewById(R.id.btnAdd);
            final String userId = user.getUid();
            final ListView lvItems = (ListView) findViewById(R.id.lvItems);
            final ArrayAdapter<String> adapter = new ArrayAdapter<>(this,
                 android.R.layout.simple_list_item_1, android.R.id.text1);

            lvItems.setAdapter(adapter);

            btnAdd.setOnClickListener(new View.OnClickListener() {
                public void onClick(View v) {
                    String title = etTitle.getText().toString();
                    //db.child("users").child(userId).child("items").push().child("title").setValue(title);
                    Item item = new Item(title );
                    db.child("users").child(userId).child("items").push().setValue(item);
                    etTitle.setText("");
                }
            });

            // delete items when clicked
            lvItems.setOnItemClickListener(new AdapterView.OnItemClickListener() {
                public void onItemClick(AdapterView<?> parent, View view, int position, long id) {
                    db.child("users").child(userId).child("items")
                            .orderByChild("title")
                            .equalTo((String) lvItems.getItemAtPosition(position))
                            .addListenerForSingleValueEvent(new ValueEventListener() {
                                @Override
                                public void onDataChange(DataSnapshot dataSnapshot) {
                                    if (dataSnapshot.hasChildren()) {
                                        DataSnapshot firstChild = dataSnapshot.getChildren().iterator().next();
                                        firstChild.getRef().removeValue();
                                    }
                                }

                                @Override
                                public void onCancelled(DatabaseError databaseError) {}
                            });
                }
            });

            // use Firebase to populate the list
            db.child("users").child(userId).child("items").addChildEventListener(new ChildEventListener() {
                @Override
                public void onChildAdded(DataSnapshot dataSnapshot, String s) {
                    adapter.add((String) dataSnapshot.child("title").getValue());
                }

                @Override
                public void onChildChanged(DataSnapshot dataSnapshot, String s) {}

                @Override
                public void onChildRemoved(DataSnapshot dataSnapshot) {
                    adapter.remove((String) dataSnapshot.child("title").getValue());
                }

                @Override
                public void onChildMoved(DataSnapshot dataSnapshot, String s) {}

                @Override
                public void onCancelled(DatabaseError databaseError) {}
            });
        }
    }

    private void loadLogInView() {
        Intent intent = new Intent(this, LogInActivity.class);
        intent.addFlags(Intent.FLAG_ACTIVITY_NEW_TASK);
        intent.addFlags(Intent.FLAG_ACTIVITY_CLEAR_TASK);
        startActivity(intent);
    }
}
You create a reference to the root node of the database with FirebaseDatabase.getInstance().getReference(). You then set a listener on the Add New Item button that saves data to Firebase when clicked.
There are four methods for writing data to the Firebase Realtime Database:
setValue()writes or replaces data to a defined path, such asusers/<user-id>/<username>. You can usesetValue()to save different types of data to a Firebase database: String, Long, Double, Boolean, Map<String, Object>, List<Object>, custom Java objects.push()adds to a list of data. Every time you callpush(), Firebase generates a unique key that can also be used as a unique identifier, such asuser-posts/<user-id>/<unique-post-id>.updateChildren()updates some of the keys for a defined path without replacing all of the data.runTransaction()update complex data that could be corrupted by concurrent updates.
In our code, data is saved with:
String title = etTitle.getText().toString();
Item item = new Item(title );
db.child("users").child(userId).child("items").push().setValue(item);
.child gets a reference to the specified node if it exists or creates it if it doesn’t exist. The above will save the entered text at the path /users/<user-id>/items/<item-id>/title.
.push() generates a new child location using a unique key. You use it to generate a unique key for each item added.
.setValue() writes or replaces data to the defined path.
To retrieve data from Firebase, add a listener to the database reference with addChildEventListener(). You can listen for the following types of events that retrieve data:
ValueEventListener: onDataChange()reads and listens for changes to the entire contents of a path.ChildEventListener: onChildAdded()retrieves lists of items or listen for additions to a list of items. Suggested use withonChildChanged()andonChildRemoved()to monitor changes to lists.ChildEventListener: onChildChanged()listens for changes to the items in a list. Use withonChildAdded()andonChildRemoved()to monitor changes to lists.ChildEventListener: onChildRemoved()listens for items being removed from a list. Use withonChildAdded()andonChildChanged()to monitor changes to lists.ChildEventListener: onChildMoved()listens for changes to the order of items in an ordered list.onChildMoved()events always follow theonChildChanged()event that caused the item’s order to change (based on your current order-by method).
The listener receives a DataSnapshot, which is a snapshot of the data. A snapshot is a picture of the data at a particular location in a Firebase database at a single point in time. Calling getValue() on a snapshot returns the Java object representation of the data. The possible types returned by getValue() are Boolean, String, Long, Double, Map<String, Object>, and List<Object>. If no data exists at the location, the snapshot will return null and it’s a good idea to check for null before you try using the data. Finally, add the retrieved data to the list view.
Also we set an onClick listener on the ListView and queries the database when an item is tapped. It searches the Firebase database for the item with a title equal to the string at the tapped location. With a more complex app you might want to search for something that is unique to the object, like an id. It then removes the first occurrence of the item from the database. The list view is automatically updated.
Create menu in res/menu/menu_main.xml and add item with the following Logout item.
<item
    android:id="@+id/action_logout"
    android:orderInCategory="100"
    android:title="@string/action_logout"
    app:showAsAction="never"/>
Open MainActivity and add following snippet.
    @Override
    public boolean onCreateOptionsMenu(Menu menu) {
        getMenuInflater().inflate(R.menu.menu_main, menu);
        return super.onCreateOptionsMenu(menu);
    }

    @Override
    public boolean onOptionsItemSelected(MenuItem item) {
        switch (item.getItemId()) {
            case R.id.action_logout:
                auth.signOut();
                loadLogInView();
                break;
            default:
                break;
        }
        return true;
    }
This menu item will logout the user.
If you run the app and add some items, they will be added to the list and to the database.
Authenticate Using Facebook Login
Head over to Facebook Developer website to create your app and get your application ID by clicking on the Add a new app button. You can read detailed instruction in Android Facebook SDK integration tutorial .
To enable authenticate using Facebook in Firebase follow these steps
- Go to your Firebase project console.
- Click Authentication under Develop section.
- Select Sign-in method tab and enable Facebook Sign-In by giving Facebook App Id and App Secret.
To start working with Facebook authentication we need to add Firebase Authentication dependencies to our android project. Please add the following dependency in your module-level gradle and compile.
compile 'com.google.firebase:firebase-auth:10.0.1'
compile 'com.facebook.android:facebook-android-sdk:[4,5)'
Example of layout
<?xml version="1.0" encoding="utf-8"?>
<LinearLayout
    xmlns:android="http://schemas.android.com/apk/res/android"
    android:layout_width="match_parent"
    android:layout_height="match_parent"
    android:orientation="vertical"
    android:padding="16dp">

    <com.facebook.login.widget.LoginButton
        android:id="@+id/btnLogin"
        android:layout_width="wrap_content"
        android:layout_height="wrap_content"
        android:layout_centerInParent="true"
        />

</LinearLayout>
Example of Activity.
public class FacebookActivity extends AppCompatActivity {
    private TextView tvStatus;
    private LoginButton btnLogin;
    private CallbackManager callbackManager;
    private FirebaseAuth firebaseAuth;
    String TAG = "DBG";

    @Override
    protected void onCreate(Bundle savedInstanceState) {
        super.onCreate(savedInstanceState);
        callbackManager = CallbackManager.Factory.create();
        setContentView(R.layout.activity_facebook);

        firebaseAuth = FirebaseAuth.getInstance();

        btnLogin = (LoginButton)findViewById(R.id.btnLogin);
        btnLogin.setReadPermissions("public_profile,user_photos,user_birthday,user_work_history");
        btnLogin.registerCallback(callbackManager, new FacebookCallback<LoginResult>() {
            @Override
            public void onSuccess(LoginResult loginResult) {
                AccessToken token = loginResult.getAccessToken();
                Log.d(TAG, "onSuccess: " + token.getUserId());
                handleFacebookAccessToken(loginResult.getAccessToken());
            }

            @Override
            public void onCancel() {
                Log.d(TAG, "onCancel: Login attempt canceled.");
            }

            @Override
            public void onError(FacebookException e) {
                Log.d(TAG, "onError: Login attempt failed.");
            }
        });

        if (AccessToken.getCurrentAccessToken() != null) {
            goMainScreen();
        }
    }

    private void handleFacebookAccessToken(AccessToken accessToken) {
        AuthCredential credential = FacebookAuthProvider.getCredential(accessToken.getToken());
        firebaseAuth.signInWithCredential(credential).addOnCompleteListener(this, new OnCompleteListener<AuthResult>() {
            @Override
            public void onComplete(@NonNull Task<AuthResult> task) {
                Log.d(TAG, "onComplete: " + task.getResult().getUser().getUid());

                if(!task.isSuccessful())
                    Toast.makeText(getApplicationContext(), "Error login", Toast.LENGTH_LONG).show();
                else
                    Toast.makeText(getApplicationContext(), "Successful login", Toast.LENGTH_LONG).show();
            }
        }).addOnFailureListener(new OnFailureListener() {
            @Override
            public void onFailure(@NonNull Exception e) {
                e.printStackTrace();
            }
        });
    }

    @Override
    protected void onActivityResult(int requestCode, int resultCode, Intent data) {
        callbackManager.onActivityResult(requestCode, resultCode, data);
    }

    public void goMainScreen(){
        Intent intent = new Intent(this, ItemsActivity.class);
        intent.addFlags(Intent.FLAG_ACTIVITY_CLEAR_TOP |
           Intent.FLAG_ACTIVITY_CLEAR_TASK | Intent.FLAG_ACTIVITY_NEW_TASK);
        startActivity(intent);
    }
}
How to run several queries sequentially
Starting with Google Play services version 9.0.0, you can use a Tasks API which provides
- asynchronous method calls, similar to
PendingResultin previous versions of Google Play Services - chain tasks one after another
- enable the executor, etc to be specified for each task and thread switching very easily (between background and main thread).
- allow errors to be captured and dealt with at a convenient time
Tasks API would be good for background work that returns a single value such as general network requests, reading files off disk, etc.
If you want to work with the Task API without having to integrate Firebase into your app, you can get the library with a dependency in your build.gradle:
compile 'com.google.android.gms:play-services-tasks:9.6.1'
But, if you are integrating Firebase, you'll get this library included for free, so no need to call it out specifically in that case.
So, instead of nesting listeners, you can create a sequence of tasks.
The result will be sent to addOnSuccessListener if all tasks execute successfully. If any of them fail during the use case execution, the sequence will be aborted and the exception is passed to addOnFailureListener.
Let's create simple Task
public Task<String> getName() {
    final TaskCompletionSource<String> tcs = new TaskCompletionSource<>();
    tcs.setResult("John");
    //tcs.setException(Exception());
    return tcs.getTask();
}
Let's execute it
// Activity activity = MainActivity.this;

// first approach
getName().addOnSuccessListener(activity, new OnSuccessListener<String>() {
    @Override
    public void onSuccess(String name) {
        Log.d(TAG, "onSuccess: " + name);
    }
});

// second approach
getName().addOnCompleteListener(activity, new OnCompleteListener<String>() {
    @Override
    public void onComplete (Task task) {
        if (task.isSuccessful()) {
            // do something with name ...
            String name = (String) task.getResult();
            Log.d("WWW", "onComplete: " + name);
        } else {
            // handle the failure ...
            Exception e = task.getException();
        }
    }
});
So, with OnCompleteListener, you can have a single listener that handles both success and failure, and you find out which one by calling isSuccessful() on the Task object passed to the callback. Practically speaking, this is functionally equivalent to registering both an OnSuccessListener and an OnFailureListener. The style you choose is mostly a matter of preference.
Also we can run several tasks sequentially. Let's create GetUser and GetPhoto tasks.
class GetUser implements Continuation<Void, Task<String>> {
    @Override
    public Task<String> then(Task<Void> task) {
        final TaskCompletionSource<String> tcs = new TaskCompletionSource();

        //tcs.setException(error.toException());
        tcs.setResult("John");
        return tcs.getTask();
    }
}

class GetPhoto implements Continuation<String, Task<String>> {
    @Override
    public Task<String> then(Task<String> task) {
        final TaskCompletionSource<String> tcs = new TaskCompletionSource();

        String name = task.getResult();

        //tcs.setException(error.toException());
        tcs.setResult("John's photos");
        return tcs.getTask();
    }
}
Run it sequentially with following command
Tasks.<Void>forResult(null)
        .continueWithTask(new GetUser())
        .continueWithTask(new GetPhoto())
        .addOnSuccessListener(activity, new OnSuccessListener<String>() {
            @Override
            public void onSuccess(String s) {
                Log.d("WWW", "onSuccess!!!!");
            }
        });
The primary difference between continueWith and continueWithTask is one of the generic types of the Continuation you pass to it.
You can think of a Continuation as something that converts some input type to some output type. If you define a Continuation<IN, OUT>, where IN is the input type passed to its then method via a Task<IN>, and OUT is the type that method returns.
When calling continueWith, you pass a Continuation<IN, OUT>, and the then method is expected to compute and return the OUT value given a Task<IN> value as input. You might choose to do this if you don't have any blocking work to do for the conversion, such as reducing an integer array to the sum of its elements or counting the number of words in a String.
When calling continueWithTask, you pass a Continuation<IN, Task<OUT>>, and the then method is expected to return a Task<OUT> that eventually generates the OUT value, given the IN value as input. You might choose this if you are able to delegate the conversion work to an existing reusable Task. continueWithTask is perfect when you want to use a Continuation and a TaskCompletionSource together.
Practically speaking, you aren't required to choose one or the other to do your work. It's a matter of preferred style, or if you have a nice Task ready to delegate your conversation rather than a Continuation. Typically you only use a Continuations if you have a pipeline of conversions to chain together.
The Task API provides a couple methods (whenAll) to help you know when several Tasks are all complete. These static utility methods create a new Task that gets triggered in response to the completion of a collection of Tasks that you provide.
Let's create getName and getPhoto tasks.
public Task<String> getName() {
    final TaskCompletionSource<String> tcs = new TaskCompletionSource<>();
    tcs.setResult("John");
    //tcs.setException(Exception());
    return tcs.getTask();
}

public Task<String> getPhoto() {
    final TaskCompletionSource<String> tcs = new TaskCompletionSource<>();
    tcs.setResult("John's photos");
    //tcs.setException(Exception());
    return tcs.getTask();
}
Collect all tasks to array
Task<?>[] tasks = new Task[] {
        getName(),
        getPhoto()
};
Also create task that will start after all.
class FinishTask implements Continuation<Void, Task<Void>> {
    @Override
    public Task<Void> then(@NonNull Task<Void> task) throws Exception {
        final TaskCompletionSource<Void> tcs = new TaskCompletionSource<>();

        if (task.isSuccessful()) {
            Log.d(TAG, "then: isSuccessful" + name);
            tcs.setResult(null);
        } else {
            Log.d(TAG, "then: NOT isSuccessful");
        }

        return tcs.getTask();
    }
}
Run with following command
Tasks.whenAll(tasks).continueWithTask(new FinishTask()).addOnSuccessListener(activity, new OnSuccessListener<String>() {
        @Override
        public void onSuccess(String s) {
            Log.d(TAG, "onSuccess!!!!");
        }
    });
How to fetch list of items and combine them via RxJava2
For this purpose we can RxJava2.
You can place following snippet somewhere in Utils.java
public static Observable<List<Item>> getItems(String id) {
    return Observable.create(new ObservableOnSubscribe<List<Item>>() {
        @Override
        public void subscribe(ObservableEmitter<List<Item>> e) throws Exception {
            String itemIndex = String.format("%s_%d", id, Item.STATE_ACCEPT);

            ValueEventListener listener = new ValueEventListener() {
                @Override
                public void onDataChange(DataSnapshot dataSnapshot) {

                    List<Item> items = new ArrayList<>();

                    if (dataSnapshot.getChildrenCount() > 0) {
                        for (DataSnapshot ds : dataSnapshot.getChildren()) {
                            Item item = ds.getValue(Item.class);
                            items.add(item);
                        }
                        e.onNext(items);
                        e.onComplete();
                    } else {
                        e.onNext(Collections.<Item>emptyList());
                    }
                }

                @Override
                public void onCancelled(DatabaseError databaseError) {
                    e.onError(new FirebaseException(databaseError.getMessage()));
                }
            };

            Query query = Utils.getDB().child(Constants.FIREBASE_ITEMS_DB).orderByChild("itemIndex").equalTo(itemIndex);
            query.addListenerForSingleValueEvent(listener);
        }
    });
}
You can use it somewhere in Activity.
Observable<List<Item>> itemA = Utils.getItems(itemAId);
Observable<List<Item>> itemB = Utils.getItems(itemBId);

Observable.zip(itemA, itemB, (a, b) -> {
    List<Item> items = new ArrayList<>();
    items.addAll(a);
    items.addAll(b);
    return items;
}).subscribeOn(Schedulers.io())
    .observeOn(AndroidSchedulers.mainThread())
    .subscribe((items) -> {
        for (Item item : items) {
            ...
        }
    });
You can spy more examples here.
Useful links
Quote
Categories
- Android
- AngularJS
- Databases
- Development
- Django
- iOS
- Java
- JavaScript
- LaTex
- Linux
- Meteor JS
- Python
- Science
Archive ↓
- December 2023
- November 2023
- October 2023
- March 2022
- February 2022
- January 2022
- July 2021
- June 2021
- May 2021
- April 2021
- August 2020
- July 2020
- May 2020
- April 2020
- March 2020
- February 2020
- January 2020
- December 2019
- November 2019
- October 2019
- September 2019
- August 2019
- July 2019
- February 2019
- January 2019
- December 2018
- November 2018
- August 2018
- July 2018
- June 2018
- May 2018
- April 2018
- March 2018
- February 2018
- January 2018
- December 2017
- November 2017
- October 2017
- September 2017
- August 2017
- July 2017
- June 2017
- May 2017
- April 2017
- March 2017
- February 2017
- January 2017
- December 2016
- November 2016
- October 2016
- September 2016
- August 2016
- July 2016
- June 2016
- May 2016
- April 2016
- March 2016
- February 2016
- January 2016
- December 2015
- November 2015
- October 2015
- September 2015
- August 2015
- July 2015
- June 2015
- February 2015
- January 2015
- December 2014
- November 2014
- October 2014
- September 2014
- August 2014
- July 2014
- June 2014
- May 2014
- April 2014
- March 2014
- February 2014
- January 2014
- December 2013
- November 2013
- October 2013