Exploring RxJava in Android Android 09.09.2017

Introduction
RxJava is a library that allows us to represent any operation as an asynchronous data stream that can be created on any thread, declaratively composed, and consumed by multiple objects on any thread.
These are some of the main reasons why you should consider RxJava:
- Abstraction of complexity of async data flows and events. It’s quite common to fall into the hell of nested and multiple listeners, the hell of multiple events from everywhere when using an event bus, etc. With RxJava we can simplify all this using just asynchronous stream of transformable data.
- Filtering, composition, transformation. Thanks to the massive amount of operators we can easily transform any stream of data transmitted. As we will see later we can filter, combine, transform, create, etc. any kind of data stream.
- Error handling. Very straightforward error handling by centralising in a single callback method any error, stopping the data sequence.
- Easy testing. Having a single source/destination of the data source and testing helper classes make it quite easy to test.
- Light and high performance. RxJava is light and fast, at the moment it weights around 1 MB and it’s quite fast streaming our data.
So let’s take a quick look to the key elements that compose the RxJava library.
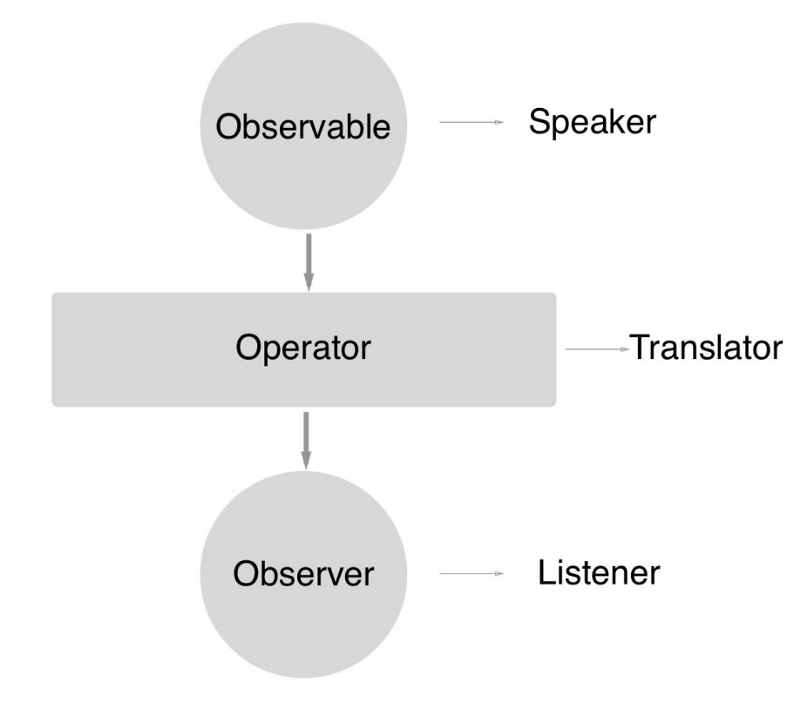
- The Observable. This is the data source, the object that will be emitting the sequences of data items that the entities who are interested in the data they provide, will be subscribing. It implements all the operators mentioned before to be able to transform the data streams. Observables can be divided in two types: hot observables which might emit data as soon as they are created and cold observables which wait until an Observer subscribes to it.
- The Observer. This is the type of object that will be subscribing and "observing" the data emitted by the Observable, they will "react" somehow using the data provided. Typically they implement the three main events
OnNext,OnError,OnComplete. - Operators. These is one of the key and most powerful features of RxJava. There are quite a lot operators of different types that will help us to manipulate and transform in many ways the data streams. We can group them in different categories such as Creating, Transforming, Filtering, Combining, Mathematical, etc.
- Schedulers. The Schedulers will help us to implement multithreading in our data streaming. Calling the Observable method
subscribeOnand indicating one of the Schedulers we can select in which thread the Observable will do it’s data stream job. On the other hand, calling the methodobserveOn, will set up the thread where we will be receiving and observing its data stream. In RxJava the most common Schedulers areNewThread(create a new thread for each job),io(for input/output operations),computation(event-loops, callbacks processing, etc),immediate(perform the job immediately in the current thread), etc. - Subject. A Subject is object that is able to act as Observable and Observer. It can emit data streams and at the same time can subscribe to another data stream source (Observable), so we can think in it like a sort of bridge between two data streams.
In simpler terms:
- An Observable performs some action, and publishes the result.
- An Observer waits and watches the Observable, and reacts whenever the Observable publishes results.
A class that implements the Observer interface must provide methods for each of the three changes above:
- An
onNext()method that the Observable calls whenever it wishes to publish a new value - An
onError()method that’s called exactly once, when an error occurs on the Observable. - An
onComplete()method that’s called exactly once, when the Observable completes execution.
So an Observable that has an Observer subscribed to it will call the Observer’s onNext() zero or more times, as long as it has values to publish, and terminates by either calling onError() or onComplete().
Retrolamba
Retrolambda is a brilliant tool for Android developers constrained to using Java 6. It cleverly compiles lambdas as traditional anonymous classes, and you can save yourself some terrible boilerplate work when using RxJava.
In your project level gradle file add the following line in the dependencies section :
classpath 'me.tatarka:gradle-retrolambda:3.7.0'
All good, now in the module level gradle file we have to apply this plugin, add the following line in the file (add this line at the top of the file).
apply plugin: 'me.tatarka.retrolambda'
Now we have to enable JAVA 8 support for our project, copy and paste the following lines in the android section of the module level gradle file.
compileOptions {
    sourceCompatibility JavaVersion.VERSION_1_8
    targetCompatibility JavaVersion.VERSION_1_8
}
So what is a lambda, it is nothing but a anonymous function. Let us take a look at some code for better understanding.
Suppose I have an interface called ClickMeInterface that has one function named click which takes a single string argument.
public interface ClickMeInterface {
    void click(String name);
}
Suppose there is a function that takes an object of ClickMeInterface as a parameter.
void giveMeClicks(ClickMeInterface clickInterface)
Usually you would implement an anonymous class and pass it as a parameter in the function, just like below.
void giveMeClicks(new ClickMeInterface() {
    @Override
    public void click(String name) {
        //do something here
    }
})
With lambda this can be simplified to something like this.
void giveMeClicks(name -> {
    // do something here
})
Simple and concise. So the format for this is straightforward, arguments of the function go before the -> symbol and the body goes after the symbol.
Suppose you are writing OnClickListener for a button. So something like this
btnSubmit.setOnClickListener(new View.OnClickListener() {
    @Override
    public void onClick(View v) {
        Toast.makeText(getApplicationContext(), "Click", Toast.LENGTH_SHORT).show();
    }
});
will get converted to this
btnSubmit.setOnClickListener(view -> {
    Toast.makeText(getApplicationContext(), "Click", Toast.LENGTH_SHORT).show();
});
Creating observables
Most of the time in a system, you'll have some way to get the observables from the API. Here's how you can create an observable from a value, just call the just method.
Observable.just(1, 2, 3); // 1, 2, 3 will be emitted
There’s also a way to create an Observable from a collection, then it'll emit all the items in the collection one by one and the observers will have a chance to process them.
Observable.fromIterable(iterable);
Observable.fromCallable(callable);
So, RxJava provides several convenience methods to create observables
Observable.just("Hello")allows to create an observable as wrapper around other data types.Observable.fromIterable()takes anjava.lang.Iterable<T>and emits their values in their order in the data structure.Observable.fromArray()takes an array and emits their values in their order in the data structure.Observable.fromCallable()allows to create an observable for ajava.util.concurrent.Callable<V>.Observable.fromFuture()allows to create an observable for ajava.util.concurrent.Future.Observable.interval()emitsLongobjects in a given interval.
Observable.intervals(5, TimeUnit.SECONDS);

Observable.fromCallable(() -> {
    return createFirstValue();
});

Observable.create((emitter) -> {
    try {
        emitter.onNext(createFirstValue());
        emitter.onNext(createSecondValue());
        emitter.onComplete();
    } catch (Throwable t) {
        emitter.onError(t);
    }
});

List<Integer> versionList = Arrays.asList(1,2,3);
Observable.fromIterable(versionList)
        .forEach(s -> Log.i("TAG", String.valueOf(s)));
Subscribing to observables
The next component to the Observable stream is the Observer (or Observers) subscribed to it.
To subscribe to a stream, simply call Observable<T>.subscribe() and pass in an Observer instance.
Observable<Integer> observable = Observable.just(1, 2, 3);

observable.subscribe(new Observer<Integer>() {
    @Override
    public void onComplete() {
       Log.d(TAG, "onComplete()");
    }
    @Override
    public void onError(Throwable e) {
       Log.d(TAG, "onError()");
    }
    @Override
    public void onNext(Integer integer) {
       Log.d(TAG, "onNext():" + integer);
    }
    @Override
    public void onSubscribe(@NonNull Disposable d) {
        Log.d(TAG, "onSubscribe():");
    }
});
Operators
Items emitted by an Observable can be transformed, modified, and filtered through operators before notifying the subscribed Observer object(s). Some of the most common operations found in functional programming (such as map, filter, reduce, etc.) can also be applied to an Observable stream. Let’s look at map as an example:
Observable.just(1, 2, 3, 4, 5).map(new Function<Integer, Integer>() {
    @Override
    public Integer apply(Integer integer) {
        return integer * 3;
    }
}).subscribe(new Observer<Integer>() {
    @Override
    public void onComplete() {
        Log.d(TAG, "onComplete()");
    }
    @Override
    public void onError(Throwable e) {
        Log.d(TAG, "onError()");
    }
    @Override
    public void onNext(Integer integer) {
        Log.d(TAG, "onNext():" + integer);
    }
    @Override
    public void onSubscribe(@NonNull Disposable d) {
        Log.d(TAG, "onSubscribe():");
    }
});
map vs flatMap
Observable<Observable<Integer>> obs1 = Observable.just(1,2,3)
    .map(i -> Observable.just(i * 10, i * 10 + 1))
// [[10,11], [20,11], [30,31]]

Observable<Observable<Integer>> obs1 = Observable.just(1,2,3)
    .flatMap(i -> Observable.just(i * 10, i * 10 + 1))
// [10,11, 20,11, 30,31]
You can read about other operatios in my article Introduction to RxJava.
Multithreading with RxJava
Controlling the thread within which operations occur in the Observable chain is done by specifying the Scheduler within which an operator should occur. Essentially, you can think of a Scheduler as a thread pool that, when specified, an operator will use and run on. By default, if no such Scheduler is provided, the Observable chain will operate on the same thread where Observable.subscribe() is called. Otherwise, a Scheduler can be specified via Observable.subscribeOn(Scheduler) and/or Observable.observeOn(Scheduler) wherein the scheduled operation will occur on a thread chosen by the Scheduler.
The key difference between the two methods is that Observable.subscribeOn(Scheduler) instructs the source Observable which Scheduler it should run on. The chain will continue to run on the thread from the Scheduler specified in Observable.subscribeOn(Scheduler) until a call to Observable.observeOn(Scheduler) is made with a different Scheduler. When such a call is made, all observers from there on out (i.e., subsequent operations down the chain) will receive notifications in a thread taken from the observeOn Scheduler.
Here are some of the types of Schedulers available in RxJava and RxAndroid to indicate the kind of thread to execute tasks on.
Schedulers.immediate()returns aSchedulerwhich executes the work instantly in the current thread. Be aware that this will block the current thread, so it should be used with caution.Schedulers.trampoline()schedules tasks in the current thread. These tasks are not executed immediately but instead are executed after the thread has finished its current tasks. This is different fromSchedulers.immediate()because instead of executing a task immediately, it waits for the current tasks to complete.Schedulers.newThread()fires up a new thread and returns aSchedulerto execute the task in the new thread for eachObserver. You should be careful using this because the new thread is not reused afterwards but instead is destroyed.Schedulers.computation()this gives us aSchedulerthat is intended for computationally intensive work such as image transformation, complex calculations, etc. This operation fully employs the CPU cores. ThisScheduleruses a fixed thread pool size which is dependent on the CPU cores for optimal usage. You should be careful not to create more threads than the available CPU cores because this can reduce performance.Schedulers.io()creates and returns aSchedulerdesignated for I/O-bound work such as performing asynchronous network calls or reading and writing to the database. These tasks are not CPU-intensive or else make use ofSchedulers.computation().Schedulers.single()creates and returns aSchedulerand executes several tasks sequentially in a single thread.Schedulers.from(Executor executor)this will create aSchedulerthat will execute a task or unit of work on the givenExecutor.AndroidSchedulers.mainThread()this will create aSchedulerthat executes the task on the Android application main thread. This scheduler type is provided by theRxAndroidlibrary.
Example 1: Hello world
You’ll need the RxJava and RxAndroid libraries for this tutorial, which you can add to your project by including the following lines in your app build.gradle file.
implementation 'io.reactivex.rxjava2:rxjava:2.1.13'
implementation 'io.reactivex.rxjava2:rxandroid:2.0.2'
The primary feature of the RxAndroid library is that it has Android Schedulers to help your concurrency goals for your Android app. It has a Scheduler for the Android main thread as well as an implementation that can target any message Looper. Striving to be a core library, RxAndroid does not have many other features. You will need specialized reactive binding libraries for Android to do more than that, which we will explore later.
Let's start simple. We will modify TextView in the middle of our MainActivity (which already contains "Hello World!") to change to "Goodbye World!" after 3 seconds. We will do all of this reactively using Observable.delay(). Because this will emit on a computational Scheduler, we will need to leverage observeOn() to safely switch the emission to the Android main thread.
First, in the res/layout/activity_main.xml file, modify the TextView block to have an ID property called tvTitle (as shown in the following code). This way, we can refer to it from our app code in a moment:
<?xml version="1.0" encoding="utf-8"?>
<android.support.constraint.ConstraintLayout
    xmlns:android="http://schemas.android.com/apk/res/android"
    xmlns:tools="http://schemas.android.com/tools"
    xmlns:app="http://schemas.android.com/apk/res-auto"
    android:layout_width="match_parent"
    android:layout_height="match_parent">
        <TextView
        android:id="@+id/tvTitle"
        android:layout_width="wrap_content"
        android:layout_height="wrap_content"
        android:text="Hello World!"
        app:layout_constraintBottom_toBottomOf="parent"
        app:layout_constraintLeft_toLeftOf="parent"
        app:layout_constraintRight_toRightOf="parent"
        app:layout_constraintTop_toTopOf="parent" />
</android.support.constraint.ConstraintLayout>
In the onCreate() method implementation, we are going to look up our TextView component and save it to a variable called tvTitle.
Then we are going to create an Observable emitting just the string "Goodbye World!" and delay it for 3 seconds. Because delay() will put it on a computational Scheduler, we will use observeOn() to put that emission back in AndroidSchedulers.mainThread() once it is received. Implement all this, as shown in the following code:
public class MainActivity extends AppCompatActivity {
    @Override
    protected void onCreate(Bundle savedInstanceState) {
        super.onCreate(savedInstanceState);
        setContentView(R.layout.activity_main);

        final TextView tvTitle = (TextView) findViewById(R.id.tvTitle);
        Observable.just("Goodbye World!")
            .delay(3, TimeUnit.SECONDS)
            .observeOn(AndroidSchedulers.mainThread())
            .subscribe(new Observer<String>() {
                   @Override
                   public void onComplete() {
                       Log.d(TAG, "onComplete()");
                   }
                   @Override
                   public void onError(Throwable e) {
                       Log.d(TAG, "onError()");
                   }
                   @Override
                   public void onNext(String str) {
                       tvTitle.setText(str);
                   }
                   @Override
                   public void onSubscribe(@NonNull Disposable d) {
                       Log.d(TAG, "onSubscribe():");
                   }
               }
            );
    }
}
If you do not use this observeOn() operation to switch back to the Android mainThread(), the app will likely crash. Therefore, it is important to make sure any emissions that modify the Android UI happen on the mainThread(). Thankfully, RxJava makes this easy to do compared to traditional concurrency tools.
Example 2: Asynchronous loading
Let’s make an Activity that asynchronously loads a list of users from jsonplaceholder. Asynchronously loading data is probably the most common use of RxJava in Android. First, let’s create our Observable:
Observable<List<String>> obsUsers = Observable.fromCallable(new Callable<List<String>>() {
    @Override
    public List<String> call() {
        return restClient.getUsers();
    }
});
As restClient you can use Retrofit or OkHttp.
In our last example, we used Observable.just() to create our Observable. It would then reasonably follow that we might want to say something like Observable.just(restClient.getUsers()) to create our Observable for this example. But we can’t do this because restClient.getUsers() is a blocking network call. If we use it with Observable.just(), restClient.getUsers() will be evaluated immediately and block the UI thread.
Enter the Observable.fromCallable() method. It gives us two important things:
- The code for creating the emitted value is not run until someone subscribes to the Observable.
- The creation code can be run on a different thread.
These two properties will come in handy in a moment. Now let’s subscribe to the Observable:
Subscription subUsers = obsUsers
.subscribeOn(Schedulers.io())
.observeOn(AndroidSchedulers.mainThread())
.subscribe(new Observer<List<String>>() {
    @Override
    public void onComplete() {}

    @Override
    public void onError(Throwable e) {}

    @Override
    public void onSubscribe(@NonNull Disposable d) {}

    @Override
    public void onNext(List<String> users){
        displayUsers(users);
    }
});
Let’s break this down one function at a time.
subscribeOn() essentially alters the Observable we created above. All of the code that this Observable would normally run, including the code the gets run upon subscription, will now run on a different thread. This means the logic in our Callable object, including the call to getUsers(), will run on a different thread. But which thread will it run on? In this case we specify that the code is run on the IO Scheduler (Schedulers.io()). For now we can just think of a Scheduler as a separate thread for doing work.
Since our Observable is set to run on the IO Scheduler, this means it’s going to interact with our Observer on the IO Scheduler as well. This is a problem because it means our onNext() method is going to get called on the IO Scheduler. But the code in our onNext() calls methods on some of our views. View methods can only be called on the UI thread.
There’s a simple way to address this. We can tell RxJava that we want to observe this Observable on the UI thread, i.e. we want our onNext() callback to be called on the UI thread. We do this by specifying a different scheduler in the observeOn() method, namely the scheduler returned by AndroidSchedules.mainThread() (a scheduler for the UI thread).
Last but not least we call subscribe(). This is critical since the code in our Callable won’t run until we actually subscribe something to it.
There’s one last thing. What’s this subUsers thing? When an Observer subscribes to an Observable a Subscription is created. A Subscription represents a connection between an Observer and an Observable. Sometimes we need to sever this connection. Let’s take a look at some code that should go in our Activity’s onDestroy() method in order to see why.
if (subUsers != null && !subUsers.isUnsubscribed()) {
    subUsers.unsubscribe();
}
If you’ve ever done threading work on Android before you know there’s typically one huge problem: what happens if your thread finishes (or never finishes) it’s execution after an Activity has been torn down. This can cause a whole host of problems including memory leaks and NullPointerExceptions.
Subscriptions allow us to deal with this problem. We can say "Hey, Observable, this Observer doesn’t want to receive your emissions anymore. Please disconnect from the Observer." We do this by calling unsubscribe(). After calling unsubscribe(), the Observer we created above will no longer receive emissions and in doing so avoid all the problems associated with a thread completing it’s work (or not completing at all) after the Activity has been destroyed.
Let’s do a quick recap:
Observable.fromCallable()allows us to delay the creation of a value to be emitted by an Observable. This is handy when the value you want to emit from your Observable needs to be created off of the UI thread.subscribeOn()allows us to run our value creation code on a specific thread, namely a thread that is not the UI thread.observeOn()allows us to then observe the emitted values of an Observable on an appropriate thread, namely the main UI thread.- We should always
unsubscribe()our Observers in order to prevent nasty things from happening when we’re using Observables to load things asynchronously.
Let's enable lambda and include RxJava2 in your build.gradle file:
android {
    ...
    compileOptions {
        sourceCompatibility JavaVersion.VERSION_1_8
        targetCompatibility JavaVersion.VERSION_1_8
    }
}

dependencies {
    ...
    implementation 'io.reactivex.rxjava2:rxjava:2.1.13'
    implementation 'io.reactivex.rxjava2:rxandroid:2.0.2'
}
Following is a example of Disposable and Observable.
public class MainActivity extends AppCompatActivity  {
    Disposable disposableData;
    Observable<Pair<Boolean, Integer>> obsIsInternetAvailable = Observable.fromCallable(
         new Callable<Pair<Boolean, Integer>>() {
        @Override
        public Pair<Boolean, Integer> call() {
            Boolean isConnection = false;
            int connectTimeout = 5000; // in ms
            int readTimeout = 5000; // in ms
            String ip204 = "http://clients3.google.com/generate_204";

            long startTime = System.currentTimeMillis();

            try {
                URL url = new URL(ip204);
                HttpURLConnection conn = (HttpURLConnection) url.openConnection();
                conn.setConnectTimeout(connectTimeout);
                conn.setReadTimeout(readTimeout);
                conn.setRequestMethod("HEAD");
                InputStream in = conn.getInputStream();
                int status = conn.getResponseCode();
                in.close();
                conn.disconnect();
                if (status == HttpURLConnection.HTTP_NO_CONTENT) {
                    isConnection = true;
                }
            } catch (Exception e) {
                isConnection = false;
            }

            long endTime = System.currentTimeMillis();

            return new Pair(isConnection, endTime - startTime);
        }
    });

    @Override
    protected void onCreate(Bundle savedInstanceState) {
        super.onCreate(savedInstanceState);
        setContentView(R.layout.activity_main);

        disposableData = obsIsInternetAvailable.subscribeOn(Schedulers.io())
                .observeOn(AndroidSchedulers.mainThread())
                .subscribe(
                    result -> {
                        Log.d(TAG, "Items: " + result);
                    },
                    err -> err.printStackTrace()
                    );
    }

    @Override
    protected void onDestroy() {
        super.onDestroy();

        if (disposableData != null && !disposableData.isDisposed()) {
            disposableData.dispose();
        }
    }
}
Example 3: Replacing AsyncTask with Observables
Similar to how AsyncTask performs the task in the background and then calls onPostExecute() on the main thread on the UI, RxJava can accomplish this same function by defining which thread to perform the task with subscribeOn(), and then where to define the callback thread with observeOn().
public class MainActivity extends AppCompatActivity {
    Disposable disposableData;
    ProgressDialog dlg;

    @Override
    protected void onCreate(Bundle savedInstanceState) {
        super.onCreate(savedInstanceState);
        setContentView(R.layout.activity_main);

        dlg = new ProgressDialog(this);
        String input = "Android";

        disposableData = Observable.just(input)
                .map(this::doInBackground)
                .subscribeOn(Schedulers.io())
                .observeOn(AndroidSchedulers.mainThread())
                .doOnSubscribe(d -> onPreExecute())
                .subscribe(this::onPostExecute);
    }

    private void onPreExecute() {
        dlg.setMessage("Loading ...");
        dlg.setCancelable(false);
        dlg.show();
    }

    private int doInBackground(String data) {
        try {
            Thread.sleep(2000);
        } catch (InterruptedException e) {
            e.printStackTrace();
        }
        return data.length();
    }

    private void onPostExecute(int result) {
        dlg.dismiss();
        Log.d("TAG", String.valueOf(result));
    }

    @Override
    protected void onDestroy() {
        super.onDestroy();

        if (disposableData != null && !disposableData.isDisposed()) {
            disposableData.dispose();
        }
    }
}
Example 4: EditText, text changes and asynchronous loading
One of the benefits of using RxJava is the ability to compose asynchronous events in a more straightforward way. Complex UI interactions in Android can also be greatly simplified too, especially when there are multiple UI events that can trigger. To describe the interaction pattern with standard Android code, you would usually need to use a combination of both listeners, Handlers and AsyncTask. With RxJava and RxBinding, this logic can be greatly simplified and you can describe the interaction patterns between multiple UI components.
First, add RxBinding. RxBinding is a set of libraries that allow you to react to user interface events via the RxJava paradigm.
compile 'com.jakewharton.rxbinding2:rxbinding:2.0.0'
If you rely on any widgets from the 'support-v4' library bindings, make sure to add the following.
compile 'com.jakewharton.rxbinding:rxbinding-support-v4:0.4.0'
You may also need to add any widgets that rely on the 'appcompat-v7' library.
compile 'com.jakewharton.rxbinding:rxbinding-appcompat-v7:0.4.0'
For example, consider what you would need to do to implement a search that will trigger an API call to fetch results related to the search term, so long as the term is at least two characters long and there has been at least a 300 milliseconds delay since the user last modified the search term in the view. With RxJava, this pattern can be described as follows:
RxTextView.textChanges(etSearch)
    .filter(text -> text.length() > 2)
    .debounce(300, TimeUnit.MILLISECONDS)
    .distinctUntilChanged()
    .switchMap(text -> loadData(text.toString()))
    .subscribeOn(Schedulers.io())
    .observeOn(AndroidSchedulers.mainThread())
    .subscribe(/* attach observer */);
Being an Observable, we can apply every transformation to the stream of data provided by just using the factory methods provided by the class RxView. So coming to our problem of preventing unnecessary calls when user is typing to enhance performance by reducing load on server. We can apply debounce() functions to do that. Behind the scene debounce() wait for the applied timeout to hold the stream of input data. If some other event occur during the debounce timeout then the new data replaced the earlier one. And thus no processing is done when user is interacting with the application during debounce time period.
The filter operation will only trigger if there is more than 2 characters, the debounce() operation will filter multiple events that occur within 300 ms, and the switchMap() operation will return an API response in the form of another Observable to make the API call. switchMap is preferred over flatMap because it ignores stale response.
Following is a layout.
<?xml version="1.0" encoding="utf-8"?>
<android.support.constraint.ConstraintLayout xmlns:android="http://schemas.android.com/apk/res/android"
    xmlns:app="http://schemas.android.com/apk/res-auto"
    xmlns:tools="http://schemas.android.com/tools"
    android:layout_width="match_parent"
    android:layout_height="match_parent"
    android:focusableInTouchMode="true">

    <Button
        android:id="@+id/button4"
        android:layout_width="wrap_content"
        android:layout_height="wrap_content"
        android:layout_marginLeft="8dp"
        android:layout_marginRight="8dp"
        android:layout_marginTop="8dp"
        android:onClick="doRequest"
        android:text="Button"
        app:layout_constraintLeft_toLeftOf="parent"
        app:layout_constraintRight_toRightOf="parent"
        app:layout_constraintTop_toTopOf="parent" />

    <EditText
        android:id="@+id/etTitle"
        android:layout_width="wrap_content"
        android:layout_height="wrap_content"
        android:ems="10"
        android:inputType="textPersonName"
        android:hint="Name"
        android:layout_marginRight="8dp"
        app:layout_constraintRight_toRightOf="parent"
        android:layout_marginLeft="8dp"
        app:layout_constraintLeft_toLeftOf="parent"
        android:layout_marginTop="30dp"
        app:layout_constraintTop_toBottomOf="@+id/button4"
        app:layout_constraintHorizontal_bias="0.502" />
</android.support.constraint.ConstraintLayout>
Following is a MainActivity.
public class MainActivity extends AppCompatActivity {
    private String TAG = MainActivity.class.getSimpleName();
    EditText etTitle;
    Disposable subsTitle;

    @Override
    protected void onCreate(Bundle savedInstanceState) {
        super.onCreate(savedInstanceState);
        setContentView(R.layout.activity_main);

        etTitle = (EditText) findViewById(R.id.etTitle);

        subsTitle = RxTextView.textChanges(etTitle)
                .filter(text -> text.length() > 2)
                .debounce(300, TimeUnit.MILLISECONDS)
                .distinctUntilChanged()
                .switchMap(text -> loadData(text.toString()))
                //.map(text -> loadData(text.toString()))
                .subscribeOn(Schedulers.io())
                .observeOn(AndroidSchedulers.mainThread())
                //.flatMap(in -> in)
                .subscribe(result -> {
                    Log.d(TAG, "textChanges: " + result);
                });
    }

    @Override
    protected void onDestroy() {
        super.onDestroy();
        Log.d(TAG, "onDestroy: ");

        if (subsTitle != null && !subsTitle.isDisposed()) {
            subsTitle.dispose();
        }
    }

    public void doRequest(View v) {
        loadData("Android")
                .subscribeOn(Schedulers.io())
                .observeOn(AndroidSchedulers.mainThread())
                .subscribe(result -> {
                    Log.d(TAG, "doRequest: " + result);
                });
    }

    private Observable<String> loadData(final String query) {
        return Observable.just(true)
                .delay(2, TimeUnit.SECONDS)
                .map(bool -> {
                    return String.format("PROCESSED: %s", query);
                });
    }

}
Example 5: Validate form
Lets start by setting up the input fields in our layout.
<?xml version="1.0" encoding="utf-8"?>
<android.support.constraint.ConstraintLayout xmlns:android="http://schemas.android.com/apk/res/android"
    xmlns:app="http://schemas.android.com/apk/res-auto"
    xmlns:tools="http://schemas.android.com/tools"
    android:layout_width="match_parent"
    android:layout_height="match_parent"
    android:focusableInTouchMode="true">

    <EditText
        android:id="@+id/etUsername"
        android:layout_width="wrap_content"
        android:layout_height="wrap_content"
        android:ems="10"
        android:inputType="textPersonName"
        android:hint="Username"
        android:layout_marginRight="8dp"
        app:layout_constraintRight_toRightOf="parent"
        android:layout_marginLeft="8dp"
        app:layout_constraintLeft_toLeftOf="parent"
        app:layout_constraintHorizontal_bias="0.497"
        app:layout_constraintTop_toTopOf="parent"
        android:layout_marginTop="8dp" />

    <EditText
        android:id="@+id/etPassword"
        android:layout_width="wrap_content"
        android:layout_height="wrap_content"
        android:ems="10"
        android:hint="Password"
        android:layout_marginLeft="8dp"
        app:layout_constraintLeft_toLeftOf="parent"
        android:layout_marginRight="8dp"
        app:layout_constraintRight_toRightOf="parent"
        android:layout_marginTop="8dp"
        app:layout_constraintTop_toBottomOf="@+id/etUsername" />

    <EditText
        android:id="@+id/etPasswordConfirm"
        android:layout_width="wrap_content"
        android:layout_height="wrap_content"
        android:ems="10"
        android:inputType="textPersonName"
        android:hint="Confirm password"
        android:layout_marginLeft="8dp"
        app:layout_constraintLeft_toLeftOf="parent"
        android:layout_marginRight="8dp"
        app:layout_constraintRight_toRightOf="parent"
        android:layout_marginTop="8dp"
        app:layout_constraintTop_toBottomOf="@+id/etPassword" />

    <Button
        android:id="@+id/btnSubmit"
        android:layout_width="wrap_content"
        android:layout_height="wrap_content"
        android:layout_marginLeft="8dp"
        android:layout_marginRight="8dp"
        android:text="Submit"
        android:enabled="false"
        android:onClick="doSubmit"
        app:layout_constraintLeft_toLeftOf="parent"
        app:layout_constraintRight_toRightOf="parent"
        app:layout_constraintHorizontal_bias="0.469"
        android:layout_marginTop="8dp"
        app:layout_constraintTop_toBottomOf="@+id/etPasswordConfirm" />

</android.support.constraint.ConstraintLayout>
Now let’s setup an observable on our EditTexts. RxBinding has a built in method for doing this, RxTextView.textChanges(). It takes a EditText and returns an Observable emmitting a CharSequence on each character change.
public class MainActivity extends AppCompatActivity {
    EditText etUsername, etPassword, etPasswordConfirm;
    Button btnSubmit;

    @Override
    protected void onCreate(Bundle savedInstanceState) {
        super.onCreate(savedInstanceState);
        setContentView(R.layout.activity_main);

        etUsername = (EditText) findViewById(R.id.etUsername);
        etPassword = (EditText) findViewById(R.id.etPassword);
        etPasswordConfirm = (EditText) findViewById(R.id.etPasswordConfirm);
        btnSubmit = (Button) findViewById(R.id.btnSubmit);

        Observable<Boolean> usernameObservable = RxTextView.textChanges(etUsername)
                .map(username -> !username.toString().isEmpty());

        Observable<CharSequence> passwordObservable = RxTextView.textChanges(etPassword);

        Observable<CharSequence> confirmPasswordObservable = RxTextView.textChanges(etPasswordConfirm)
                .skip(1);

        Observable<Boolean> passwordMatcherObservable = Observable.combineLatest(passwordObservable, confirmPasswordObservable,
                (password, confirmPassword) -> password.toString().equals(confirmPassword.toString()));

        Observable.combineLatest(passwordMatcherObservable, usernameObservable,
                (passwordMatch, isUsernameValid) -> passwordMatch && isUsernameValid)
                .distinctUntilChanged()
                .subscribe(valid -> btnSubmit.setEnabled(valid));
    }

    public void doSubmit(View v) {
        Toast.makeText(this, "Submit", Toast.LENGTH_SHORT).show();
    }
}
We added the distinctUntilChanged() operator to the chain. It constrains the final value to be emitted only if it is different from the previously emitted value.
RxJava has a combineLatest operator which combines these observables and manipulate them in a way that lets us know when both fields are validated so we can enable a submit button.
Example 6: How to combine two Observables
public class MainActivity extends AppCompatActivity {
    TextView tv;
    String TAG = "DBG";
    Disposable disposable;

    public Observable<Boolean> obsIsA(String a) {
        return Observable.fromCallable(() -> {
            Thread.sleep(2000);
            if (a.equals("a")) return true;
            return false;
        });
    }

    public Observable<Boolean> obsIsB(String b) {
        return Observable.fromCallable(() -> {
            Thread.sleep(3000);
            if (b.equals("b")) return true;
            return false;
        });
    }

    @Override
    protected void onCreate(Bundle savedInstanceState) {
        super.onCreate(savedInstanceState);
        setContentView(R.layout.activity_main);

        tv = findViewById(R.id.tv);

        disposable = Observable.zip(obsIsB("b"), obsIsA("c"), (b, a) -> {
                Log.d(TAG, "Observable: " + b);
                Log.d(TAG, "Observable: " + a);
                return a && b;
            }).subscribeOn(Schedulers.io())
            .observeOn(AndroidSchedulers.mainThread())
            .subscribe((aBoolean) -> {
                if (aBoolean) tv.setText("TRUE");
                else tv.setText("FALSE");
            });
    }

    @Override
    public void onStop() {
        super.onStop();
        if (disposable != null) disposable.dispose();
    }
}
RxLifecycle
RxLifecycle allows you to bind subscription lifecycles to the lifecycle of the Android components. It will automatically destroy the subscriptions and avoid memory leaks when the Android component is destroyed.
myObservable.compose(
    RxLifecycleAndroid.bindActivity(lifecycle)).subscribe();
Just compose your observable and call one static method from the library, it doesn’t get much easier. There’s also a more verbose API to manually specify when to cancel the subscription, but for most cases you’re good with the default one.
RxBindings
RxBindings add Rx support to Android UI components. Instead of doing something like this:
Button btnSubmit = (Button) findViewById(R.id.btnSubmit);
btnSubmit.setOnClickListener(new View.OnClickListener() {
    @Override
    public void onClick(View v) { // handle click }
});
Using RxBinding, you can accomplish the same thing but with RxJava:
Button btnSubmit = (Button) findViewById(R.id.btnSubmit);
Subscription sub = RxView.clicks(btnSubmit)
    .subscribe(new Action1Void() {
        @Override
        public void call(Void aVoid) { // handle click }
    });

// of course you should unsubscribe when appropriate
In the following example, I’m specifying that this button should react to an OnClick event only if there’s been at least a 500 millisecond gap since the previous click event:
RxView.clicks(btnSubmit)
    .debounce(500, TimeUnit.MILLISECONDS)
    .subscribe(aVoid -> {
        Toast.makeText(MainActivity.this, "Click", Toast.LENGTH_SHORT).show();
    });
Next, use the RxTextView.textChanges() method to react to a text change event by updating the TextView with the contents of our EditText.
RxTextView.textChanges(etName)
    .subscribe(charSequence -> {
        tvName.setText(charSequence);
    });
This may not appear like a big deal but it has a few major benefits:
- Easily avoid memory leaks. Since it’s easy to unsubscribe/dispose at the correct time with Rx it helps that all of your UI callbacks have that useful feature. You don’t have to worry about accidentally holding onto a reference of a UI component and thus leak an Activity Context.
- You can use the extensive arsenal of Rx operators to manipulate UI data and events.
- Consistent pattern for handling UI events, since everything becomes an Rx chain they can all be treated in a much more consistent way making it easier to mentally process.
- Write more modular code. Sometimes when we write UI handling events we have to trigger more than one action that are distinct. Violating the single responsibility principle. With Rx we can multiple subscribers to say a button click and they are responsible for two totally different things helping keep logic separated.
RxAndroid
Another thing you should be careful of when developing Android apps is on which thread do you process the data. You cannot do any long running computations on the UI thread, as it’ll render the UI unresponsive. So you want your Observers to operate on background threads. To make it seamless, use RxAndoid library, with which you can easily control on which threads you subscribe to observables.
Observable.just("Hello world!")
    .subscribeOn(Schedulers.newThread())
    .observeOn(AndroidSchedulers.mainThread())
    .subscribe(/* an Observer */);
In the snippet above we’re observing the events on the main Android looper thread, and the subscription actions will be executed on the new background thread. The library offers more customizations, but for the most part, the defaults will work nicely.
Flavors of Observable
You can create different types of observables.
| Type | Description |
|---|---|
| Flowable<T> | Emits 0 or n items and terminates with an success or an error event. Supports backpressure, which allows to control how fast a source emits items. |
| Observable<T> | Emits 0 or n items and terminates with an success or an error event. |
| Single<T> | Emits either a single item or an error event. The reactive version of a method call. |
| Maybe<T> | Succeeds with an item, or no item, or errors. The reactive version of an Optional. |
| Completable | Either completes with an success or with an error event. It never emits items. The reactive version of a Runnable. |
Flowable. Flowable function in much the same way as Observable, but with one major difference: Flowable only send as many items as the observer requests. If you have an Observable that’s emitting more items than its assigned observer can consume, then you may want to consider switching to a Flowable instead.
You can then Flowable using exactly the same techniques used to create Observable. For example, each of the following code snippets will create a Flowable that’s capable of emitting data:
Flowable<String> names = Flowable.fromArray(
    new String[] {"Jennifer", "Courteney", "Lisa", "Matthew", "David"}
);
flowable.subscribe()
or
Flowable<Integer> ints = Flowable.range(0, 20);
ints.subscribe()
Once you've created your Flowable, you can specify how you want to control the flow of data by using BackpressureStrategy and setting it to one of the following values:
BUFFER. Buffers theonNext()values in memory until the downstream can consume it, for exampleBackpressureStrategy.BUFFER. Note that this can still lead to anOufOfMemoryError.DROP. If the Observer can’t keep up, then drop the most recentonNext()value.LATEST. Keeps only the latestonNext()value, dropping all previous values that the Observer hasn’t consumed.ERROR. Signals aMissingBackpressureExceptionas soon as the downstream can’t keep up.MISSING.OnNext()events are written without any buffering or dropping.
The major disadvantage to the backpressure-aware Flowable, is that they do incur more of an overhead than an Observable, so in the interests of creating a high-performing app you should stick with Observables until backpressure becomes a problem. As a general rule, it’s usually safe to stick with Observables when you’re dealing with less than 1,000 emissions, or infrequent events.
At this point, you may be wondering: why would I ever use Observable when I can just use Flowable and not have to worry about backpressure? The answer is that a Flowable incurs more of an overhead than a regular Observable, so in the interests of creating a high-performing app, you should stick with Observable unless you suspect that your application is struggling with backpressure.
Single. Another variation if Observable is Single class. Single are useful when you just need to emit one value. In these scenarios, creating an Observable can feel like overkill, but a Single is designed to simply emit a single value and then complete, either by calling:
onSuccess(). TheSingleemits its sole value.onError(). If theSingleis unable to emit its item, then it’ll pass this method the resultingThrowable. ASinglewill call one of these methods only, and then immediately terminate.
Let’s look at an example of a Single in action:
Single.just("Hello World")
    .subscribe(new SingleObserver<String>() {
        @Override
        public void onSubscribe(Disposable d) {
            Log.e(TAG, "onSubscribe");
        }

        @Override
        public void onSuccess(String value) {
            Log.e(TAG, " onSuccess : " + value);
        }

        @Override
        public void onError(Throwable e) {
            Log.e(TAG, "onError: ");
        }
    }
);
Disposable
Processing an Observable’s emissions requires resources, so long-running or infinite Observables are a potential source of memory leaks. Memory leaks always have a negative impact on performance, but they’re a particular problem for devices where memory is restricted to begin with, such as Android smartphones and tablets.
Finite Observables that call onComplete() will typically dispose of themselves, but if you’re working with an Observable that has the potential to run for a significant period of time or even infinitely, you’ll need to explicitly disconnect this Observer from its Observable, which will free up resources ready to be garbage collected.
In RxJava 1.0, the rx.Subscription interface was responsible for unsubscribing an Observer. However, the Reactive-Streams specification uses the word "Subscription" for another purpose, so to avoid a naming conflict RxJava 1.0’s rx.Subscription has essentially become io.reactivex.Disposable in RxJava 2.0. You can now break the connection between an Observable and its assigned Observer, by calling .dispose().
Disposable d = Flowable.just(1)
    .subscribeWith(new DisposableSubscriber<Integer>() {

    @Override
    public void onNext(Integer integer) {
        Log.e(TAG, "onNext");
    }

    public void onError(Throwable t) {
        Log.e(TAG, "onError");
    }

    public void onComplete() {
        Log.e(TAG, "Completed");
    }
});

d.dispose();
Useful links
Quote
Categories
- Android
- AngularJS
- Databases
- Development
- Django
- iOS
- Java
- JavaScript
- LaTex
- Linux
- Meteor JS
- Python
- Science
Archive ↓
- September 2024
- December 2023
- November 2023
- October 2023
- March 2022
- February 2022
- January 2022
- July 2021
- June 2021
- May 2021
- April 2021
- August 2020
- July 2020
- May 2020
- April 2020
- March 2020
- February 2020
- January 2020
- December 2019
- November 2019
- October 2019
- September 2019
- August 2019
- July 2019
- February 2019
- January 2019
- December 2018
- November 2018
- August 2018
- July 2018
- June 2018
- May 2018
- April 2018
- March 2018
- February 2018
- January 2018
- December 2017
- November 2017
- October 2017
- September 2017
- August 2017
- July 2017
- June 2017
- May 2017
- April 2017
- March 2017
- February 2017
- January 2017
- December 2016
- November 2016
- October 2016
- September 2016
- August 2016
- July 2016
- June 2016
- May 2016
- April 2016
- March 2016
- February 2016
- January 2016
- December 2015
- November 2015
- October 2015
- September 2015
- August 2015
- July 2015
- June 2015
- February 2015
- January 2015
- December 2014
- November 2014
- October 2014
- September 2014
- August 2014
- July 2014
- June 2014
- May 2014
- April 2014
- March 2014
- February 2014
- January 2014
- December 2013
- November 2013
- October 2013