Hello world in ReactJS and Node.js as background JavaScript 21.11.2016

ReactJS is an open-source project and offers a novel approach towards building user interfaces in JavaScript. ReactJS is only concerned about rendering the UI and makes no assumptions about the rest of your technology stack.
React is an engine for building composable user interfaces using JavaScript and (optionally) XML. "Pro React" by Cássio de Sousa Antonio
React features
- JSX. JSX is JavaScript syntax extension. It isn't necessary to use JSX in React development, but it is recommended.
- Components. React is all about components. You need to think of everything as a component. This will help you to maintain the code when working on larger scale projects.
- Unidirectional data flow and Flux. React implements one way data flow which makes it easy to reason about your app. Flux is a pattern that helps keeping your data unidirectional.
ReactJS's benefits
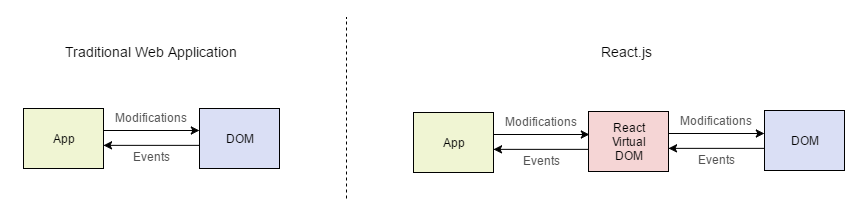
- Reactive rendering is simple. Manipulating the in-memory representation of the DOM is faster and more efficient than manipulating the real DOM. When the state of the application changes (as the result of an user interaction or data fetching, for example) ReactJS quickly compares the current state of the UI with the desired state and computes the minimal set of real DOM mutations to achieve it. This makes ReactJS very fast and efficient.
- Component-oriented development using pure JavaScript. In a ReactJS application, everything is made of components, which are self-contained, concern-specific building blocks. Developing applications using components allows a "divide and conquer" approach where no particular part needs to be especially complex. They are kept small and because they can be combined, it's easy to create complex and more feature-rich components made of smaller components. ReactJS components are written in plain JavaScript, instead of template languages or the HTML directives traditionally used for web application UIs.
- Flexible abstraction of the Document model. ReactJS has its own lightweight representation of the UI that abstracts away the underlying document model. The most notable advantage of this approach is that it enables the use of the same principles to render HTML for the Web as well as native iOS and Android views.
ReactJS component is simply a JavaScript class with a render() method that returns a description of the component's UI, like so:
class Hello extends React.Component {
    render() {
        return (
            <h1>Hello World</h1>
        )
    }
}
You probably noticed the HTML tags in the middle of the JavaScript code. As mentioned, ReactJS has a syntax extension to JavaScript called JSX that lets us write XML (and consequently HTML) inline with code.
So, let's create simple project. Create a new folder react-hello-world and initialize it with npm init. You will use npm for dependency management (downloading and installing all required libraries). Your project's dependencies include ReactJS, the Babel compiler for JSX transforming (loader and core), and webpack (including the webpack dev server).
mkdir react-hello-world
cd react-hello-world
npm init
Accept the default for all the prompts.
Create the source folder (common names are source or app). This folder will only contain JavaScript modules. Static assets that don’t go through the module bundler (which includes index.html, images and CSS files) will be saved in the root folder.
mkdir source
In the root folder of your project, create the index.html file. It should look like
<!DOCTYPE html>
<html>
<head>
<title>Hello world</title>
<style>.header {color: #FF0000}</style>
</head>
<body>
<div id="root"></div>
<script type="text/javascript" src="bundle.js"></script>
</body>
</html>
In React, components are the individual building blocks of how your data is viewed. You write components to handle how your data should look and to automatically render state changes. When you create a component, you define all of this by overriding React.Component's render function.
// subl3 source/app.js

import React from 'react';
import {render} from 'react-dom';

class Hello extends React.Component {
    render() {
        return (
            <h1 class="header">Hello World</h1>
        );
    }
}

render(<Hello />, document.getElementById('root'));
Webpack is a module bundler which takes modules with dependencies and generates static assets by bundling them together based on some configuration.
Let's start with installing webpack using npm
npm i webpack webpack-dev-server --save-dev
Webpack requires some configuration settings to carry out its work and the best practice is doing it via a config file called webpack.config.js.
#subl3 webpack.config.js

module.exports = {
    entry: [
        './source/app.js'
    ],
    output: {
        path: __dirname,
        filename: "bundle.js"
    },
    module: {
        loaders: [{
            test: /\.jsx?$/,
            exclude: /(node_modules|bower_components)/,
            loader: 'babel',
            query: {
                presets: ['react', 'es2015'],
                plugins: ['react-html-attrs', 'transform-class-properties', 'transform-decorators-legacy']
            }
        }]
    }
};
First, the entry key points to the main application module. The next key, output, tells webpack where to save the single JavaScript file containing all the modules packed in the correct order. Finally, in the the module loaders section, you pass all .js files through Babel, the JavaScript compiler that transforms all JSX into plain JavaScript code. The loaders property takes an array of loaders, here we are just using babel-loader. Each loader property should specify what are the file extension it has to process via the test property. Here we have configured it to process both .js and .jsx files using the regular expression.
By using JSX and ES6 we can be more productive while working with ReactJS. But the JSX syntax and ES6, are not supported in all the browsers. Hence, if we are using them in the ReactJS code, we need to use a tool which translates them to the format that has been supported by the browsers. It's where babel comes.
To setup, install the following npm packages
npm i babel-core babel-loader babel-preset-es2015 babel-preset-react --save-dev
The babel-preset-es2015 and babel-preset-react are plugins being used by the babel-loader to translate ES6 and JSX syntax respectively.
Let's install some other useful bebel plugins
npm i babel-plugin-react-html-attrs babel-plugin-transform-decorators-legacy babel-plugin-transform-class-properties --save-dev
These plugins allow write class tag instead of className.
Use npm to install react and react-dom
npm i react react-dom --save-dev
The project structure is done. The necessary command to start a local server (which will be needed to test in the browser) is node_modules/.bin/webpack-dev-server, but to avoid having to to type this long command in every time, you can edit the package.json you created and turn this long command into a task, as shown
{
  "name": "react-hello-world",
  "version": "1.0.0",
  "main": "index.js",
  "scripts": {
    "start": "node_modules/.bin/webpack-dev-server --progress"
  },
  "author": "proft",
  "devDependencies": {
    "babel-core": "^6.18.2",
    "babel-loader": "^6.2.8",
    "babel-preset-es2015": "^6.18.0",
    "babel-preset-react": "^6.16.0",
    "react": "^15.4.0",
    "react-dom": "^15.4.0",
    "webpack": "^1.13.3",
    "webpack-dev-server": "^1.16.2"
  },
  "babel": {
    "presets": ["react", "es2015"]
  }
}
Start server npm start and go to localhost:8080.
Quote
Categories
- Android
- AngularJS
- Databases
- Development
- Django
- iOS
- Java
- JavaScript
- LaTex
- Linux
- Meteor JS
- Python
- Science
Archive ↓
- September 2024
- December 2023
- November 2023
- October 2023
- March 2022
- February 2022
- January 2022
- July 2021
- June 2021
- May 2021
- April 2021
- August 2020
- July 2020
- May 2020
- April 2020
- March 2020
- February 2020
- January 2020
- December 2019
- November 2019
- October 2019
- September 2019
- August 2019
- July 2019
- February 2019
- January 2019
- December 2018
- November 2018
- August 2018
- July 2018
- June 2018
- May 2018
- April 2018
- March 2018
- February 2018
- January 2018
- December 2017
- November 2017
- October 2017
- September 2017
- August 2017
- July 2017
- June 2017
- May 2017
- April 2017
- March 2017
- February 2017
- January 2017
- December 2016
- November 2016
- October 2016
- September 2016
- August 2016
- July 2016
- June 2016
- May 2016
- April 2016
- March 2016
- February 2016
- January 2016
- December 2015
- November 2015
- October 2015
- September 2015
- August 2015
- July 2015
- June 2015
- February 2015
- January 2015
- December 2014
- November 2014
- October 2014
- September 2014
- August 2014
- July 2014
- June 2014
- May 2014
- April 2014
- March 2014
- February 2014
- January 2014
- December 2013
- November 2013
- October 2013