ReactJs with Flux architecture: creating ToDo application JavaScript 01.12.2016

Problem
React is a very powerful library for building interactive JavaScript applications. One of its strongest qualities is that it forces you to build your app in a uni-directional data flow. This is much different from other frameworks' two-way data binding. With React, every piece of your application is controlled from a single source, it's owner. The owner is defined by the Component that is passing props to its owned component.
React component interaction comes in two forms: flow of data from parent to child component and flow of data from child to parent. To achieve parent to child data flow we use props when create child component in the parent component. To achieve child to parent data flow in React, we use handlers passed in to the child component via the parent component as props. The parent knows that such activity could occur in it's child so it sets up a handler for when the activity occurs.
As more nested components are added, this logic can grow out of hand and can make it difficult to keep track of events passed through the component hierarchy.
Also, if you decide to add new features, this inconvenience will quickly become a maintenance nightmare:
Application > ComponentA > ComponentB > ComponentC > ComponentD > EndComponent
To prevent this from happening, we're going to solve two problems:
- We'll change how the new data enters our application.
- We'll change how the components get and set data.
We'll rethink of how data flows inside our application with the help of Flux. We'll be building our application with the help of ES6 and Babel.
Flux coming
Flux is the application architecture from Facebook that complements React. It's not a framework or a library, but rather a solution to a common problem; how to build scalable client-side applications.
With the Flux architecture, we can rethink how data flows inside our application. Flux makes sure that all our data flows only in a single direction. This helps us reason about how our application works, regardless of how small or large it is. With Flux, we can add a new functionality without exploding our application's complexity.
With Flux, we separate the concerns of our application into four logical entities:
- Actions
- Dispatcher
- Stores
- Views
Actions are objects that we create when our application's state changes. For example, when our application receives a new data, we create a new action. An action object has a type property that identifies what action it is and any other properties that our application needs to transition to a new state. Here is an example of an action object:
let action = {
    type: "CREATE_TODO",
    title: "Go shopping"
};
As you can see, this is an action of type CREATE_TODO, and it has the title property, which is a new Todo object that our application has received. You can guess in which case this action is created by looking at its type. For each new Todo that our application receives, it creates a CREATE_TODO action.
Where does this action go? What part of our application gets this action? Actions are dispatched to stores.
Stores are responsible for managing your application's data. They provide methods for accessing that data, but not for changing it. If you want to change data in stores, you have to create and dispatch an action.
The dispatcher is responsible for dispatching all the actions to all stores:
- All stores register with a dispatcher. They provide a callback function.
- All actions are dispatched by a dispatcher to all the stores that are registered with it.
This is how our data flow looks like:
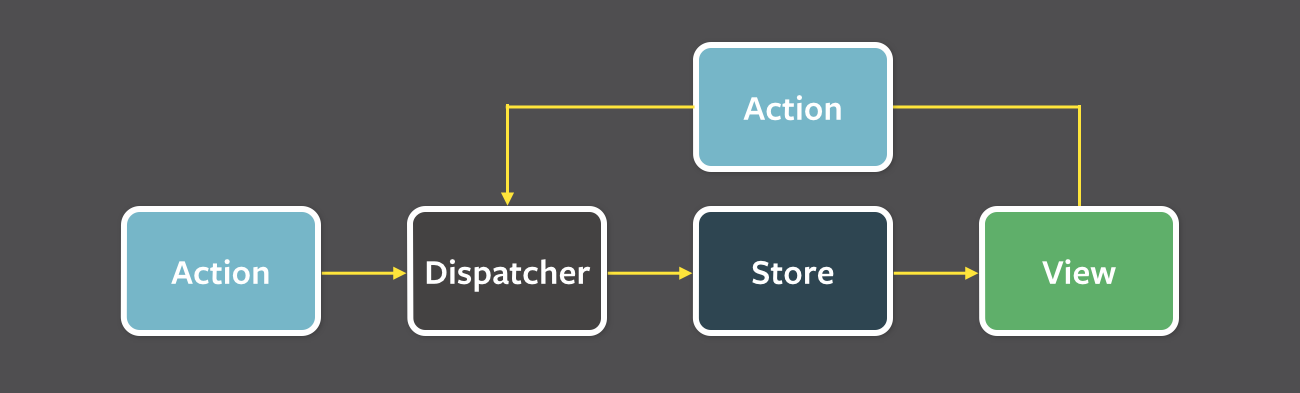
You can see that the dispatcher plays a role of a central element in our data flow. All actions are dispatched by it. Stores register with it. All the actions are dispatched synchronously. You can't dispatch an action in the middle of the previous action dispatch. No action can skip the dispatcher in the Flux architecture.
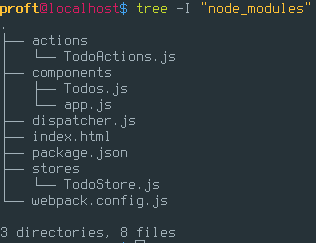
Project structure is following
I'm going to use settings and index.html from previous tutorial Hello world in ReactJS and Node.js as background.
Difference is entry key in webpack.config.js
...
entry: [
    './components/app.js'
],
...
Also I'm going to use react-icons and FontAwesome for flavor.
npm i react-icons --save-dev
Result
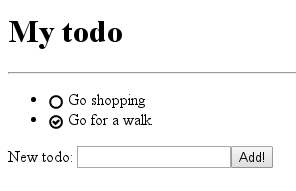
Following is components/app.js
import React from 'react';
import {render} from 'react-dom';
import {Todos} from './Todos'

class App extends React.Component {
    render() {
        return (
            <div>
                <h1>My todo</h1>
                <hr/>
                <Todos/>
            </div>
        );
    }
}
render(<App />, document.getElementById('root'));
Following is components/Todos.js
import React from 'react';
import TodoStore from '../stores/TodoStore';
import * as TodoActions from '../actions/TodoActions';
import {FaCheckCircleO,FaCircleO} from 'react-icons/lib/fa';

export class Todo extends React.Component {
    render() {
        return (
            <li>{this.props.completed ? <FaCheckCircleO/> : <FaCircleO/>} {this.props.title}</li>
        )
    }
}

export class Todos extends React.Component {
    constructor() {
        super();
        this.state = {
            title: "",
            todos: TodoStore.getAll()
        }
    }

    componentWillMount() {
        TodoStore.on("change", () => {
            this.setState({todos: TodoStore.getAll()});
        })
    }

    createTodo(e) {
        e.preventDefault();
        TodoActions.createTodo(this.state.title);
        this.setState({title: ""});
    }

    handleChange(event) {
        this.setState({title: event.target.value});
    }

    render() {
        const {todos} = this.state;
        const TodoComponents = todos.map((todo) => {
            return <Todo key={todo.id} {...todo}/>;
        });

        return (
            <div>
                <ul>{TodoComponents}</ul>
                New todo: <input type="text" ref="titleTask" value={this.state.title} onChange={this.handleChange.bind(this)} />
                <button onClick={this.createTodo.bind(this)}>Add!</button>
            </div>
        )
    }
}
Creating a dispatcher
Now let's implement Flux data flow. We'll start by creating a dispatcher first. Facebook offers us its implementation of a dispatcher that we can reuse. Let's take advantage of this.
Navigate to your project directory and run the following command
npm i flux --save-dev
The flux module comes with a Dispatcher function that we'll be reusing.
Next, create a new file called dispatcher.js in our project's root directory.
import {Dispatcher} from "flux";
export default new Dispatcher;
First, we import Dispatcher provided by Facebook, then create, and export a new instance of it. Now we can use this instance in our application.
Next, we need a convenient way of creating and dispatching actions. For each action, let's create a function that creates and dispatches that action. These functions will be our action creators.
Creating an action
Let's create a new folder called actions in our project's root directory. Then, create the TodoActions.js file in it:
import dispatcher from "../dispatcher";

export function createTodo(title) {
    dispatcher.dispatch({
        type: "CREATE_TODO",
        title
    });
}
Our action will need a dispatcher to dispatch the actions. Then, we create our first action createTodo().
The createTodo() function takes the title as an argument, and creates the action object with a type property set to CREATE_TODO.
Finally, the createTodo() action creator dispatches our action object by calling the dispatch() method on the dispatcher object. The dispatch() method dispatches the action object to all the stores registered with the dispatcher.
So far, we've created dispatcher and action createTodo. Next, let's create our first store.
Creating a store
As we learned earlier, stores manage data in your Flux architecture. They provide that data to the React components. We're going to create a simple store that manages a new Todo that our application receives from simple form.
Create new folder called stores in our project's root directory. Then, create the TodoStore.js file in it:
import {EventEmitter} from "events";
import dispatcher from "../dispatcher";

class TodoStore extends EventEmitter {
    constructor() {
        super();
        this.todos = [
            {
                id: 1,
                title: "Go shopping",
                completed: false
            }, {
                id: 2,
                title: "Go for a walk",
                completed: true
            }
        ]
    }

    createTodo(title) {
        const id = Date.now();
        this.todos.push({
            id,
            title,
            complete: false
        });

        this.emit("change");
    }

    getAll() {
        return this.todos;
    }

    handleAction(action) {
        switch (action.type){
            case "CREATE_TODO": {
                this.createTodo(action.title)
            }
        }
    }
}

const todoStore = new TodoStore;

dispatcher.register(todoStore.handleAction.bind(todoStore));

export default todoStore;
The TodoStore.js file implements a simple store. We can break it into four logical parts:
- Importing dependency modules.
- Creating the
TodoStoreobject with methods. - Creating an action handler
handleAction(action)and registering a store with adispatcher.
We import the EventEmitter class to be able to add and remove event listeners from our store. TodoStore manages a simple Todo object that we initially set to simple list.
Stores are in full control of managing their data. They only allow other parts in our application to read that data, but never write to it directly. Only actions should mutate data in the stores.
The third logical part of the TodoStore.js file is creating an action handler and registering the store with a dispatcher.
When the store changes its data, it needs to tell everyone who is interested in the data change. For this, it calls emit() function that emits the change event and triggers all the event listeners created by other parts in our application.
Outcome
Revisit the Flux architecture and take a look at a bigger picture of how it works:
- The stores register themselves with a dispatcher.
- Action create and dispatch actions to the stores via a dispatcher.
- Stores check for relevant actions and change their data accordingly.
- Stores notify everyone who is listening about the data change.
Quote
Categories
- Android
- AngularJS
- Databases
- Development
- Django
- iOS
- Java
- JavaScript
- LaTex
- Linux
- Meteor JS
- Python
- Science
Archive ↓
- September 2024
- December 2023
- November 2023
- October 2023
- March 2022
- February 2022
- January 2022
- July 2021
- June 2021
- May 2021
- April 2021
- August 2020
- July 2020
- May 2020
- April 2020
- March 2020
- February 2020
- January 2020
- December 2019
- November 2019
- October 2019
- September 2019
- August 2019
- July 2019
- February 2019
- January 2019
- December 2018
- November 2018
- August 2018
- July 2018
- June 2018
- May 2018
- April 2018
- March 2018
- February 2018
- January 2018
- December 2017
- November 2017
- October 2017
- September 2017
- August 2017
- July 2017
- June 2017
- May 2017
- April 2017
- March 2017
- February 2017
- January 2017
- December 2016
- November 2016
- October 2016
- September 2016
- August 2016
- July 2016
- June 2016
- May 2016
- April 2016
- March 2016
- February 2016
- January 2016
- December 2015
- November 2015
- October 2015
- September 2015
- August 2015
- July 2015
- June 2015
- February 2015
- January 2015
- December 2014
- November 2014
- October 2014
- September 2014
- August 2014
- July 2014
- June 2014
- May 2014
- April 2014
- March 2014
- February 2014
- January 2014
- December 2013
- November 2013
- October 2013