How-to create AlertDialog in Android Android 17.12.2013
Simple note about AlertDialog in Android. I'll show how to create simple dialog and custom dialog from layout using XML.
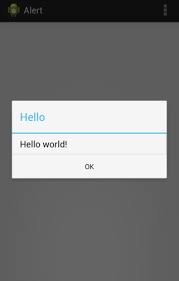
Simple AlertDialog
Main goal of AlertDialog is to provide information to user or to get some input from the user.
Let's start from describing main activity layout main_activity.xml.
<RelativeLayout xmlns:android="http://schemas.android.com/apk/res/android"
xmlns:tools="http://schemas.android.com/tools"
android:layout_width="match_parent"
android:layout_height="match_parent"
tools:context=".MainActivity" >

<Button android:id="@+id/btnShow"
android:layout_width="wrap_content"
android:layout_height="wrap_content"
android:layout_centerHorizontal="true"
android:layout_centerVertical="true"
android:text="Show AlertDialog" />
</RelativeLayout>
Describe our onCreate method and dialog creation method.
public class MainActivity extends Activity {
    Button btnShow;

    @Override
    protected void onCreate(Bundle savedInstanceState) {
        super.onCreate(savedInstanceState);
        setContentView(R.layout.activity_main);
        btnShow = (Button) findViewById(R.id.btnShow);
        btnShow.setOnClickListener(new View.OnClickListener() {
            @Override public void onClick(View v) {
                showDialog();
            }
        });
    }

    public void showDialog() {
        AlertDialog.Builder alert = new AlertDialog.Builder(this);
        alert.setTitle("Hello");
        alert.setMessage("Hello world!");
        alert.setPositiveButton("OK", new DialogInterface.OnClickListener() {
            @Override
            public void onClick(DialogInterface dialog, int which) {
                dialog.dismiss();
            }
        });
        AlertDialog dialog = alert.create();
        dialog.show();
    }
}
Here is example where our information dialog transforms to confirm dialog.
public void showDialog() {
    AlertDialog.Builder alert = new AlertDialog.Builder(this);
    alert.setTitle("The question");
    alert.setMessage("To be or not to be?");
    alert.setCancelable(false);
    alert.setNegativeButton("Not to be", new DialogInterface.OnClickListener() {
        @Override
        public void onClick(DialogInterface dialog, int which) {
            Toast.makeText(getBaseContext(), "Not to be", Toast.LENGTH_SHORT).show();
        }
    });
    alert.setPositiveButton("To be", new DialogInterface.OnClickListener() {
        @Override
        public void onClick(DialogInterface dialog, int which) {
            Toast.makeText(getBaseContext(), "To be", Toast.LENGTH_SHORT).show();
        }
    });
    AlertDialog dialog = alert.create();
    dialog.show();
}
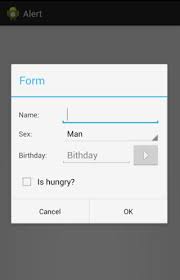
AlertDialog with custom layout
Finally, we are going to create dialog with custom layout. The activity_main.xml is the same. In layout we'll use EditText, Spinner, DataPicker, CheckBox.
Bellow is layout_custom_dialog.xml with custom layout for our dialog.
<?xml version="1.0" encoding="utf-8"?>
<LinearLayout xmlns:android="http://schemas.android.com/apk/res/android"
    android:layout_width="match_parent"
    android:layout_height="match_parent"
    android:orientation="vertical"
    android:padding="15dp" >

    <LinearLayout android:layout_width="match_parent"
        android:layout_height="wrap_content"
        android:gravity="center_vertical"
        android:orientation="horizontal" >

        <TextView
            android:layout_width="0dip"
            android:layout_weight=".3"
            android:layout_height="wrap_content"
            android:text="Name:"
            />

        <EditText android:id="@+id/etName"
            android:layout_width="0dip"
            android:layout_weight=".7"
            android:layout_height="wrap_content"
            android:singleLine="true"
            android:imeOptions="actionDone" />
    </LinearLayout>

    <LinearLayout android:layout_width="match_parent"
        android:layout_height="wrap_content"
        android:gravity="center_vertical"
        android:orientation="horizontal" >

        <TextView android:layout_width="0dip"
            android:layout_weight=".3"
            android:layout_height="wrap_content"
            android:text="Sex:"
            />

        <Spinner android:id="@+id/spSex"
            android:layout_width="0dip"
            android:layout_weight=".7"
            android:layout_height="wrap_content"
            android:entries="@array/sex_array"
            android:prompt="@string/sex_prompt" />
    </LinearLayout>

    <LinearLayout android:layout_width="match_parent"
        android:layout_height="wrap_content"
        android:gravity="center_vertical"
        android:orientation="horizontal" >

        <TextView
            android:layout_width="0dip"
            android:layout_weight=".3"
            android:layout_height="wrap_content"
            android:text="Birthday:"
            />

        <EditText android:id="@+id/etDate"
            android:layout_weight=".5"
            android:layout_width="0dip"
            android:layout_height="wrap_content"
            android:hint="Bithday"
            android:inputType="date" />

        <ImageButton android:id="@+id/btnDate"
            android:layout_width="0dip"
            android:layout_weight=".2"
            android:layout_height="wrap_content"
            android:onClick="selectDate"
            android:src="@drawable/abc_ic_go" />
    <LinearLayout>

    <CheckBox android:id="@+id/cbHungry"
        android:layout_width="wrap_content"
        android:layout_height="wrap_content"
        android:layout_marginTop="10dp"
        android:text="Is hungry?" />

</LinearLayout>
MainActivity stay the same, we gonna change only showDialog.
public void showDialog() {
    LayoutInflater inflater = getLayoutInflater();
    View alertLayout = inflater.inflate(R.layout.custom_layout_dialog, null);
    final EditText etName = (EditText) alertLayout.findViewById(R.id.etName);
    final EditText etDate = (EditText) alertLayout.findViewById(R.id.etDate);
    final CheckBox cbHungry = (CheckBox) alertLayout.findViewById(R.id.cbHungry);
    final Spinner spSex = (Spinner) alertLayout.findViewById(R.id.spSex);
    final ImageButton btnDate = (ImageButton) alertLayout.findViewById(R.id.btnDate);

    class SelectDateFragment extends DialogFragment implements DatePickerDialog.OnDateSetListener {
        @Override
        public Dialog onCreateDialog(Bundle savedInstanceState) {
            final Calendar calendar = Calendar.getInstance();
            int yy = calendar.get(Calendar.YEAR);
            int mm = calendar.get(Calendar.MONTH);
            int dd = calendar.get(Calendar.DAY_OF_MONTH);
            return new DatePickerDialog(getActivity(), this, yy, mm, dd);
        }

        public void onDateSet(DatePicker view, int yy, int mm, int dd) {
            etDate.setText((mm + 1) + "/" + dd + "/" + yy);
        }
    }

    btnDate.setOnClickListener(new View.OnClickListener() {
        @Override
        public void onClick(View v) {
            DialogFragment newFragment = new SelectDateFragment();
            newFragment.show(getSupportFragmentManager(), "DatePicker");
        }
    });

    AlertDialog.Builder alert = new AlertDialog.Builder(this);
    alert.setTitle("Form");
    alert.setView(alertLayout);
    alert.setCancelable(false);
    alert.setNegativeButton("Cancel", new DialogInterface.OnClickListener() {
        @Override
        public void onClick(DialogInterface dialog, int which) {
            Toast.makeText(getBaseContext(), "Cancel clicked", Toast.LENGTH_SHORT).show();
        }
    });

    alert.setPositiveButton("OK", new DialogInterface.OnClickListener() {
        @Override
        public void onClick(DialogInterface dialog, int which) {
            String user = etName.getText().toString();
            String bday = etDate.getText().toString();
            String sex = String.valueOf(spSex.getSelectedItem());
            String hungry = (cbHungry.isChecked()) ? "Yes" : "No";
            Toast.makeText(getBaseContext(), "Name: " + user + "\nBirthday: " + bday + "\nSex: " + sex + "\nHungry: " + hungry, Toast.LENGTH_SHORT).show();
        }
    });
    AlertDialog dialog = alert.create();
    dialog.show();
}
To add an icon to the dialog, use the setIcon() method. Here is an example
.setIcon(R.mipmap.ic_launcher)
Full code you can see at github.
AlertDialog with list
Also we can pass list to AlertDialog and do something on click
public class MainActivity extends AppCompatActivity {
    String[] movies = {"The Shawshank Redemption", "The Godfather", "The Dark Knight"};
    ...
    public void showDialog() {
        AlertDialog.Builder alert = new AlertDialog.Builder(this);
        alert.setTitle("IMDb Top 250");

        alert.setItems(movies, new DialogInterface.OnClickListener() {
            public void onClick(DialogInterface dialog, int item) {
                Toast.makeText(getBaseContext(), movies[item], Toast.LENGTH_SHORT).show();
            }
        });

        AlertDialog dialog = alert.create();
        dialog.show();
    }
}
Custom AlertDialog title and Message
AlertDialog.Builder builder = new AlertDialog.Builder(this);
// creates textview for centre title
TextView myMsg = new TextView(this);
myMsg.setText("Succesfully send!");
myMsg.setGravity(Gravity.CENTER_HORIZONTAL);
myMsg.setTextSize(20);
myMsg.setTextColor(Color.WHITE);

// set custom title
builder.setCustomTitle(myMsg);
builder.setMessage("Check your email and verify your username and password...");
builder.setPositiveButton("OK", null);
AlertDialog dialog = builder.show();

// create custom message
TextView messageText = (TextView)dialog.findViewById(android.R.id.message);
messageText.setGravity(Gravity.CENTER);
AlertDialog setItems example in Kotlin
// Method to show an alert dialog with single choice list items
private fun showDialog(){
    val array = arrayOf("RED","GREEN","YELLOW","BLACK","MAGENTA","PINK")
    val builder = AlertDialog.Builder(this)
    builder.setTitle("Choose a color.")

    builder.setItems(array,{_, which ->
        val selected = array[which]

        try {
            toast("$selected color selected.")
        }catch (e:IllegalArgumentException){
            toast("$selected Color not supported.")
        }
    })

    val dialog = builder.create()
    dialog.show()
}

// Extension function to show toast message
fun Context.toast(message: String) {
    Toast.makeText(this, message, Toast.LENGTH_SHORT).show()
}
AlertDialog setSingleChoiceItems example in Kotlin
// Method to show an alert dialog with single choice list items
private fun showDialog(){
    lateinit var dialog:AlertDialog
    val array = arrayOf("RED","GREEN","YELLOW","BLACK","MAGENTA","PINK")
    val builder = AlertDialog.Builder(this)
    builder.setTitle("Choose a color.")

    builder.setSingleChoiceItems(array,-1,{_,which->
        val color = array[which]
        try {
            toast("$color color selected.")
        } catch (e:IllegalArgumentException){
            toast("$color color not supported.")
        }

        dialog.dismiss()
    })

    dialog = builder.create()
    dialog.show()
}
AlertDialog multiple choice example in Kotlin
private fun showDialog(){
    lateinit var dialog:AlertDialog
    val arrayColors = arrayOf("RED","GREEN","YELLOW","BLACK","MAGENTA","PINK")
    val arrayChecked = booleanArrayOf(true,false,true,false,false,false)
    val builder = AlertDialog.Builder(this)
    builder.setTitle("Choose favorite colors.")

    builder.setMultiChoiceItems(arrayColors, arrayChecked, {dialog,which,isChecked->
        // Update the clicked item checked status
        arrayChecked[which] = isChecked

        // Get the clicked item
        val color = arrayColors[which]

        // Display the clicked item text
        toast("$color clicked.")
    })


    builder.setPositiveButton("OK") { _, _ ->
        text_view.text = "Your preferred colors..... \n"
        for (i in 0 until arrayColors.size) {
            val checked = arrayChecked[i]
            if (checked) {
                text_view.text = "${text_view.text}  ${arrayColors[i]} \n"
            }
        }
    }

    dialog = builder.create()
    dialog.show()
}
Useful links
Quote
Categories
- Android
- AngularJS
- Databases
- Development
- Django
- iOS
- Java
- JavaScript
- LaTex
- Linux
- Meteor JS
- Python
- Science
Archive ↓
- September 2024
- December 2023
- November 2023
- October 2023
- March 2022
- February 2022
- January 2022
- July 2021
- June 2021
- May 2021
- April 2021
- August 2020
- July 2020
- May 2020
- April 2020
- March 2020
- February 2020
- January 2020
- December 2019
- November 2019
- October 2019
- September 2019
- August 2019
- July 2019
- February 2019
- January 2019
- December 2018
- November 2018
- August 2018
- July 2018
- June 2018
- May 2018
- April 2018
- March 2018
- February 2018
- January 2018
- December 2017
- November 2017
- October 2017
- September 2017
- August 2017
- July 2017
- June 2017
- May 2017
- April 2017
- March 2017
- February 2017
- January 2017
- December 2016
- November 2016
- October 2016
- September 2016
- August 2016
- July 2016
- June 2016
- May 2016
- April 2016
- March 2016
- February 2016
- January 2016
- December 2015
- November 2015
- October 2015
- September 2015
- August 2015
- July 2015
- June 2015
- February 2015
- January 2015
- December 2014
- November 2014
- October 2014
- September 2014
- August 2014
- July 2014
- June 2014
- May 2014
- April 2014
- March 2014
- February 2014
- January 2014
- December 2013
- November 2013
- October 2013