Introduction to Android Architecture Components Android 26.03.2018
During Google I/O 2017, Google launched a preview of Architecture Components to help Android developer Architect their App a better with more power over lifecycle management and data persistence.
Using Android Architecture components, the developer follows important principles of a good software: separation of concerns and driving UI from a persistent model.
It helps us developers address two pain points:
- Manage our UI components lifecycle
- Persist data over configuration changes
In this tutorial, we'll explore the standardized architecture proposed by the Android team at Google I/O and look at the main elements of the new Architecture Components: Lifecycle, ViewModel, LifeData, and Room.
The new Android Architecture Guide defines some key principles that a good Android application should conform to and also proposes a secure path for the developer to create a good app. However, the guide explicitly states that the route presented isn't obligatory, and ultimately the decision is personal; it's the developer who should decide which type of architecture to adopt.
Android Architecture components are a collection of libraries that help you design robust, testable, and maintainable apps with more power over lifecycle management and data persistence.
According to the guide, a good Android application should provide a solid separation of concerns and drive the UI from a model. Any code that does not handle a UI or operating system interaction should not be in an Activity or Fragment, because keeping them as clean as possible will allow you to avoid many lifecycle-related problems. After all, the system can destroy Activities or Fragments at any time. Also, the data should be handled by models that are isolated from the UI, and consequently from lifecycle issues.
A typical Android app is constructed out of multiple app components, including activities, fragments, services, content providers and broadcast receivers. Android app needs to be much more flexible as the user weaves their way through the different apps on their device, constantly switching flows and tasks. This app-hopping behavior is common, so your app must handle these flows correctly.
The new architecture has following components that make it easy. They are also designed to fit together as building blocks.
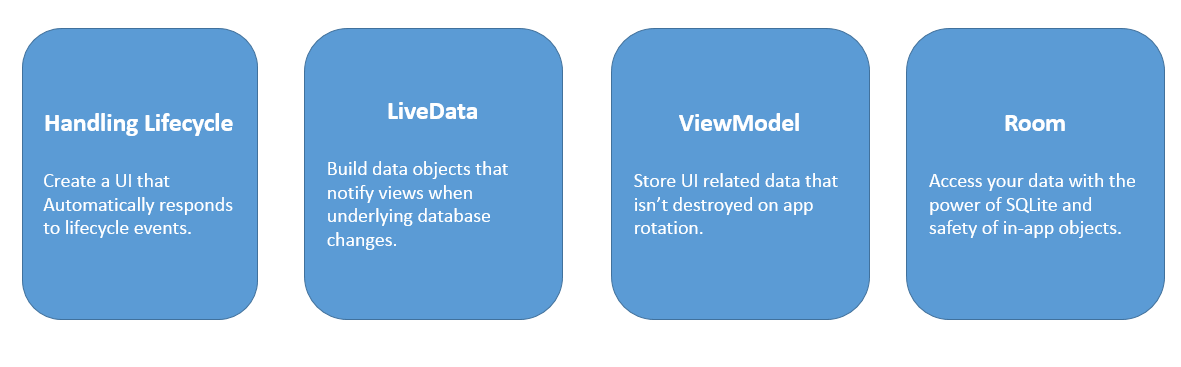
There are four components, each with a specific role: Room, ViewModel, LiveData, and Lifecycle. All of those parts have their own responsibilities, and they work together to create a solid architecture. Let's take a look at a simplified diagram of the proposed architecture to understand it better.
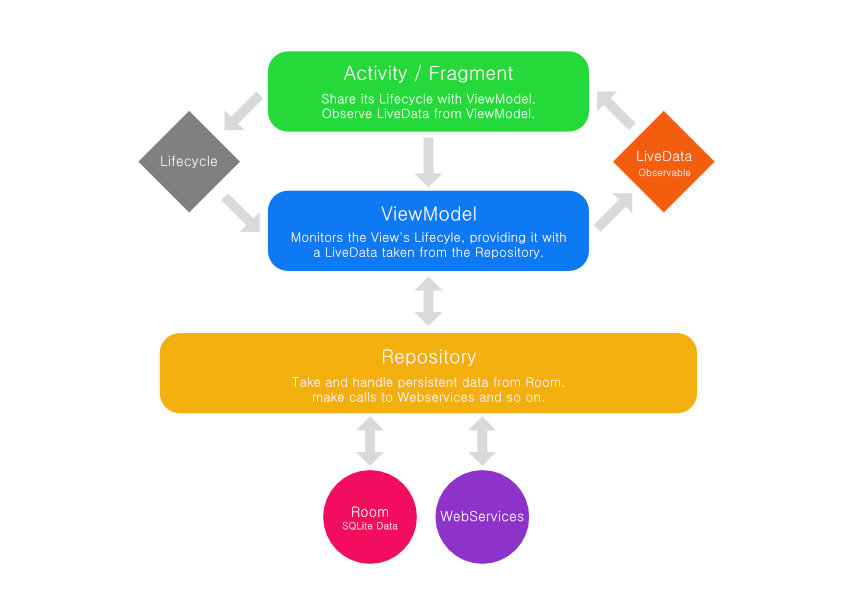
As you can see, we have three main elements, each one with its responsibility.
- The
ActivityandFragmentrepresent theViewlayer, which doesn't deal with business logic and complex operations. It only configures the view, handles the user interaction, and most importantly, observes and exhibitsLiveDataelements taken from theViewModel. - The
ViewModelautomatically observes theLifecyclestate of the view, maintaining consistency during configuration changes and other Android lifecycle events. It is also demanded by the view to fetch data from theRepository, which is provided as observableLiveData. It is important to understand that theViewModelnever references theViewdirectly and that the updates on the data are always done by theLiveDataentity. - The
Repositoryisn't a special Android component. It is a simple class, without any particular implementation, which is responsible for fetching data from all available sources, from a database to web services. It handles all this data, generally transforming them to observableLiveDataand making them available to theViewModel. - The
Roomdatabase is an SQLite mapping library that facilitates the process of dealing with a database. It automatically writes a ton of boilerplate, checks errors at compile time, and best of all, it can directly return queries with observableLiveData.
I'm sure you've noticed that we've talked a lot about observables. The Observer Pattern is one of the bases of the LiveData element and Lifecycle aware components. This pattern allows an object to notify a list of observers about any changes on its state or data. So when an Activity observes a LiveData entity, it will receive updates when that data undergoes any kind of modification.
Repository
The Repository class functions as a clean API for handling all data operations. The Repository class functions as a mediator between different data source.You might be able to imagine an example where you’re getting both data from your network server and you’re also getting data from a local data cache the logic about whether to grab new data from the server or use the local cache data and when to do additional fetches all of that complexity would be inside of the Repository class and what this means is that when your UI code needs some data it doesn’t have to worry about all the complexity of life should Repository class get this from the network or should it get this with local data caches or whatever else you might have there. So it hides that complexity of where the data is actually coming from the rest of your app.

Lifecycle-Aware Components
Most of the Android app components have lifecycles attached to them, which are managed directly by the system itself. Until recently it was up to the developer to monitor the components' state and act accordingly, initializing and ending tasks at the appropriate time. However, it was really easy to get confused and make mistakes related to this type of operation. But the android.arch.lifecycle package changed all that.
Lifecycle is a library which helps to manage Activity or Fragment lifecycles avoiding memory and resource leaks.
As of Support Library 26.1.0, Activities and Fragments have a Lifecycle object attached to them that can be observed by LifecycleObserver classes, like a ViewModel or any object that implements this interface. That means that the observer will receive updates about the state changes of the object that it is observing, like when an Activity is paused or when it is starting. It can also check the current state of the observed object. So it's much easier now to handle operations that must consider the framework lifecycles.
For example, if an Activity features video content, then you can use this new lifecycle awareness to detect and pause the video automatically whenever the Activity loses focus, and restart it as soon as your application regains the foreground.

The Lifecycles library introduces the following components:
Lifecycle. An abstract class that has an Android Lifecycle attached to it. Objects can observe this state and act accordingly.LifecycleOwner. An interface that’s implemented by objects with aLifecycle. Fragments and Activities already implement the LifecycleOwner interface (in Support Library 26.1.0+), and are thereforeLifecycleOwnersby default. You can observe any class that extends aLifecycleOwnerusing aLifecycleObsever.LifecycleObserver.LifecycleObserverreceives updates aboutLifecycleOwnerevents. Prior to theLifecycleslibrary, you could only react to methods that were triggered by lifecycle events, likeonCreateandonDestroy, but now you can create methods that are triggered by changes in a LifecycleOwner’s state. You can make a method lifecycle-aware by adding the@OnLifecycleEventannotation.Observer. AnObserverreceives an update whenever their assignedLifecycleOwnerenters a new lifecycle state. AnObserverthat’s assigned to anActivitywill be notified when thisActivityenters a paused state, and again when it enters a resumed state. You add anObserverto a lifecycle, usinglifecycle.addObserver(this).
So, we have 3 classes: Lifecycle, LifecycleOwner and LifecycleObserver. Using them all together helps create lifecycle-aware components which monitor lifecycle event and query current lifecycle state.
The @OnLifecycleEvent annotation can react to the following lifecycle events: ON_CREATE, ON_DESTROY, ON_PAUSE, ON_RESUME, ON_START, ON_STOP , ON_ANY.
Starting from Support Library 26.1.0, if your Activity/Fragment extends from its classes, you get the lifecycle callbacks for free.
public class MainActivity extends AppCompatActivity {
    private String TAG = MainActivity.class.getSimpleName();

    @Override
    protected void onCreate(Bundle savedInstanceState) {
        super.onCreate(savedInstanceState);
        setContentView(R.layout.activity_main);

        getLifecycle().addObserver(new LifecycleObserver() {
            @OnLifecycleEvent(Lifecycle.Event.ON_START)
            void onStart() {
                Log.d(TAG, "onStart");
            }

            @OnLifecycleEvent(Lifecycle.Event.ON_DESTROY)
            void onDestroy() {
                Log.d(TAG, "onDestroy");
            }
        });
    }
}
LiveData
LiveData is a data holder class that keeps a value and allows this value to be observed. Unlike a regular observable, LiveData respects the lifecycle of app components, such that the Observer can specify a Lifecycle in which it should observe.
The LiveData component is a data holder that contains a value that can be observed. Given that the observer has provided a Lifecycle during the LiveData instantiation, LiveData will behave according to Lifecycle state. If the observer's Lifecycle state is STARTED or RESUMED, the observer is active; otherwise, it is inactive.
LiveData is a lifecycle-aware observable that holds data and provides updates.
LiveData knows when the data was changed and also if the observer is active and should receive an update. Another interesting characteristic of the LiveData is that it's capable of removing the observer if it's in a Lifecycle.State.DESTROYED state, avoiding memory leaks when observed by Activities and Fragments.
LiveData considers an Observer to be in an active state if the Observer’s Lifecycle is in STARTED or RESUMED state. If the Lifecycle is not in an active state (STARTED or RESUMED), the observer isn’t called even if the value changes. If the Lifecycle is destroyed, the observer is removed automatically. There might be multiple fragments and activities that are observing LiveData instance, and LiveData gracefully manages them such that it connects to the system service only if any of them is visible (that is, active).
However, unlike a regular Observable, LiveData is lifecycle-aware, so it only updates Observers that are in an "active" state (i.e STARTED or RESUMED). If the LifecycleOwner reaches a Lifecycle.State.DESTROYED state, then the LiveData will remove the Observer automatically. This lifecycle-awareness helps you avoid the crashes and errors that can occur if you try to update a stopped Activity or Fragment.
Whenever a component enters the STARTED state, it automatically receives the most recent value from the LiveData object it’s observing. If an Activity or Fragment is resumed, or recreated as part of a configuration change, then it’ll receive the latest data.
To use the LiveData component in your project, you’ll need to add the following to your module-level build.gradle file:
implementation "android.arch.lifecycle:livedata:1.1.0"
The LiveData class provides the following advantages:
- No memory leaks. Since the Observers are bound to their own Lifecycle objects, they are automatically cleaned when their Lifecycle is destroyed.
- No crashes due to stopped activities. If the Observer’s Lifecycle is inactive (like an activity in the back stack), they won’t receive change events.
- Always up to date data. If a Lifecycle starts again (like an activity going back to started state from the back stack) it receives the latest location data (if it didn’t already).
- Proper configuration change. If an activity or fragment is re-created due to a configuration change (like device rotation), it instantly receives the last available Location data.
- Sharing Resources. Now we can keep a single instance of class, connect to the system service just once, and properly support all observers in the app.
- *No more manual lifecycle handling. Fragment can observe the data when it wants to, does not worry about being stopped or start observing after being stopped. LiveData automatically manages all of this since the fragment provided its Lifecycle while observing.
A LiveData must implement onActive and onInactive methods.
class LocationLiveData(context: Context)
    : LiveData<Location>(), AnkoLogger, LocationListener {

    private val locationManager: LocationManager =
            context.getSystemService(Context.LOCATION_SERVICE) as LocationManager

    override fun onActive() {
        info("onActive")
        locationManager.requestLocationUpdates(LocationManager.GPS_PROVIDER, 0, 0f, this)
    }

    override fun onInactive() {
        info("onInactive")
        locationManager.removeUpdates(this)
    }
}
To observe a LiveData component, you must call observer(LifecycleOwner, Observer).
class MainActivity : LifecycleActivity(), AnkoLogger {
    fun observeLocation() {
        val location = LocationLiveData(this)
        location.observe(this,
                Observer { location ->
                    info("location: $location")
                })
    }
}
ViewModel
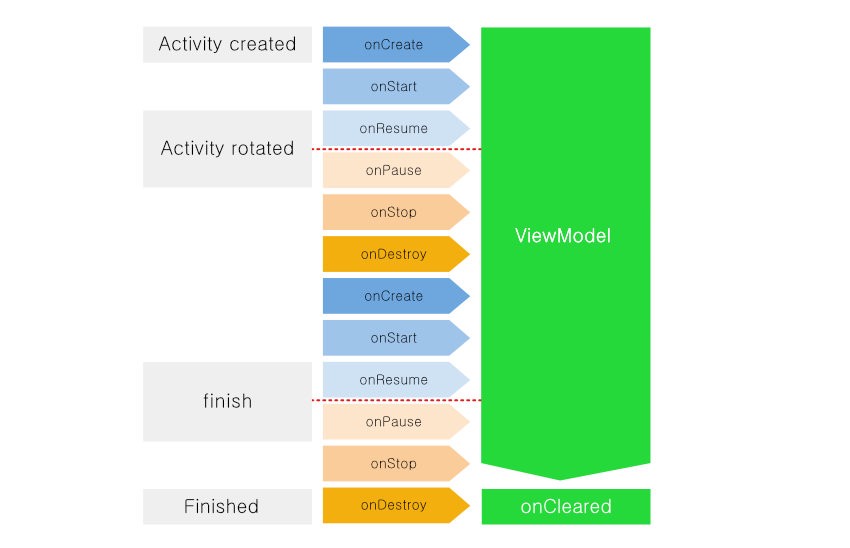
One of the most important classes of the new Architecture Components is the ViewModel, which is designed to hold data that is related to the UI, maintaining its integrity during configuration changes like screen rotations. The ViewModel is able to talk with the Repository, getting LiveData from it and making it available in turn to be observed by the view. ViewModel also won't need to make new calls to the Repository after configuration changes, which optimizes the code a lot.
The ViewModel class allows data to survive configuration changes such as screen rotations.
- The
ViewModelclass is designed to store and manage UI-related data so that the data survives configuration changes such as screen rotations. - It is easier and more efficient to separate out view data ownership from UI controller logic. Lifecycles provides a new class called
ViewModel, a helper class for the UI controller which is responsible for preparing the data for the UI. TheViewModelis automatically retained during configuration changes so that the data it holds is immediately available to the next activity or fragment instance. - If the activity is re-created, it receives the same
ViewModelinstance that was created by the previous activity. When the owner activity is finished, the Framework callsViewModel’sonCleared()method so that it can clean up resources.
Configuration changes
To use the ViewModel component in your project, you’ll need to add the following to your module-level build.gradle file:
implementation "android.arch.lifecycle:viewmodel:1.1.0"
The Architecture Components expect you to get a ViewModel instance by using ViewModelProvider. A ViewModelProvider instance is tied to either:
- A
FragmentActivity(or a subclass, likeAppCompatActivity), or - A
Fragment, from the fragments backport
If you do not have one of those, you cannot use ViewModelProvider.
If you do have one of those, call the static of() method on the ViewModelProviders class (note the plural) to get a ViewModelProvider (note the singular) tied to your FragmentActivity or Fragment. This ViewModelProvider is tied to the logical instance of this activity or fragment, regardless of configuration changes. So, if the activity is destroyed and recreated as part of a configuration change, you will get the same ViewModelProvider instance in the new activity as you had in the old one.
Then, to get a ViewModel, call get() on the ViewModelProvider, passing in the Java class object for your subclass of ViewModel (e.g., MyViewModel.class). If there already is an instance of this ViewModel tied to this ViewModelProvider, you get that instance. Otherwise, a fresh instance will be created for you, from the zero-argument constructor.
To create a ViewModel class, you extend the ViewModel class and then put all the data that is necessary for you UI into this class.
public class MovieViewModel extends AndroidViewModel {
    private LiveData<List<Movie>> items;

    private MovieDatabase db;

    public MovieViewModel(Application application) {
        super(application);
        db = MovieDatabase.getAppDatabase(this.getApplication());
        items = db.movieDao().getAllItems();
    }


    public LiveData<List<Movie>> getAllItems() {
        return items;
    }
}
To access from a view, you may call ViewProviders.of(Activity|Fragment).get(ViewModel::class). This factory method will return a new instance of the ViewModel or get the retained one, as appropriate.
public class MainActivity extends AppCompatActivity {
    private MovieViewModel movieViewModel;
    ...

    private void initData() {
        movieViewModel = ViewModelProviders.of(this).get(MovieViewModel.class);

        movieViewModel.getAllItems().observe(activity, new Observer<List<Movie>>() {
            @Override
            public void onChanged(@Nullable List<Movie> items) {
                if (items.isEmpty()) {
                    MovieDatabase db = MovieDatabase.getAppDatabase(activity.getApplication());
                    db.movieDao().insert(new Movie("Movie 1", 2001));
                    db.movieDao().insert(new Movie("Movie 2", 2002));
                    db.movieDao().insert(new Movie("Movie 3", 2003));
                }

                adapter.addAll(items);
            }
        });
    }
}
So, use the ViewModel for holding onto data in your process necessary to be able to rapidly repopulate the UI after a configuration change.
ViewModel vs onSaveInstanceState()
You may ask a question: what about onSaveInstanceState() usually used to store data upon configuration changes? The answer is simple: ViewModel does not replace onSaveInstanceState()!
ViewModel is stored only for activity that is recreated due to orientation changes. In addition to this, onSaveInstanceState() can survive through activity being killed by a system (e.g. when the app goes to the background and system decides to free some memory). What’s the purpose of having them both then? Of course, we could use only onSaveInstanceState(), unfortunately it has few disadvantages:
- in
onSaveInstanceState()we can store only the small amount of data - data needs to be
Parcelable, so it’s not so easy to set and restore values
So, when should we use onSaveInstanceState()?
- use
ViewModelto store actual data for UI (e.g. list of friends for the user) - use onSaveInstanceState() to store data necessary for getting data for activity after it’s killed by the system (e.g. id of the current user)
Thanks to this we’ll have both cases handled. If our activity will be killed by a system, we’ll be able to retrieve a data, because we have an id of the items, for example. And when we’ll get the list, we can store it in the ViewModel and use it even after orientation changes.
ViewModel survive configuration changes but they don’t survive the activity being finished. So they’re not like a permanent thing that stays around forever they’re linked to an activity lifecycle but they’re not linked to like the app lifecycle or anything like that. So when the activity finishes such as if the user presses a back button of they go to their overview screen it actually swipes your activity off the screen the ViewModel also be destroyed as well so a ViewModel does not replace a database or persisting your data.
Room
In new approach, lets tackle the database using Room which a new SQLite object mapping library. To setup a table in room you can define a Plain Old Java Object with annotation @Entity and @PrimaryKey.
For each POJO you need to define a Database Access Object (DAO). The annotated method represent the SQLite commands to interact with POJO data.
Room is a persistence library which provides an abstraction layer over SQLite to allow database access.
Android supported SQLite from the start; however, to make it work, it was always necessary to write a lot of boilerplate. Also, SQLite didn't save POJOs (plain-old Java objects), and didn't check queries at compile time. Along comes Room to solve these issues! It is an SQLite mapping library, capable of persisting Java POJOs, directly converting queries to objects, checking errors at compile time, and producing LiveData observables from query results. Room is an Object Relational Mapping library with some cool Android extras.
Until now, you could do most of what Room is capable of using other ORM Android libraries. However, none of them are officially supported and, most importantly, they can't produce LifeData results. The Room library fits perfectly as the persistent layer on the proposed Android Architecture.
To create a Room database, you'll need an @Entity to persist, which can be any Java POJO, a @Dao interface to make queries and input/output operations, and a @Database abstract class that must extend RoomDatabase.
Room creates a table for each class that you annotate with @Entity, where each field corresponds to a column in the table. Entity classes are usually small model classes that don’t contain any logic.
@Entity
public class Movie {
    @PrimaryKey(autoGenerate = true)
    public int id;
    private String name;
    private int year;

    public Movie(String name, int year) {
        this.name = name;
        this.year = year;
    }

    public String getName() {
        return name;
    }

    public void setName(String name) {
        this.name = name;
    }

    public int getYear() {
        return year;
    }

    public void setYear(int year) {
        this.year = year;
    }

    @Override
    public String toString() {
        return "Movie{" +
                "name='" + name + '\'' +
                ", year=" + year +
                '}';
    }
}
You access your data via Data Access Objects (DAO), which can either be an interface or an abstract class, but must contain all the methods you want to use in your database queries.
These annotated methods generate the corresponding SQL at compile time, reducing the amount of boilerplate you need to write and maintain.
There’s several convenience queries you can use with DAOs, including:
@Insert. When you annotate a DAO method with@Insert, Room generates an implementation inserting all entries into the database in a single transaction.@Update. Modifies entities in the database.@Delete. Removes entities from the database.@Query. This is the main annotation you’ll use in your DAO classes and it’s how you’ll perform all your read/write operations.
@Dao
interface MovieDao {
    @Query("SELECT * FROM Movie")
    LiveData<List<Movie>> getAllItems();

    @Query("SELECT * FROM Movie WHERE id = :id")
    Movie getItembyId(String id);

    @Insert(onConflict = REPLACE)
    void insert(Movie movie);

    @Delete
    void delete(Movie movie);
}
The @Database class provides the bridge between your application and SQLite.
Your @Database class must be an abstract class that extends RoomDatabase, which defines tables present in your database, provides Data Access Objects (DAO) classes, and includes a list of entities associated with the database.
@Database(entities = {Movie.class}, version = 1)
public abstract class MovieDatabase extends RoomDatabase {
    private static MovieDatabase db;
    public abstract MovieDao movieDao();

    public static MovieDatabase getAppDatabase(Context context) {
        if (db == null) {
            db = Room.databaseBuilder(context.getApplicationContext(), MovieDatabase.class, "movie-db")
                    // don't do this on a real app!
                    .allowMainThreadQueries()
                    .build();
        }
        return db;
    }

    public static void destroyInstance() {
        db = null;
    }
}
Example
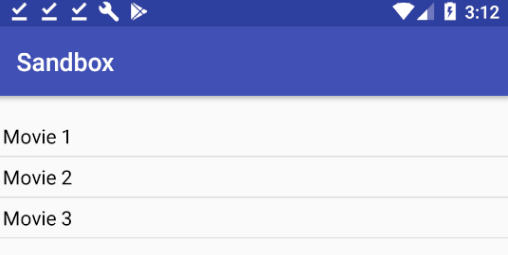
To make this easier, let us walk through a sample application that provides real-time features. The application will be simple. It will have a RecyclerView showing a list of movies.
Add the following dependencies for Architecture Components and Room in your app-level build.gradle file.
allprojects {
    repositories {
        google()
        jcenter()
    }
}
Add the following dependencies for Architecture Components and Room in your module-level build.gradle file.
dependencies {
    ...
    implementation "android.arch.lifecycle:common-java8:1.1.1"
    implementation "android.arch.lifecycle:extensions:1.1.1"
    implementation "android.arch.lifecycle:viewmodel:1.1.1"
    implementation "android.arch.lifecycle:livedata:1.1.1"
    annotationProcessor "android.arch.lifecycle:compiler:1.1.1"
    implementation "android.arch.persistence.room:runtime:1.0.0"
    annotationProcessor "android.arch.persistence.room:compiler:1.0.0"
}
We will call our model Movie.
@Entity
public class Movie {
    @PrimaryKey(autoGenerate = true)
    public int id;
    private String name;
    private int year;

    public Movie(String name, int year) {
        this.name = name;
        this.year = year;
    }

    public String getName() {
        return name;
    }

    public void setName(String name) {
        this.name = name;
    }

    public int getYear() {
        return year;
    }

    public void setYear(int year) {
        this.year = year;
    }

    @Override
    public String toString() {
        return "Movie{" +
                "name='" + name + '\'' +
                ", year=" + year +
                '}';
    }
}
Next up, we need to create a DAO - Data Access Object class. This class will be used to define all the queries we will perform on our database.
@Dao
interface MovieDao {
    @Query("SELECT * FROM Movie")
    LiveData<List<Movie>> getAllItems();

    @Query("SELECT * FROM Movie WHERE id = :id")
    Movie getItembyId(String id);

    @Insert(onConflict = REPLACE)
    void insert(Movie movie);

    @Delete
    void delete(Movie movie);
}
Now, all we need to do is create a RoomDatabase class. So create an abstract class called MovieDatabase.
@Database(entities = {Movie.class}, version = 1)
public abstract class MovieDatabase extends RoomDatabase {
    private static MovieDatabase db;
    public abstract MovieDao movieDao();

    public static MovieDatabase getAppDatabase(Context context) {
        if (db == null) {
            db = Room.databaseBuilder(context.getApplicationContext(), MovieDatabase.class, "movie-db")
                    // don't do this on a real app!
                    .allowMainThreadQueries()
                    .build();
        }
        return db;
    }

    public static void destroyInstance() {
        db = null;
    }
}
Earlier in the post, we mentioned ViewModel. ViewModels are entities that are free of the Activity/Fragment lifecycle. For example, they can retain their state/data even during an orientation change.
ViewModels do not contain code related to the UI. This helps in the decoupling of our app components.
In Room, the database instance should ideally be contained in a ViewModel rather than on the Activity/Fragment.
We create a ViewModel for our movie items.
public class MovieViewModel extends AndroidViewModel {
    private LiveData<List<Movie>> items;

    private MovieDatabase db;

    public MovieViewModel(Application application) {
        super(application);
        db = MovieDatabase.getAppDatabase(this.getApplication());
        items = db.movieDao().getAllItems();
    }


    public LiveData<List<Movie>> getAllItems() {
        return items;
    }
}
Now since we will be displaying a list of items, we need a RecyclerView. So first, let’s create an adapter for the same.
public class MovieAdapter extends RecyclerView.Adapter<MovieAdapter.RecyclerViewHolder>{
    Context context;
    LayoutInflater inflater;
    List<Movie> items;

    public class RecyclerViewHolder extends RecyclerView.ViewHolder {
        TextView tv;

        public RecyclerViewHolder(View itemView) {
            super(itemView);
            tv = (TextView) itemView.findViewById(R.id.tv);
        }
    }

    public MovieAdapter(Context context) {
        this.context = context;
        this.inflater = LayoutInflater.from(context);
        this.items = new ArrayList<>();
    }

    @Override
    public RecyclerViewHolder onCreateViewHolder(ViewGroup parent, int viewType) {
        View v = inflater.inflate(R.layout.recycle_item, parent, false);

        RecyclerViewHolder viewHolder = new RecyclerViewHolder(v);
        return viewHolder;
    }

    @Override
    public void onBindViewHolder(final RecyclerViewHolder holder, int position) {
        final Movie item = items.get(position);
        holder.tv.setText(item.getName());
        holder.tv.setTag(holder);

        holder.itemView.setOnClickListener(new View.OnClickListener() {
            @Override
            public void onClick(View view) {
                Toast.makeText(context, item.getName(), Toast.LENGTH_SHORT).show();
            }
        });

    }

    @Override
    public int getItemCount() {
        return items.size();
    }

    public void addAll(List<Movie> items) {
        this.items.clear();
        this.items = items;
        notifyDataSetChanged();
    }
}
Following is layout for adapter item
<?xml version="1.0" encoding="utf-8"?>
<RelativeLayout
    xmlns:android="http://schemas.android.com/apk/res/android"
    android:layout_width="match_parent"
    android:layout_height="wrap_content"
    android:padding="5dp">

    <TextView
        android:id="@+id/tv"
        android:layout_centerInParent="true"
        android:layout_width="match_parent"
        android:layout_height="wrap_content"
        android:text="Title"
        android:textColor="#000000"
        android:textSize="16sp" />

</RelativeLayout>
Now create an Activity that extends AppCompatActivity to display a list of all the movie items.
public class MainActivity extends AppCompatActivity {
    private AppCompatActivity activity = MainActivity.this;
    private RecyclerView rv;
    private MovieAdapter adapter;
    private MovieViewModel movieViewModel;
    private String TAG = MainActivity.class.getSimpleName();

    @Override
    protected void onCreate(Bundle savedInstanceState) {
        super.onCreate(savedInstanceState);
        setContentView(R.layout.activity_main);

        initRecyclerView();
        initData();
    }

    private void initData() {
        movieViewModel = ViewModelProviders.of(this).get(MovieViewModel.class);

        movieViewModel.getAllItems().observe(activity, new Observer<List<Movie>>() {
            @Override
            public void onChanged(@Nullable List<Movie> items) {
                if (items.isEmpty()) {
                    MovieDatabase db = MovieDatabase.getAppDatabase(activity.getApplication());
                    db.movieDao().insert(new Movie("Movie 1", 2001));
                    db.movieDao().insert(new Movie("Movie 2", 2002));
                    db.movieDao().insert(new Movie("Movie 3", 2003));
                }

                adapter.addAll(items);
            }
        });
    }

    private void initRecyclerView() {
        LinearLayoutManager lm = new LinearLayoutManager(this, LinearLayoutManager.VERTICAL, false);
        adapter = new MovieAdapter(this);

        rv = findViewById(R.id.rcView);
        rv.setAdapter(adapter);
        rv.setHasFixedSize(true);
        rv.setLayoutManager(lm);

        DividerItemDecoration dividerItemDecoration = new DividerItemDecoration(rv.getContext(), lm.getOrientation());
        rv.addItemDecoration(dividerItemDecoration);
    }
}
So go ahead and run your app. You should get an output similar to this.
Quote
Categories
- Android
- AngularJS
- Databases
- Development
- Django
- iOS
- Java
- JavaScript
- LaTex
- Linux
- Meteor JS
- Python
- Science
Archive ↓
- September 2024
- December 2023
- November 2023
- October 2023
- March 2022
- February 2022
- January 2022
- July 2021
- June 2021
- May 2021
- April 2021
- August 2020
- July 2020
- May 2020
- April 2020
- March 2020
- February 2020
- January 2020
- December 2019
- November 2019
- October 2019
- September 2019
- August 2019
- July 2019
- February 2019
- January 2019
- December 2018
- November 2018
- August 2018
- July 2018
- June 2018
- May 2018
- April 2018
- March 2018
- February 2018
- January 2018
- December 2017
- November 2017
- October 2017
- September 2017
- August 2017
- July 2017
- June 2017
- May 2017
- April 2017
- March 2017
- February 2017
- January 2017
- December 2016
- November 2016
- October 2016
- September 2016
- August 2016
- July 2016
- June 2016
- May 2016
- April 2016
- March 2016
- February 2016
- January 2016
- December 2015
- November 2015
- October 2015
- September 2015
- August 2015
- July 2015
- June 2015
- February 2015
- January 2015
- December 2014
- November 2014
- October 2014
- September 2014
- August 2014
- July 2014
- June 2014
- May 2014
- April 2014
- March 2014
- February 2014
- January 2014
- December 2013
- November 2013
- October 2013