Using SQLite database in Android application Android 17.10.2016

SQLite is an Open Source database. SQLite supports standard relational database features like SQL syntax, transactions and prepared statements. The database requires limited memory at runtime (approximately 250 KByte) which makes it a good candidate from being embedded into other runtimes.
According to the official Android documentation, here are the steps needed to start reading/writing to SQLite:
- Describe your schema in terms of contract classes.
- Define your create/drop table commands in strings.
- Extend
SQLiteOpenHelperto run create commands and manage upgrades/downgrades.
Once you’ve done this, you’ll be ready to read and write to your database.
SQLite supports the data types TEXT (similar to String in Java), INTEGER (similar to long in Java) and REAL (similar to double in Java). All other types must be converted into one of these fields before getting saved in the database. You can see all supported types here.
We can create our own tables to hold the data accordingly. This structure is referred to as a schema. Android has features available to handle changing database schemas, which mostly depend on using the SQLiteOpenHelper class.
SQLiteOpenHelper designed to make it easier to create and update databases and designed to get rid of two very common problems.
- When the application runs the first time – at this point, we do not yet have a database. So we will have to create the tables, indexes, starter data, and so on.
- When the application is upgraded to a newer schema – our database will still be on the old schema from the older edition of the app. We will have option to alter the database schema to match the needs of the rest of the app.
For that we’ll need to create a custom subclass of SQLiteOpenHelper implementing at least the following three methods.
constructortakes theContext(e.g., an Activity), the name of the database, an optional cursor factory, and an integer representing the version of the database schema you are using (typically starting from 1 and increment later).onCreate(SQLiteDatabase db)method called when there is no database and the app needs one. It passes us aSQLiteDatabaseobject, pointing to a newly-created database, that we can populate with tables and initial data.onUpgrade(SQLiteDatabase db, int oldVersion, int newVersion)method called when the schema version we need does not match the schema version of the database. It passes us aSQLiteDatabaseobject and the old and new version numbers. Hence we can figure out the best way to convert the database from the old schema to the new one.
My model class is
public class Movie {
    private long id;
    private String title;
    private float rating;

    public void Movie(int id, String title, float rating) {
        this.id = id;
        this.title = title;
        this.rating = rating;
    }

    public long getId() {
        return id;
    }

    public void setId(long id) {
        this.id = id;
    }

    public String getTitle() {
        return title;
    }

    public void setTitle(String title) {
        this.title = title;
    }

    public float getRating() {
        return rating;
    }

    public void setRating(float rating) {
        this.rating = rating;
    }
}
Define MovieDBHelper class to perform all database CRUD (Create, Read, Update and Delete) operations.
public class MovieDBHelper extends SQLiteOpenHelper {
    public static final String DATABASE_NAME = "movies.db";
    public static final String TABLE_NAME = "movies";
    public static final String ID = "ID";
    public static final String TITLE = "TITLE";
    public static final String RATING = "RATING";

    public MovieDBHelper(Context context) {
        super(context, DATABASE_NAME, null, 1);
    }

    @Override
    public void onCreate(SQLiteDatabase db) {
        String sql = String.format("CREATE TABLE %s (%s INTEGER PRIMARY KEY
            AUTOINCREMENT, %s TEXT, %s REAL)", TABLE_NAME, ID, TITLE, RATING);
        db.execSQL(sql);
    }

    @Override
    public void onUpgrade(SQLiteDatabase db, int oldVersion, int newVersion) {
        db.execSQL("DROP TABLE IF EXISTS " + TABLE_NAME);
        onCreate(db);
    }

    public long insert(Movie movie){
        SQLiteDatabase db = this.getWritableDatabase();

        ContentValues cv = new ContentValues();
        cv.put(TITLE, movie.getTitle());
        cv.put(RATING, movie.getRating());

        long result = db.insert(TABLE_NAME, null, cv);

        db.close();

        return result;
    }

    public long update(Movie movie) {
        SQLiteDatabase db = this.getWritableDatabase();

        ContentValues values = new ContentValues();
        values.put(TITLE, movie.getTitle());
        values.put(RATING, movie.getRating());

        long result = db.update(TABLE_NAME, values, ID + " = ?", new String[] { String.valueOf(movie.getId()) });

        db.close();
        return result;
    }

    public ArrayList<Movie> fetch(){
        SQLiteDatabase db = this.getReadableDatabase();
        ArrayList<Movie> movies = new ArrayList<Movie>();

        Cursor cursor = db.query(TABLE_NAME,
                new String[] {ID, TITLE, RATING}, null, null, null, null, null);

        while (cursor.moveToNext()) {
            Movie movie = new Movie();
            movie.setId(cursor.getInt(0));
            movie.setTitle(cursor.getString(1));
            movie.setRating(cursor.getFloat(2));
            movies.add(movie);
        }
        return movies;
    }

    public Movie fetchOne(long id) {
        SQLiteDatabase db = this.getReadableDatabase();
        Movie movie = null;

        Cursor cursor = db.query(TABLE_NAME, new String[] {ID, TITLE, RATING}, ID + "=?",
                new String[] { String.valueOf(id) }, null, null, null, null);

        if (cursor != null) {
            cursor.moveToFirst();

            movie = new Movie();
            movie.setId(cursor.getInt(0));
            movie.setTitle(cursor.getString(1));
            movie.setRating(cursor.getFloat(2));
        }

        return movie;
    }

    public void delete(Movie movie) {
        SQLiteDatabase db = this.getWritableDatabase();
        db.delete(TABLE_NAME, ID + " = ?", new String[] { String.valueOf(movie.getId()) });
        db.close();
    }

    public int getCount() {
        String countQuery = "SELECT  * FROM " + TABLE_NAME;
        SQLiteDatabase db = this.getReadableDatabase();
        Cursor cursor = db.rawQuery(countQuery, null);
        return cursor.getCount();
    }
}
You can check this database at any time by opening Android Device Monitor and select the package name of your app, next goto Data -> data -> and then select the folder database from the name of your app.
MovieDBHelper class uses ContentValues as a convenience class that allows key/value pairs to be declared consisting of table column identifiers and the values to be stored in each column. This class is of particular use when inserting or updating entries in a database table.
SQLiteDatabase class provides the primary interface between the application code and underlying SQLite databases including the ability to create, delete and perform SQL based operations on databases. Some key methods of this class are as follows:
insert()method inserts a new row into a database table.delete()method deletes rows from a database table.query()method performs a specified database query and returns matching results via aCursorobject.execSQL()method executes a single SQL statement that does not return result data.rawQuery()methods executes an SQL query statement and returns matching results in the form of aCursorobject.
Cursor class provided specifically to provide access to the results of a database query. For example, a SQL SELECT operation performed on a database will potentially return multiple matching rows from the database. A Cursor instance can be used to step through these results, which may then be accessed from within the application code using a variety of methods. Some key methods of this class are as follows:
close()method releases all resources used by the cursor and closes it.getCount()method returns the number of rows contained within the result set.moveToFirst()method moves to the first row within the result set.moveToLast()method moves to the last row in the result set.moveToNext()method moves to the next row in the result set.move()method moves by a specified offset from the current position in the result set.get<type>()method returns the value of the specified <type> contained at the specified column index of the row at the current cursor position (variations consist ofgetString(),getInt(),getShort(),getFloat()andgetDouble()).
My ArrayAdapter class is
public class MovieAdapter extends ArrayAdapter<Movie> {
    private Context context;
    List<Movie> movies;

    private class ViewHolder {
        TextView tvRating;
        TextView tvTitle;
    }

    public MovieAdapter(Context context, List<Movie> movies) {
        super(context, R.layout.list_item, movies);
        this.context = context;
        this.movies = movies;
    }

    @Override
    public Movie getItem(int position) {
        return movies.get(position);
    }

    @Override
    public long getItemId(int position) {
        return movies.get(position).getId();
    }

    @Override
    public int getCount() {
        return movies.size();
    }

    @Override
    public View getView(int position, View convertView, ViewGroup parent) {
        ViewHolder holder = null;
        if (convertView == null) {
            LayoutInflater inflater = (LayoutInflater) context.getSystemService(Activity.LAYOUT_INFLATER_SERVICE);
            convertView = inflater.inflate(R.layout.list_item, null);
            holder = new ViewHolder();

            holder.tvTitle = (TextView) convertView.findViewById(R.id.tvTitle);
            holder.tvRating = (TextView) convertView.findViewById(R.id.tvRating);
            convertView.setTag(holder);
        } else {
            holder = (ViewHolder) convertView.getTag();
        }

        Movie movie = (Movie) getItem(position);
        holder.tvTitle.setText(movie.getTitle());
        holder.tvRating.setText(String.valueOf(movie.getRating()));
        return convertView;
    }

    @Override
    public void add(Movie movie) {
        super.add(movie);
        //movies.add(movie);
        notifyDataSetChanged();
    }

    public void update(Movie movie) {
        int pos = movies.indexOf(movie);
        movies.set(pos, movie);
        notifyDataSetChanged();
    }

    @Override
    public void remove(Movie movie) {
        super.remove(movie);
        //movies.remove(movie);
        notifyDataSetChanged();
    }
}
My MainActivity class is
public class MainActivity extends AppCompatActivity {
    Button btnAdd, btnUpdate;
    ListView lvMovies;
    ArrayList<Movie> movies;
    MovieAdapter movieAdapter;
    MovieDBHelper db;
    Random rnd;

    @Override
    protected void onCreate(Bundle savedInstanceState) {
        super.onCreate(savedInstanceState);
        setContentView(R.layout.activity_test);

        btnAdd = (Button) findViewById(R.id.btnAdd);
        btnUpdate = (Button) findViewById(R.id.btnUpdate);
        lvMovies = (ListView) findViewById(R.id.lvMovies);

        rnd = new Random();

        db = new MovieDBHelper(this);
        movies = db.fetch();
        movieAdapter = new MovieAdapter(this, movies);
        lvMovies.setAdapter(movieAdapter);

        lvMovies.setOnItemClickListener(new AdapterView.OnItemClickListener() {
            @Override
            public void onItemClick(AdapterView parent, View v, int pos, long id) {
                Movie movie = (Movie) lvMovies.getItemAtPosition(pos);
                db.delete(movie);
                movieAdapter.remove(movie);
            }
        });
    }

    public void movieAdd(View v) {
        Movie movie = new Movie();

        NumberFormat formatter = new DecimalFormat("#0.00");

        movie.setTitle("Movie " + rnd.nextInt(100));
        movie.setRating(Float.parseFloat(formatter.format(rnd.nextFloat() * 10)));
        long movieID = db.insert(movie);
        movie.setId(movieID);
        movieAdapter.add(movie);
    }

    public void movieUpdate(View v) {
        int pos = rnd.nextInt(movieAdapter.getCount());
        Movie movie = movieAdapter.getItem(pos);
        movie.setTitle("Movie " + rnd.nextInt(100));
        db.update(movie);
        movieAdapter.update(movie);
    }

    private static int getRandomNumberInRange(int min, int max) {
        Random r = new Random();
        return r.nextInt((max - min) + 1) + min;
    }
}
My activity_main.xml layout is
<?xml version="1.0" encoding="utf-8"?>
<RelativeLayout xmlns:android="http://schemas.android.com/apk/res/android"
    xmlns:tools="http://schemas.android.com/tools"
    android:id="@+id/activity_main"
    android:layout_width="match_parent"
    android:layout_height="match_parent"
    android:paddingBottom="@dimen/activity_vertical_margin"
    android:paddingLeft="@dimen/activity_horizontal_margin"
    android:paddingRight="@dimen/activity_horizontal_margin"
    android:paddingTop="@dimen/activity_vertical_margin"
    tools:context="me.proft.sandbox.MainActivity">

    <LinearLayout
        android:id="@+id/llAction"
        android:layout_width="fill_parent"
        android:layout_height="wrap_content"
        android:layout_margin="5dp"
        android:orientation="horizontal"
        android:weightSum="2" >

        <Button
            android:id="@+id/btnAdd"
            android:layout_width="0dp"
            android:layout_height="wrap_content"
            android:layout_weight="1"
            android:text="Add"
            android:onClick="movieAdd" />

        <Button
            android:id="@+id/btnUpdate"
            android:layout_width="0dp"
            android:layout_height="wrap_content"
            android:layout_weight="1"
            android:text="Update"
            android:onClick="movieUpdate"/>
    </LinearLayout>

    <ListView
        android:id="@+id/lvMovies"
        android:layout_width="match_parent"
        android:layout_height="match_parent"
        android:layout_below="@+id/llAction"
        android:scrollbarStyle="outsideOverlay" />
</RelativeLayout>
My list_item.xml layout is
<?xml version="1.0" encoding="utf-8"?>
<LinearLayout xmlns:android="http://schemas.android.com/apk/res/android"
    android:orientation="vertical" android:layout_width="match_parent"
    android:layout_height="match_parent">

    <RelativeLayout
        android:layout_width="fill_parent"
        android:layout_height="wrap_content">

        <TextView
            android:id="@+id/tvRating"
            android:layout_width="wrap_content"
            android:layout_height="wrap_content"
            android:textAppearance="?android:attr/textAppearanceLarge"
            android:padding="6dp" />

        <TextView
            android:id="@+id/tvTitle"
            android:layout_width="wrap_content"
            android:layout_height="wrap_content"
            android:layout_toRightOf="@+id/tvRating"
            android:textAppearance="?android:attr/textAppearanceMedium"
            android:padding="6dp" />
    </RelativeLayout>
</LinearLayout>
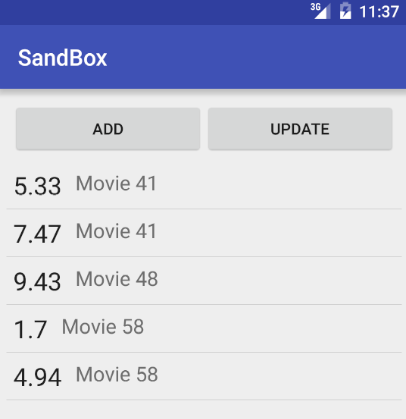
Result
To save us from dealing with raw SQL, ORMs came to the rescue. Some of the most famous Android ORMs are DBFlow, greenDAO, and OrmLite. In this tutorial we've used raw SQL queries to simplify the entrance.
Show SQLite tables from the Android command line shell (adb)
You can show a list of SQLite tables by starting the Android adb shell (command line tool), and then invoke the sqlite3 command.
First, start your android emulator. Next, start the android adb shell. Use the sqlite3 command to connect to your database.
sqlite3 /data/data/me.proft.sandbox/databases/movies.db
Some commands for sqlite
.tables- list all tabales.schema tablename- list how the table looks.help- list all of the available SQLite prompt commands
Also you can pull your database file onto you PC with following command
adb pull /data/data/me.proft.sandbox/databases/movies.db /path/on/pc
How to view and edit SQLite database from browser
For this task we'll use Android-Debug-Database. Android Debug Database is a powerful library for debugging databases and shared preferences in Android applications.
What can Android Debug Database do?
- See all the databases.
- See all the data in the shared preferences used in your application.
- Run any sql query on the given database to update and delete your data.
- Directly edit the database values.
- Directly edit shared preferences.
- Delete database rows and shared preferences.
- Search in your data.
- Sort data.
- Download database.
Add this to your app's build.gradle.
debugCompile 'com.amitshekhar.android:debug-db:1.0.0'
Use debugCompile so that it will only compile in your debug build and not in your release apk.
That's all, just start the application, you will see in the logcat an entry like follows :
- D/DebugDB: open http://XXX.XXX.X.XXX:8080 in your browser
- You can also always get the debug address url from your code by calling the method
DebugDB.getAddressLog();
To view data from Android Default Emulator run following commands from terminal
# list devices
adb devices

# forward port
adb -s emulator-5554 forward tcp:8080 tcp:8080

# open in browser
chromium http://localhost:8080
Quote
Categories
- Android
- AngularJS
- Databases
- Development
- Django
- iOS
- Java
- JavaScript
- LaTex
- Linux
- Meteor JS
- Python
- Science
Archive ↓
- September 2024
- December 2023
- November 2023
- October 2023
- March 2022
- February 2022
- January 2022
- July 2021
- June 2021
- May 2021
- April 2021
- August 2020
- July 2020
- May 2020
- April 2020
- March 2020
- February 2020
- January 2020
- December 2019
- November 2019
- October 2019
- September 2019
- August 2019
- July 2019
- February 2019
- January 2019
- December 2018
- November 2018
- August 2018
- July 2018
- June 2018
- May 2018
- April 2018
- March 2018
- February 2018
- January 2018
- December 2017
- November 2017
- October 2017
- September 2017
- August 2017
- July 2017
- June 2017
- May 2017
- April 2017
- March 2017
- February 2017
- January 2017
- December 2016
- November 2016
- October 2016
- September 2016
- August 2016
- July 2016
- June 2016
- May 2016
- April 2016
- March 2016
- February 2016
- January 2016
- December 2015
- November 2015
- October 2015
- September 2015
- August 2015
- July 2015
- June 2015
- February 2015
- January 2015
- December 2014
- November 2014
- October 2014
- September 2014
- August 2014
- July 2014
- June 2014
- May 2014
- April 2014
- March 2014
- February 2014
- January 2014
- December 2013
- November 2013
- October 2013