How to add a Navigation Drawer to an Android App Android 26.02.2018
In Android, Navigation Drawer is a panel that displays the app main navigation options on the left edge of the screen like sliding menu. The navigation drawer is hidden most of the time, but it is revealed when the user swipes a finger from the left edge of the screen or, while at the top level of the app, the user touches the app icon in the action bar.
Note that if you have many different destinations (more than six, say) in your app, it's recommended that you use a navigation drawer.
To begin using DrawerLayout and NavigationView in your project, you'll need to import the design support and also the Android support artifact. So add these to your module's build.gradle file to import them.
dependencies {
    implementation 'com.android.support:design:27.0.2'
    implementation 'com.android.support:support-v4:27.0.2'
}
Open activity_main.xml file from res/layout folder path and it will contain the code like as shown below.
<?xml version="1.0" encoding="utf-8"?>
<android.support.v4.widget.DrawerLayout xmlns:android="http://schemas.android.com/apk/res/android"
    xmlns:app="http://schemas.android.com/apk/res-auto"
    xmlns:tools="http://schemas.android.com/tools"
    android:id="@+id/drawer_layout"
    android:layout_width="match_parent"
    android:layout_height="match_parent"
    android:fitsSystemWindows="true"
    tools:openDrawer="start">

    <include
        layout="@layout/app_bar_main"
        android:layout_width="match_parent"
        android:layout_height="match_parent" />

    <android.support.design.widget.NavigationView
        android:id="@+id/nav_view"
        android:layout_width="wrap_content"
        android:layout_height="match_parent"
        android:layout_gravity="start"
        android:fitsSystemWindows="true"
        app:headerLayout="@layout/nav_header_main"
        app:menu="@menu/activity_main_drawer" />
</android.support.v4.widget.DrawerLayout>
Here DrawerLayout acts as a top-level container for window content that allows for interactive "drawer" views to be pulled out from one or both vertical edges of the window.
Here is my app_bar_main.xml resource file. This file simply has a CoordinatorLayout, an AppBarLayout, and a Toolbar widget.
<?xml version="1.0" encoding="utf-8"?>
<android.support.design.widget.CoordinatorLayout
    xmlns:android="http://schemas.android.com/apk/res/android"
    xmlns:app="http://schemas.android.com/apk/res-auto"
    xmlns:tools="http://schemas.android.com/tools"
    android:layout_width="match_parent"
    android:layout_height="match_parent"
    tools:context=".MainActivity">

    <android.support.design.widget.AppBarLayout
        android:layout_width="match_parent"
        android:layout_height="wrap_content"
        android:fitsSystemWindows="true">

        <android.support.v7.widget.Toolbar
            android:id="@+id/toolbar_main"
            android:layout_width="match_parent"
            android:layout_height="?attr/actionBarSize"
            android:background="?attr/colorPrimary"
            app:layout_scrollFlags="scroll|enterAlways" />

    </android.support.design.widget.AppBarLayout>
</android.support.design.widget.CoordinatorLayout>
Finally, we created a NavigationView widget. NavigationView represents a standard navigation menu for application. The menu contents can be populated by a menu resource file.
We also included an app:headerLayout attribute which points to @layout/nav_header_main. This will add a View as a header of the navigation menu.
Here is my nav_header_main.xml layout resource file:
<?xml version="1.0" encoding="utf-8"?>
<LinearLayout xmlns:android="http://schemas.android.com/apk/res/android"
    android:id="@+id/nav_header"
    android:layout_width="match_parent"
    android:layout_height="160dp"
    android:background="@color/colorAccent"
    android:clickable="true"
    android:focusable="true"
    android:foreground="?attr/selectableItemBackgroundBorderless"
    android:gravity="bottom"
    android:orientation="vertical"
    android:padding="16dp"
    android:theme="@style/ThemeOverlay.AppCompat.Dark">

    <ImageView
            android:id="@+id/nav_header_imageView"
            android:layout_width="64dp"
            android:layout_height="64dp"
            android:src="@mipmap/ic_launcher" />

    <TextView
            android:id="@+id/nav_header_textView"
            android:layout_width="match_parent"
            android:layout_height="wrap_content"
            android:paddingTop="16dp"
            android:text="Title"
            android:textAppearance="@style/TextAppearance.AppCompat.Body1" />
</LinearLayout>
To include the menu items for the navigation drawer, we can use the attribute app:menu with a value that points to a menu resource file.
<android.support.design.widget.NavigationView
        app:menu="@menu/activity_main_drawer" />
Here is the res/menu/activity_main_drawer.xml menu resource file:
<?xml version="1.0" encoding="utf-8"?>
<menu xmlns:android="http://schemas.android.com/apk/res/android">
    <group>
        <item android:id="@+id/nav_item_one"
            android:icon="@android:drawable/ic_dialog_info"
            android:title="Item 1" />
        <item android:id="@+id/nav_item_two"
            android:icon="@android:drawable/ic_dialog_info"
            android:title="Item 2" />
        <item android:id="@+id/nav_item_three"
            android:icon="@android:drawable/ic_dialog_info"
            android:title="Item 3" />
    </group>

    <group android:id="@+id/group_menu">
        <item android:id="@+id/nav_item_four"
            android:title="Item 4" />
        <item android:id="@+id/nav_item_five"
            android:title="Item 5" />
    </group>

    <item android:title="Title 1">
        <menu>
            <item android:id="@+id/nav_item_six"
                android:icon="@android:drawable/ic_dialog_info"
                android:title="Item 6" />
            <item android:id="@+id/nav_item_seven"
                android:icon="@android:drawable/ic_dialog_info"
                android:title="Item 7" />
        </menu>
    </item>
</menu>
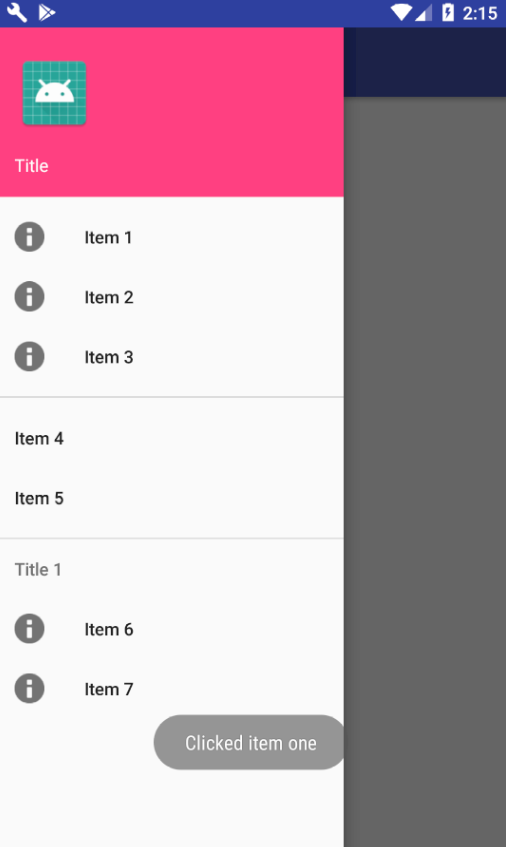
Each of the <item> elements has an id, an icon, and a title. Note that a horizontal line will be drawn at the end of each <group> for us when shown in the navigation drawer.
Note that when showing the navigation list items from a menu resource, we could use a ListView instead. But, by configuring the navigation drawer with a menu resource, we get the material design styling on the navigation drawer for free! If you used a ListView, you would have to maintain the list and also style it to meet the recommended material design specs for the navigation drawer.
Now open your main activity file MainActivity.java and write the code like as shown below
public class MainActivity extends AppCompatActivity
        implements NavigationView.OnNavigationItemSelectedListener {

    DrawerLayout drawer;
    ActionBarDrawerToggle toggle;

    @Override
    protected void onCreate(Bundle savedInstanceState) {
        super.onCreate(savedInstanceState);
        setContentView(R.layout.activity_main);

        Toolbar toolbar = (Toolbar) findViewById(R.id.toolbar);
        setSupportActionBar(toolbar);

        drawer = (DrawerLayout) findViewById(R.id.drawer_layout);
        toggle = new ActionBarDrawerToggle(
                this, drawer, toolbar, R.string.navigation_drawer_open, R.string.navigation_drawer_close);
        drawer.setDrawerListener(toggle);
        toggle.syncState();

        NavigationView navigationView = (NavigationView) findViewById(R.id.nav_view);
        navigationView.setNavigationItemSelectedListener(this);
    }

    @Override
    public void onBackPressed() {
        DrawerLayout drawer = (DrawerLayout) findViewById(R.id.drawer_layout);
        if (drawer.isDrawerOpen(GravityCompat.START)) {
            drawer.closeDrawer(GravityCompat.START);
        } else {
            super.onBackPressed();
        }
    }

    @Override
    public boolean onOptionsItemSelected(MenuItem item) {
        if (toggle.onOptionsItemSelected(item)) {
            return true;
        }
        return super.onOptionsItemSelected(item);
    }

    @SuppressWarnings("StatementWithEmptyBody")
    @Override
    public boolean onNavigationItemSelected(MenuItem item) {
        // handle navigation view item clicks here
        int id = item.getItemId();
        if (id == R.id.nav_item_one) {
            Toast.makeText(this, "Clicked item one", Toast.LENGTH_SHORT).show();
        } else if (id == R.id.nav_item_two) {
        } else if (id == R.id.nav_item_three) {
        } else if (id == R.id.nav_item_four) {
        }

        drawer.closeDrawer(GravityCompat.START);
        return true;
    }
}
The ActionBarDrawerToggle sets up the app icon located on the left of the action bar or toolbar to open and close the navigation drawer. To be able to create an instance of ActionBarDrawerToggle, we have to provide the following parameters:
- a parent context - for example, in an
Activityyou use this, while in aFragmentyou callgetActivity() - an instance of the
DrawerLayoutwidget to link to the activity'sActionBar - the icon to place on top of the app icon to indicate that there is a toggle
- the string resources for the open and close operations respectively (for accessibility)
We invoked the method addDrawerListener() on a DrawerLayout so as to connect an ActionBarDrawerToggle with a DrawerLayout.
Note that we also enable the app icon via setHomeButtonEnabled() and enable it for "up" navigation via setDisplayHomeAsUpEnabled().
We then forward the onPostCreate(), onConfigurationChanged(), and onOptionsItemSelected() activity callback methods on to the toggle.
We can also add action on open or close event.
toggle = new ActionBarDrawerToggle(
    this, drawer, toolbar, R.string.navigation_drawer_open, R.string.navigation_drawer_close){
        public void onDrawerClosed(View view){
            super.onDrawerClosed(view);
            // do something
        }

        public void onDrawerOpened(View drawerView){
            super.onDrawerOpened(drawerView);
            // do something
        }
    };
When we run above program in android studio we will get the result like as shown below.
Kotlin variant
Following is MainActivity in Kotlin language.
class MainActivity : AppCompatActivity() {

    private lateinit var drawer: DrawerLayout
    private lateinit var toggle: ActionBarDrawerToggle

    override fun onCreate(savedInstanceState: Bundle?) {
        super.onCreate(savedInstanceState)
        setContentView(R.layout.activity_main)

        val toolbar: Toolbar = findViewById(R.id.toolbar_main)
        setSupportActionBar(toolbar)

        drawer = findViewById(R.id.drawer_layout)

        toggle = ActionBarDrawerToggle(this, drawer, toolbar, R.string.navigation_drawer_open, R.string.navigation_drawer_close)
        drawer.addDrawerListener(toggle)
        supportActionBar?.setDisplayHomeAsUpEnabled(true)
        supportActionBar?.setHomeButtonEnabled(true)
    }

    override fun onPostCreate(savedInstanceState: Bundle?) {
        super.onPostCreate(savedInstanceState)
        toggle.syncState()
    }

    override fun onConfigurationChanged(newConfig: Configuration?) {
        super.onConfigurationChanged(newConfig)
        toggle.onConfigurationChanged(newConfig)
    }

    override fun onOptionsItemSelected(item: MenuItem?): Boolean {
        if (toggle.onOptionsItemSelected(item)) {
            return true
        }
        return super.onOptionsItemSelected(item)
    }

    override fun onBackPressed() {
        if (drawer.isDrawerOpen(GravityCompat.START)) {
            drawer.closeDrawer(GravityCompat.START)
        } else {
            super.onBackPressed()
        }
    }
}
Now, let's see how to handle click events for each of the items in the navigation drawer. Note that clicking on any item is supposed to take you to a new Activity or Fragment - that's why it's called a navigation drawer!
First, your activity needs to implement the NavigationView.OnNavigationItemSelectedListener. By implementing this contract or interface, we must now override the only method: onNavigationItemSelected().
class MainActivity : AppCompatActivity(), NavigationView.OnNavigationItemSelectedListener {

    override fun onCreate(savedInstanceState: Bundle?) {
        // ...
        val navigationView: NavigationView = findViewById(R.id.nav_view)
        navigationView.setNavigationItemSelectedListener(this)
        // ...
    }

    override fun onNavigationItemSelected(item: MenuItem): Boolean {
        when (item.itemId) {
            R.id.nav_item_one -> Toast.makeText(this, "Clicked item one", Toast.LENGTH_SHORT).show()
            R.id.nav_item_two -> Toast.makeText(this, "Clicked item two", Toast.LENGTH_SHORT).show()
            R.id.nav_item_three -> Toast.makeText(this, "Clicked item three", Toast.LENGTH_SHORT).show()
            R.id.nav_item_four -> Toast.makeText(this, "Clicked item four", Toast.LENGTH_SHORT).show()
        }
        //drawer.closeDrawer(GravityCompat.START)
        return true
    }
}
This method is invoked when an item in the navigation menu is selected. We used the when expression to perform different actions based on the menu item that was clicked—the menu item ids serve as constants for the when expression.
Next, we have to initialize our NavigationView and set this listener inside onCreate() of our activity.
Navigation Drawer and Fragments
In this section you will learn how to open Fragment from Navigation Drawer.
Let's modify app_bar_main.xml and add FrameLayout.
<?xml version="1.0" encoding="utf-8"?>
<android.support.design.widget.CoordinatorLayout
    xmlns:android="http://schemas.android.com/apk/res/android"
    xmlns:app="http://schemas.android.com/apk/res-auto"
    android:layout_width="match_parent"
    android:layout_height="match_parent">

    <android.support.design.widget.AppBarLayout
        android:layout_width="match_parent"
        android:layout_height="wrap_content"
        android:fitsSystemWindows="true">

        <android.support.v7.widget.Toolbar
            android:id="@+id/toolbar_main"
            android:layout_width="match_parent"
            android:layout_height="?attr/actionBarSize"
            android:background="?attr/colorPrimary"
            app:layout_scrollFlags="scroll|enterAlways" />

    </android.support.design.widget.AppBarLayout>

    <FrameLayout
        android:id="@+id/frame_layout"
        android:layout_width="match_parent"
        android:layout_height="match_parent"
        app:layout_behavior="@string/appbar_scrolling_view_behavior"/>

</android.support.design.widget.CoordinatorLayout>
Now create Kotlin classes named as FragmentOne.kt, FragmentTwo.java, etc. The FragmentOne.kt file called the fragment_one.xml file and so on.
Code for FragmentOne.kt file.
class FragmentOne : Fragment() {
    companion object {
        fun newInstance(): FragmentOne = FragmentOne()
    }

    override fun onCreateView(inflater: LayoutInflater?,
                              container: ViewGroup?,
                              savedInstanceState: Bundle?): View? =
            inflater!!.inflate(R.layout.fragment_one, container, false)
}
Layout for FragmentOne.kt.
<?xml version="1.0" encoding="utf-8"?>
<RelativeLayout xmlns:android="http://schemas.android.com/apk/res/android"
    android:layout_width="match_parent"
    android:layout_height="match_parent"
    android:orientation="vertical">

    <TextView
        android:id="@+id/textView"
        android:layout_width="wrap_content"
        android:layout_height="wrap_content"
        android:layout_centerInParent="true"
        android:text="Item 1"
        android:textAppearance="?android:attr/textAppearanceLarge"/>

</RelativeLayout>
Finally update MainActivity.
class MainActivity : AppCompatActivity(), NavigationView.OnNavigationItemSelectedListener {
    private lateinit var drawer: DrawerLayout
    private lateinit var toggle: ActionBarDrawerToggle

    override fun onCreate(savedInstanceState: Bundle?) {
        super.onCreate(savedInstanceState)
        setContentView(R.layout.activity_main)

        val navigationView: NavigationView = findViewById(R.id.nav_view)
        navigationView.setNavigationItemSelectedListener(this)

        val toolbar: Toolbar = findViewById(R.id.toolbar_main)
        setSupportActionBar(toolbar)

        drawer = findViewById(R.id.drawer_layout)

        toggle = ActionBarDrawerToggle(this, drawer, toolbar, R.string.navigation_drawer_open, R.string.navigation_drawer_close)
        drawer.addDrawerListener(toggle)
        supportActionBar?.setDisplayHomeAsUpEnabled(true)
        supportActionBar?.setHomeButtonEnabled(true)

        loadFragment(R.id.nav_item_one);
    }

    private fun loadFragment(itemId: Int) {
        var fragment: Fragment? = null

        when (itemId) {
            R.id.nav_item_one -> fragment = FragmentOne()
            R.id.nav_item_two -> fragment = FragmentTwo()
        }

        if (fragment != null) {
            val fragmentTransaction = supportFragmentManager.beginTransaction()
            fragmentTransaction.replace(R.id.frame_layout, fragment)
            fragmentTransaction.commit()
        }

        drawer.closeDrawer(GravityCompat.START)
    }

    override fun onPostCreate(savedInstanceState: Bundle?) {
        super.onPostCreate(savedInstanceState)
        toggle.syncState()
    }

    override fun onConfigurationChanged(newConfig: Configuration?) {
        super.onConfigurationChanged(newConfig)
        toggle.onConfigurationChanged(newConfig)
    }

    override fun onOptionsItemSelected(item: MenuItem?): Boolean {
        if (toggle.onOptionsItemSelected(item)) {
            return true
        }
        return super.onOptionsItemSelected(item)
    }

    override fun onBackPressed() {
        if (drawer.isDrawerOpen(GravityCompat.START)) {
            drawer.closeDrawer(GravityCompat.START)
        } else {
            super.onBackPressed()
        }
    }

    override fun onNavigationItemSelected(item: MenuItem): Boolean {
        loadFragment(item.itemId);
        return true
    }
}
Quote
Categories
- Android
- AngularJS
- Databases
- Development
- Django
- iOS
- Java
- JavaScript
- LaTex
- Linux
- Meteor JS
- Python
- Science
Archive ↓
- September 2024
- December 2023
- November 2023
- October 2023
- March 2022
- February 2022
- January 2022
- July 2021
- June 2021
- May 2021
- April 2021
- August 2020
- July 2020
- May 2020
- April 2020
- March 2020
- February 2020
- January 2020
- December 2019
- November 2019
- October 2019
- September 2019
- August 2019
- July 2019
- February 2019
- January 2019
- December 2018
- November 2018
- August 2018
- July 2018
- June 2018
- May 2018
- April 2018
- March 2018
- February 2018
- January 2018
- December 2017
- November 2017
- October 2017
- September 2017
- August 2017
- July 2017
- June 2017
- May 2017
- April 2017
- March 2017
- February 2017
- January 2017
- December 2016
- November 2016
- October 2016
- September 2016
- August 2016
- July 2016
- June 2016
- May 2016
- April 2016
- March 2016
- February 2016
- January 2016
- December 2015
- November 2015
- October 2015
- September 2015
- August 2015
- July 2015
- June 2015
- February 2015
- January 2015
- December 2014
- November 2014
- October 2014
- September 2014
- August 2014
- July 2014
- June 2014
- May 2014
- April 2014
- March 2014
- February 2014
- January 2014
- December 2013
- November 2013
- October 2013