How to create ActionBar/Toolbar and Menu in Android Android 22.07.2016
There are two kind of bar with control items in activity
ActionBaris action control bar or navigation bar you usually see at the top of an app, it usually has an app logo icon on the left, name of the current screen next to the logo, and other menu list on the right. To use actionbar, you don’t have to define an actionbar in the layout file which is handy but it deosn’t give you much flexibilities when you want to do some customizations in the actionbar, such as adding background image, animations, place the actionbar on the bottom instead on the top.Toolbardoes evertying you can do with ActionBar, and gives you the freedom to do customiztions that you can’t do easily withActionBar.
You can use either old ActionBar (without any declarations in XML) or define android.support.v7.widget.Toolbar in activity layout and customize it look and events (more coding in this way).
ActionBar example
Let's look at ActionBar and it's parameters. Insert following lines in onCreate method and you'll get ActionBar with icon
ActionBar actionBar = getSupportActionBar();
actionBar.setLogo(R.drawable.ic_launcher);
actionBar.setDisplayUseLogoEnabled(true);
actionBar.setDisplayShowHomeEnabled(true);
Toolbar example
ToolBar was introduced in Android Lollipop, API 21 release and is the successor of the ActionBar. It's a ViewGroup that can be placed anywhere in your XML layouts. ToolBar's appearance and behavior can be more easily customized than the ActionBar.
There are two ways to use Toolbar
- Use a
Toolbaras anActionBarwhen you want to use the existingActionBarfacilities (such as menu inflation and selection, ActionBarDrawerToggle, and so on) but want to have more control over its appearance. - Use a standalone
Toolbarwhen you want to use the pattern in your app for situations that anActionBarwould not support; for example, showing multiple toolbars on the screen, spanning only part of the width, and so on.
So, you should replace ActionBar with ToolBar if you want the flexibilities that comes with the Toolbar (adding background image, animations, place the actionbar on the bottom instead on the top and so on). Note that the ActionBar continues to work and if all you need is a static bar at the top that can host icons and a back button, then you can safely continue to use ActionBar.
To use Toolbar as an ActionBar, first ensure the AppCompat-v7 support library is added to your application build.gradle (Module:app) file
dependencies {
  ...
  compile 'com.android.support:appcompat-v7:25.2.0'
}
Second, let's disable the theme-provided ActionBar. The easiest way is to have your theme extend from Theme.AppCompat.NoActionBar (or the light variant) within the res/styles.xml file
<resources>
  <style name="AppTheme" parent="Theme.AppCompat.Light.NoActionBar">
  </style>
<resources>
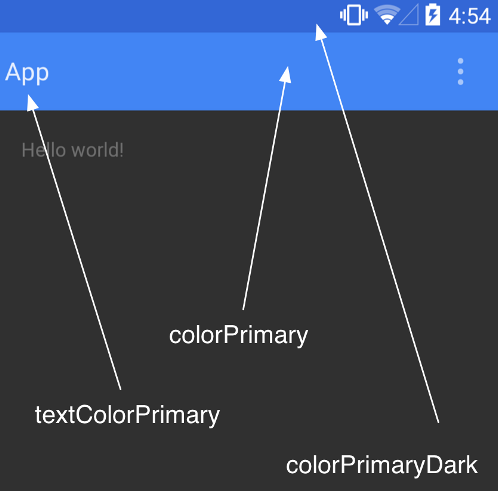
Now lets talk about the color scheme for our project, as you can see from the image below, there are attributes which you can set to get a basic color scheme of your App done, right now we are just dealing we App bar so we would talk about colorPrimary and colorPrimaryDark. colorPrimary as the name says is the primary color of your App and the App bar while with the colorPrimaryDark you can set the color of the status bar to a certain color.
Next, you need to add a Toolbar to your Activity layout file. Below I place the Toolbar at the top of a LinearLayout like the standard ActionBar
<LinearLayout xmlns:android="http://schemas.android.com/apk/res/android"
    xmlns:app="http://schemas.android.com/apk/res-auto"
    android:layout_width="match_parent"
    android:layout_height="match_parent"
    android:orientation="vertical">

    <android.support.v7.widget.Toolbar
      android:id="@+id/toolbar"
      android:minHeight="?attr/actionBarSize"
      android:layout_width="match_parent"
      android:layout_height="wrap_content"
      app:titleTextColor="@android:color/white"
      android:background="?attr/colorPrimary">
    </android.support.v7.widget.Toolbar>

    <TextView
        android:layout_width="wrap_content"
        android:layout_height="wrap_content"
        android:text="Hello world!"/>
</LinearLayout>
Next, in your Activity or Fragment, set the Toolbar to act as the ActionBar by calling the setSupportActionBar(Toolbar) method
import android.support.v7.app.AppCompatActivity;
import android.support.v7.widget.Toolbar;

public class MainActivity extends AppCompatActivity {
    @Override
    protected void onCreate(Bundle savedInstanceState) {
        super.onCreate(savedInstanceState);
        setContentView(R.layout.activity_my);

        Toolbar toolbar = (Toolbar) findViewById(R.id.toolbar);
        toolbar.setTitle(R.string.myTitle);
        //toolbar.setSubtitle("Subtitle");

        setSupportActionBar(toolbar);

        toolbar.setNavigationIcon(android.R.drawable.ic_dialog_alert);
        toolbar.setNavigationOnClickListener(
            new View.OnClickListener() {
                @Override
                public void onClick(View v) {
                    Toast.makeText(MainActivity.this, "Toolbar", Toast.LENGTH_SHORT).show();
                }
            }
        );
    }
}
Adding items to ActionBar or Toolbar
Menus are typically created in resource files using XML but they are stored in the res/menu directory though they can also be created in code. To create a menu resource, use the <menu> element.
The <item> element defines each individual menu item and is enclosed in the <menu> element. A basic menu item looks as follows
<item
    android:id="@+id/menu_email"
    android:title="@string/menu_email"
    android:icon="@android:drawable/ic_dialog_email"
    app:showAsAction="ifRoom"
    />
The most common <item> attributes are the following
id, this is the standard resource identifier;title, this indicates the text to display;icon, this is a draw-able resource;showAsAction, this controls how the menu item is shown;enabled, this is enabled by default.
The showAsAction attribute controls how the menu item is shown. The options include the following:
ifRoom, this menu item should be included in the Action Bar if there's enough space;withText, this indicates that both the title and the icon should be shown;never, this indicates that the menu item should never be included in the Action Bar;always, this indicates that the menu item should be always included in the Action Bar.
First, we will add a string resource to the strings.xml file for the menu title. Start by opening the /res/values/strings.xml file and add the following <string> element to the <resources> element <string name="menu_email">EMail</string>
Create a new file in the res/menu directory (right click on res - New - Android resource directory) and call it menu_main.xml.
Open the menu_main.xml file and add the following XML to define the menu
<?xml version="1.0" encoding="utf-8"?>

<menu xmlns:android="http://schemas.android.com/apk/res/android"
xmlns:app="http://schemas.android.com/apk/res-auto">

<item android:id="@+id/menu_email"
    android:title="@string/menu_email"
    app:showAsAction="never">
</item>
</menu>
With the menu now created, we just have to override the onCreateOptionsMenu() method in our activity to inflate the menu
@Override
public boolean onCreateOptionsMenu(Menu menu) {
    getMenuInflater().inflate(R.menu.menu_main, menu);
    return super.onCreateOptionsMenu(menu);
}
Add the following method to the application to see a Toast when the EMail menu is selected
@Override
public boolean onOptionsItemSelected(MenuItem item) {
    switch (item.getItemId()) {
        case R.id.menu_email:
            Toast.makeText(this, "EMail", Toast.LENGTH_LONG).show();
            break;
        default:
            break;
    }
    return true;
}
If you want to show icon in overflow menu use following snippet
@SuppressLint("RestrictedApi")
@Override
public boolean onCreateOptionsMenu(Menu menu) {
    getMenuInflater().inflate(R.menu.context_menu, menu);

    if(menu instanceof MenuBuilder){
        MenuBuilder m = (MenuBuilder) menu;
        m.setOptionalIconsVisible(true);
    }

    return true;
}
Creating sub menus
Sub menus are created and accessed in almost exactly the same manner as other menu elements and can be placed in any of the provided menus, although they cannot be placed within other sub menus. To define a sub menu, include a <menu> element within an <item> element.
Here is the XML form this recipe with two sub menu items added
<?xml version="1.0" encoding="utf-8"?>

<menu xmlns:android="http://schemas.android.com/apk/res/android"
xmlns:app="http://schemas.android.com/apk/res-auto">

<item android:id="@+id/menu_email
    android:title="@string/menu_email"
    app:showAsAction="never">

    <menu>
        <item android:id="@+id/menu_sub1"
            android:title="Sub menu 1" />
        <item android:id="@+id/menu_sub2"
            android:title="Sub menu 2" />
    </menu>
</item>
</menu>
Grouping menu items
Another menu feature that Android supports is grouping menu items. Android provides several methods for groups, including the following
setGroupVisible()show or hide all items;setGroupEnabled()enable or disable all items;setGroupCheckable()set the checkable behavior.
Android will keep all grouped items with showAsAction="ifRoom" together. This means all items in the group with showAsAction="ifRoom" will be in the Action Bar or all items will be in the overflow.
To create a group, add the <item> menu elements to a <group> element. Here is an example using the menu XML from this recipe with two additional items in a group
<?xml version="1.0" encoding="utf-8"?>

<menu xmlns:android="http://schemas.android.com/apk/res/android"
xmlns:app="http://schemas.android.com/apk/res-auto">

<group android:id="@+id/group_topmost">
    <item android:id="@+id/menu_item1"
        android:title="Item 1"
        app:showAsAction="ifRoom"/>
    <item android:id="@+id/menu_item2"
        android:title="Item 2"
        app:showAsAction="ifRoom"/>
</group>

<item android:id="@+id/menu_email"
    android:title="@string/menu_email"
    app:showAsAction="never"/>
</menu>
Custom title
A Toolbar is just a decorated ViewGroup and as a result, the title contained within can be completely customized by embedding a view within the Toolbar such as:
<android.support.v7.widget.Toolbar
    android:id="@+id/toolbar"
    android:minHeight="?attr/actionBarSize"
    android:layout_width="match_parent"
    android:layout_height="wrap_content"
    app:titleTextColor="@android:color/white"
    android:background="?attr/colorPrimary">

     <TextView
        android:id="@+id/toolbar_title"
        android:layout_width="wrap_content"
        android:layout_height="wrap_content"
        android:text="Toolbar Title"
        android:textColor="@android:color/white"
        style="@style/TextAppearance.AppCompat.Widget.ActionBar.Title"
        android:layout_gravity="center"
     />
</android.support.v7.widget.Toolbar>
This means that you can style the TextView like any other. You can access the TextView inside your activity with:
/* Inside the activity */
// Sets the Toolbar to act as the ActionBar for this Activity window.
Toolbar toolbar = (Toolbar) findViewById(R.id.toolbar);
setSupportActionBar(toolbar);
// Remove default title text
getSupportActionBar().setDisplayShowTitleEnabled(false);
// Get access to the custom title view
TextView mTitle = (TextView) toolbar.findViewById(R.id.toolbar_title);
Note that you must hide the default title using setDisplayShowTitleEnabled. This results in:
How to change color of menu in Toolbar
<style name="AppTheme" parent="Theme.AppCompat.Light.NoActionBar">
    ...
    <item name="actionMenuTextColor">@color/white</item>
    <item name="android:actionMenuTextColor">@color/white</item>
</style>
Changing the Toolbar’s text color and overflow icon color
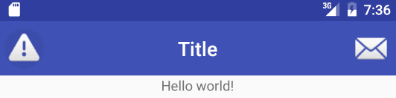
How to add back button to Toolbar
@Override
protected void onCreate(Bundle savedInstanceState) {
    ...
    toolbar = findViewById(R.id.toolbar);
    setSupportActionBar(toolbar);
    if (getSupportActionBar() != null) {
       getSupportActionBar().setDisplayHomeAsUpEnabled(true);
       getSupportActionBar().setDisplayShowHomeEnabled(true);
    }
}

@Override
public boolean onOptionsItemSelected(MenuItem item) {
   switch (item.getItemId()) {
       case android.R.id.home:
           finish();
           break;
   }
   return true;
}
Android context menu example
First, define main activity layout
<?xml version="1.0" encoding="utf-8"?>
<android.support.constraint.ConstraintLayout
    xmlns:android="http://schemas.android.com/apk/res/android"
    xmlns:app="http://schemas.android.com/apk/res-auto"
    android:layout_width="match_parent"
    android:layout_height="match_parent">

    <android.support.v7.widget.Toolbar
        android:id="@+id/tbMain"
        android:layout_width="match_parent"
        android:layout_height="wrap_content"
        android:background="?attr/colorPrimary"
        android:minHeight="?attr/actionBarSize"
        app:layout_constraintEnd_toEndOf="parent"
        app:layout_constraintStart_toStartOf="parent"
        app:layout_constraintTop_toTopOf="parent"
        app:titleTextColor="@android:color/white"/>

    <TextView
        android:id="@+id/tvText"
        android:layout_width="wrap_content"
        android:layout_height="wrap_content"
        android:layout_marginBottom="8dp"
        android:layout_marginTop="8dp"
        android:text="Hello world!"
        app:layout_constraintLeft_toLeftOf="parent"
        app:layout_constraintRight_toRightOf="parent"
        app:layout_constraintTop_toBottomOf="@id/tbMain" />

</android.support.constraint.ConstraintLayout>
Second, describe context menu items
<?xml version="1.0" encoding="utf-8"?>
<menu xmlns:android="http://schemas.android.com/apk/res/android"
    xmlns:app="http://schemas.android.com/apk/res-auto">
    <item android:id="@+id/red" android:title="Red" app:showAsAction="always" />
    <item android:id="@+id/green" android:title="Green" app:showAsAction="always" />
    <item android:id="@+id/blue" android:title="Blue" app:showAsAction="always" />
</menu>
Third, define events and action in MainActivity class
public class SearchActivity extends AppCompatActivity {
    TextView tvText;
    Toolbar tbMain;

    @Override
    protected void onCreate(Bundle savedInstanceState) {
        super.onCreate(savedInstanceState);
        setContentView(R.layout.activity_search);

        tvText = findViewById(R.id.tvText);
        tbMain = findViewById(R.id.tbMain);

        tbMain.setTitle("Context menu");

        registerForContextMenu(tvText);
    }

    @Override
    public void onCreateContextMenu(ContextMenu menu, View v, ContextMenu.ContextMenuInfo menuInfo) {
        super.onCreateContextMenu(menu, v, menuInfo);

        MenuInflater inflater = getMenuInflater();
        inflater.inflate(R.menu.context_menu, menu);

        menu.setHeaderTitle("Select a color for TextView");
    }

    @Override
    public boolean onContextItemSelected(MenuItem item){
        switch(item.getItemId()){
            case R.id.red:
                tvText.setTextColor(Color.RED);
                return true;

            case R.id.green:
                tvText.setTextColor(Color.GREEN);
                return true;

            case R.id.blue:
                tvText.setTextColor(Color.BLUE);
                return true;

            default:
                return super.onContextItemSelected(item);
        }
    }
}
onCreateContextMenu called when a context menu for the view is about to be shown. Unlike onCreateOptionsMenu, this will be called every time the context menu is about to be shown and should be populated for the view (or item inside the view for AdapterView subclasses, this can be found in the menuInfo).
onContextItemSelected hook is called whenever an item in a context menu is selected. The default implementation simply returns false to have the normal processing happen. You can use this method for any items for which you would like to do processing without those other facilities.
Toolbar example in Kotlin
Following is MainActivity.kt file.
class MainActivity : AppCompatActivity() {
    override fun onCreate(savedInstanceState: Bundle?) {
        super.onCreate(savedInstanceState)
        setContentView(R.layout.activity_main)

        // Set the toolbar as support action bar
        setSupportActionBar(toolbar)

        // Now get the support action bar
        val actionBar = supportActionBar

        // Set toolbar title/app title
        actionBar!!.title = "Hello APP"

        // Set action bar/toolbar sub title
        actionBar.subtitle = "App subtitle"

        // Set action bar elevation
        actionBar.elevation = 4.0F

        // Display the app icon in action bar/toolbar
        actionBar.setDisplayShowHomeEnabled(true)
        actionBar.setLogo(R.mipmap.ic_launcher)
        actionBar.setDisplayUseLogoEnabled(true)
    }

    override fun onCreateOptionsMenu(menu: Menu): Boolean {
        // Inflate the menu to use in the action bar
        val inflater = menuInflater
        inflater.inflate(R.menu.toolbar_menu, menu)
        return super.onCreateOptionsMenu(menu)
    }

    override fun onOptionsItemSelected(item: MenuItem): Boolean {
        // Handle presses on the action bar menu items
        when (item.itemId) {
            R.id.menu_email -> {
                text_view.text = "Sending email..."
                return true
            }
        }
        return super.onOptionsItemSelected(item)
    }
}
Following is activity_main.xml file.
<?xml version="1.0" encoding="utf-8"?>
<LinearLayout xmlns:android="http://schemas.android.com/apk/res/android"
    xmlns:tools="http://schemas.android.com/tools"
    xmlns:app="http://schemas.android.com/apk/res-auto"
    android:id="@+id/root_layout"
    android:layout_width="match_parent"
    android:layout_height="match_parent"
    android:orientation="vertical"
    android:background="#fcfeff">
    <android.support.v7.widget.Toolbar
        android:id="@+id/toolbar"
        android:layout_width="match_parent"
        android:layout_height="?attr/actionBarSize"
        android:minHeight="?attr/actionBarSize"
        android:background="?attr/colorPrimary"
        app:titleTextColor="#fff"
        app:subtitleTextColor="#f5fbff"
        android:padding="1dp"
        />
    <TextView
        android:id="@+id/text_view"
        android:layout_width="match_parent"
        android:layout_height="wrap_content"
        android:padding="25dp"
        android:textAppearance="@style/Base.TextAppearance.AppCompat.Large"
        android:textColor="#168ace"
        android:textStyle="bold"
        android:layout_gravity="center"
        android:text="Tap an item from action bar menu."
        />
</LinearLayout>
Following is toolbar_menu.xml file.
<?xml version="1.0" encoding="utf-8"?>
<menu
    xmlns:android="http://schemas.android.com/apk/res/android"
    xmlns:app="http://schemas.android.com/apk/res-auto">

    <item
        android:id="@+id/menu_email"
        android:title="EMail"
        android:icon="@android:drawable/ic_dialog_email"
        app:showAsAction="ifRoom" />

</menu>
Result
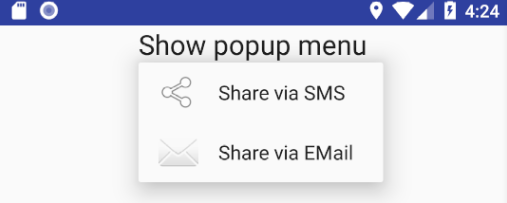
Popup menu with icons example in Kotlin
Following is MainActivity.kt file.
class MainActivity : AppCompatActivity() {
    override fun onCreate(savedInstanceState: Bundle?) {
        super.onCreate(savedInstanceState)
        setContentView(R.layout.activity_main)

        val popupMenu = PopupMenu(this, tv)

        // Inflate the popup menu
        popupMenu.inflate(R.menu.popup_menu)

        // Set popup menu item click listener
        popupMenu.setOnMenuItemClickListener {
            when (it.itemId) {
                R.id.pm_sms-> {
                    Toast.makeText(this, "Share via SMS", Toast.LENGTH_LONG).show()
                    true
                }
                R.id.pm_email-> {
                    Toast.makeText(this, "Share via EMail", Toast.LENGTH_LONG).show()
                    true
                }
                else-> false
            }
        }

        // Set a click listener for text view
        tv.setOnClickListener{
            // Display the popup menu with icons
            try {
                val popup = PopupMenu::class.java.getDeclaredField("mPopup")
                popup.isAccessible = true
                val menu = popup.get(popupMenu)
                menu.javaClass
                        .getDeclaredMethod("setForceShowIcon", Boolean::class.java)
                        .invoke(menu, true)
            } catch (e: Exception){
                e.printStackTrace()
            } finally {
                popupMenu.show()
            }

            // Or simply show the popup menu without icons
            //popupMenu.show()
        }
    }

}
Following is activity_main.xml file.
<?xml version="1.0" encoding="utf-8"?>
<RelativeLayout xmlns:android="http://schemas.android.com/apk/res/android"
    android:id="@+id/root_layout"
    android:layout_width="match_parent"
    android:layout_height="match_parent">

    <TextView
        android:id="@+id/tv"
        android:layout_centerHorizontal="true"
        android:layout_alignParentTop="true"
        android:text="Show popup menu"
        android:layout_width="wrap_content"
        android:layout_height="wrap_content"
        android:textAppearance="@style/Base.TextAppearance.AppCompat.Large"/>

</RelativeLayout>
Following is popup_menu.xml file.
<?xml version="1.0" encoding="utf-8"?>
<menu xmlns:android="http://schemas.android.com/apk/res/android">
    <item
        android:id="@+id/pm_sms"
        android:title="Share via SMS"
        android:icon="@android:drawable/ic_menu_share" />
    <item
        android:id="@+id/pm_email"
        android:title="Share via EMail"
        android:icon="@android:drawable/ic_dialog_email" />
</menu>
Toolbat with title and icons
File MainActivity.kt
class MainActivity: AppCompatActivity() {
    override fun onCreate(savedInstanceState: Bundle?) {
        super.onCreate(savedInstanceState)
        setContentView(R.layout.activity_main)

        val actionBar = supportActionBar

        actionBar!!.title = "Title"
        actionBar.subtitle = "Subtitle"
        actionBar.setDisplayHomeAsUpEnabled(true)
        actionBar.setDisplayShowHomeEnabled(true)
    }

    override fun onCreateOptionsMenu(menu: Menu): Boolean {
        val inflater = menuInflater
        inflater.inflate(R.menu.toolbar, menu)
        return super.onCreateOptionsMenu(menu)
    }

    override fun onOptionsItemSelected(item: MenuItem): Boolean {
        when (item.itemId) {
            android.R.id.home -> {
                text_view.text = "Home"
                return true
            }
            R.id.action_cut -> {
                text_view.text = "Cut"
                return true
            }
            R.id.action_copy -> {
                text_view.text = "Copy"
                return true
            }
            R.id.action_paste -> {
                text_view.text = "Paste"
                return true
            }
        }
        return super.onOptionsItemSelected(item)
    }
}
File activity_main.xml
<?xml version="1.0" encoding="utf-8"?>
<RelativeLayout
    xmlns:android="http://schemas.android.com/apk/res/android"
    xmlns:tools="http://schemas.android.com/tools"
    android:layout_width="match_parent"
    android:layout_height="match_parent"
    tools:context=".MainActivity">

    <TextView
        android:id="@+id/text_view"
        android:layout_width="wrap_content"
        android:layout_height="wrap_content"
        android:layout_centerInParent="true" />
</RelativeLayout>
File toolbar.xml
<?xml version="1.0" encoding="utf-8"?>
<menu xmlns:android="http://schemas.android.com/apk/res/android"
    xmlns:app="http://schemas.android.com/apk/res-auto">

    <item
        android:id="@+id/action_cut"
        android:title="Cut"
        app:showAsAction="ifRoom|withText"
        android:icon="@android:drawable/ic_menu_call" />
    <item
        android:id="@+id/action_copy"
        android:title="Copy"
        app:showAsAction="always|withText" />
    <item
        android:id="@+id/action_paste"
        android:title="Paste"
        app:showAsAction="ifRoom" />
</menu>
Useful links
Quote
Categories
- Android
- AngularJS
- Databases
- Development
- Django
- iOS
- Java
- JavaScript
- LaTex
- Linux
- Meteor JS
- Python
- Science
Archive ↓
- September 2024
- December 2023
- November 2023
- October 2023
- March 2022
- February 2022
- January 2022
- July 2021
- June 2021
- May 2021
- April 2021
- August 2020
- July 2020
- May 2020
- April 2020
- March 2020
- February 2020
- January 2020
- December 2019
- November 2019
- October 2019
- September 2019
- August 2019
- July 2019
- February 2019
- January 2019
- December 2018
- November 2018
- August 2018
- July 2018
- June 2018
- May 2018
- April 2018
- March 2018
- February 2018
- January 2018
- December 2017
- November 2017
- October 2017
- September 2017
- August 2017
- July 2017
- June 2017
- May 2017
- April 2017
- March 2017
- February 2017
- January 2017
- December 2016
- November 2016
- October 2016
- September 2016
- August 2016
- July 2016
- June 2016
- May 2016
- April 2016
- March 2016
- February 2016
- January 2016
- December 2015
- November 2015
- October 2015
- September 2015
- August 2015
- July 2015
- June 2015
- February 2015
- January 2015
- December 2014
- November 2014
- October 2014
- September 2014
- August 2014
- July 2014
- June 2014
- May 2014
- April 2014
- March 2014
- February 2014
- January 2014
- December 2013
- November 2013
- October 2013