Android BottomNavigationView tutorial with example Android 30.01.2017
In March 2016 Google announced that there's a new element to be added in Material Design components and it's the BottomNavigationView. As per documentation it should be used when application has three to five top-level destinations. Basically this is same as TabLayout but with some more enhancement and animations.
Following is detailed description of what Material Guidelines tell us where and how should we use BottomNavigationView to maintain a Material Design in our app:
BottomNavigationViewshould be used to provide quick navigation between top-level views of an app. Only those destinations that require direct access should be inBottomNavigationView.- There can be only 3 to 5 top-level destinations in
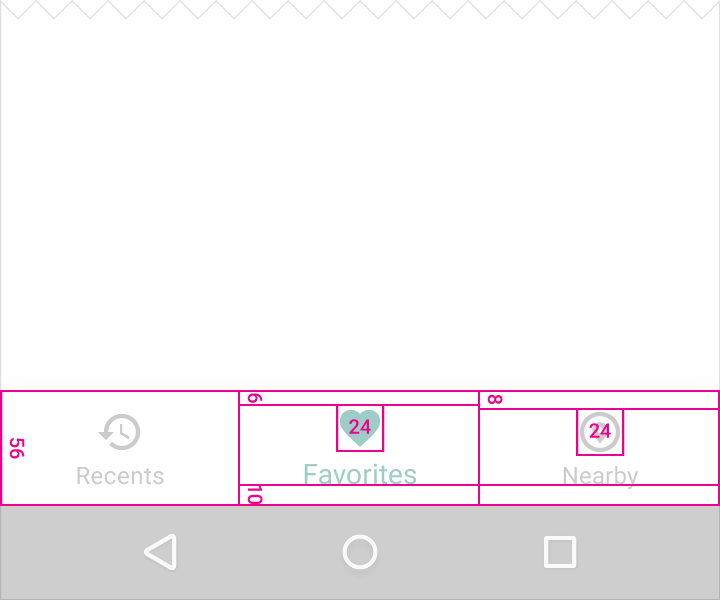
BottomNavigationView. If you have 1 or 2 top-level destinations, use TabLayout. If you have more than 5, go for Side Navigation Drawer. - Each option should have the width of the view divided by the number of actions (with a max of 168dp and a minimum of 80dp). The height is 56dp and each icon is 24 x 24dp. It should have padding 6dp above icon (active view), 8dp above icon (inactive view), 10dp under the text, 12dp left and right of the text. It should have an elevation of 8dp. As Snack bars have lower elevation (6dp), they appear behind the bottom navigation bar.
- The active icon should be tinted with the app's primary color. Black or white color is to be used if the bottom navigation bar is already colored.
- If the view is in focus, that view’s icon and text label are to be displayed. If there’re only three actions, both icons and text labels are to be displayed at all times. If there are four or five actions, inactive views should be displayed as icons only.
- Navigation through the
BottomNavigationViewshould reset the task state. If the user taps on Active action, it should navigate the user to the top of the view. No swipe action is supported. - Developers should be careful when combining bottom navigation with tabs. This might cause confusion when navigating an app.
To get started with BottomNavigationView, you need the latest version (version 25) of Android SDK.
First step is to add the design support library to your app-level build.gradle file. Example is as shown below:
dependencies {
    ...
    compile 'com.android.support:appcompat-v7:25.0.1'
    compile 'com.android.support:support-v4:25.0.1'
    compile 'com.android.support:design:25.0.1'
}
Before declaring layout and activity let's specify labels for menu items and colors for active/deactive statuses for menu.
Strings in res/values/strings.xml file.
<resources>
    ...
    <string name="menu_email">Email</string>
    <string name="menu_info">Info</string>
    <string name="menu_map">Map</string>
</resources>
Colors in res/values/colors.xml file.
<?xml version="1.0" encoding="utf-8"?>
<resources>
    <color name="colorPrimary">#56B900</color>
    <color name="colorPrimaryDark">#289C2B</color>
    <color name="colorAccent">#FF4081</color>
    <color name="colorPrimaryLight">#84FF19</color>
    <color name="colorWhite">#FFFFFF</color>
    <color name="colorGray">#CCCCCC</color>
</resources>
We can easily handle the display of both enabled and disabled menu items. First, we need to create a selector file for our active/deactive colors like following in res/drawable/bottom_nav_colors.xml file.
<?xml version="1.0" encoding="utf-8"?>
<selector xmlns:android="http://schemas.android.com/apk/res/android">
    <item android:state_checked="true" android:color="@color/colorWhite" />
    <item android:color="@color/colorGray" />
</selector>
Next step, is to add the actual BottomNavigationView to the layout. Typically, you will add something like:
<?xml version="1.0" encoding="utf-8"?>
<RelativeLayout xmlns:android="http://schemas.android.com/apk/res/android"
    xmlns:tools="http://schemas.android.com/tools"
    xmlns:app="http://schemas.android.com/apk/res-auto"
    android:id="@+id/activity_bottom"
    android:layout_width="match_parent"
    android:layout_height="match_parent"
    tools:context="me.proft.sandbox.BottomActivity">

    <TextView
        android:id="@+id/tvLabel"
        android:layout_width="wrap_content"
        android:layout_height="wrap_content"
        android:layout_centerInParent="true"
        android:textAppearance="@style/TextAppearance.AppCompat.Large"
        android:text="Email"/>

    <android.support.design.widget.BottomNavigationView
        android:id="@+id/bottomNavigation"
        android:layout_width="match_parent"
        android:layout_height="wrap_content"
        android:layout_alignParentBottom="true"
        app:itemBackground="@color/colorPrimary"
        app:itemIconTint="@drawable/bottom_nav_colors"
        app:itemTextColor="@drawable/bottom_nav_colors"
        app:menu="@menu/bottom_nav_items" />
</RelativeLayout>
The BottomNavigationView uses app:menu that is a custom attribute that points to the menu resource containing items to be shown on the BottomNavigationView.
There are other custom attributes for the view, including:
app:itemBackground. The background color to be used for the bottom navigation menu.app:itemIconTint. The tint to be used for the icons in the bottom navigation menu.app:itemTextColor. The color to be used for the text in the bottom navigation menu.app:menu. The menu resource to be used to display items in the bottom navigation menu.
We are going to use menu xml file to show items needed in BottomNavigationView. According to guidelines, three to five items are recommended. Create a XML file named bottom_nav_items.xml in res/menu directory. Add code to define the navigation options with name and icon here:
<?xml version="1.0" encoding="utf-8"?>
<menu xmlns:android="http://schemas.android.com/apk/res/android">
    <item
        android:id="@+id/menu_email"
        android:title="@string/menu_email"
        android:icon="@android:drawable/ic_dialog_email"
        />
    <item
        android:id="@+id/menu_info"
        android:title="@string/menu_info"
        android:icon="@android:drawable/ic_dialog_info"
        />

    <item
        android:id="@+id/menu_map"
        android:title="@string/menu_map"
        android:icon="@android:drawable/ic_dialog_map" />
</menu>
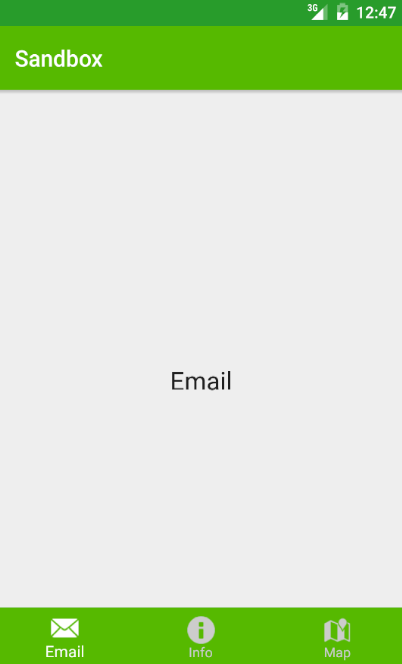
This means that there will be 3 items, Email, Info and Map on the BottomNavigationView. We can run the app now, and we'll see our neatly implemented BottomNavigationView.
To listen for click events on the BottomNavigationView, we just need to call setOnNavigationItemSelectedListener().
Below is full code of MainActivity.
public class MainActivity extends AppCompatActivity {
    TextView tvLabel;

    @Override
    protected void onCreate(Bundle savedInstanceState) {
        super.onCreate(savedInstanceState);
        setContentView(R.layout.activity_bottom);
        tvLabel = (TextView) findViewById(R.id.tvLabel);

        setupBottomNavigationView();
    }

    private void setupBottomNavigationView() {
        BottomNavigationView bottomNavigationView = (BottomNavigationView) findViewById(R.id.bottomNavigation);
        bottomNavigationView.setOnNavigationItemSelectedListener(new BottomNavigationView.OnNavigationItemSelectedListener() {
            @Override
            public boolean onNavigationItemSelected(@NonNull MenuItem item) {
                switch (item.getItemId()) {
                    case R.id.menu_email:
                        tvLabel.setText("Email");
                        break;
                    case R.id.menu_info:
                        tvLabel.setText("Info");
                        break;
                    case R.id.menu_map:
                        tvLabel.setText("Map");
                        break;
                }
                return true;
            }
        });
    }
}
Result
If you want more features then BottomNavigationView you can use BottomNavigationViewEx. BottomNavigationViewEx can use different styles, ViewPager, ViewBadger, etc.
Change the icon size
To change the icon size you need to pick every icon individually and set its size. You can do this using a for loop to adjust all sizes or you can change the size of a particular icon to create your custom effect.
Below is the code segment which will help you understand the changes that need to be done and how can you pick the icons.
BottomNavigationView bottomNavigation = (BottomNavigationView) findViewById(R.id.bottomNavigation);

BottomNavigationMenuView menuView = (BottomNavigationMenuView) bottomNavigation.getChildAt(0);

for (int i = 0; i < menuView.getChildCount(); i++) {
    final View iconView = menuView.getChildAt(i).findViewById(android.support.design.R.id.icon);
    final ViewGroup.LayoutParams layoutParams = iconView.getLayoutParams();
    final DisplayMetrics displayMetrics = getResources().getDisplayMetrics();
    layoutParams.height = (int) TypedValue.applyDimension(TypedValue.COMPLEX_UNIT_DIP, 32, displayMetrics);
    layoutParams.width = (int) TypedValue.applyDimension(TypedValue.COMPLEX_UNIT_DIP, 32, displayMetrics);
    iconView.setLayoutParams(layoutParams);
}
Adding Fragments
Open the layout file of main activity i.e activity_main.xml and add BottomNavigationView widget. Here we are also adding a FrameLayout to load the Fragments when the navigation item is selected.
<?xml version="1.0" encoding="utf-8"?>
<android.support.constraint.ConstraintLayout xmlns:android="http://schemas.android.com/apk/res/android"
    xmlns:app="http://schemas.android.com/apk/res-auto"
    xmlns:tools="http://schemas.android.com/tools"
    android:layout_width="match_parent"
    android:layout_height="match_parent">

    <FrameLayout
        android:id="@+id/flContainer"
        android:layout_width="match_parent"
        android:layout_height="match_parent"
        app:layout_behavior="@string/appbar_scrolling_view_behavior" />

    <android.support.design.widget.BottomNavigationView
        android:id="@+id/bnvMenu"
        android:layout_width="match_parent"
        android:layout_height="wrap_content"
        android:layout_gravity="bottom"
        android:background="?android:attr/windowBackground"
        android:foreground="?attr/selectableItemBackground"
        app:itemBackground="@color/colorPrimary"
        app:itemIconTint="@android:color/white"
        app:itemTextColor="@android:color/white"
        app:menu="@menu/bottom_nav_items"
        app:layout_constraintBottom_toBottomOf="parent"
        app:layout_constraintLeft_toLeftOf="parent"
        app:layout_constraintRight_toRightOf="parent" />

</android.support.constraint.ConstraintLayout>
Now open MainActivity.java and modify it as below.
public class BottomNavigationActivity extends AppCompatActivity {
    @Override
    protected void onCreate(Bundle savedInstanceState) {
        super.onCreate(savedInstanceState);
        setContentView(R.layout.activity_bottom_navigation);

        loadFragment(new EmailFragment());

        BottomNavigationView bottomNavigationView = (BottomNavigationView) findViewById(R.id.bnvMenu);
        bottomNavigationView.setOnNavigationItemSelectedListener(new BottomNavigationView.OnNavigationItemSelectedListener() {
            @Override
            public boolean onNavigationItemSelected(@NonNull MenuItem item) {
                Fragment fragment;
                switch (item.getItemId()) {
                    case R.id.menu_email:
                        fragment = new EmailFragment();
                        loadFragment(fragment);
                        break;
                    case R.id.menu_info:
                        fragment = new InfoFragment();
                        loadFragment(fragment);
                        break;
                    case R.id.menu_map:
                        fragment = new MapFragment();
                        loadFragment(fragment);
                        break;
                }
                return true;
            }
        });
    }

    private void loadFragment(Fragment fragment) {
        FragmentTransaction transaction = getSupportFragmentManager().beginTransaction();
        transaction.replace(R.id.flContainer, fragment);
        transaction.addToBackStack(null);
        transaction.commit();
    }
}
Create new Fragment by going to File ⇒ New ⇒ Fragment ⇒ Fragment (Blank) and name it as EmailFragment.java. Likewise create other three fragments too.
public class EmailFragment extends Fragment {
    private TextView tv;

    public EmailFragment() {}

    public static EmailFragment newInstance(String param1, String param2) {
        EmailFragment fragment = new EmailFragment();
        Bundle args = new Bundle();
        fragment.setArguments(args);
        return fragment;
    }

    public View onCreateView(LayoutInflater inflater, ViewGroup container, Bundle savedInstanceState) {
        View view = inflater.inflate(R.layout.fragment_email, container, false);
        tv = (TextView) view.findViewById(R.id.tv);

        tv.setText("EMail");
        return view;
    }
}
Layout for EmailFragment is as simple as following snippet.
<FrameLayout xmlns:android="http://schemas.android.com/apk/res/android"
    xmlns:tools="http://schemas.android.com/tools"
    android:layout_width="match_parent"
    android:layout_height="match_parent">

    <TextView
        android:id="@+id/tv"
        android:gravity="center_horizontal"
        android:layout_width="match_parent"
        android:layout_height="match_parent" />

</FrameLayout>
Also you can hide BottomNavigationView on scroll.
Useful links
Quote
Categories
- Android
- AngularJS
- Databases
- Development
- Django
- iOS
- Java
- JavaScript
- LaTex
- Linux
- Meteor JS
- Python
- Science
Archive ↓
- September 2024
- December 2023
- November 2023
- October 2023
- March 2022
- February 2022
- January 2022
- July 2021
- June 2021
- May 2021
- April 2021
- August 2020
- July 2020
- May 2020
- April 2020
- March 2020
- February 2020
- January 2020
- December 2019
- November 2019
- October 2019
- September 2019
- August 2019
- July 2019
- February 2019
- January 2019
- December 2018
- November 2018
- August 2018
- July 2018
- June 2018
- May 2018
- April 2018
- March 2018
- February 2018
- January 2018
- December 2017
- November 2017
- October 2017
- September 2017
- August 2017
- July 2017
- June 2017
- May 2017
- April 2017
- March 2017
- February 2017
- January 2017
- December 2016
- November 2016
- October 2016
- September 2016
- August 2016
- July 2016
- June 2016
- May 2016
- April 2016
- March 2016
- February 2016
- January 2016
- December 2015
- November 2015
- October 2015
- September 2015
- August 2015
- July 2015
- June 2015
- February 2015
- January 2015
- December 2014
- November 2014
- October 2014
- September 2014
- August 2014
- July 2014
- June 2014
- May 2014
- April 2014
- March 2014
- February 2014
- January 2014
- December 2013
- November 2013
- October 2013