Getting started with Dependency injection in Android using Dagger2 Android 28.12.2016
 What is Dependency injection?
Dependency injection is a software design pattern that allows the removal of hard-coded dependencies and makes it possible to change them, whether at run-time or compile-time. It focused on making our applications loosely coupled, extensible, and maintainable.
The terms Dependency Injection (DI) and Inversion of Control (IoC) are generally used interchangeably to describe the same design stuff.
Inversion of control principles:
- The modules of top levels shouldn’t depend on modules of the lower levels. The modules of all levels should depend on abstractions.
- The abstractions shouldn’t depend on details. The details should depend on abstractions.
Basically, instead of having your objects creating a dependency or asking a factory object to make one for them, you pass the needed dependencies in to the constructor or via property setters, and you make it somebody else's problem.
When you have an object that needs or depends on another object to do its work, you have a dependency. Dependencies can be solved by letting the dependent object create the dependency or asking a factory object to make one. In the context of dependency injection, however, the dependencies are supplied to the class that needs the dependency to avoid the need for the class itself to create them. This way you create software that is loosely coupled and highly maintainable.
For example, Vehicle class requires Motor class. Here's how most people would create it without dependency injection:
public class Vehicle {
    private Motor motor;

    public Vehicle() {
        this.motor = new Motor();
    }
}
And here’s how you would create the Vehicle following the dependency injection pattern
public class Vehicle {
    @Inject
    private Motor motor;

    public Vehicle(Motor motor) {
        this.motor = motor;
    }
}
This might seem like a very minor change, but it gives us some huge advantages:
- Since these dependencies are external, we can now inject different types of
DriverorMotordepending on our needs. - Writing unit tests? This pattern lets you easily create an
Vehiclewith mockMotor. If a java class creates an instance of another class via thenewoperator, then it cannot be used and tested independently from that class and is called a hard dependency. - The
Vehicleclass is no longer responsible for finding or creating its dependencies.
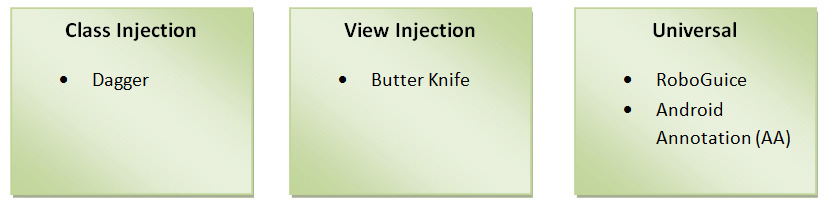
Some of the popular and widely used dependency injection libraries are
Dependency injection is effective in these situations:
- You need to inject configuration data into one or more components.
- You need to inject the same dependency into multiple components.
- You need to inject different implementations of the same dependency.
- You need to inject the same implementation in different configurations.
- You need some of the services provided by the container.
Dagger 2
Dagger 2 is a dependency injection tool by Google used for Java and Android projects. Dagger2 is a forked from Dagger 1 which was created by Square.
In Dagger 1 all this process happens at run time, while in case of Dagger 2 all graph validation, configurations done at compile time.
Dagger 2 generally for code generation and is based on annotations. During program execution object graph gets created by your application. And using abstraction your application create such a dynamic flow by observing object interactions.
Dagger 2 is awesome java library which provides the alternative way of object instantiation. You do not worry about the constructor with a different type of argument. Dagger 2 will take care automatically based on the qualifier. What you need to do just used annotated @Inject then all required object will be created and assigned automatically.
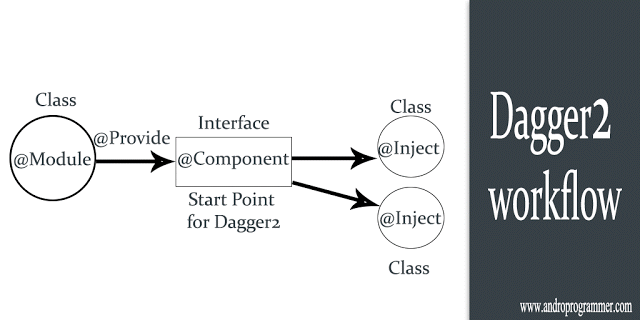
Let's visualize the dependency injection process with Dagger2 as follows:
A dependency consumer asks for the dependency(Object) from a dependency provider through a connector.
- Dependency provider. Classes annotated with
@Moduleare responsible for providing objects which can be injected. Such classes define methods annotated with@Provides. The returned objects from these methods are available for dependency injection. - Dependency consumer. The
@Injectannotation is used to define a dependency. - Connecting consumer and producer. A
@Componentannotated interface defines the connection between the provider of objects (modules) and the objects which express a dependency. The class for this connection is generated by the Dagger.
Dagger 2 uses the following annotations:
- Annotations
@Moduleand@Providesdefine classes and methods which provide dependencies. - Annotation
@Injectrequests dependencies. Can be used on a constructor, a field, or a method. - Annotation
@Componentenables selected modules and used for performing dependency injection.
In Dagger 2, classes annotated with @Module are responsible for providing objects which can be injected. Such classes can define methods annotated with @Provides. The returned objects from these methods are available for dependency injection.
You can use the @Singleton annotation to indicate that there should be only one instance of the object.
You use the @Inject annotation to define a dependency. If you annotate a constructor with @Inject, Dagger 2 can also use an instance of this object to fulfill dependencies. This was done to avoid the definition of lots of @Provides methods for these objects.
Dagger 2 does not inject fields automatically. If you want to use field injection you have to define a method in your @Component interface which takes the instance into which you want to inject as parameter.
The @Component is used on an interface. Such an interface is used by Dagger 2 to generate code. The base pattern for the generated class is that Dagger is used as prefix followed by the interface name. This generate class has a create method which allows configuring the objects based on the given configuration. The methods defined on the interface are available to access the generated objects.
A @Component interface defines the connection between provider of objects (modules) and the objects which expresses a dependency.
Here is a list of other advantages for using Dagger 2:
- Simplifies access to shared instances. Just as the ButterKnife library makes it easier to define references to
Views, event handlers, and resources, Dagger 2 provides a simple way to obtain references to shared instances. For instance, once we declare in Dagger our singleton instances such asMotororDriver, we can declare fields with a simple @Inject annotation. - Easy configuration of complex dependencies. There is an implicit order in which your objects are often created. Dagger 2 walks through the dependency graph and generates code that is both easy to understand and trace, while also saving you from writing the large amount of boilerplate code you would normally need to write by hand to obtain references and pass them to other objects as dependencies.
- Easier unit and integration testing. Because the dependency graph is created for us, we can easily swap out modules that make network responses and mock out this behavior.
- Scoped instances. Not only can you easily manage instances that can last the entire application lifecycle, you can also leverage Dagger 2 to define instances with shorter lifetimes (i.e. bound to a user session, activity lifecycle, etc.).
To implement Dagger 2 correctly, you have to follow these steps:
- Identify the dependent objects and its dependencies.
- Create a class with the
@Moduleannotation, using the@Providesannotation for every method that returns a dependency. - Request dependencies in your dependent objects using the
@Injectannotation. - Create an interface using the
@Componentannotation and add the classes with the@Moduleannotation created in the second step. - Create an object of the
@Componentinterface to instantiate the dependent object with its dependencies.
Many Android components, e.g. activities, are instantiated by the Android framework and not in your code. This makes it difficult to supply dependencies via constructors to Android components.
To enable Dagger 2 in Android Studio adjust your build.gradle project file.
dependencies {
    ...
    implementation 'com.google.dagger:dagger-android:2.15'
    implementation 'com.google.dagger:dagger-android-support:2.15' // if you use the support libraries
    annotationProcessor 'com.google.dagger:dagger-compiler:2.15'
    annotationProcessor 'com.google.dagger:dagger-android-processor:2.15'
}
The latest version, as of this writing, is 2.15, feel free to update it to the latest release.
Following is example of independent object Motor and dependent object Vehicle.
Step 1: Identify dependent objects
For this tutorial, I'm going to use two classes, Vehicle and Motor. Motor is the independent class and Vehicle is the dependent class. I'm going to start creating this model within a new package called model.
This is what the Motor class look like:
public class Motor {
    private int rpm;

    public Motor(){
        this.rpm = 0;
    }

    public int getRpm(){
        return rpm;
    }

    public void accelerate(int value){
        rpm = rpm + value;
    }

    public void stop() {
        rpm = 0;
    }
}
This is what the Vehicle class looks like:
public class Vehicle {
    private Motor motor;

    public Vehicle(Motor motor){
        this.motor = motor;
    }

    public void increaseSpeed(int value){
        motor.accelerate(value);
    }

    public void stop(){
        motor.stop();
    }

    public int getSpeed(){
        return motor.getRpm();
    }
}
Step 2: Create @Module Class
You now have to create a class with the @Module annotation. This class is going to provide the objects you will need with its dependencies satisfied. For this, you have to create a new package, name it module and add a new class inside it as follows:
import javax.inject.Singleton;

import dagger.Module;
import dagger.Provides;

@Module
public class VehicleModule {
    @Provides
    @Singleton
    Motor provideMotor(){
        return new Motor();
    }

    @Provides
    @Singleton
    Vehicle provideVehicle(){
        return new Vehicle(new Motor());
    }
}
Vehicle needs Motor to work properly. That is why you need to create two providers, one for Motor (the independent model) and another one for Vehicle (indicating its dependency).
Don't forget that every provider (or method) must have the @Provides annotation and the class must have the @Module annotation. The @Singleton annotation indicates that there will be only one instance of the object.
Step 3: Request dependencies in dependent objects
Now that you have the providers for your different models, you need to request them. Just as Vehicle needs Motor, you have to add the @Inject annotation in the Vehicle constructor as follows:
@Inject
public Vehicle(Motor motor){
    this.motor = motor;
}
You can use the @Inject annotation to request dependencies in the constructor, fields, or methods. In this case, I'm keeping the injection in the constructor.
Step 4: Connecting @Modules with @Inject
The connection between the provider of dependencies, @Module, and the classes requesting them through @Inject is made using @Component, which is an interface:
import javax.inject.Singleton;
import dagger.Component;

@Singleton
@Component(modules = {VehicleModule.class})
public interface VehicleComponent {
    Vehicle provideVehicle();
}
Next to the @Component annotation, you have to specify which modules are going to be used-in this case I use VehicleModule, which we created earlier. If you need to use more modules, then just add them using a comma as a separator.
Within the interface, add methods for every object you need and it will automatically give you one with all its dependencies satisfied. In this case, I only need a Vehicle object, which is why there is only one method.
Step 5: Using @Component interface to obtain objects
Now that you have every connection ready, you have to obtain an instance of this interface and invoke its methods to obtain the object you need. I'm going to implement it in the onCreate method in the MainActivity as follows:
public class MainActivity extends AppCompatActivity {
    Vehicle vehicle;

    @Override
    protected void onCreate(Bundle savedInstanceState) {
        super.onCreate(savedInstanceState);
        setContentView(R.layout.activity_main);

        VehicleComponent component = DaggerVehicleComponent.builder().vehicleModule(new VehicleModule()).build();
        vehicle = component.provideVehicle();

        Toast.makeText(this, String.valueOf(vehicle.getSpeed()), Toast.LENGTH_SHORT).show();
    }
}
After you Run your project Android Studio will generate DaggerVehicleComponent. Next step is import DaggerVehicleComponent like import me.proft.sandbox.module.DaggerVehicleComponent.
When you try to create a new object of the interface with the @Component annotation, you have to do it using the prefix DaggerNameOfTheComponentInterface, in this case DaggerVehicleComponent, and then use the builder method to call every module within.
You can see that the magic takes place on line vehicle = component.provideVehicle(). You are only asking for one object of the class Vehicle and the library is the one in charge of satisfying all the dependencies this object needs. Again you can see there is no new instantiation of any other object—everything is managed by the library.
You can now run the app and try it on your device or in an emulator. If you followed the tutorial step by step, you will see a Toast message indicating the initial value or the rpm variable.
How to inject SharedPreferences into Activity
Android components (activities, fragments, etc.) are instantiated by the Android framework which makes it difficult to use dependency injection on them. Fortunately, Dagger provides classes that simplifies the dependency injection into Android components.
Let's inject SharedPreferences into Activity.
First step is to create a model class which provides SharedPreferences object.
public class MyPreferences {
    private SharedPreferences sp;

    @Inject
    public MyPreferences(SharedPreferences sp) {
        this.sp = sp;
    }

    public void putData(String key, int data) {
        sp.edit().putInt(key,data).apply();
    }

    public int getData(String key) {
        return sp.getInt(key,0);
    }
}
With the @Inject annotation on the constructor, we instruct Dagger that an object of this class can be injected into other objects. Dagger automatically calls this constructor, if an instance of this class is requested.
Adjust your activity to receive an instance of MyPreferences.
public class MainActivity extends AppCompatActivity {
    private String TAG = MainActivity.class.getSimpleName();

    @Inject
    MyPreferences preferences;

    @Override
    protected void onCreate(Bundle savedInstanceState) {
        AndroidInjection.inject(this);

        super.onCreate(savedInstanceState);
        setContentView(R.layout.activity_main);

        preferences.putData("someValue", 1);
        Log.d(TAG, "onCreate: " + preferences.getData("someValue"));
    }
}
Because activities are managed by Android there is only one place to hook into their lifecycle, i.e. via provided methods like onCreate.
Above piece of code will get our MyApplication object which extended DaggerApplication and will try to add this Activity to the graph, and it will fail as Android constructed instances need an additional factory set up for each (for MainActivity). Fortunately Dagger gives as an ability to do it without too much code:
@Module
public abstract class ActivityBindingModule {
    @ActivityScoped
    @ContributesAndroidInjector
    abstract MainActivity mainActivity();
}
Above module was added to main component as well. It will generate code which will contain necessary factories for each of the methods.
@ActivityScoped attention is manually created annotation.
@Documented
@Scope
@Retention(RetentionPolicy.RUNTIME)
public @interface ActivityScoped {}
It helps in creating a singleton object. When this annotation is added with @Provides annotation than it makes dagger to create an object only once and use same object in future. If you are not using it then you may end up creating the new objects again and again which you might not want to do.
Create an application object.
public class MyApplication extends DaggerApplication {
    @Override
    public void onCreate() {
        super.onCreate();
    }

    @Override
    protected AndroidInjector applicationInjector() {
        return DaggerAppComponent.builder()
                .application(this)
                .build();
    }
}
Register the Application class via the manifest like the following.
<application
    android:name=".MyApplication"
    android:allowBackup="true"
    android:icon="@mipmap/ic_launcher"
    android:label="@string/app_name"
    android:theme="@style/AppTheme">
    ...
</application>
Create a module named SharedModule like the following.
@Module
public class SharedModule {
    @Provides
    SharedPreferences provideSharedPreferences(Context ctx) {
        return PreferenceManager.getDefaultSharedPreferences(ctx);
    }
}
The new module SharedModule contains provideSharedPreferences method which is annotated with @Provides which means that wherever object of SharedPreferences is needed then provide this object. But it required Context to work. This context was available as we have access to application object:
@Module
public abstract class AppModule {
    @Binds
    abstract Context bindContext(Application application);
}
Above module configurations could not be mixed because of the Provides and Binds annotation usage. And both of them were set up in the main component:
@Singleton
@Component(modules = {AppModule.class, SharedModule.class,
    ActivityBindingModule.class,
    AndroidSupportInjectionModule.class})
public interface AppComponent extends AndroidInjector<MyApplication> {
    @Component.Builder
    interface Builder {
        @BindsInstance
        AppComponent.Builder application(Application application);
        AppComponent build();
    }
}
This component is responsible for injecting the Application class. In the @Component annotation the modules are specified which are used to create the implementation of the component. While we reference our ActivityBindingModule to inject activities, we also reference the AndroidInjectionModule which is needed to ensure the binding of the Android base types (Activities, Fragments, etc.).
Select Build > Make Project to trigger the generation of the code.
Quote
Categories
- Android
- AngularJS
- Databases
- Development
- Django
- iOS
- Java
- JavaScript
- LaTex
- Linux
- Meteor JS
- Python
- Science
Archive ↓
- September 2024
- December 2023
- November 2023
- October 2023
- March 2022
- February 2022
- January 2022
- July 2021
- June 2021
- May 2021
- April 2021
- August 2020
- July 2020
- May 2020
- April 2020
- March 2020
- February 2020
- January 2020
- December 2019
- November 2019
- October 2019
- September 2019
- August 2019
- July 2019
- February 2019
- January 2019
- December 2018
- November 2018
- August 2018
- July 2018
- June 2018
- May 2018
- April 2018
- March 2018
- February 2018
- January 2018
- December 2017
- November 2017
- October 2017
- September 2017
- August 2017
- July 2017
- June 2017
- May 2017
- April 2017
- March 2017
- February 2017
- January 2017
- December 2016
- November 2016
- October 2016
- September 2016
- August 2016
- July 2016
- June 2016
- May 2016
- April 2016
- March 2016
- February 2016
- January 2016
- December 2015
- November 2015
- October 2015
- September 2015
- August 2015
- July 2015
- June 2015
- February 2015
- January 2015
- December 2014
- November 2014
- October 2014
- September 2014
- August 2014
- July 2014
- June 2014
- May 2014
- April 2014
- March 2014
- February 2014
- January 2014
- December 2013
- November 2013
- October 2013