Getting stared with Floating Action Button and Snackbar Android 04.07.2016
![]()
Android Design Support Library contains a number of different components that allow many of the key features of material design to be built into Android applications, some of them are Floating Action Button, Snackbar and TabLayout.
The Floating Action Button is a button which appears to float above the surface of the user interface of an app and is generally used to promote the most common action within a user interface screen, for example, to add an entry to a list of contacts or to send an email from within the app.
To conform with the material design guidelines, there are a number of rules that should be followed when using Floating Action Buttons (FAB).
- FAB must be circular and can be either 56 x 56dp (Default) or 40 x 40dp (Mini) in size.
- FAB should be positioned a minimum of 16dp from the edge of the screen on phones and 24dp on desktops and tablet devices.
- FAB must contain an interior icon that is 24x24dp in size (regardless of the size) and it is recommended that each user interface screen have only one FAB.
The Snackbar component provides a way to present the user with information in the form of a panel that appears at the bottom of the screen. Snackbar instances contain a brief text message and an optional action button which will perform a task when tapped by the user. Once displayed, a Snackbar will either timeout automatically or can be removed manually by the user via a swiping action. During the appearance of the Snackbar the app will continue to function and respond to user interactions in the normal manner.
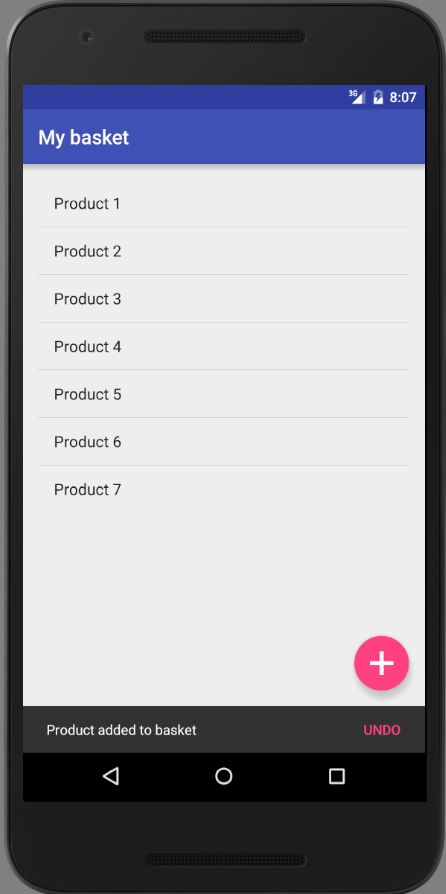
Let's create simple app that will add new product to basket by clicking on FAB. After clicking we can remove product from basket using Snackbar.
FAB
You should place a FAB inside CoordinatorLayout. There are some configurable options of FAB
- You can position the floating button by using
layout_gravityattribute. - FAB supports two sizes normal and mini. You can define the size of the button by using
app:fabSizeattribute. - By default, FAB takes
colorAccentas background color. If you want to change the background of FAB, useapp:backgroundTintattribute to define your own background color.
First, in Android Studio, go to File > New Project and fill all the details required to create a new project.
Second, open build.gradle and add design support library dependency.
# file build.gradle
dependencies {
    compile fileTree(dir: 'libs', include: ['*.jar'])
    testCompile 'junit:junit:4.12'
    compile 'com.android.support:appcompat-v7:23.1.1'
    compile 'com.android.support:design:23.1.1'
}
Third, open dimens.xml and add below dimensions.
#file dimens.xml
<resources>
    <dimen name="activity_horizontal_margin">16dp</dimen>
    <dimen name="activity_vertical_margin">16dp</dimen>
    <dimen name="fab_margin">16dp</dimen>
</resources>
Fifth, open the layout file of main activity (activity_main.xml) and do the below changes. You can see the FAB is added in the below layout.
<?xml version="1.0" encoding="utf-8"?>

<android.support.design.widget.CoordinatorLayout xmlns:android="http://schemas.android.com/apk/res/android"
    xmlns:app="http://schemas.android.com/apk/res-auto"
    xmlns:tools="http://schemas.android.com/tools"
    android:layout_width="match_parent"
    android:layout_height="match_parent"
    android:fitsSystemWindows="true"
    tools:context="me.proft.fabdemo.MainActivity">

    <include layout="@layout/content_main" />

    <android.support.design.widget.FloatingActionButton
        android:id="@+id/fab"
        android:layout_width="wrap_content"
        android:layout_height="wrap_content"
        android:layout_gravity="bottom|end"
        android:layout_margin="@dimen/fab_margin"
        android:src="@drawable/add" />

</android.support.design.widget.CoordinatorLayout>
Sixth, create another xml layout named content_main.xml and add the below code. This layout contains the actual content of the activity except the toolbar and fab.
<?xml version="1.0" encoding="utf-8"?>
<RelativeLayout xmlns:android="http://schemas.android.com/apk/res/android"
    xmlns:app="http://schemas.android.com/apk/res-auto"
    xmlns:tools="http://schemas.android.com/tools"
    android:layout_width="match_parent"
    android:layout_height="match_parent"
    android:paddingBottom="@dimen/activity_vertical_margin"
    android:paddingLeft="@dimen/activity_horizontal_margin"
    android:paddingRight="@dimen/activity_horizontal_margin"
    android:paddingTop="@dimen/activity_vertical_margin"
    app:layout_behavior="@string/appbar_scrolling_view_behavior"
    tools:context="me.proft.fabdemo.MainActivity"
    tools:showIn="@layout/activity_main">

    <ListView
        android:id="@+id/basket"
        android:layout_width="match_parent"
        android:layout_height="wrap_content" >
    </ListView>

</RelativeLayout>
The click event listener of FAB is same as a normal button click event. Add the below code to your MainActivity.java to take appropriate action when FAB is clicked.
// file MainActivity.java

public class MainActivity extends AppCompatActivity {
    ArrayList<String> basket = new ArrayList<String>();
    ArrayAdapter<String> adapter;
    private ListView lvBasket;
    private Integer counter = 1;

    View.OnClickListener removeProduct = new View.OnClickListener() {
        @Override
        public void onClick(View view) {
            basket.remove(basket.size() -1);
            adapter.notifyDataSetChanged();
            Snackbar.make(view, "Product removed", Snackbar.LENGTH_LONG).setAction("Action", null).show();
        }
    };

    @Override
    protected void onCreate(Bundle savedInstanceState) {
        super.onCreate(savedInstanceState);
        setContentView(R.layout.activity_main);

        lvBasket = (ListView) findViewById(R.id.basket);

        basket.add("Product " + counter.toString());
        adapter = new ArrayAdapter(this, android.R.layout.simple_list_item_1, basket);
        lvBasket.setAdapter(adapter);

        FloatingActionButton fab = (FloatingActionButton) findViewById(R.id.fab);
        fab.setOnClickListener(new View.OnClickListener() {
            @Override
            public void onClick(View view) {
                ++counter;
                basket.add("Product " + counter.toString());
                adapter.notifyDataSetChanged();

                Snackbar.make(view, "Product added to basket", Snackbar.LENGTH_LONG)
                    .setAction("Undo", removeProduct).show();
            }
        });

    }
}
Code on github.
Here is how to change FAB's own color
app:backgroundTint="@colo/colorPrimary"
Here is how to change FAB’s icon color :
android:tint="@color/myWhite"
Here is how to give elevation :
app:elevation="6dp"
Here is how to change FAB’s size :
app:fabSize="normal"
Here is how to give border on FAB :
app:borderWidth="4dp"
How to Create Expandable Floating Action Button Menu
Floating action buttons adjust their position and visibility in response to other UI elements on the screen.
First define all FAB
<?xml version="1.0" encoding="utf-8"?>
<RelativeLayout xmlns:android="http://schemas.android.com/apk/res/android"
    android:layout_width="match_parent"
    android:layout_height="match_parent"
    xmlns:app="http://schemas.android.com/apk/res-auto">

    <android.support.design.widget.FloatingActionButton
        android:id="@+id/fab3"
        android:layout_width="45dp"
        android:layout_height="45dp"
        android:layout_gravity="bottom|end"
        android:layout_margin="5dp"
        app:srcCompat="@android:drawable/ic_btn_speak_now" />

    <android.support.design.widget.FloatingActionButton
        android:id="@+id/fab2"
        android:layout_width="45dp"
        android:layout_height="45dp"
        android:layout_gravity="bottom|end"
        android:layout_margin="5dp"
        app:srcCompat="@android:drawable/ic_menu_camera" />

    <android.support.design.widget.FloatingActionButton
        android:id="@+id/fab1"
        android:layout_width="45dp"
        android:layout_height="45dp"
        android:layout_gravity="bottom|end"
        android:layout_margin="5dp"
        app:srcCompat="@android:drawable/ic_dialog_map" />

    <android.support.design.widget.FloatingActionButton
        android:id="@+id/fab"
        android:layout_width="wrap_content"
        android:layout_height="wrap_content"
        android:layout_gravity="bottom|end"
        android:layout_margin="5dp"
        app:srcCompat="@android:drawable/ic_dialog_email" />
</RelativeLayout>
Second in the MainActivity class define all your FAB and perform the click like shown below
public class MainActivity extends AppCompatActivity {
    FloatingActionButton fab1, fab2, fab3;
    boolean isFABOpen;

    @Override
    protected void onCreate(Bundle savedInstanceState) {
        super.onCreate(savedInstanceState);
        setContentView(R.layout.activity_main);

        FloatingActionButton fab = findViewById(R.id.fab);
        fab1 = findViewById(R.id.fab1);
        fab2 = findViewById(R.id.fab2);
        fab3 = findViewById(R.id.fab3);
        fab.setOnClickListener(new View.OnClickListener() {
            @Override
            public void onClick(View view) {
                if(!isFABOpen) showFABMenu();
                else closeFABMenu();
            }
        });
    }

    private void showFABMenu(){
        isFABOpen=true;
        fab1.animate().translationY(-getResources().getDimension(R.dimen.offset1));
        fab2.animate().translationY(-getResources().getDimension(R.dimen.offset2));
        fab3.animate().translationY(-getResources().getDimension(R.dimen.offset3));
    }

    private void closeFABMenu(){
        isFABOpen=false;
        fab1.animate().translationY(0);
        fab2.animate().translationY(0);
        fab3.animate().translationY(0);
    }
}
Third define dimensions inside <em>res -> values -> dimens.xml</em>
<?xml version="1.0" encoding="utf-8"?>
<resources>
    <dimen name="offset1">65dp</dimen>
    <dimen name="offset2">115dp</dimen>
    <dimen name="offset3">165dp</dimen>
</resources>
Snackbar
Let's look at Snackbar in details. Snackbar is simply replacement of Toast in Material Design Library. Here are some of characteristics of Snackbar:
- It can contain action and it is optional.
- It appears above most elements on the screen.
- It animate from bottom of screen.
- It should contain very short string/message.
- Only one
Snackbarcan be displayed at a time same asToast.
Syntax:
Snackbar.make(view, message, duration)
    .setAction(action message, click listener)
    .show();
Attributes:
viewcan be parent view to holdSnackbar.messagecan be a simple string which can be displayed inSnackbar.durationwill be same as Toast (LENGHT_SHORT or LENGTH_LONG).
Methods:
make()method makes snackbar.setAction()method sets an action.show()method shows a snackbar.
Before use don't foregt to add design support library in gradle file.
compile 'com.android.support:design:25.3.1'
Example:
View root = activity.findViewById(android.R.id.content);

Snackbar sb = Snackbar.make(root, "Object deleted", Snackbar.LENGTH_SHORT)
    .setAction("UNDO", new View.OnClickListener() {
        @Override
        public void onClick(View v) {
            // perform anything for the action selected
            Toast.makeText(activity, "Delete pressed", Toast.LENGTH_SHORT).show();
        }
    });

// changing message text color
sb.setActionTextColor(Color.RED);

// changing action button text color
View sbView = sb.getView();
TextView textView = (TextView) sbView.findViewById(android.support.design.R.id.snackbar_text);
textView.setTextColor(Color.YELLOW);

// changing background color
View snackbarBg = sb.getView();
int color = ContextCompat.getColor(activity, R.color.colorPrimary);
snackbarBg.setBackgroundColor(color);

sb.show();
Snackbar example in Kotlin
class MainActivity : AppCompatActivity() {

    override fun onCreate(savedInstanceState: Bundle?) {
        super.onCreate(savedInstanceState)
        setContentView(R.layout.activity_main)

        // Button click listener
        button_simple.setOnClickListener{
            Snackbar.make(
                    root_layout, // Parent view
                    "Hello Snackbar!", // Message to show
                    Snackbar.LENGTH_SHORT // How long to display the message.
            ).show()
        }

        // Button to show a snack bar with action enabled
        button_action.setOnClickListener{
            // Change the app background color
            root_layout.setBackgroundColor(Color.YELLOW)

            // Show a snack bar for undo option
            Snackbar.make(
                    root_layout, // Parent view
                    "We changes app background color.", // Message to show
                    Snackbar.LENGTH_LONG //
            ).setAction( // Set an action for snack bar
                    "Undo", // Action button text
                    { // Action button click listener
                        // Do something when undo action button clicked
                        root_layout.setBackgroundColor(Color.parseColor("#f2f2f2"))
            }).show() // Finally show the snack bar
        }

        // Customize the snack bar style
        button_style.setOnClickListener{
            // Initialize a new snack bar instance
            val snackbar = Snackbar.make(
                    root_layout,
                    "This is a styled snack bar.",
                    Snackbar.LENGTH_INDEFINITE
            )

            // Get the snack bar root view
            val snack_root_view = snackbar.view

            // Get the snack bar text view
            val snack_text_view = snack_root_view
                    .findViewById<TextView>(android.support.design.R.id.snackbar_text)

            // Get the snack bar action view
            val snack_action_view = snack_root_view
                    .findViewById<Button>(android.support.design.R.id.snackbar_action)

            // Change the snack bar root view background color
            snack_root_view.setBackgroundColor(Color.parseColor("#FFCFBEB4"))

            // Change the snack bar text view text color
            snack_text_view.setTextColor(Color.RED)

            // Change snack bar text view text style
            snack_text_view.setTypeface(Typeface.MONOSPACE,Typeface.BOLD_ITALIC)

            // Change the snack bar action button text color
            snack_action_view.setTextColor(Color.YELLOW)

            // Set an action for snack bar
            snackbar.setAction("Hide Me",{
                // Hide the snack bar
                snackbar.dismiss()
            })

            // Finally, display the snack bar
            snackbar.show()
        }
    }
}
Useful libs
Quote
Categories
- Android
- AngularJS
- Databases
- Development
- Django
- iOS
- Java
- JavaScript
- LaTex
- Linux
- Meteor JS
- Python
- Science
Archive ↓
- September 2024
- December 2023
- November 2023
- October 2023
- March 2022
- February 2022
- January 2022
- July 2021
- June 2021
- May 2021
- April 2021
- August 2020
- July 2020
- May 2020
- April 2020
- March 2020
- February 2020
- January 2020
- December 2019
- November 2019
- October 2019
- September 2019
- August 2019
- July 2019
- February 2019
- January 2019
- December 2018
- November 2018
- August 2018
- July 2018
- June 2018
- May 2018
- April 2018
- March 2018
- February 2018
- January 2018
- December 2017
- November 2017
- October 2017
- September 2017
- August 2017
- July 2017
- June 2017
- May 2017
- April 2017
- March 2017
- February 2017
- January 2017
- December 2016
- November 2016
- October 2016
- September 2016
- August 2016
- July 2016
- June 2016
- May 2016
- April 2016
- March 2016
- February 2016
- January 2016
- December 2015
- November 2015
- October 2015
- September 2015
- August 2015
- July 2015
- June 2015
- February 2015
- January 2015
- December 2014
- November 2014
- October 2014
- September 2014
- August 2014
- July 2014
- June 2014
- May 2014
- April 2014
- March 2014
- February 2014
- January 2014
- December 2013
- November 2013
- October 2013