Data flow in SwiftUI: State, Binding, StateObject, ObservedObject iOS 22.05.2021
In SwiftUI, everything focuses mostly on the state, and when it mutates or alters, the states act as the source of truth that drives the flow of data in your app.
Before we start you should be familiar with property wrappers which enhance the behavior of variables.
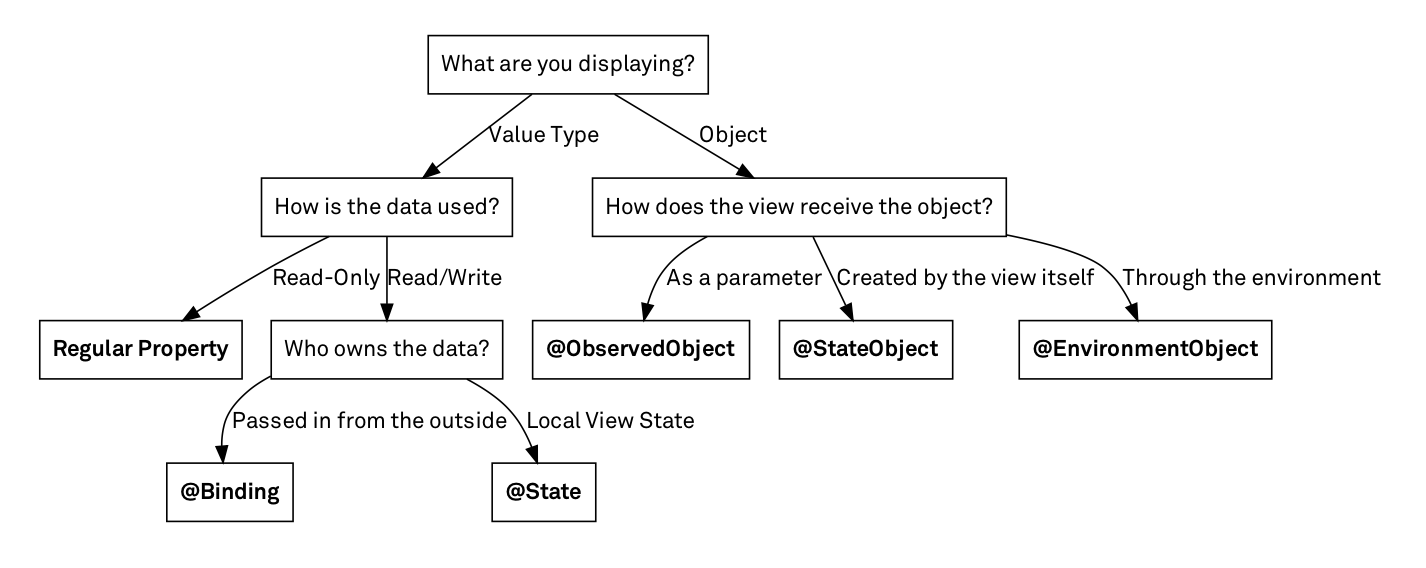
Each wrapper indicates a different source of data:
@Statevariables are owned by the view. SwiftUI ensures that this view is updated whenever the value of the state variable changes. Apple encourages you to mark theseprivateto emphasize that a@Statevariable is owned and managed by that view specifically.@Statebinding variables are only in memory for the lifetime of the view.@Bindingdeclares dependency on a@Statevariable owned by another view, which uses the$prefix to pass a binding to this state variable to another view. In the receiving view,@Bindingvariable is a reference to the data, so it doesn't need an initial value. So, with@Binding, you create a property similar to a state property, but with the data stored elsewhere, in a state property or an observable object of an ancestor view.@ObservedObjectdeclares dependency on a reference type that conforms to theObservableObjectprotocol. It implements anobjectWillChangeproperty to publish changes to its data. The class can define one or more@Publishedproperties.@EnvironmentObjectdeclares dependency on some shared data — data that's visible to all views in the app. It's a convenient way to pass data indirectly, instead of passing data from parent view to child to grandchild, especially if the child view doesn't need it.
State
State is the simplest source of truth your app can have and used to store state that is local to a view layout. It is designed to contain simple value types, such as Ints, Strings (for example, value in a text field), and Bools (for example, toggle button).
@State works by re-computing the body variable of your view any time it updates. So if you have some State in your view that keeps track of an integer, and you add 1 to the integer, your State will see this and re-render the view.
@State private var firstName = ""
A binding to a State property is performed by prefixing the property name with a $ sign. In following snippet we do a binding between TextField view and the firstName state property.
struct ContentView: View {
    @State private var firstName = ""
    @State private var isAgreement = false

    var body: some View {
        VStack {
            TextField("Enter your name", text: $firstName)
            Text(firstName)
            Image(systemName: isAgreement ? "checkmark.square" : "square")
            Toggle(isOn: $isAgreement) {
                Text("Agree to ...")
            }
        }
    }
}
More handy example
struct Todo: Identifiable, Equatable {
    let id = UUID()
    let description: String
    var done: Bool
}

private extension Array where Element == Todo {
    mutating func toggleStatus(for todo: Todo) {
        guard let index = self.firstIndex(where: { $0 == todo }) else { return }
        self[index].done.toggle()
    }
}

struct ContentView: View {
    @State private var todos: [Todo] = [
        .init(description: "Learn SwiftUI", done: false),
        .init(description: "Read a book", done: false),
        .init(description: "Do workout", done: false)
    ]

    var body: some View {
        NavigationView {
            List {
                ForEach(todos) { todo in
                    HStack {
                        Text(todo.description).strikethrough(todo.done)
                        Spacer()
                        Image(systemName: todo.done ? "checkmark.square" : "square")
                    }
                    .contentShape(Rectangle())
                    .onTapGesture {
                        todos.toggleStatus(for: todo)
                    }
                }
            }.navigationBarTitle("TODOs")
        }
    }
}
Use @State when the view itself creates (and owns) the instance you want to wrap and you're wrapping a value type (struct or enum).
Binding
The @Binding property wrapper is used for properties that are passed by another view. The view that receives the binding is able to read the bound property, respond to changes made by the parent view, and it has write access to the property in other words @Binding creates two-way binding between parent's variable and child's variable.
Consider two views which has parent-child relation
struct AgreementView: View {
    @Binding var isAgreement: Bool

    var body: some View {
        Image(systemName: isAgreement ? "checkmark.square" : "square")
    }
}

struct ContentView: View {
    @State private var isAgreement = true
    @State private var firstName = ""

    var body: some View {
        VStack {
            TextField("Enter your name", text: $firstName)
            Text(firstName)
            Toggle(isOn: $isAgreement) {
                Text("Agree to ...")
            }
            AgreementView(isAgreement: $isAgreement)
        }
    }
}
There is the access from AgreementView child view to the isAgreement state property from parent view.
Use @Binding when you need read- and write access to a property that's owned by a parent view and you're wrapping a value type (struct or enum).
Observable Objects
We should use @ObservedObject to handle data that lives outside of SwiftUI, like your business logic. We can share it between multiple independent views which can subscribe and observe changes on that object, and as soon as changes appear SwiftUI rebuilds all views bound to this object.
ObservableObject is part of the Combine framework, which was first introduced with iOS 13 to make it easier to establish relationships between publishers and subscribers. You can use the @Published property wrapper when declaring a property to send updates to all subscribers whenever the value is updated.
import Foundation
import Combine

class DemoViewModel: ObservableObject {
    @Published var version = 5
    @Published var title = "Swift"
}
Inside a view you can use either the @ObservedObject or @StateObject property wrapper to subscribe to the ObservableObject. Once subscribed, the view has access to the @Published values.
import SwiftUI

struct ContentView: View {
    @ObservedObject var vm = DemoViewModel()

    var body: some View {
        Text("\(vm.title) \(vm.version)")
    }
}
Whenever the @Published data changes, SwiftUI will automatically re-render the view layout to display the new state.
Use @ObservedObject when you need to respond to changes in an ObservableObject and you're wrapping a reference types.
State Objects
Starting from iOS 14 you can use the StateObject property wrapper which is an alternative to the @ObservedObject wrapper.
A StateObject is similar to a State variable and an ObservedObject is similar to a Binding variable. While a State and Binding variable can hold a primitive data type, a StateObject and ObservedObject can hold an reference object with multiple properties.
Using StateObject guarantees that the reference is owned by the view in which it is declared (instead of ObservedObject) and will not be destroyed by SwiftUI. SwiftUI creates @StateObject only once for every container that declares it and keeps it outside of view lifecycle.
Use @StateObject to create any type that is more complex than what @State can handle. Ensure that the type conforms to ObservableObject, and has @Published wrappers on the properties you would like to cause the view to re-render.
As a general rule, always use @StateObject when you are instantiating a model.
import SwiftUI

struct ContentView: View {
    @StateObject var vm = DemoViewModel()

    var body: some View {
        Text("\(vm.title) \(vm.version)")
    }
}
Use @StateObject when you need to respond to changes in an ObservableObject and you're wrapping a reference types and the view will not be destroyed by SwiftUI during lifecycle of the view.
Environment Objects
@EnvironmentObject is for those scenarios where you need to use an ObservableObject but the views aren’t direct parent/child pairs. You may want to use a piece of data on the home view, and also deep within a navigation views, but you don’t want (or need) every view in between to know about that data — that would make for some messy code.
Use @EnvironmentObject to consume an ObservableObject that has already been created in a parent view and then attached via the view’s environmentObject(). It does this at run time, as opposed to at compile-time, so if you haven’t set up your environment object properly, your app will crash when it goes to use it.
@StateObject var vm = DemoViewModel()

NavigationLink(destination: SecondView(vm)) {
    Text("Next Screen")
}
In the above snippet, a navigation link is used to navigate to another view named SecondView, passing through a reference to the vm observed object.
The declaration of a EnvironmentObject is similar to a ObservableObject. The main difference is in usage, EnvironmentObject is stored in the environment of the view in which it is declared and can be accessed by all child views without needing to be passed from view to view.
class TemperatureSetting: ObservableObject {
    @Published var temp = 21.0
}
Usage of EnvironmentObject is as simple as declaration of a varible with new property wrapper instead of the @StateObject or @ObservedObject wrapper.
struct HeaterView: View {
    @EnvironmentObject var setting: TemperatureSetting

    var body: some View {
        Slider(value: $setting.temp, in: 0...100)
    }
}

struct TemperatureDisplayView: View {
    @EnvironmentObject var setting: TemperatureSetting

    var body: some View {
        Text("Temperature = \(setting.temp)")
    }
}
Now we have an ObservableObject with name TemperatureSetting and two views that link with an environment object. The perfect place to do this is in the parent view. In the following snippet, both views are child views of main ContentView:
struct ContentView: View {
    let setting = TemperatureSetting()

    var body: some View {
        VStack {
            HeaterView()
            TemperatureDisplayView()
        }.environmentObject(setting)
    }
}
Use @EnvironmentObject when your data is used across more than a few nearby views.
Quote
Categories
- Android
- AngularJS
- Databases
- Development
- Django
- iOS
- Java
- JavaScript
- LaTex
- Linux
- Meteor JS
- Python
- Science
Archive ↓
- September 2024
- December 2023
- November 2023
- October 2023
- March 2022
- February 2022
- January 2022
- July 2021
- June 2021
- May 2021
- April 2021
- August 2020
- July 2020
- May 2020
- April 2020
- March 2020
- February 2020
- January 2020
- December 2019
- November 2019
- October 2019
- September 2019
- August 2019
- July 2019
- February 2019
- January 2019
- December 2018
- November 2018
- August 2018
- July 2018
- June 2018
- May 2018
- April 2018
- March 2018
- February 2018
- January 2018
- December 2017
- November 2017
- October 2017
- September 2017
- August 2017
- July 2017
- June 2017
- May 2017
- April 2017
- March 2017
- February 2017
- January 2017
- December 2016
- November 2016
- October 2016
- September 2016
- August 2016
- July 2016
- June 2016
- May 2016
- April 2016
- March 2016
- February 2016
- January 2016
- December 2015
- November 2015
- October 2015
- September 2015
- August 2015
- July 2015
- June 2015
- February 2015
- January 2015
- December 2014
- November 2014
- October 2014
- September 2014
- August 2014
- July 2014
- June 2014
- May 2014
- April 2014
- March 2014
- February 2014
- January 2014
- December 2013
- November 2013
- October 2013