Scheduling operations via WorkManager in Android Android 04.09.2019
Applications performing tasks in the background is one of the most powerful features of Android, but also the most likely to result in significant battery drain. Having multiple applications wake, and keep the device awake, can significantly reduce the expected battery life of a device.
Once a task is scheduled, WorkManager will run it regardless of whether the user navigates away from the related screen, exits your application, or even reboots their device. This makes it ideal for tasks requiring guaranteed execution.
By default, WorkManager runs each task immediately, but you can also specify the conditions a device needs to fulfill before the task can run, including network conditions, charging status, and the amount of storage space available on the device. For example, you can reduce the amount of mobile data your app consumes by delaying data-intensive tasks until the device is connected to an unmetered network, or only perform battery-intensive tasks when the device is charging.
The JobScheduler API was introduced in Android 5.0 Lollipop (API Level 21) to serve as a coordinator for all background work requested by any application running on a device. It effectively batches the background jobs of multiple applications, introducing efficiencies in both battery and memory use, which serves to reduce the overall impact of each individual background job.
The WorkManager is an Android Architecture Components that provides a rich, backward-compatible way to use the features provided by the platform Job Scheduler.
Like the JobScheduler, the WorkManager is intended for work that must be completed even if your app has been closed. When work is scheduled, the WorkManager will determine the best available alternative to execute scheduled work: the latest available version of the platform Job Scheduler, the Firebase Job Dispatcher, or even the Alarm Manager. The scheduled work is guaranteed to run, even if your app has been terminated or the device has been rebooted.

WorkManager provides flexible APIs and additional benefits over other JobSchedulers:
- Support the required constraints, such as network, storage, charging status
- Support one time job or periodic tasks
- Chaining of a serial tasks to run sequentially or parallelly
- Handle API level compatibility back to API level 14
- It works even without Google Play Service
So, WorkManager is the recommended solution for background execution, taking into account all OS background execution limits. If you need to guarantee that a task will run even if it is deferred, you should use WorkManager. This API allows you to schedule jobs (one-off or repeating) and chain and combine jobs. You can also apply execution constraints to them such as triggering when the device is idle or charging, or executing when a content provider changes. Another nice feature of WorkManager is that it respects power-management features, so that if a job is scheduled to run at a defined time and the device is in Doze at that time, WorkManager will try to run the task during a maintenance window if the constraints are met or after Doze is lifted.
It is really important to understand, that only a certain kind of background work is useful to hand off. Tasks that don’t need to be executed instantly, but need a guarantee to be executed even after your application’s process death are most suited to hand off to WorkManager.
To start, consider the following diagram, which shows how WorkManager works and architecture, you follow the steps:
- You create
Workersubclass that implementdoWork()method for your job - Then create
WorkRequestthat specifies theWorkerand all arguments - The last step is to enqueue your job by passing the
WorkRequesttoWorkManagerinstance
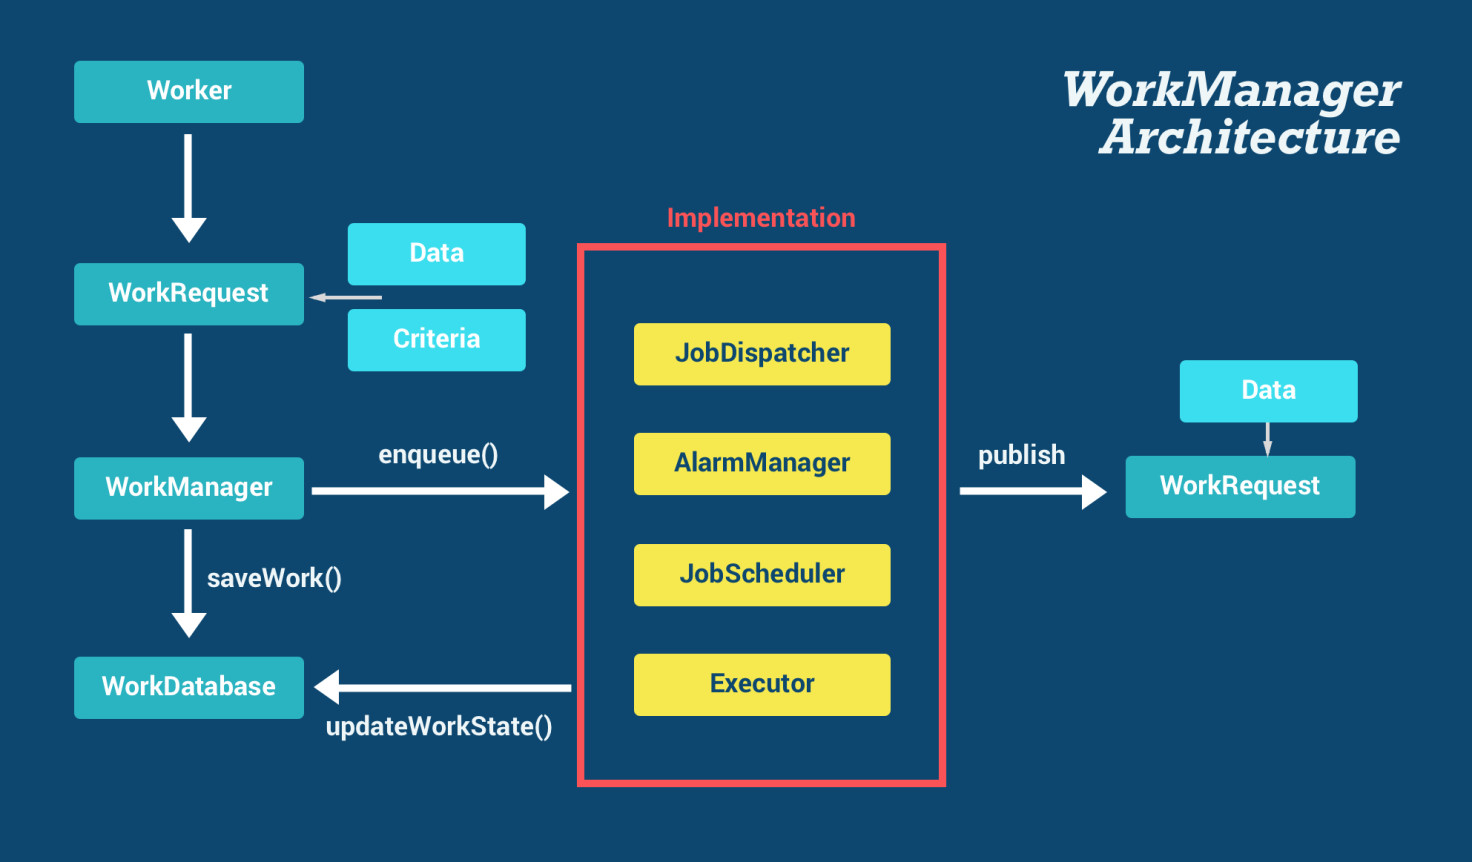
The basic classes of WorkManager:
Worker. The work needs to be defined here.WorkRequest. It defines a work, like which worker class is going to be executed.WorkManager. It enqueues and managers the work request.WorkInfo. It contains information about the work.
To use the WorkManager, add a dependency to the Android Architecture Components Work Manager library to your app module’s Gradle Build file:
dependencies {
    def work_version = "2.2.0"
    implementation "androidx.work:work-runtime-ktx:$work_version"
}
Check out this page for the newest version number.
Also update your app/build.gradle
android {
    ...
    compileOptions {
        sourceCompatibility = 1.8
        targetCompatibility = 1.8
    }

    kotlinOptions {
        jvmTarget = "1.8"
    }
}
The Work Manager API is similar to the Job Scheduler and Firebase Job Dispatcher. Begin by extending the Worker class, overriding its doWork handler to implement the background work to be executed. Return Worker.Result.SUCCESS to indicate the background work has been successfully completed, FAILURE to indicate it has failed and should not be retried, or RETRY to indicate Work Manager should retry the Worker at a later point:
The first step is to create a Worker that defines what needs to be executed. Therefore we need to subclass the Worker class and specify the work that needs to be done in the doWork() method.
class MyBackgroundWorker(var context: Context, params: WorkerParameters)
    : Worker(context, params) {

    companion object {
        val KEY_URL = "KEY_URL"
    }

    override fun doWork(): Result {
        // get data
        var url = inputData.getString(KEY_URL)?.run { this } ?: ""
        response = loadData(url)
        //...
        if (response.isSuccessful) {
            ...
            return Result.success()
        } else {
            if (response.code() in (500..599)) {
                Result.RETRY
            }
            return Result.failure()
        }
    }
}
To start this worker, you need to create WorkRequest that specifies which Worker class should perform the task, with any input data, constraints, or backoff strategy.
val data = workDataOf(KEY_URL to "http://en.proft.me")
val constraints = Constraints.Builder().setRequiredNetworkType(NetworkType.CONNECTED).build()

val worker = OneTimeWorkRequest.Builder(MyBackgroundWorker::class.java)
    .setInputData(data) // optional
    .addTag("work-tag") // optional
    .setConstraints(constraints) // optional
    .setBackoffCriteria(BackoffPolicy.EXPONENTIAL, 30, TimeUnit.SECONDS) // optional
    .build()

WorkManager.getInstance(context).enqueue(worker)
Once you’ve defined a Worker, request an instance of the Work Manager to request your Worker be executed using a OneTimeWorkRequest or PeriodicWorkRequest to schedule a one-off or repeating request, respectively.
Schedule a background worker to repeat every 12 hours
val periodicWork = PeriodicWorkRequest.Builder(
    MyBackgroundWorker::class.java,
    12, TimeUnit.HOURS
).build()
When a task is defined we should specify it is a periodic one or not. If it is periodic we will use PeriodicWorkRequest class, if not we will use OneTimeWorkRequest.
OneTimeWorkRequest
- It is used for non-repeating work
- It could have an initial delay
- It could be part of a chain or graph of work
PeriodicWorkRequest
- Used for tasks that need to execute periodically
- The minimum repeat interval that can be defined is 15 minutes (same as the JobScheduler API) and it cannot have an initial delay
- It cannot be part of a chain or graph of work
- It could have an initial delay
- The execution may be delayed because WorkManager is subject to OS battery optimizations, such as doze mode
If no constraints have been specified, the Work Manager will typically run the Worker immediately. Alternatively, you can use the Constraint.Builder to construct a Constraint, which specifies requirements - including battery and storage level, charging and idle status, and network connection type - and assign it to your Work Request using the setConstraints method:
val constraints = Constraints.Builder()
    .setRequiresDeviceIdle(true)
    .setRequiresCharging(true)
    .build()

val worker = OneTimeWorkRequest.Builder(MyBackgroundWorker::class.java)
    .setConstraints(constraints)
    .build()

WorkManager.getInstance(context).enqueue(work)
Here’s an example of other supported constraints:
val constraints = Constraints.Builder()
        .setRequiresBatteryNotLow(true)
        .setRequiredNetworkType(NetworkType.CONNECTED)
        .setRequiresCharging(true)
        .setRequiresStorageNotLow(true)
        .setRequiresDeviceIdle(true)
        .build()
If a Worker returns Result.retry(), WorkManager will reschedule the work. You can customize the backoff criteria when you make a new WorkRequest. This allows you to define when the work should be retried.
The backoff criteria is defined by two properties:
- BackoffPolicy, which by default is exponential, but can be set to linear.
- Duration, which defaults to 30 seconds.
The Work Manager also provides support for Worker chaining, and using Live Data to observe Work Status and associated output values. Chaining allows you to schedule Work Requests sequentially, effectively creating a dependency graph between independent Work Requests.
To create a new chained sequence, use the Work Manager’s beginWith method, passing in the first Work Request to execute. This will return a WorkContinuation object whose then method allows you to add the next Work Request, and so on. When the sequence definition is complete, you call enqueue on the final Work Continuation object:
WorkManager.getInstance()
    .beginWith(startWork)
    .then(secondWork)
    .then(lastWork)
    .enqueue()
Each beginWith and then method can accept multiple Work Request objects, all of which will then be run in parallel, and must complete, before the next Worker (or group of Workers) is run. It’s possible to create even more complex sequences by joining multiple chains together using the Work Continuation’s combine methods. In any case, each Worker is still subject to any Constraints you assign, and a permanent failure on any Worker in the chain will terminate the entire sequence.
When the Work Request has completed, you can extract any output Data assigned within your Worker implementation:
override fun doWork(): Result {
    val outputData = Data.Builder()
        .putInt(KEY_RESULT, result)
        .build()
    setOutputData(outputData)
    return Result.SUCCESS
}
The current status of any enqueued Work Request is reported using a WorkStatus within a Live Data object, and can be observed by calling the getStatusById method on a Work Manager instance, passing in the unique ID of the Work Request to monitor:
WorkManager.getInstance(this).getWorkInfoByIdLiveData(worker.id)
    .observe(this, Observer{ workStatus ->
        if (workStatus != null && workStatus.state == WorkInfo.State.SUCCEEDED) {
            // TODO Do something with the current status
        }
    })
To extract the output Data, use the Work Status getOutputData method, and specify the desired keys:
if (workStatus != null && workStatus.getState().isFinished()) {
    val myResult = workStatus.getOutputData().getInt(KEY_RESULT, defaultValue))
}
To cancel an enqueued Work Request, pass its UUID to the Work Manager’s cancelWorkById method:
val workId = worker.id
WorkManager.getInstance().cancelWorkById(workId);
To every work request you make, you can assign a tag. You can use this tag to cancel tasks. Suppose you want to cancel all tasks that are uploading images selected by the user, just give all of them the same tag and call cancelWorkByTag.
Example with retry
WorkManager’s KTX provides a sweeter syntax when you need to build a Data object to pass in or out a Worker class. In this case the Java syntax looks like:
Data myData = new Data.Builder()
    .putInt(KEY_ONE_INT, aInt)
    .putIntArray(KEY_ONE_INT_ARRAY, aIntArray)
    .putString(KEY_ONE_STRING, aString)
    .build();
In Kotlin we can do much better using the workDataOf helper function:
val data = workDataOf(
        KEY_MY_INT to myIntVar,
        KEY_MY_INT_ARRAY to myIntArray,
        KEY_MY_STRING to myString
    )
In addition to the worker classes available in Java (Worker, ListenableWorker and RxWorker), there’s a Kotlin only class that uses Kotlin’s Coroutines for your Work.
The main difference between a Worker class and a CoroutineWorker is that the doWork() method in a CoroutineWorker is a suspend function and can run asynchronous tasks, while Worker’s doWork() can only execute synchronous tasks. Another CoroutineWorker feature is that it automatically handles stoppages and cancellation while a Worker class needs to implement the onStopped() method to cover these cases.
Following is example of defination of worker
class MyWorker(appContext: Context, workerParams: WorkerParameters):
        CoroutineWorker(appContext, workerParams) {
    override suspend fun doWork(): Result = coroutineScope {
        val worker = this@MyWorker
        val context = applicationContext

        val name = inputData.getString(PARAM_NAME)

        var isScheduleNext = true
        try {
            // do something
            sendNotification("Simple Work Manager", "SUCCESS");
            Result.success()
        }
        catch (e: Exception) {
            // only retry 3 times
            if (runAttemptCount > 3) {
                return@coroutineScope Result.success()
            }

            // retry if network failure, else considered failed
            when(e.cause) {
                is SocketException -> {
                    isScheduleNext = false
                    Result.retry()
                }
                else -> {
                    Result.failure()
                }
            }
        }
        finally {
            if (isScheduleNext) {
                // schedule for next day
            }
        }
    }

    public void sendNotification(String title, String message) {
        NotificationManager notificationManager = (NotificationManager) getApplicationContext()
           .getSystemService(Context.NOTIFICATION_SERVICE);

        //If on Oreo then notification required a notification channel.
        if (android.os.Build.VERSION.SDK_INT >= android.os.Build.VERSION_CODES.O) {
            NotificationChannel channel = new NotificationChannel("default", "Default",
            NotificationManager.IMPORTANCE_DEFAULT);
            notificationManager.createNotificationChannel(channel);
        }

        NotificationCompat.Builder notification = new NotificationCompat.Builder(getApplicationContext(),
              "default")
                .setContentTitle(title)
                .setContentText(message)
                .setSmallIcon(R.mipmap.ic_launcher);

        notificationManager.notify(1, notification.build());
    }
}
Following is example of launch of worker
val workManager = WorkManager.getInstance(context)

// trigger at 8:30am
val alarmTime = LocalTime.of(8, 30)
var now = LocalDateTime.now().truncatedTo(ChronoUnit.MINUTES)
val nowTime = now.toLocalTime()

// if today's time had passed, schedule for next day
if (nowTime == alarmTime || nowTime.isAfter(alarmTime)) {
    now = now.plusDays(1)
}

now = now.withHour(alarmTime.hour).withMinute(alarmTime.minute) // .withSecond(alarmTime.second)
     // .withNano(alarmTime.nano)
val duration = Duration.between(LocalDateTime.now(), now)

val data = workDataOf(PARAM_NAME to "Timer 01")

val workRequest = OneTimeWorkRequestBuilder<MyWorker>()
    .setInitialDelay(duration.seconds, TimeUnit.SECONDS)
    .setInputData(data) // optional
    .build()

workManager.enqueueUniqueWork(WORK_ID, ExistingWorkPolicy.REPLACE, workRequest)

// cancel example
//val workManager = WorkManager.getInstance()
//workManager.cancelUniqueWork(WORK_ID)
How work runs
When you enqueue your WorkRequest:
- The Internal TaskExecutor immediately saves your WorkRequest info to the WorkManager database.
- Later, when the Constraints for the WorkRequest are met (which could be immediately), the Internal TaskExecutor tells the WorkerFactory to create a Worker.
- Then the default Executor calls your Worker’s doWork() method off of the main thread.
Quote
Categories
- Android
- AngularJS
- Databases
- Development
- Django
- iOS
- Java
- JavaScript
- LaTex
- Linux
- Meteor JS
- Python
- Science
Archive ↓
- September 2024
- December 2023
- November 2023
- October 2023
- March 2022
- February 2022
- January 2022
- July 2021
- June 2021
- May 2021
- April 2021
- August 2020
- July 2020
- May 2020
- April 2020
- March 2020
- February 2020
- January 2020
- December 2019
- November 2019
- October 2019
- September 2019
- August 2019
- July 2019
- February 2019
- January 2019
- December 2018
- November 2018
- August 2018
- July 2018
- June 2018
- May 2018
- April 2018
- March 2018
- February 2018
- January 2018
- December 2017
- November 2017
- October 2017
- September 2017
- August 2017
- July 2017
- June 2017
- May 2017
- April 2017
- March 2017
- February 2017
- January 2017
- December 2016
- November 2016
- October 2016
- September 2016
- August 2016
- July 2016
- June 2016
- May 2016
- April 2016
- March 2016
- February 2016
- January 2016
- December 2015
- November 2015
- October 2015
- September 2015
- August 2015
- July 2015
- June 2015
- February 2015
- January 2015
- December 2014
- November 2014
- October 2014
- September 2014
- August 2014
- July 2014
- June 2014
- May 2014
- April 2014
- March 2014
- February 2014
- January 2014
- December 2013
- November 2013
- October 2013