How to play audio file in Android Android 08.05.2018
Android smartphones offer amazing audio capabilities.
Following table shows a simplified version of the supported Android audio formats. There are many special rules and exceptions depending on device.
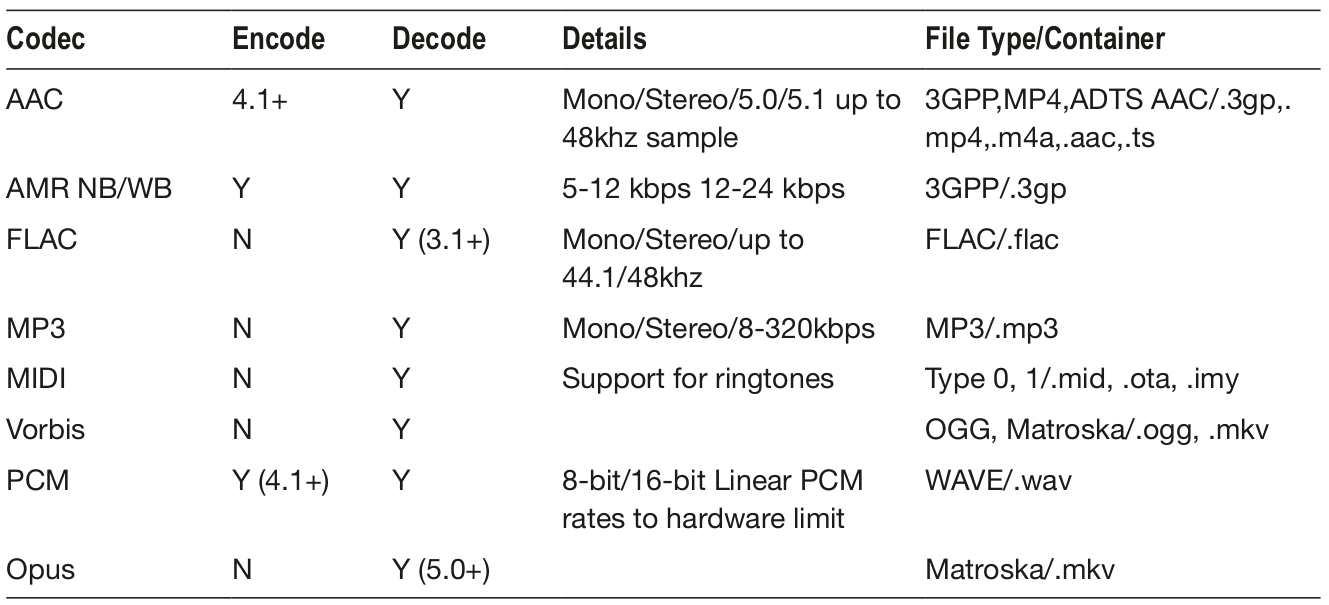
- Y indicates encoding or decoding is available (all SDK versions) for a codec.
- N indicates encoding is not available for a codec.
It can get confusing with all of the audio APIs and classes in Android. Let’s break it down. Following table summarizes the classes and APIs for Android audio. As you can see, many of these APIs have been around since the beginning of Android with API of level 1. Others have been added into Android more recently.
| Name | Description | API | Level |
|---|---|---|---|
| AudioTrack | Low-level API, not meant to be real time. Used in most audio apps. Manages and plays a single audio resource for Java applications. Streaming/decoding of PCM audio buffers to the audio sink for playback by "pushing" the data to the AudioTrack object. Supports .wav playback. | 22 | Low |
| AudioRecord | Manages the audio resources for Java applications to record audio from the hardware by "pulling" (reading) the data from the AudioRecord object. Can set rate, quality, encoding, channel config. | 22 | Low |
| AudioManager | AudioManager provides access to volume and ringer mode control. | 1 | |
| MediaPlayer | MediaPlayer class can be used to control playback of audio/video files and streams. Playback control of audio/video files and streams is managed as a state machine. | 1 | High |
| MediaRecorder | High-level API used to record audio and video. The recording control is based on a simple state machine. Does not support .wav or .mp3. Generally better to use Audio Record for more flexibility. | 18 | High |
| MediaStore | The media provider contains metadata for all available media on both internal and external storage devices. | 1 | |
| MediaFormat | MediaFormat is useful to read encoded files and every detail that is connected to the content. The format of the media data is specified as string/value pairs. Keys common to all audio/video formats. | 16 | |
| MediaCodec | MediaCodec class can be used to access low-level media codecs, such as encoder/decoder components. It is part of the Android low-level multimedia support infrastructure (normally used together with MediaExtractor, MediaSync, MediaMixer, MediaCrypto, MediaDrm, Image, Surface, and AudioTrack). | Low | |
| SoundPool | SoundPool uses the MediaPlayer service to decode the audio into a raw 16-bit PCM stream and play the sound with very low latency, helping the CPU decompression effort. Multiple audio streams at once. | 8 | High |
| AudioFormat | The AudioFormat class is used to access a number of audio formats and channel configuration constants that can be used in AudioTrack and AudioRecord. | 8 | |
| TextToSpeech | Synthesizes speech from text for immediate playback or to create a sound file. The constructor for the TextToSpeech class, using the default TTS engine. | 4/21 | |
| SpeechRecognition | This class provides access to the speech recognition service. The implementation of this API is likely to stream audio to remote servers to perform speech recognition. | 8 | |
| MediaExtractor | MediaExtractor facilitates extraction of demuxed, typically encoded, media data from a data source. Reads bytes from the encoded data whether it is an online stream, embedded resources, or local files. | 16 |
The high-level APIs MediaPlayer, MediaRecorder and SoundPool are very useful and easy to use when you need to play and record audio without the need for low level controls. The low-level APIs AudioTrack and AudioRecord are excellent when you need low-level control over playing and recording audio.
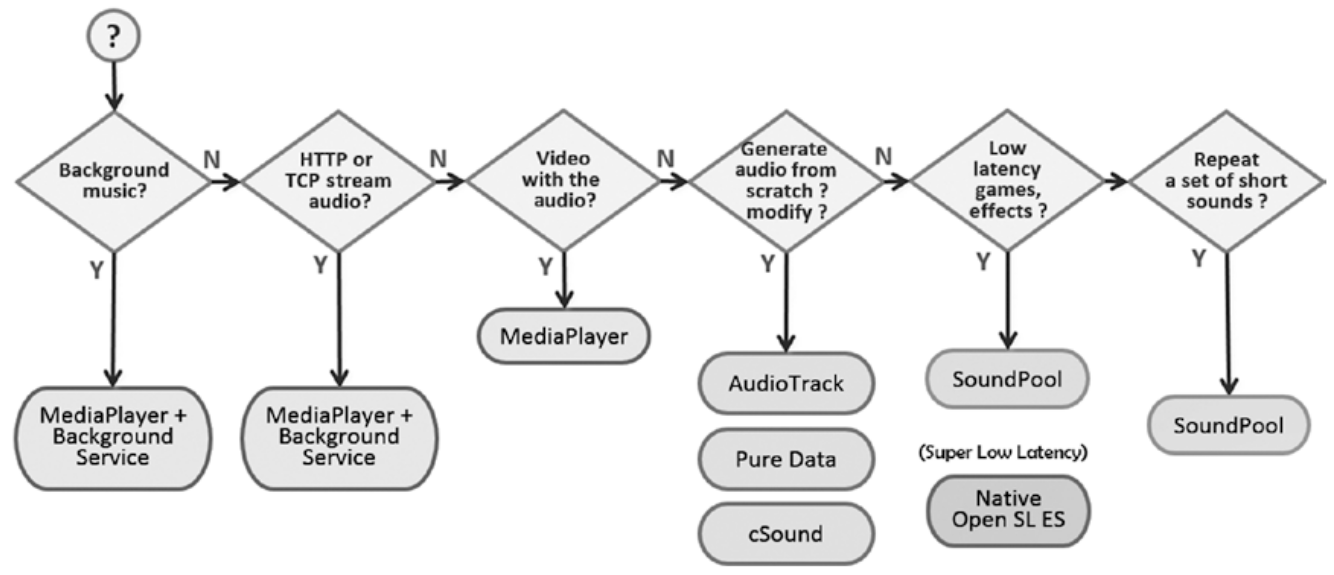
As with most of the functions available on the Android platform, there is almost always more than one way to accomplish a given task. Audio is no exception. Following figure shows the various classes and APIs you can employ to accomplish common audio tasks.
Latency
No discussion on audio would be complete without talking about latency. Audio latency has been one of the most annoying issues on the entire platform.
Android developers are second-class citizens when it comes to audio latency on our mobile platform. Android audio latency has seen improvements but still lags other platforms. The most recent significant improvements include
- OpenSL supported was added on Android 2.3+.
- USB Audio is included in Android 5.0+ (API 21), but is not yet supported by most devices.
Playing Audio
If you want to play audio in your Android apps, there are three APIs to choose from. You need to choose the approach that best matches your needs.
MediaPlayer. Streams and decodes in real time for local or remote files. Good for long clips and applications such as background music. More CPU and resource intensive. Relatively long initialization time.MediaPlayeris a state machine!SoundPool. Good for short audio effects or clips. Stored uncompressed in memory, 1MB limit. Clips must be fully loaded before playing. Supports volume and speed control, looping, simultaneous sounds, priorities.AudioTrack. Lowest-level audio API on Android. Provides a channel you can configure. Push and pull byte data to the channel. Configure rate, samples, audio format, etc. You can decode audio in unsupported formats.
In summary, MediaPlayer is the good general-purpose class to play a file, SoundPool is well suited for short audio effects, and AudioTrack lets you get into the low-level audio configurations.
OPEN SL ES was included in Android starting at version 2.3. AudioTrack and AudioRecord APIs make use of OPEN SL ES.
MediaPlayer has a lot of functionality and yet it is pretty simple to just play simple sounds. Once you generate your audio URI from the resourceID, you just start the MediaPlayer. The code is shown below. Notice that it is a simple process to invoke the .setDataSource, .prepare, and .start methods on the MediaPlayer object.
private void playMediaPlayer(int resId) (
    // Release any resources from previous MediaPlayer
    if (mp != null) mp.release();
    mp = new MediaPlayer();
    Uri u = Uri.parse("android.resource://me.proft.winamp/" + resId);
    mp.setDataSource(MainActivity.this, u);
    mp.prepare();
    mp.start();
}
Recall that SoundPool is ideal when you need to play short sounds.
Setup for SoundPool is a little more involved than with MediaPlayer because you have to load your sound, which can take a bit of time, so you use a listener to know when it is ready.
Once loaded, the onLoadComplete method will be triggered and you can then use the .play method to play the sound.
Notice the extra control you get on Priority, Volume, Repeat, and Frequency. This is one of the advantages for SoundPool. See the following key code:
private void playSoundPool(int soundID) {
    int MAX_STREAMS = 20;
    int REPEAT = 0;
    SoundPool soundPool = new SoundPool(MAX_STREAMS, AudioManager.STREAM_MUSIC, REPEAT);
    soundPool.setOnLoadCompleteListener(new OnLoadCompleteListener() {
        @Override
        public void onLoadComplete(SoundPool soundPool, int soundId, int status) {
            int priority = 0;
            int repeat = 0;
            float rate = 1.f; // Frequency Rate can be from .5 to 2.0
            // Set volume
            AudioManager mgr = (AudioManager)getSystemService(Context.AUDIO_SERVICE);
            float streamVolumeCurrent =
                mgr.getStreamVolume(AudioManager.STREAM_MUSIC);
            float streamVolumeMax =
                mgr.getStreamMaxVolume(AudioManager.STREAM_MUSIC);
            float volume = streamVolumeCurrent / streamVolumeMax;
            // Play it
            soundPool.play(soundId, volume, volume, priority, repeat, rate);
        }
    });
    soundPool.load(this, soundID, 1);
}
AudioTrack is the low-level API for playing audio. The PlaySound function shown below uses AudioTrack to play the sound with soundID. Notice that AudioTrack is run on a thread.
Inside the thread, the first thing you do is set up the sample rate and buffer size parameters. Remember to match the buffer size and sample rate for your device. In the code below, the buffer size is automatically calculated using the .getMinBufferSize method, while the sample rate is specified directly as 44,100 Hz.
You then invoke the .play method on the object and then invoke the .write method on the AudioTrack object to copy the raw PCM audio data to the object.
You can see this is a much lower level approach to producing audio. But, this ability to directly read and write buffers to the audio hardware gives you a lot of power including the ability to encode and decode.
private void playSound(final int soundID) {
    playingThread = new Thread(new Runnable() {
        public void run() {
            int minBufferSize = AudioTrack.getMinBufferSize(44100, STEREO, PCM_16BIT);
            AudioTrack audioTrack = new AudioTrack(STREAM, 44100, STEREO, PCM_16, BUFSZ, STREAM);
            audioTrack.play();
            int i = 0;
            int bufferSize = 512;
            byte [] buffer = new byte[bufferSize];
            InputStream inputStream = getResources().openRawResource(soundID);
            while((i = inputStream.read(buffer)) != -1) audioTrack.write(buffer, 0, i);
                inputStream.close();

            }
        }, "AudioRecorder Thread");
    playingThread.start();
}
For example, you may have an .mp3 song that has a very long duration. What happens if you try to play it using SoundPool? You will see that it is truncated after only a few seconds of playing. This is due to the SoundPool limitations with file size.
What happens if you try to play .mp3 files with AudioTrack? You will see this leads to unhandled exceptions, as AudioTrack only works with raw PCM data.
Playing Audio with a Background Service
For playing background music in your apps, the background service is the best architecture. This architecture allows you to play long-running music tracks in the background while performing other more critical operations in the foreground.
Following app plays the track audio.mp3 in the background. The song file is stored locally in the /res/raw folder.
Once the app is launched, the song will begin to play. You can see there are some very basic controls available, including Play and Pause buttons.
There is also an undocumented feature that allows you to skip forward in the track. The skip forward can be accomplished by long-pressing the Pause button. Each time you long-press the Pause button, the track will skip forward 30 seconds. This type of function is often implemented by providing a SeekBar with seek forward and seek backward buttons to move the position within the track.
The project contains an activity MainActivity.java, and a service MusicService.java.
You need to register your service in the AndroidManifest.xml file:
<application
    ..>
    <service
        android:name=".MusicService"
        android:enabled="true">
    </service>
</application>
Within the activity, three steps are required to interface with the service that will be running in the background.
- Bind the service to the activity.
- Start and connect to the service.
- Control the service from the activity.
The following code shows how the three steps are accomplished:
// Bind the Service
bindService(new Intent(activity, MusicService.class), serviceConnection, Context.BIND_AUTO_CREATE);

// Connect to Service
public void onServiceConnected(ComponentName name, IBinder binder) {
    musicService = ((MusicService.ServiceBinder)binder).getServiceInstance();
}

// Start the service
Intent music = new Intent(activity, MusicService.class);
startService(music);

// Controlling the service
musicService.resumeMusic();
musicService.pauseMusic();
The services .resumeMusic and .pauseMusic methods are used within the activity to control the playing of the song by the service when the corresponding buttons are pressed.
Once you have the service defined in the AndroidManifest.xml, implementing the service is fairly straightforward.
public class MusicService extends Service implements MediaPlayer.OnErrorListener {
    private final IBinder binder = new ServiceBinder();
    MediaPlayer player;
    private int length = 0;
    private int seekForwardTime = 30000;

    public MusicService() { }

    public class ServiceBinder extends Binder {
        public MusicService getServiceInstance() {
            return MusicService.this;
        }
    }

    @Override
    public IBinder onBind(Intent arg0){return binder;}

    @Override
    public void onCreate () {
        super.onCreate();

        player = MediaPlayer.create(this, R.raw.audio);
        player.setOnErrorListener(this);

        if(player!= null) {
            player.setLooping(false);
            player.setVolume(100,100);
        }
        player.setOnErrorListener(new MediaPlayer.OnErrorListener() {
            public boolean onError(MediaPlayer mp, int what, int extra) {
                onError(player, what, extra);
                return true;
            }
        });
    }

    @Override
    public int onStartCommand (Intent intent, int flags, int startId) {
        player.start();
        return START_NOT_STICKY;

    }

    public void pauseMusic() {
        if(player.isPlaying()) {
            player.pause();
            length = player.getCurrentPosition();
        }
    }

    public void forwardMusic() {
        if (player.isPlaying()) {
            int currentPosition = player.getCurrentPosition();
            // check if seekForward time is lesser than song duration
            if (currentPosition + seekForwardTime <= player.getDuration()) {
                // forward song
                player.seekTo(currentPosition + seekForwardTime);
            }
        }
    }

    public void resumeMusic() {
        if (player.isPlaying() == false) {
            player.seekTo(length);
            player.start();
        }
    }

    public void stopMusic() {
        player.stop();
        player.release();
        player = null;
    }

    @Override
    public void onDestroy () {
        super.onDestroy();
        if (player != null) {
            try {
                player.stop();
                player.release();
            } finally {
                player = null;
            }
        }
    }

    public boolean onError(MediaPlayer mp, int what, int extra) {
        Toast.makeText(this, "Music player failed", Toast.LENGTH_SHORT).show();
        if (player != null) {
            try {
                player.stop();
                player.release();
            } finally {
                player = null;
            }
        }
        return false;
    }
}
Inside the service, you use MediaPlayer to play the song. It is the best choice for playing long audio files in a background service. Using MediaPlayer, you just need to create the object and specify the song you wish to play. Notice that there are a couple of extra methods you are using to set looping and volume controls.
With the service bound to the activity, you are free to control the playing of the song at any point during the lifecycle of the activity.
Following is MainActivity.
public class MainActivity extends AppCompatActivity  {
    private boolean isBound = false;
    private MusicService musicService;
    Button btnStart, btnStop;
    Activity activity = MainActivity.this;

    private ServiceConnection serviceConnection = new ServiceConnection() {
        public void onServiceConnected(ComponentName name, IBinder binder) {
            musicService = ((MusicService.ServiceBinder)binder).getServiceInstance();
        }

        public void onServiceDisconnected(ComponentName name) {
            musicService = null;
        }
    };

    void doBindService() {
        bindService(new Intent(activity, MusicService.class), serviceConnection, Context.BIND_AUTO_CREATE);
        isBound = true;
    }

    void doUnbindService() {
        if (isBound) {
            unbindService(serviceConnection);
            isBound = false;
        }
    }

    @Override
    public void onDestroy() {
        doUnbindService();
        super.onDestroy();
    }


    @Override
    protected void onCreate(Bundle savedInstanceState) {
        super.onCreate(savedInstanceState);
        setContentView(R.layout.activity_main);

        btnStart = findViewById(R.id.btnStart);
        btnStop = findViewById(R.id.btnStop);

        // Set Button handlers
        btnStart.setOnClickListener(btnClick);
        btnStop.setOnClickListener(btnClick);
        btnStop.setOnLongClickListener(longClick);

        // Bind the Service
        doBindService();

        // Start the service
        Intent music = new Intent(activity, MusicService.class);
        startService(music);
    }

    private View.OnClickListener btnClick = new View.OnClickListener() {
        @Override
        public void onClick(View v) {
            switch(v.getId()) {
                case R.id.btnStart:{
                    enableButtons(true);
                    musicService.resumeMusic();
                    break;
                }
                case R.id.btnStop:{
                    enableButtons(false);
                    musicService.pauseMusic();
                    break;
                }
            }
        }
    };

    private View.OnLongClickListener longClick = new View.OnLongClickListener() {
        @Override
        public boolean onLongClick(View v) {
            musicService.forwardMusic();
            Toast.makeText(activity, "Forwarding 60 seconds", Toast.LENGTH_SHORT).show();
            return true;
        }
    };

    private void enableButton(int id, boolean isEnable) {
        ((Button)findViewById(id)).setEnabled(isEnable);
    }

    private void enableButtons(boolean isPlaying) {
        enableButton(R.id.btnStart, !isPlaying);
        enableButton(R.id.btnStop, isPlaying);
    }
}
Following is a layout.
<LinearLayout xmlns:android="http://schemas.android.com/apk/res/android"
    android:orientation="vertical"
    android:layout_width="match_parent"
    android:layout_height="match_parent"
    android:padding="20dip">

    <TextView
        android:layout_width="match_parent"
        android:layout_height="wrap_content"
        android:layout_weight="1.0"
        android:textSize="18sp"/>

    <LinearLayout
        android:orientation="horizontal"
        android:layout_width="match_parent"
        android:layout_height="wrap_content">

        <Button
            android:id="@+id/btnStart"
            android:layout_width="wrap_content"
            android:layout_height="wrap_content"
            android:text="Start"
            android:enabled="false"
            android:layout_weight="1.0"/>

        <Button
            android:id="@+id/btnStop"
            android:layout_width="wrap_content"
            android:layout_height="wrap_content"
            android:text="End"
            android:layout_weight="1.0"/>
    </LinearLayout>
</LinearLayout>
Audio Synthesis
It is not always optimal to load up your app with audio samples. This is where audio synthesis comes into play. Pure Data and Csound are open source visual programming languages for sound synthesis and they run well on Android.
On Android, there are now three choices:
- Pure Data. Excellent stable library ported to Android by Google. Recommended as a general purpose synthesis engine for Android.
- Csound. Powerful synthesis engine. Higher learning curve and not quite as light a resource footprint as Pure Data, but can produce some amazing sounds. Chosen as the audio engine for the OLPC (One Laptop Per Child) initiative.
- Supercollider. An excellent choice for live coding. The Android library is not very stable at this time. It is an excellent synthesis engine, but unfortunately at this time there are just not enough Android resources available for me to recommend it.
Quote
Categories
- Android
- AngularJS
- Databases
- Development
- Django
- iOS
- Java
- JavaScript
- LaTex
- Linux
- Meteor JS
- Python
- Science
Archive ↓
- September 2024
- December 2023
- November 2023
- October 2023
- March 2022
- February 2022
- January 2022
- July 2021
- June 2021
- May 2021
- April 2021
- August 2020
- July 2020
- May 2020
- April 2020
- March 2020
- February 2020
- January 2020
- December 2019
- November 2019
- October 2019
- September 2019
- August 2019
- July 2019
- February 2019
- January 2019
- December 2018
- November 2018
- August 2018
- July 2018
- June 2018
- May 2018
- April 2018
- March 2018
- February 2018
- January 2018
- December 2017
- November 2017
- October 2017
- September 2017
- August 2017
- July 2017
- June 2017
- May 2017
- April 2017
- March 2017
- February 2017
- January 2017
- December 2016
- November 2016
- October 2016
- September 2016
- August 2016
- July 2016
- June 2016
- May 2016
- April 2016
- March 2016
- February 2016
- January 2016
- December 2015
- November 2015
- October 2015
- September 2015
- August 2015
- July 2015
- June 2015
- February 2015
- January 2015
- December 2014
- November 2014
- October 2014
- September 2014
- August 2014
- July 2014
- June 2014
- May 2014
- April 2014
- March 2014
- February 2014
- January 2014
- December 2013
- November 2013
- October 2013