Firebase for Android: Remote Configuration Android 21.11.2017

Firebase Remote Configuration (aka Remote Config) is a technology that allows you to change the behavior and appearance of your app without publishing an app update. It’s a cloud service that can store variables on your behalf. The magic is when these variables can be set using Analytics.
Firebase Remote Config works by allowing us to define in-app parameters that can be overridden from within the Firebase console. These parameters can then be activated for all or for a defined set of users.
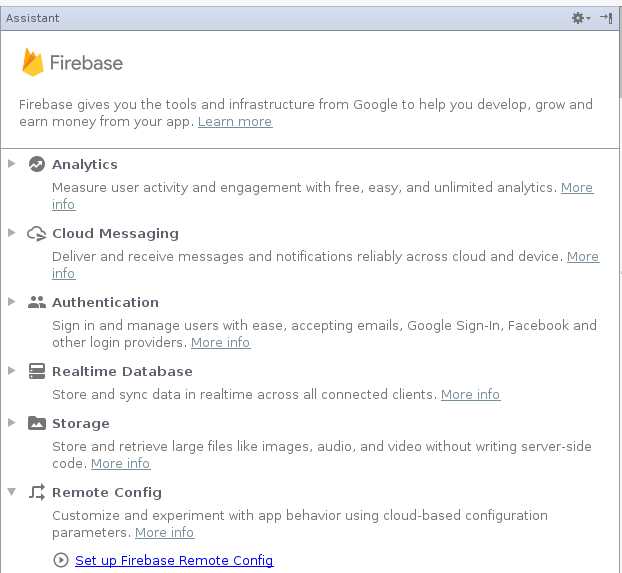
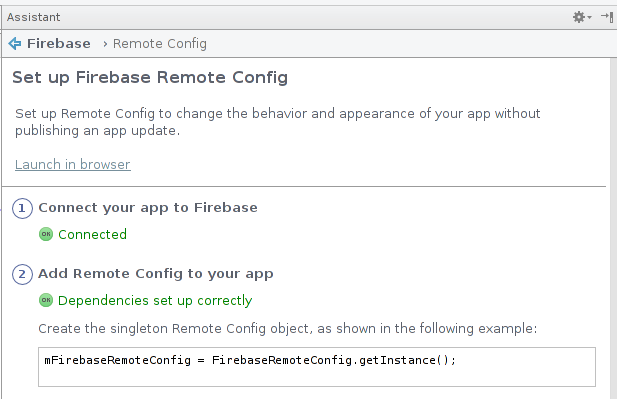
Create a new app and connect it to Firebase using the Firebase Assistant (Tools > Firebase in Android Studio).
Once you’ve done this, make sure you add the Remote Config libraries in the appropriate step.
As part of this process you would have created a Firebase project in Firebase console. Open it and find the Remote Config in GROW section. On there you can add a parameter. Give it the key GREETINGS and a value something like Hello, Android!. Once you’ve entered it, hit the ADD PARAMETER button.
Be sure to also press the PUBLISH CHANGES button at the top of the screen to commit the new values. It’s a common mistake to miss this!
Back in Android Studio, edit the layout file to give the TextView an ID. In this example I called it tvGreetings.
<?xml version="1.0" encoding="utf-8"?>
<android.support.constraint.ConstraintLayout xmlns:android="http://schemas.android.com/apk/res/android"
    xmlns:app="http://schemas.android.com/apk/res-auto"
    xmlns:tools="http://schemas.android.com/tools"
    android:layout_width="match_parent"
    android:layout_height="match_parent">

    <TextView
        android:id="@+id/tvGreetings"
        android:layout_width="wrap_content"
        android:layout_height="wrap_content"
        android:text="Greetings!"
        android:textAppearance="@style/TextAppearance.AppCompat.Large"
        app:layout_constraintEnd_toEndOf="parent"
        app:layout_constraintStart_toStartOf="parent"
        app:layout_constraintTop_toTopOf="parent" />
</android.support.constraint.ConstraintLayout>
Once you’re done, edit the MainActivity code as follows. First, you'll initialize the TextView and greetings strings:
tvGreetings = (TextView) findViewById(R.id.tvGreetings);
greeting = "Greetings";
Then you’ll need an instance of the Firebase Remote Config class. You can do this by calling getInstance() on the FirebaseRemoteConfig abstract class:
FirebaseRemoteConfig fbRemoteConfig = FirebaseRemoteConfig.getInstance();
Before calling remote config, you should set the configuration settings. There are a number of settings you can use, but the important one when learning and developing is to use Developer Mode. Firebase Remote Config reads are strongly throttled so as to avoid denial-of-service attacks, but when you are building and testing an app these throttles can cause your app to misbehave, so use developer mode, where there are no throttles; but a limited number of devices can be turned on using configuration settings.
Fetching configs from the server is normally limited to 5 requests per hour. Enabling developer mode allows many more requests to be made per hour, so developers can test different config values during development.
Here’s the code:
FirebaseRemoteConfigSettings configSettings = new FirebaseRemoteConfigSettings.Builder()
       .setDeveloperModeEnabled(BuildConfig.DEBUG)
       .build();
fbRemoteConfig.setConfigSettings(configSettings);
Now it’s time to fetch remote config variables. Instead of an API to fetch each one individually, Firebase provides the facility to fetch all at once in an asynchronous manner. Once you have them all you can then grab each individual one. The values will be fetched from either your local cache (aka the Default config) or the Remote Configuration Server. When you aren’t running in developer mode, the values will be cached for 12 hours after a successful read. In developer mode (as we are here), you can set the cache expiration.
By passing a value to the fetch() method you can specify how long the local cache expires in. For development, if you always want to fetch from the server, use a very low value here - like 0. If you use greater than 0, you’ll cache the values for that number of seconds.
fbRemoteConfig.fetch(0)
   .addOnCompleteListener(this, new OnCompleteListener<Void>() {
       @Override
       public void onComplete(@NonNull Task<Void> task) {
           if(task.isSuccessful()){
               fbRemoteConfig.activateFetched();
               greeting = fbRemoteConfig.getString("GREETINGS");
               tvGreetings.setText(greeting);
           } else {
               Log.d(TAG, "fetchRemoteConfig: " + task.getException().getMessage());
           }
       }
   });
It’s an asynchronous task, so when it completes, the onComplete method will fire. In this you can check if the task is successful or not. If it retrieves configuration data, you can then activate it, and read it piece by piece. In this case I have a remote config variable called GREETINGS that I read into a local string and then use to set the caption of the TextView.
For convenience, here’s the full code for the Activity:
public class MainActivity extends AppCompatActivity {
    TextView tvGreetings;
    FirebaseRemoteConfig fbRemoteConfig;
    String greeting;
    String TAG = "TAG";
    String KEY = "GREETINGS";

    @Override
    protected void onCreate(Bundle savedInstanceState) {
        super.onCreate(savedInstanceState);
        setContentView(R.layout.activity_main);

        tvGreetings = findViewById(R.id.tvGreetings);

        initRemoteConfig();
        fetchRemoteConfig();
    }

    private void initRemoteConfig() {
        fbRemoteConfig = FirebaseRemoteConfig.getInstance();
        fbRemoteConfig.setDefaults(R.xml.defaults);

        greeting = fbRemoteConfig.getString(KEY);
        tvGreetings.setText(greeting);

        FirebaseRemoteConfigSettings configSettings = new FirebaseRemoteConfigSettings.Builder()
                .setDeveloperModeEnabled(BuildConfig.DEBUG)
                .build();
        fbRemoteConfig.setConfigSettings(configSettings);
    }

    private void fetchRemoteConfig() {
        long cacheExpiration = 3600; // 1 hour in seconds.
        if (fbRemoteConfig.getInfo().getConfigSettings().isDeveloperModeEnabled()) {
            cacheExpiration = 0;
        }

        fbRemoteConfig.fetch(cacheExpiration)
                .addOnCompleteListener(this, new OnCompleteListener<Void>() {
                    @Override
                    public void onComplete(@NonNull Task<Void> task) {
                        if(task.isSuccessful()){
                            fbRemoteConfig.activateFetched();
                            greeting = fbRemoteConfig.getString(KEY);
                            Log.d(TAG, "fetchRemoteConfig: " + greeting);
                            tvGreetings.setText(greeting);
                        } else {
                            Log.d(TAG, "fetchRemoteConfig: " + task.getException().getMessage());
                        }
                    }
                });
    }
}
As you can see in above code after fetching values successfully we have used fbRemoteConfig.activateFetched() which will activate all the fetched values and new values will be reflected to our existing configuration.
When you run the app, if everything works, you’ll see that instead of the default Greetings label on the screen, you’ll get whatever value you entered into Remote Config.
Using Default Values
In this example, we had a very simple case of reading a string from Remote Config and then rendering it in a TextView. The string was already set to Greetings prior to this, giving it a default value in case Remote Configuration failed. Should the absence of a value cause an issue in your app, it makes sense to have default values set. There are a number of ways you could do this - for example, doing it in code or as part of a layout file, but not all of these are consistent (you can’t set the value of a variable as part of a layout, for example), so using an XML resource file for the default values makes sense. Remote Config can load a specially structured XML file with the setDefaults() method. Let’s check it out.
In your Android Studio project, right-click the res folder and select New > Android resource file.
In the New Resource File dialog, give the file the name defaults and ensure that the Resource Type is set to XML and the Root element to defaultsMap.
Now that you have the file, it’s easy to update it to contain keys and values. If the remote configuration values aren’t available due to connectivity or other issues, you’ll get the defaults.
Here’s the XML file:
<?xml version="1.0" encoding="utf-8"?>
<defaultsMap xmlns:android="http://schemas.android.com/apk/res/android">
    <entry>
        <key>GREETINGS</key>
        <value>Greetings</value>
    </entry>
</defaultsMap>
And here’s the code to read it:
fbRemoteConfig.setDefaults(R.xml.defaults);
In this example you retrieved a String value from Remote Config. In addition to this you also have the following methods, each retrieving their named data type: getBoolean(), getByteArray(), getDouble(), getLong().
Each one will use a String key, and if Remote Config stores that type, make sure that you use the correct method in order to ensure that the returned value is of the right data type.
Using Conditions with Remote Config
Where Remote Configuration gets really powerful is when you use Conditions. These set the value of the variable based on details about the user or app derived from Google Analytics for Firebase. So, for example, in our Greetings app, we could change the greeting based on the country the user is coming from.
You create a condition in the Firebase Console. If you have conditions, you’ll see a tab at the top of the Remote Config screen; otherwise you can add one from within editing a parameter. If you’ve been following this post, you’ll see the GREETINGS parameter. Click the pencil icon beside it to enter the editor. At the top of the screen you’ll see Add value for condition.
Click it and you’ll see an option to Define a new condition. This will give you a popup that allows you to name a condition, give it a color, and then specify when that condition applies.
The Applies If... section allow you to pick when you want that condition to apply based on the following:
- App Version. You can have multiple versions of the app or multiple apps in the Firebase project, and can set a condition for that.
- OS Type. Android or iOS.
- User in random percentile. Each user will have a persistent percentile that is randomly assigned on a per-project basis. You can use this to set a condition for users that are in a given percentile.
- Device Language. Including locale.
- Country or Region. As inferred from the device. You can set multiple ones.
- User Audience. Analytics audience for the user.
- User Property. Analytics user property.
By combining these you have a very powerful and flexible way to determine a condition, and you can then set the Remote Config variable for that.
Remote Config Life Cycle
When building apps that use Remote Config, it’s important to understand the life cycle for how your app interfaces with Remote Config with regard to how it works with default values, and how it works with server values, which in turn can be affected by conditions.
The flow for this is shown in following figure.
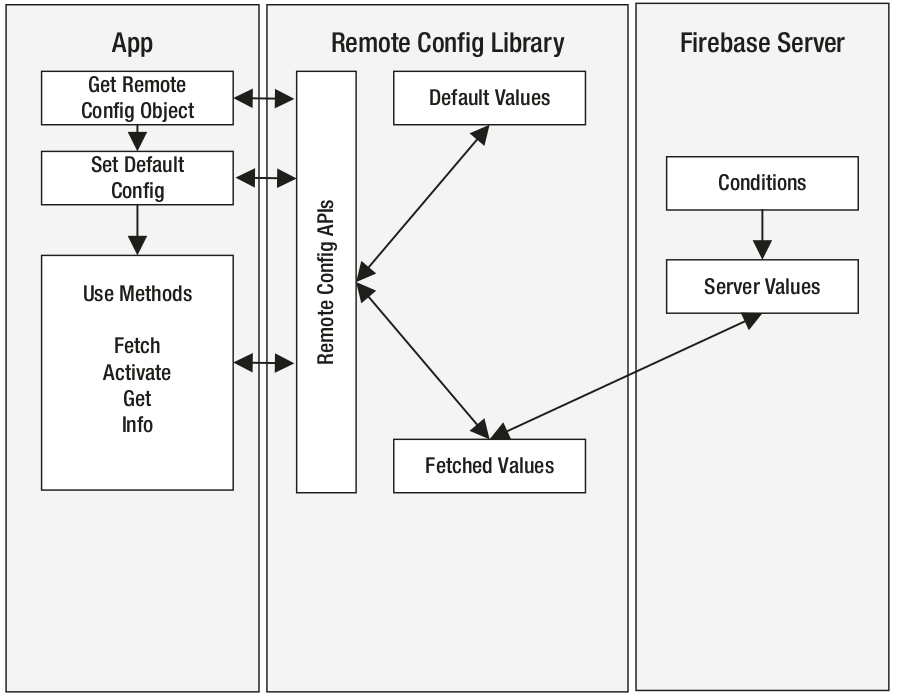
First your app will create a Remote Config object using the API. When it has this, it can set its configuration, including where it will get default values from. At this point the object is initialized with default values, so if you can go no further, you’ll have a functional data set for your app. Once you’ve done this, you can then fetch data from Remote Config via the APIs. If the cache hasn’t expired, then the API will get fetched values for you. Fetched values are attained from the server. At the time of fetching, the conditions will be applied, and the correct values for the condition will be downloaded, and made available to the app via the API.
Remote Config will typically cache the values after the first successful fetching. By default, the cache will expire after 12 hours but you can override this as shown earlier. It keeps track of the values in the cache, and if they are older than the expiration, then fresh values will be retrieved and re-cached.
Quote
Categories
- Android
- AngularJS
- Databases
- Development
- Django
- iOS
- Java
- JavaScript
- LaTex
- Linux
- Meteor JS
- Python
- Science
Archive ↓
- December 2023
- November 2023
- October 2023
- March 2022
- February 2022
- January 2022
- July 2021
- June 2021
- May 2021
- April 2021
- August 2020
- July 2020
- May 2020
- April 2020
- March 2020
- February 2020
- January 2020
- December 2019
- November 2019
- October 2019
- September 2019
- August 2019
- July 2019
- February 2019
- January 2019
- December 2018
- November 2018
- August 2018
- July 2018
- June 2018
- May 2018
- April 2018
- March 2018
- February 2018
- January 2018
- December 2017
- November 2017
- October 2017
- September 2017
- August 2017
- July 2017
- June 2017
- May 2017
- April 2017
- March 2017
- February 2017
- January 2017
- December 2016
- November 2016
- October 2016
- September 2016
- August 2016
- July 2016
- June 2016
- May 2016
- April 2016
- March 2016
- February 2016
- January 2016
- December 2015
- November 2015
- October 2015
- September 2015
- August 2015
- July 2015
- June 2015
- February 2015
- January 2015
- December 2014
- November 2014
- October 2014
- September 2014
- August 2014
- July 2014
- June 2014
- May 2014
- April 2014
- March 2014
- February 2014
- January 2014
- December 2013
- November 2013
- October 2013