Getting started with Kotlin in Android Android 11.09.2017

Introduction
Kotlin is a statically typed programming language from JetBrains. It is fully interoperable with Java (meaning you can use Java frameworks and even mix commands from both in your code) and comes with no limitations.
Advantages of Kotlin over Java are:
- Kotlin is 100% interoperable with Java. You can call Java code from Kotlin and vice-versa easily. Both Kotlin and Java generate the same bytecode, so there’s no fear that you’re shipping something completely different with Kotlin. That means you can start using Kotlin in your existing project, with all your old Java code, right away.
- No more NullPointerExceptions. NPE’s are the most common cause of crashing our app. It’s been a major time investment to fix all of the NPEs that have come up, as guarding your code with null checks everywhere is a time consuming and boring task. With Kotlin, you needn’t worry about NPEs. In Kotlin, It is so nice to catch NPEs at compile time instead of crashing apps at runtime.
- Less code with readability. Kotlin can do the stuff same as Java, very less verbosity. Also, Kotlin is way more readable compared to Java.

For instance, consider this click listener in Java:
view.setOnClickListener(new View.OnClickListener() {
     @Override
     public void onClick(View v) {
        // your code!
}});
and now consider the same thing in kotlin:
view.setOnClickListener { // your code!!! }
The good news is that seeing as Kotlin is packaged in with Android 3.0 onwards, there will be no need to download anything new and only very minimal set-up involved. The bad news is that Android Studio 3.0 is still in beta, so to get that you’re going to do steps from following section.
Setting up Android Studio for Kotlin development
The good people at JetBrains have created an IntelliJ/Android Studio Plugin for Kotlin. First, we’re going to go ahead and install the plugin.
To do this, navigate to File > Settings > Plugins > Browse Repositories and search for "Kotlin" then, click on Install.
When the install is complete, you will need to restart Android Studio to apply the new plugin.
Now that we have the plugin installed, let’s go ahead and create a new Android project - the usual way we would. Navigate to File > New > New Project and follow through project creation wizard. Select the Create Empty Activity option at the end.
Next step is to apply the Kotlin plugin to the project. There is an automated tool to do this but sometimes, the tool messes things up, so let’s just walk through the manual process of applying the plugin in our build.gradle files (both at the project level and the app-module level).
To configure the plugin, we first need to add the plugin to the root project’s build.gradle, same way it’s done for the Gradle plugin (automatically). Add the plugin to the dependencies closure in the project build.gradle file. The project build.gradle file looks like this:
buildscript {
    // replace with the latest version: https://github.com/JetBrains/kotlin/releases/latest
    ext.kotlin_version = "1.1.4"

    repositories {
        jcenter()
    }
    dependencies {
        classpath 'com.android.tools.build:gradle:2.2.3'
        classpath "org.jetbrains.kotlin:kotlin-gradle-plugin:$kotlin_version"
    }
}
We created a variable ext.kotlin_version. The reason we have this is we may have other places in the project where we need to reference the Kotlin version, so it makes sense to "externalize" that value. We placed this variable in the buildscript closure. This is because, the buildscript is the entry point into this file when the project is being built. If we place the variable outside this closure, this variable won’t be available before the project is built, and the build will fail.
Second, apply the Kotlin Android Plugin. After adding the Kotlin Gradle plugin, the next step is to apply the plugin. To do this, we need to add apply plugin: kotlin-android to the app-module’s build.gradle file.
apply plugin: 'com.android.application'
apply plugin: 'kotlin-android'
We’ve applied the plugin and setup all we need to, but our "Empty Activity" generated code is still in Java. But the Kotlin plugin can help us convert our code from Java to Kotlin.
To do this, select the file and navigate to Code > Convert Java File to Kotlin File. After converting our code to Kotlin, our empty activity looks like this:
class MainActivity : AppCompatActivity() {
    override fun onCreate(savedInstanceState: Bundle?) {
        super.onCreate(savedInstanceState)
        setContentView(R.layout.activity_main)
    }
}
Kotlin basics
Kotlin has two keywords for declaring variables, val and var . The var is a mutable variable, which is, a variable that can be changed to another value by reassigning it. This is equivalent to declaring a variable in Java:
var name = "kotlin"
In addition, the var can be initialized later:
var name: String
name = "kotlin"
Variables defined with var can be reassigned, since they are mutable:
var name = "kotlin"
name = "more kotlin"
The keyword val is used to declare a read-only variable. This is equivalent to declaring a final variable in Java. A val must be initialized when it is created, since it cannot be changed later:
val name = "kotlin"
A read only variable does not mean the instance itself is automatically immutable. The instance may still allow its member variables to be changed via functions or properties, but the variable itself cannot change its value or be reassigned to another value.
Did you notice in the previous section that the type of the variable was not included when it was initialized? This is different to Java where the type of the variable must always accompany its declaration. Even though Kotlin is a strongly typed language, we don't always need to declare types explicitly. The compiler attempts to figure out the type of an expression from the information included in the expression. A simple val is an easy case for the compiler because the type is clear from the right-hand side. This mechanism is called type inference. This reduces boilerplate whilst keeping the type safety we expect of a modern language.
To create a number literal, use one of the following forms:
val int = 123
val long = 123456L
val double = 12.34
val float = 12.34F
You will notice that a long value requires the suffix L and a float, the suffix F. The double is used as the default for floating point numbers, and int for integral numbers.
Strings. Just as in Java, strings are immutable. String literals can be created using double quotes or triple quotes. Double quotes create an escaped string. In an escaped string, special characters, such as new line, must be escaped:
val string = "string with \n new line"
Triple quotes create a raw string. In a raw string, no escaping is necessary, and all characters can be included:
String templates are a simple and effective way of embedding values, variables, or even expressions inside a string without the need for pattern replacement or string concatenation. Usage is extremely straightforward. A value or variable can be embedded simply by prefixing with a dollar $ symbol:
val name = "Sam"
val str = "hello $name"
Arbitrary expressions can be embedded by prefixing with a dollar $ and wrapping in braces {}
val name = "Sam"
val str = "hello $name. Your name has ${name.length} characters"
Arrays. In Kotlin, we can create an array by using the library function arrayOf()
val array = arrayOf(1, 2, 3)
Alternatively, we can create an Array from an initial size and a function, which is used to generate each element:
val squares = Array(10, { k -> k * k })
Unlike Java, arrays are not treated as special by the language, and are regular collection classes. Instances of arrays provide an iterator function and a size function, as well as a get and a set function. The get and set functions are also available through bracket syntax like many C-style languages:
val element1 = array[0]
val element2 = array[1]
array[2] = 5
Ranges. A range is defined as an interval that has a start value and an end value. Any types which are comparable can be used to create a range, which is done using the .. operator
val aToZ = "a".."z"
val oneToNine = 1..9
Once a range is created, the in operator can be used to test whether a given value is included in the range. This is why the types must be comparable. For a value to be included in a range, it must be greater than or equal to the start value and less than or equal to the end value
val aToZ = "a".."z"
val isTrue = "c" in aToZ
val oneToNine = 1..9
val isFalse = 11 in oneToNine
There are further library functions to create ranges not covered by the .. operator, for example, downTo() will create a range counting down and rangeTo() will create a range up to a value. Both of these functions are defined as extension functions on numerical types:
val countingDown = 100.downTo(0)
val rangeTo = 10.rangeTo(20)
Once a range is created, you can modify the range, returning a new range. To modify the delta between each successive term in the range, we can use the step() function:
val oneToFifty = 1..50
val oddNumbers = oneToFifty.step(2)
Loops
In Kotlin, there’s no conventional for-loop as you know it from C or Java. Instead, foreach loops are the default.
for (c in "charSequence") {
}
The Kotlin for loop is used to iterate over any object that defines a function or extension function with the name iterator. All collections provide this function:
val list = listOf(1, 2, 3, 4)
for (k in list) {
    println(k)
}

val set = setOf(1, 2, 3, 4)
for (k in set) {
    println(k)
}
Note the syntax using the keyword in. The in operator is always used with for loops. In addition to collections, integral ranges are directly supported either inline or defined outside
val oneToTen = 1..10
for (k in oneToTen) {
    for (j in 1..5) {
        println(k * j)
    }
}
In many cases, looping with an index is necessary, which can easily be achieved with the indices property that is defined for arrays, lists, and also CharSequences for example.
for (i in "charSequence".indices) {
    println("charSequence"[i])
}
Another way of iterating with indices is possible by using withIndex().
for ((i,c) in "charSequence".withIndex()) {
    println("$i: $c")
}
Last but not least, Kotlin has ranges, which can also be utilized for indexed iterations as the following shows:
(0 .. "charSequence".length-1).forEach {
    print("charSequence"[it])
}
The range in this example is expressed with the common .. syntax. To create a range which does not include the end element (s.length), the until function is used: (0 until s.length).
The syntax for while loops in Kotlin will be familiar to most developers, as it is exactly the same as most C-style languages:
while (true) {
    println("This will print out for a long time!")
}
Classes
A simple class can be declared like in this snippet:
class Person constructor(name: String) {}
The primary constructor is part of the class header, secondary constructors can be added in the class body. In the shown case, the constructor keyword could also be omitted, since it’s only mandatory if you want to add annotations or visibility modifiers (default: public). Constructor parameters such as name can be used during the initialization of an object of this class. For this purpose, an init block would be necessary, because primary constructors can’t contain code directly. Constructor arguments can also be used in property initializers that are declared in the class body, as shown here:
class Person(name: String, age: Int) {
    init {
        println("new Person $name will be born.")
    }
    val ageProp = age
}
Declaring properties for classes can also be done in the primary constructor directly, which makes the code even more concise. Like in all methods, Kotlin supports default parameters for parameters, set with "="
class Person(val name: String, val age: Int = 50)
Same as with local variables, instead of val , a property can be declared mutable using var instead. Note that you don’t have to write an empty class body if no content is define.
Besides ordinary classes, Kotlin knows a few special class declarations, which are worth knowing. The following will give a quick overview.
- data class. Adds standard functionality for
toString,equals,hashCodeetc. - sealed class. Restricts class hierarchies to a set of subtypes. Useful with when.
- Nested class. Classes can be created in other classes, also known as "inner class".
- enum class. Collect constants that can contain logic.
- object declarations. Used to create Singletons of a type.
Enum classes
Enumerated type (enum) is a data type consisting of a set of named values. To define an enum type, we need to add the enum keyword to the class declaration header:
enum class Color {RED, GREEN, BLUE}
val favouriteColor = Color.BLUE
To parse string into enum, use the valueOf method (like in Java):
val selectedColor = Color.valueOf("BLUE")
println(selectedColor == Color.BLUE) // prints: true
Or the Kotlin helper method:
val selectedColor = enumValueOf<Color>("BLUE")
println(selectedColor == Color.BLUE) // prints: true
To display all values in the Color enum, use values function (like in Java):
for (color in Color.values()) {
    println("name: ${it.name}, ordinal: ${it.ordinal}")
}
Or the Kotlin enumerateValues helper method:
for (color in enumValues<Color>()) {
    println("name: ${it.name}, ordinal: ${it.ordinal}")
}
Companion objects
Kotlin, as opposed to Java, lacks the ability to define static members, but instead it allows us to define objects that are associated with a class. In other words, an object is initialized only once; therefore only one instance of an object exists, sharing its state across all instances of a particular class. When a singleton object is associated with a class of the same name, it is called the companion object of the class, and the class is called the companion class of the object.
Members, such as methods and properties, defined inside a companion object may be accessed similarly to the way we access static fields and methods in Java. The main purpose of a companion object is to have code that is related to class, but not necessary to any particular instance of this class. It is a good way to define members that would be defined as static in Java; for example, factory, which creates a class instance method converting some units, activity request code, shared preferences key, and so on. To define the simplest companion object, we need to define a single block of code:
class MovieActivity {
    companion object {
    }
}
Let's use the companion object to track how many instances of the Movie class were created. To achieve this we need to define that count property with a private setter. It could be also defined as a top-level property, but it is better to place it inside a companion object, because we don't want to allow counter modification outside of this class:
class Movie {
    init {
        count++;
    }
    companion object {
        var count:Int = 0
        private set
    }
}
The class can access all the methods and properties define in the companion object, but the companion object can't access any of the class content. The companion object is assigned to a specific class, but not to a particular instance:
println(Movie.count) // Prints 0
Movie()
Movie()
println(Movie.count) // Prints: 2
Null safety
Kotlin eliminates most sources of null references by making all types non-nullable by default - meaning that the compiler won’t let you use a non-initialized, non-nullable variable.
This is one of the great things about Kotlin, everything in Kotlin is not nullable unless you specifically declare it in this way. The way to do this is with the ? question mark which also suggest you that the value could be there or not.
Java
if (text != null) {
    int length = text.length();
}
Kotlin
text?.let {
    val length = text.length
}

// or simple
val length = text?.length
There are a few ways to check and handle nullability on a type. Let’s discuss each of them using the String? example, where we want to use the strings length to control flow.
Explicit Checks. Just like Java, we could explicitly check for null:
val b: String? = "test"

if (b != null && b.length > 0) {
    // Do something with the string
} else {
    // String is null, handle error
}
Safe Operator. If we don’t want to deal with the verbosity of the above code, we can use the safe operator (?.) provided by Kotlin. This operator will either return the value if non-null, or null if it was unable to be read. Here is what the code would look like with and without the safe operator:
val length: Int? = if (b != null) b.length else null
val length: Int? = b?.length
As you can see, the safe operator makes the code a lot more concise. This becomes even more useful when you have a number of nested objects, and you are able to chain multiple safe operator calls together.
Elvis Operator. In Java, we may also be used to doing an explicit check for null and returning another value if it’s not found. For example, you may have written code like this in your lifetime:
return (myValue != null) ? myValue : -1;
Kotlin provides an elvis operator (?:) which works similar to the safe operator. However, instead of returning null, it’ll return the default value that you supply it. The above Java code would be written in Kotlin as:
return myValue ?: -1
Using that for the example further up regarding string length:
val length: Int = b?.length ?: 0
if (length > 0) doSomething() else fail()
Safe Class Casting. Similar to the safe operator for types, we can use the as? operator to safely cast objects. This will just return null if the cast is unsuccessful:
val intVal: Int? = myValue as? Int
Remember! In Kotlin you cannot leave a variable uninitialised, as you would do in Java, this is because of the fact that Kotlin doesn’t have NullPointerException, so to achieve that this is something that the language requires to have.
Not null assertion
Another tool to deal with nullity is the not-null assertion operator. It is represented by a double exclamation mark (!!). This operator explicitly casts nullable variables to non-nullable variables. Here is a usage example:
var y: String? = "foo"
var size: Int = y!!.length
Normally, we would not be able to assign a value from a nullable property length to a non-nullable variable size. However, as a developer, we can assure the compiler that this nullable variable will have a value here. If we are right, our application will work correctly, but if we are wrong, and the variable has a null value, the application will throw NullPointerException. Let's examine our activity method onCreate():
override fun onCreate(savedInstanceState: Bundle?) {
    super.onCreate(savedInstanceState)
    val locked: Boolean = savedInstanceState!!.getBoolean("locked")
}
The preceding code will compile, but will this code work correctly? As we said before, when restoring an activity instance, savedInstanceState will be passed to the onCreate method, so this code will work without exceptions. However, when creating an activity instance, the savedInstanceState will be null (there is no previous instance to restore), so NullPointerException will be thrown at runtime. This behavior is similar to Java, but the main difference is that in Java accessing potentially nullable objects without a nullity check is the default behavior, while in Kotlin we have to force it; otherwise, we will get a compilation error.
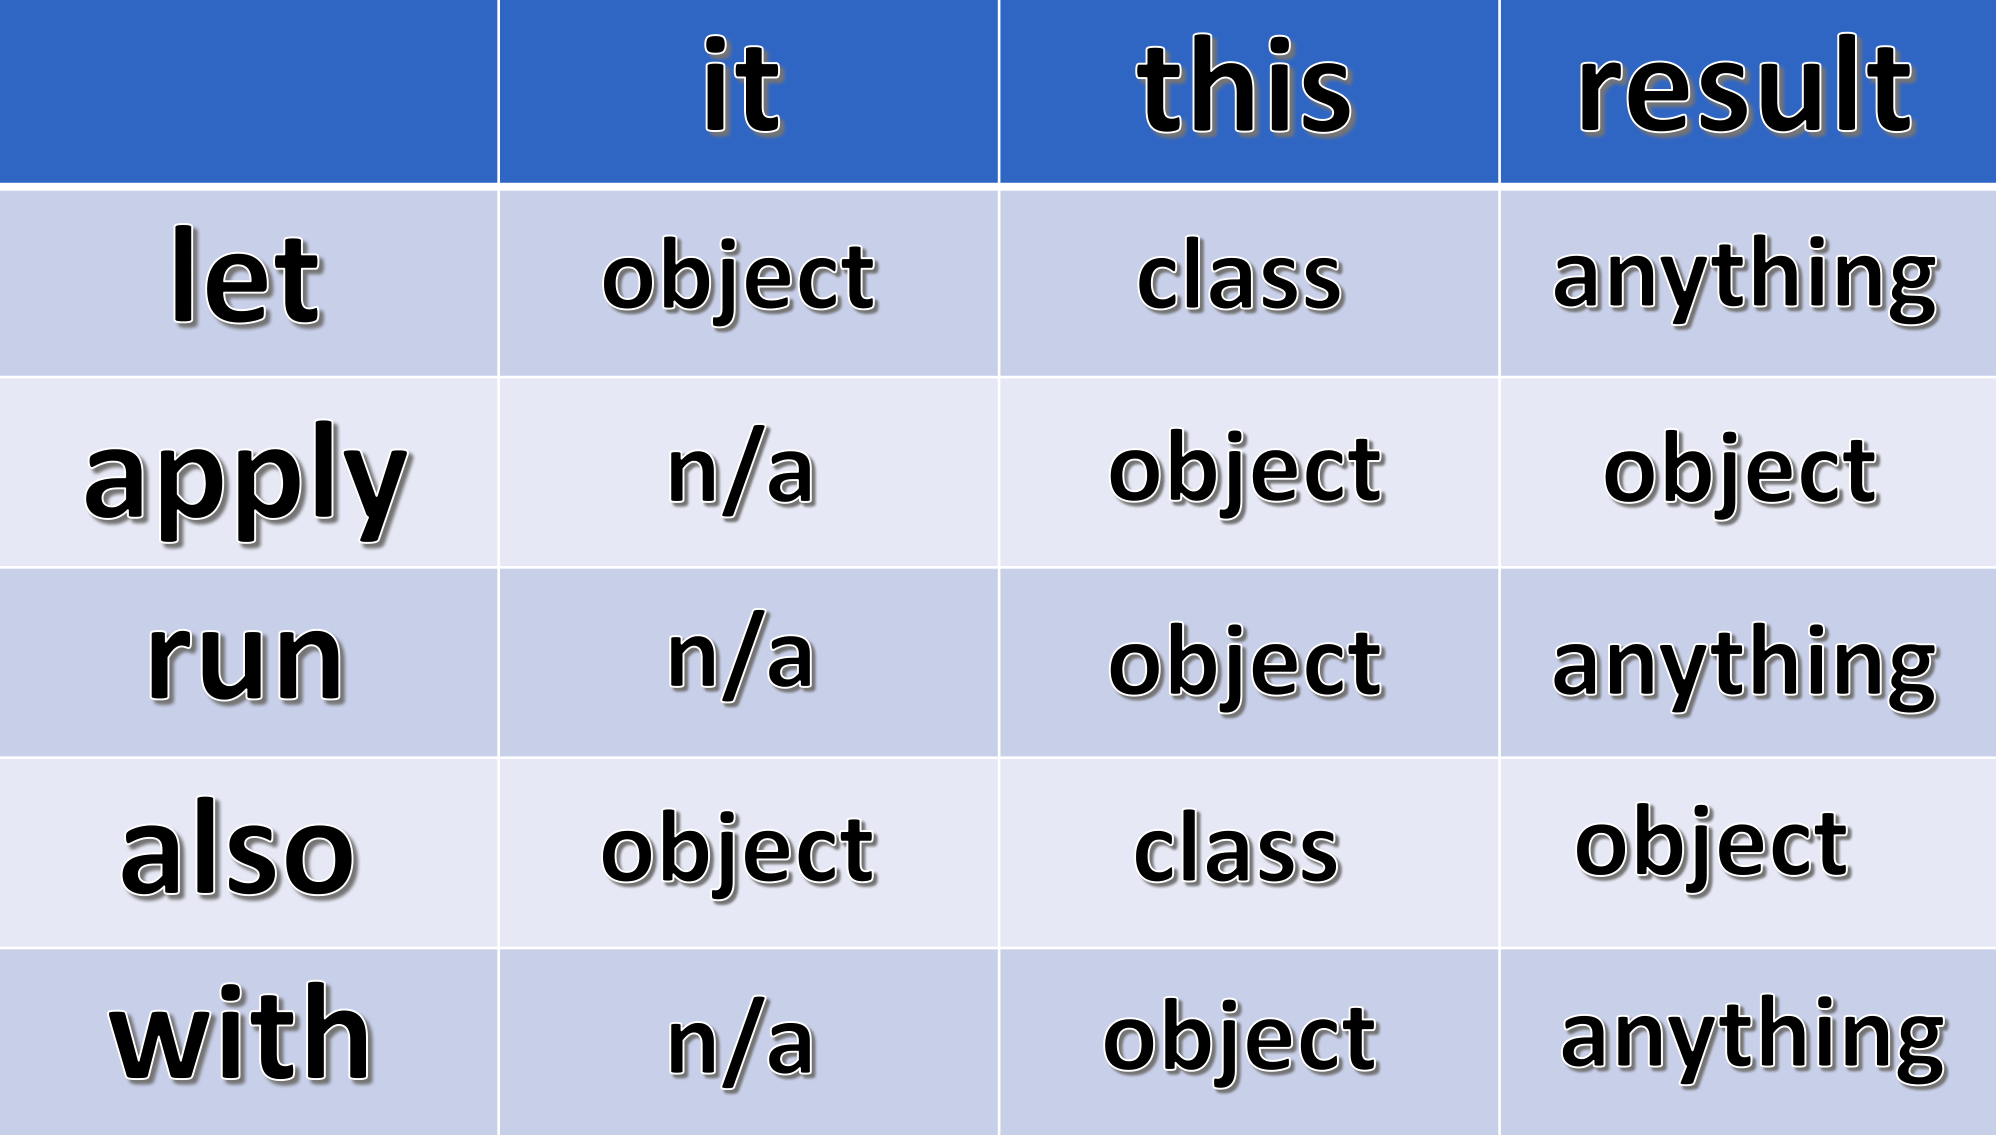
let, apply, run, also, with functions
All following functions work in a similar way in the sense they allow you to change the scope of the current function or variable, and at the same time apply multiple operations on that same variable all in the same place. So, the important thing is to look at the argument (it) the receiver (this) and the result of the function.
let
It is a function defined in the Kotlin standard library. Let's see the syntax of let combined with the safe call operator:
override fun onCreate(savedInstanceState: Bundle?) {
    super.onCreate(savedInstanceState)
    savedInstanceState?.let{
        println(it.getBoolean("isLocked")) // 1
    }
}
savedInstanceState inside let can be accessed using variable named it.
As mentioned before, the right-hand side expression of the safe call operator will be only be evaluated if the left-hand side is not null. In this case, the right-hand side is a let function that takes another function (lambda) as a parameter. Code defined in the block after let will be executed if savedInstanceState is not null.
let takes the object it is invoked upon as the parameter and returns the result of the lambda expression. Kotlin let is a scoping function wherein the variables declared inside the expression cannot be used outside.
Argument (it): The argument in the case of let refers to the object where we’re applying the function.
Receiver (this): The receiver refers to the class where we’re using the function.
Result: the result of let is whatever we want. By default, the return type is Unit if we don’t specify a return statement. Remember that in Kotlin the return keyword is not required in certain situations, this is one of them.
apply
We can compare using apply to using a builder pattern. It allows us to apply operations on an object and return that same object.
Kotlin apply is an extension function on a type. It runs on the object reference (also known as receiver) into the expression and returns the object reference on completion.
data class Movie(var name: String, var year: Int)
var movie = Movie("The Godfather", 1972)

movie.apply { this.year = 2018 }
println(movie) // Movie("The Godfather", 2018)
Following is difference between apply and also.
data class Movie(var name: String, var year: Int)
var movie = Movie("The Godfather", 1972)

movie.apply { year = 2017 }
println(movie)

movie.also { it.year = 2018 }
println(movie)
In apply it isn’t allowed. If the property name of the data class is unique in the function, you can omit this.
We should use also only when we don’t want to shadow this.
Argument (it): argument is not applicable when we use the apply function.
Receiver (this): The receiver refers to the object where we’re using the function, allowing us to access field using this keyword.
Result: the result of apply is always the object where we’re using the function.
run
With run we can do the same as with apply but we can return anything we want as the result of the function rather than getting the calling object by default.
Kotlin run is another interesting function. The following example demonstrates its use cases.
var movie = "The Godfather"
println(tutorial)
movie = run {
    val movie = "The Dark Knight"
    movie
}

println(movie) //The Dark Knight
Kotlin run expression can change the outer property. Hence in the above code, we’ve redefined it for the local scope.
Similar to the let function, the run function also returns the last statement. Unlike let, the run function doesn’t support the it keyword.
Argument (it): argument is not applicable when we use the run function.
Receiver (this): The receiver refers to the object where we’re using the function, allowing us to access field using this keyword.
Result: the result of run is whatever we want. Same as with let function, the default return type is Unit if we don’t specify a return statement.
also
We can use also to apply some operation in an object and return that same object. Similar to apply in a way but you need to use the argument to access the object, as the receiver in this case refers to the class and not the calling object.
As the name says, also expressions does some additional processing on the object it was invoked. Unlike let, it returns the original object instead of any new return data. Hence the return data has always the same type.
Like let, also uses it too.
Following code snippet shows a great example to differentiate between let and also.
data class Movie(var name: String, var year: Int)
var movie = Movie("The Godfather", 1972)

var l = movie.let { it.name = "Android" }
var al = movie.also { it.name = "Android" }

println(l) // kotlin.Unit
println(al) // Movie(name=The Godfather, year=1972)
println(person) // Movie(name=The Godfather, year=1972)
The also expression returns the data class object whereas the let expression returns nothing (Unit) as we didn’t specify anything explicitly.
Argument (it): The argument in the case of also refers to the object where we’re applying the function.
Receiver (this): The receiver refers to the class where we’re using the function, allowing us to call some mathod using this keyword.
Result: the result of also is always the object where we’re using the function.
with
We can use with if we want to call several different methods on an object for example as we don’t need to do it.method() all the time, we can just call the methods directly as the receiver inside the block is the object itself. And we can also return whatever we want.
Like apply, with is used to change instance properties without the need to call dot operator over the reference every time.
data class Movie(var name: String, var year: Int)
var movie = Movie("The Godfather", 1972)

with(movie) {
    name = "No Name"
    year = 2018
}
Again with is similar to apply except for a few differences.
Kotlin apply vs with
withruns without an object(receiver) whereasapplyneeds one.applyruns on the object reference, whereaswithjust passes it as an argument.- the last expression of
withfunction returns a result.
Argument (it): argument is not applicable when we use the with function.
Receiver (this): The receiver refers to the object where we’re using the function, allowing us to access field using this keyword.
Result: the result of with is whatever we want. Same as with let and run functions, the default return type is Unit if we don’t specify a return statement.
Let's look at following table to summarise and to have everything in the same place.
Extension functions
Coming from C#, extension functions is a great feature - and another that’s currently missing in Java. With Kotlin, you can add behavior to a class without directly extending it or using a design pattern like Decorator. Through an extension function, you can call a function from an object as if it were part of its class. We could create an extension function for String called makePretty, and call it myString.makePretty(). As we know, makePretty is not a member of String, but syntactically it looks like it is. So, how does it work? You just need to add the function to any file. In our makePretty example, it would look something like this:
fun String.makePretty(): String {
    // make the string pretty and return it
}
The key in the example above is the type qualifier before the function name. In Kotlin, it is compiled to a static function with a String parameter that returns a string and you can call it as if it were a member function, like myString.makePretty().
Extensions are useful because they allow you to add to the functionality of a class without having to inherit from it. For example, have you ever wished Activity had some method, such as hideKeyboard()? With extensions, you can accomplish this easily:
fun Activity.hideKeyboard(): Boolean {
    val view = currentFocus
    view?.let {
        val inputMethodManager = getSystemService(Context.INPUT_METHOD_SERVICE)
                as InputMethodManager
        return inputMethodManager.hideSoftInputFromWindow(view.windowToken,
                InputMethodManager.HIDE_NOT_ALWAYS)
    }
    return false
}
Data classes
This feature is a great time saver. Given that most of our applications are data driven, we often find ourselves creating classes with only properties and fields to hold data. In Java, this can be very tedious, requiring a get/set method for each field. With Kotlin, we can declare the class and all its properties in a single line. The compiler will generate all getters and setters, as well as the equality members, toString() and a copy() function.
For example, take this in Java:
public class User {
    private String name;
    private int age;

    public User(String name, int age) {
        this.name = name;
        this.age = age;
    }

    public void setName(String name) {
        this.name = name;
    }

    public String getName() {
        return this.name;
    }

    public void setAge(int age) {
        this.age = age;
    }

    public int getAge() {
        return this.age;
    }

    // and the methods equals, hashCode, copy, omitted for brevity
}
To run the same function in Kotlin, all we need is:
data class User(var name: String, var age: Int)
The compiler will generate everything we had to manually write in the above Java code.
Kotlin Android extensions
In Android, every time you want to work with any View in an Activity, you need to use the findViewById method to obtain a reference to that View. This makes findViewById one of the most important, but also one of the most frustrating bits of code that you’ll find yourself writing over and over, and over again in your Android projects. The findViewById method is a huge source of potential bugs, and if you’re working with multiple UI elements in the same Activity, then all those findViewByIds can really clutter up your code, making it difficult to read.
While there are a number of libraries, such as Butter Knife, that aim to remove the need for findViewByIds, these libraries still require you to annotate the fields for each View, which can lead to mistakes and still feels like a lot of effort that would be better invested in other areas of your project.
The Kotlin Android Extensions plugin (which has recently been incorporated into the standard Kotlin plugin) promises to make findViewById a thing of the past, offering you the benefits of the aforementioned libraries without the drawback of having to write any additional code or ship an additional runtime.
You can use Kotlin extensions to import View references into your source files. At this point the Kotlin plugin will create a set of synthetic properties that enable you to work with these views as though they were part of your activity - crucially, this means you no longer have to use findViewById to locate each View before you can work with it.
To use extensions, you’ll need to enable the Kotlin Android Extensions plugin in each module, so open your module-level build.gradle file and add the following:
apply plugin: 'kotlin-android-extensions'
Sync these changes by clicking the Sync Now popup.
You can then import the references to a single View, using the following format:
import kotlinx.android.synthetic.main.<layout>.<view-id>
For example, if your acitivity_main.xml file contained a TextView with the ID tvTitle, then you’d import the reference to this view by adding the following to your Activity
import kotlinx.android.synthetic.main.activity_main.tvTitle
You’d then be able to access tvTitle within this activity using its ID alone - and without a findViewById in sight.
Let’s take a look at extensions in action, by adding a TextView to our activity_main.xml file, importing it into our MainActivity.kt file, and using extensions to set the TextView's text programmatically.
Start by creating your TextView:
<?xml version="1.0" encoding="utf-8"?>

<RelativeLayout xmlns:android="http://schemas.android.com/apk/res/android"
    xmlns:tools="http://schemas.android.com/tools"
    android:layout_width="match_parent"
    android:layout_height="match_parent">

    <TextView
    android:id="@+id/tvTitle"
    android:layout_width="wrap_content"
    android:layout_height="wrap_content"/>

</RelativeLayout>
You can then import the TextView into your MainActivity.kt, and set its text using its ID only
import kotlinx.android.synthetic.main.activity_main.tvTitle

class MainActivity : AppCompatActivity() {
    override fun onCreate(savedInstanceState: Bundle?) {
        super.onCreate(savedInstanceState)
        setContentView(R.layout.activity_main)
        tvTitle.setText("Hello World")
    }
}
Note, if you want to work with multiple widgets from the same layout file, then you can import the entire contents of a layout file in one fell swoop, using the following formula:
import kotlinx.android.synthetic.main.<layout>.*
For example, if you wanted to import all the widgets from your activity_main.xml file, then you’d add the following to your Activity
kotlinx.android.synthetic.main.activity_main.*.
How to create collections in Kotlin
Create a List in Kotlin
val list: List<String> = listOf("Apple", "Cherry", "Carrot")
In Kotlin, lists are immutable by default (you can’t add or remove elements after the list is created). If you need to make a list mutable, you can do this by using mutableListOf
val list: List<String> = mutableListOf<>("Apple", "Cherry", "Carrot")
list.add("Cucumber")
or by creating an ArrayList
val list: ArrayList<String> = arrayListOf("Apple", "Cherry", "Carrot") //mutable
When you create a list in Kotlin, you can add mixed types to the same list
val list = listOf("Apple", "Cherry", 100, true)
There are 2 ways to create empty lists
val list = listOf<String>()
// or
val list = emptyList<String>()
Create a Set
val set = setOf("Apple", "Cherry", "Carrot") //immutable
Create a HashSet
val set = hashSetOf("Apple", "Cherry", "Carrot") //mutable
Create a SortedSet (TreeSet in Java)
val set = sortedSetOf("Apple", "Cherry", "Carrot") //mutable
Create a LinkedSet (LinkedHashSet in Java)
val set = linkedSetOf("Apple", "Cherry", "Carrot") //mutable
Create a Map
val map = mapOf(1 to "John", 2 to "Chloe", 3 to "Maria") //immutable

for ((key, value) in map) {
     println("$value has the id = $key")
}
Further reading
Quote
Categories
- Android
- AngularJS
- Databases
- Development
- Django
- iOS
- Java
- JavaScript
- LaTex
- Linux
- Meteor JS
- Python
- Science
Archive ↓
- September 2024
- December 2023
- November 2023
- October 2023
- March 2022
- February 2022
- January 2022
- July 2021
- June 2021
- May 2021
- April 2021
- August 2020
- July 2020
- May 2020
- April 2020
- March 2020
- February 2020
- January 2020
- December 2019
- November 2019
- October 2019
- September 2019
- August 2019
- July 2019
- February 2019
- January 2019
- December 2018
- November 2018
- August 2018
- July 2018
- June 2018
- May 2018
- April 2018
- March 2018
- February 2018
- January 2018
- December 2017
- November 2017
- October 2017
- September 2017
- August 2017
- July 2017
- June 2017
- May 2017
- April 2017
- March 2017
- February 2017
- January 2017
- December 2016
- November 2016
- October 2016
- September 2016
- August 2016
- July 2016
- June 2016
- May 2016
- April 2016
- March 2016
- February 2016
- January 2016
- December 2015
- November 2015
- October 2015
- September 2015
- August 2015
- July 2015
- June 2015
- February 2015
- January 2015
- December 2014
- November 2014
- October 2014
- September 2014
- August 2014
- July 2014
- June 2014
- May 2014
- April 2014
- March 2014
- February 2014
- January 2014
- December 2013
- November 2013
- October 2013