Firebase for Android: Notifications (Firebase Cloud Messaging) Android 02.06.2017
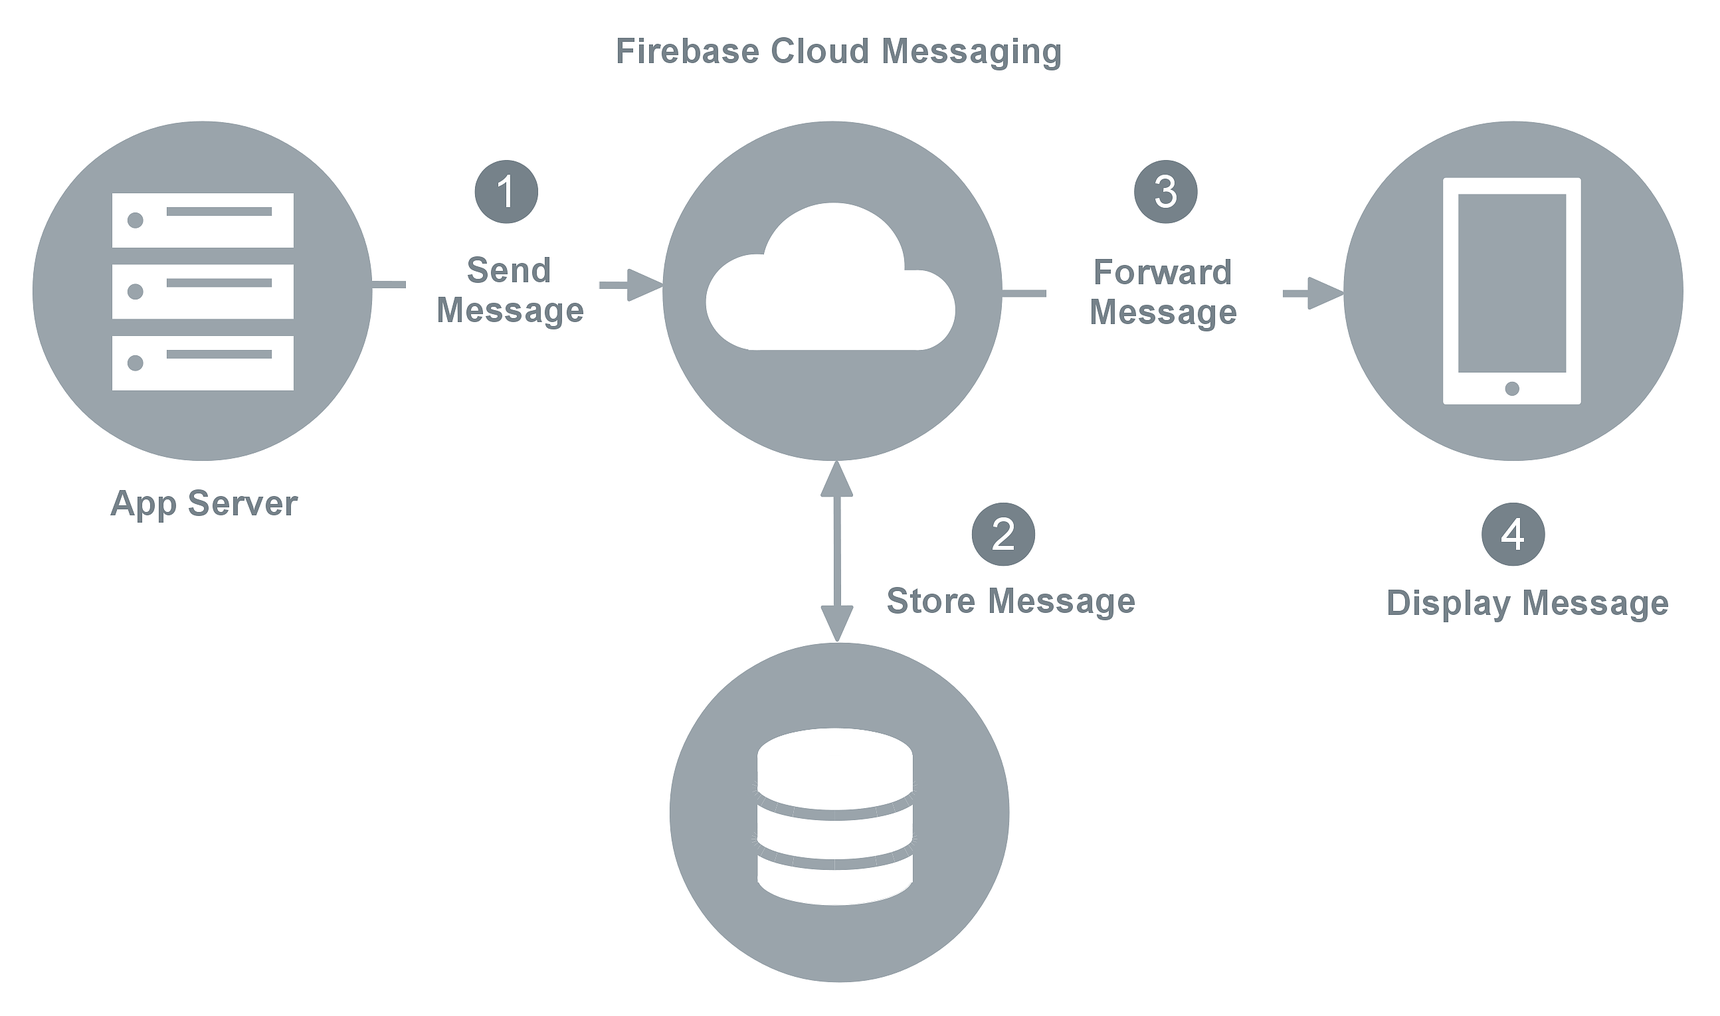
Firebase is a cloud service provider, provided by Google, which provides mobile backend as a service (MBaaS). Firebase Cloud Messaging (FCM) is the new version of GCM. Firebase Cloud Messaging provides cross-platform messaging solution that allows reliable delivery of messages at no cost. Using this we can:
- Send notification messages (2KB limit) or data messages (4KB limit). We can keep the user informed about events without draining the smartphone battery. When a user receives the notification, it appears, as a customized icon, in the status bar.
- Distribute messages to a single device, groups of devices, or to devices subscribed to some topics.
- Send acknowledgments, chats, and other messages from devices back to the server over FCM’s reliable and battery-efficient connection channel.
Firebase Cloud Messaging supports two types of messages, notification message and data message. The difference between them is that with data message you can send your own data elements in the message where as with notification message you have to use predefined elements.
As names suggest, notification message type is used to send notifications which will be displayed as notifications in the notification bar. FCM automatically handles notification messages and your app can also process it and customize it. Data message type is used to send data to client. Your app has to process it and take further action. There is restriction of 4kb on the size of message that can be sent to client.
Notification messages are handled automatically when receiving android app is in background and notification is displayed. On taping the notification, app’s launcher activity is started.
If notification needs to be displayed when receiving app is in foreground, the app needs to provide FirebaseMessagingService service implementing its callback onMessageReceived to process notification messages.
To handle the data messages in foreground and background, app needs to provide FirebaseMessagingService service implementing its callback onMessageReceived. Data can be retrieved from RemoteMessage object passed to onMessageReceived method.
If message contains both data and notification and app is in foreground, onMessageReceived callback is called. If message contains both data and notification and app is in background, notification is displayed in notification bar and data is passed as extras in the intent to launcher activity.
To configure the project to use the Firebase platform, open the Firebase Assistant window by clicking on Tools > Firebase in Android Studio. Now from the assistant go to Notifications and click Receive Notifications in your app. Next, press the Connect to Firebase button and make sure that the Create new Firebase project option is selected. Finaly, click Add Notifications.

Now you have connected Firebase platform with Notifications. Also you can manage your Firebase data from Firebase console.
Since we need to connect to the Network add the Internet permission in AndroidManifest.xml file.
<uses-permission android:name="android.permission.INTERNET"/>
Now we need to add a service that extends FirebaseMessagingService. This is the base class for communicating with Firebase Messaging. This FirebaseMessagingService extends Service class.
This class provides various functionalities:
- automatically displaying notifications
- message handling beyond receiving notifications on apps in the background.
- receive notifications in foregrounded apps
- receiving data payload
- sending upstream messages
- receiving errors in case of upstream message failures.
To handle any type of events required by the application, we need to override this base class methods. These methods are invoked on a background thread. To add this service include following to your manifest file :
<service
    android:name=".MyAndroidFirebaseMessagingService">
    <intent-filter>
        <action android:name="com.google.firebase.MESSAGING_EVENT"/>
    </intent-filter>
</service>
Add an entry for a service that extends FirebaseInstanceIdService which will be used to handle the registration token lifecycle. This is required for sending messages to specific devices/device groups.
<service
    android:name=".MyAndroidFirebaseInstanceIdService">
    <intent-filter>
        <action android:name="com.google.firebase.INSTANCE_ID_EVENT"/>
    </intent-filter>
</service>
Create a new java class MyAndroidFirebaseMessagingService and add the following code. It is a service that extends FirebaseMessagingService. It performs all kind of message handling in the background and sends the push notification once it is available.
public class MyAndroidFirebaseMessagingService extends FirebaseMessagingService {
    private static final String TAG = "DBG";

    @Override
    public void onMessageReceived(RemoteMessage remoteMessage) {
        if (remoteMessage == null)
            return;

        // check if message contains a notification payload.
        if (remoteMessage.getNotification() != null) {
            Log.e(TAG, "Notification body: " + remoteMessage.getNotification().getBody());
            createNotification(remoteMessage.getNotification());
        }

        // check if message contains a data payload
        if (remoteMessage.getData().size() > 0) {
            Log.d(TAG, "From: " + remoteMessage.getFrom());
            Log.d(TAG, "Message data payload: " + remoteMessage.getData());
        }
    }

    private void createNotification (RemoteMessage.Notification notification) {
        Intent intent = new Intent(this , MainActivity.class );
        intent.addFlags(Intent.FLAG_ACTIVITY_CLEAR_TOP);
        PendingIntent resultIntent = PendingIntent.getActivity( this , 0, intent,
                PendingIntent.FLAG_ONE_SHOT);

        Uri notificationSoundURI = RingtoneManager.getDefaultUri(RingtoneManager.TYPE_NOTIFICATION);
        NotificationCompat.Builder mNotificationBuilder = new NotificationCompat.Builder( this)
                .setSmallIcon(R.mipmap.ic_launcher)
                .setContentTitle(notification.getTitle())
                .setContentText(notification.getBody())
                .setAutoCancel( true )
                .setSound(notificationSoundURI)
                .setContentIntent(resultIntent);

        NotificationManager notificationManager =
                (NotificationManager) getSystemService(Context.NOTIFICATION_SERVICE);

        notificationManager.notify(0, mNotificationBuilder.build());
    }
}
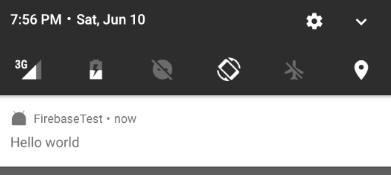
On receiving a message onMessageReceived() is called. Inside this function we are logging the message to the LogCat console and calling the createNotification() with the message text. The createNotification() method will create a push notification in the android notification area as shown below.
We are using NotificationCompat.Builder to create a new notification with default notification sound and passing the MainActivity to the intent.
There's a lot of information that can be passed down with the RemoteMessage. However, most of the options are only available if you use the Firebase back-end API, rather than the console. From the Firebase console, you are able to set a title, a message body, and custom key/value pairs.
Logging all of the available data from a RemoteMessage can be done like so:
for (Map.Entry<String, String> entry : remoteMessage.getData().entrySet()) {
    Log.e("Test", "Key = " + entry.getKey() + ", Value = " + entry.getValue() );
}

Log.e(TAG, "collapsekey: " + remoteMessage.getCollapseKey());
Log.e(TAG, "from: " + remoteMessage.getFrom());
Log.e(TAG, "message id: " + remoteMessage.getMessageId());
Log.e(TAG, "message type:: " + remoteMessage.getMessageType());
Log.e(TAG, "to: " + remoteMessage.getTo());
Log.e(TAG, "send time: " + remoteMessage.getSentTime());
Log.e(TAG, "ttl: " + remoteMessage.getTtl());
Log.e(TAG, "title: " + remoteMessage.getNotification().getTitle());
Log.e(TAG, "body: " + remoteMessage.getNotification().getBody());
Log.e(TAG, "click action: " + remoteMessage.getNotification().getClickAction());
Log.e(TAG, "color: " + remoteMessage.getNotification().getColor());
Log.e(TAG, "icon: " + remoteMessage.getNotification().getIcon());
Create a java class MyAndroidFirebaseInstanceIdService and add the following code. It is a service that extends FirebaseInstanceIdService and handles the creation, rotation, and updating of registration tokens. It makes sure theat the given message is sent to specific devices/device groups.
public class MyAndroidFirebaseInstanceIdService extends FirebaseInstanceIdService {
    private static final String TAG = "DBG";

    @Override
    public void onTokenRefresh() {
        // get hold of the registration token
        String refreshedToken = FirebaseInstanceId.getInstance().getToken();
        // lg the token
        Log.d(TAG, "Refreshed token: " + refreshedToken);
    }
    private void sendRegistrationToServer(String token) {
        // implement this method if you want to store the token on your server
    }
}
The onTokenRefresh() callback fires on generation of a new token. We are calling getToken() in the context of onTokenRefresh() to ensure that we are accessing a currently available registration token.
Now the app is complete, we will test the app by sending a notification from the Firebase Notifications panel.
- Go to Firebase console and select the app you created.
- From the left menu select Notification.
- Click on New message.
- Enter message, select Single device or User segment. Select Send message. For User segment use something like me.proft.firebasetest (value
applicationIdfrom build.gradle(Module)). For Single device you should use FCM registration token , see below how to get this token.
This will generate a new Notification message on your android device as shown below.
Send notification from terminal
First of all, you'll need a Server key. Open Firebase console and select the app you created. Next, click on gear and select Project settings then Cloud messaging.
Second, we'll need a FCM registration token. I use following command
String refreshedToken = FirebaseInstanceId.getInstance().getToken();
Finish, issue following command
curl https://fcm.googleapis.com/fcm/send -X POST \
--header "Authorization: key=APISERVER" \
--Header "Content-Type: application/json" \
 -d '{
   "to": "TOKEN"
   "notification":{
     "title": "New Notification!",
     "body": "Test"
   },
   "priority": 10
}'
Send notification from application using OkHttpClient and JSONObject
Also, we can send notification from application using OkHttpClient and JSONObject.
public void sendNotification(View v) {
    final Handler handler = new Handler();
    Runnable runnable = new Runnable() {
        @Override
        public void run () {
            createNotification();

            handler.post(new Runnable(){
                @Override
                public void run(){
                    // do some UI related thing
                    // like update a progress bar or TextView
                }
            });
        }
    };

    new Thread(runnable).start();
}

public void createNotification() {
    String SERVER_KEY = "******";
    String TOKEN = "*******";

    OkHttpClient client = new OkHttpClient();
    JSONObject json = new JSONObject();
    JSONObject dataJson = new JSONObject();
    try {
        dataJson.put("body", "Test");
        dataJson.put("title", "New Notification!");
        json.put("notification", dataJson);
        json.put("to", TOKEN);

        MediaType JSON = MediaType.parse("application/json; charset=utf-8");
        RequestBody body = RequestBody.create(JSON, json.toString());
        Request request = new Request.Builder()
                .header("Authorization","key=" + SERVER_KEY)
                .url("https://fcm.googleapis.com/fcm/send")
                .post(body)
                .build();
        Response response = client.newCall(request).execute();
        String finalResponse = response.body().string();
        Log.d("VVV", "map: " + finalResponse);
    } catch (JSONException e) {
        e.printStackTrace();
    } catch (IOException e) {
        e.printStackTrace();
    }
}
How to update UI from onMessageReceived
For this purpose we can use LocalBroadcastManager.
public class NotificationFirebaseMessagingService extends FirebaseMessagingService {
    @Override
    public void onMessageReceived(final RemoteMessage remoteMessage) {
        final Context ctx = this;

        if (remoteMessage == null) return;

        if (remoteMessage.getData() != null) {
            Handler h = new Handler(Looper.getMainLooper());
            h.post(new Runnable() {
                public void run() {
                    if (!isAppIsInBackground(ctx)) {
                        Intent intent = new Intent("NOTIFICATION_LOCAL_BROADCAST");
                        intent.putExtra(Constants.EXTRA_NOTIFICATION_TITLE, remoteMessage.getData().get("title"));
                        intent.putExtra(Constants.EXTRA_NOTIFICATION_BODY, remoteMessage.getData().get("body"));
                        LocalBroadcastManager.getInstance(ctx).sendBroadcast(intent);
                    } else {
                        createNotification(remoteMessage);
                    }
                }
            });
        }
    }

    public boolean isAppIsInBackground(Context context) {
        boolean isInBackground = true;
        ActivityManager am = (ActivityManager) context.getSystemService(Context.ACTIVITY_SERVICE);
        if (Build.VERSION.SDK_INT > Build.VERSION_CODES.KITKAT_WATCH) {
            List<ActivityManager.RunningAppProcessInfo> runningProcesses = am.getRunningAppProcesses();
            for (ActivityManager.RunningAppProcessInfo processInfo : runningProcesses) {
                if (processInfo.importance == ActivityManager.RunningAppProcessInfo.IMPORTANCE_FOREGROUND) {
                    for (String activeProcess : processInfo.pkgList) {
                        if (activeProcess.equals(context.getPackageName())) {
                            isInBackground = false;
                        }
                    }
                }
            }
        } else {
            List<ActivityManager.RunningTaskInfo> taskInfo = am.getRunningTasks(1);
            ComponentName componentInfo = taskInfo.get(0).topActivity;
            if (componentInfo.getPackageName().equals(context.getPackageName())) {
                isInBackground = false;
            }
        }

        return isInBackground;
    }
}
Following is snippet of MainActivity.
public class MainActivity extends AppCompatActivity {
    Activity activity = MainActivity.this;
    LocalReceiver myReceiver;

    @Override
    protected void onCreate(Bundle savedInstanceState) {
        super.onCreate(savedInstanceState);
        setContentView(R.layout.activity_main);

        myReceiver = new LocalReceiver();
    }

    @Override
    public void onResume(){
        super.onResume();
        IntentFilter filter = new IntentFilter("NOTIFICATION_LOCAL_BROADCAST");
        LocalBroadcastManager.getInstance(activity).registerReceiver(myReceiver, filter);
    }

    @Override
    public void onPause(){
        super.onPause();
        LocalBroadcastManager.getInstance(activity).unregisterReceiver(myReceiver);
    }

    private void updateUI(Intent intent) {
        // do what you need to do
    }

    private class LocalReceiver extends BroadcastReceiver {
        @Override
        public void onReceive(Context context, Intent intent) {
            updateUI(intent);
        }
    }
}
Quote
Categories
- Android
- AngularJS
- Databases
- Development
- Django
- iOS
- Java
- JavaScript
- LaTex
- Linux
- Meteor JS
- Python
- Science
Archive ↓
- September 2024
- December 2023
- November 2023
- October 2023
- March 2022
- February 2022
- January 2022
- July 2021
- June 2021
- May 2021
- April 2021
- August 2020
- July 2020
- May 2020
- April 2020
- March 2020
- February 2020
- January 2020
- December 2019
- November 2019
- October 2019
- September 2019
- August 2019
- July 2019
- February 2019
- January 2019
- December 2018
- November 2018
- August 2018
- July 2018
- June 2018
- May 2018
- April 2018
- March 2018
- February 2018
- January 2018
- December 2017
- November 2017
- October 2017
- September 2017
- August 2017
- July 2017
- June 2017
- May 2017
- April 2017
- March 2017
- February 2017
- January 2017
- December 2016
- November 2016
- October 2016
- September 2016
- August 2016
- July 2016
- June 2016
- May 2016
- April 2016
- March 2016
- February 2016
- January 2016
- December 2015
- November 2015
- October 2015
- September 2015
- August 2015
- July 2015
- June 2015
- February 2015
- January 2015
- December 2014
- November 2014
- October 2014
- September 2014
- August 2014
- July 2014
- June 2014
- May 2014
- April 2014
- March 2014
- February 2014
- January 2014
- December 2013
- November 2013
- October 2013