Getting started with Explicit, Implicit and Pending Intents Android 05.04.2017

Introduction
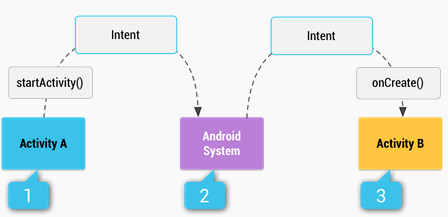
An Intent is basically an asynchronous message that is passed between components (such as Activities, Services, Broadcast Receivers, and Content Providers). Intents allow you to interact with components from the same applications as well as with components contributed by other applications.
It can be used with startActivity to launch an Activity, broadcastIntent to send it to any interested BroadcastReceiver components, and startService(Intent) or bindService(Intent, ServiceConnection, int) to communicate with a background Service.
The intent itself, an Intent object, is a passive data structure holding an abstract description of an operation to be performed.
The Intent constructor takes two arguments: the action to take and the entity to act on. Think of the first as the verb and the second as the object of the verb. The most common action is Intent.ACTION_VIEW, for which the string representation is android.intent.action.VIEW. The second will typically be a URL or, in Android, a URI (uniform resource identifier). URI objects can be created using the static parse() method in the Uri class (note the two lowercase letters in the class name do not use the URI class from java.net). Assuming that the string variable data contains the location we want to view, the code to create an Intent for it might be something like the following:
Intent intent = new Intent(Intent.ACTION_VIEW, Uri.parse(data));
That’s all! The beauty of Android is shown here - we don’t know or care if data contains a web page URL with http:, a phone number with tel:, or even something we’ve never seen. As long as there is an application registered to process this type of Intent, Android will find it for us, after we invoke it.
For example, let's assume that you have an Activity that needs to launch an email client and sends an email using your Android device. For this purpose, your Activity would send an ACTION_SEND along with appropriate chooser, to the Android Intent Resolver. The specified chooser gives the proper interface for the user to pick how to send your email data.
Intent email = new Intent(Intent.ACTION_SEND);
email.putExtra(Intent.EXTRA_EMAIL, new String[]{"john@yahoo.com"});
email.putExtra(Intent.EXTRA_SUBJECT, "subject");
email.putExtra(Intent.EXTRA_TEXT, "message");
startActivity(Intent.createChooser(email, "Choose an email client from..."));
Another example, assume that you have an Activity that needs to open URL in a web browser on your Android device. For this purpose, your Activity will send ACTION_WEB_SEARCH Intent to the Android Intent Resolver to open given URL in the web browser. The Intent Resolver parses through a list of Activities and chooses the one that would best match your Intent, in this case, the Web Browser Activity. The Intent Resolver then passes your web page to the web browser and starts the Web Browser Activity.
Intent intent = new Intent(Intent.ACTION_WEB_SEARCH );
intent.putExtra(SearchManager.QUERY, "white lion");
startActivity(intent);
There are separate mechanisms for delivering intents to each type of component − activities, services, and broadcast receivers.
Context.startActivity(). The Intent object is passed to this method to launch a new activity or get an existing activity to do something new.Context.startService(). The Intent object is passed to this method to initiate a service or deliver new instructions to an ongoing service.Context.sendBroadcast(). The Intent object is passed to this method to deliver the message to all interested broadcast receivers.
An Intent object is a bundle of information which is used by the component that receives the intent as well as information used by the Android system. An Intent object can contain the following components based on what it is communicating or going to perform:
- Action. This is mandatory part of the Intent object and is a string naming the action to be performed — or, in the case of broadcast intents, the action that took place and is being reported. The action largely determines how the rest of the intent object is structured. The Intent class defines a number of action constants corresponding to different intents. The action in an Intent object can be set by the
setAction()method and read bygetAction(). - Data. Adds a data specification to an intent filter. The specification can be just a data type (the mimeType attribute), just a URI, or both a data type and a URI. A URI is specified by separate attributes for each of its parts. The
setData()method specifies data only as a URI,setType()specifies it only as a MIME type, andsetDataAndType()specifies it as both a URI and a MIME type. The URI is read bygetData()and the type bygetType(). Example:ACTION_DIAL content://contacts/people/1. - Category. The category is an optional part of Intent object and it's a string containing additional information about the kind of component that should handle the intent. The
addCategory()method places a category in an Intent object,removeCategory()deletes a category previously added, andgetCategories()gets the set of all categories currently in the object. - Extras. This will be in key-value pairs for additional information that should be delivered to the component handling the intent. The extras can be set and read using the
putExtras()andgetExtras()methods respectively. - Flags. These flags are optional part of Intent object and instruct the Android system how to launch an activity, and how to treat it after it's launched etc.
Types of intents
There are two types of intents supported by Android: Explicit and Implicit.
Explicit intent going to be connected internal world of application, suppose if you wants to connect one activity to another activity, we can do this quote by explicit intent.
// explicit intent by specifying its class name
Intent i = new Intent(FirstActivity.this, SecondActivity.class);
startActivity(i);
These intents designate the target component by its name and they are typically used for application-internal messages - such as an activity starting a subordinate service or launching a sister activity.
Implicit intents don't name a target and the field for the component name is left blank. Implicit intents are often used to activate components in other applications. For example:
Intent read = new Intent();
read.setAction(android.content.Intent.ACTION_VIEW);
read.setData(Uri.parse("http://www.google.com"));
startActivity(read);

// or call somebody

Intent intent = new Intent(Intent.ACTION_CALL);
intent.setData(Uri.parse("tel:555–555–5555"));
activity.startActivity(intent);
The target component which receives the intent can use the getExtras() method to get the extra data sent by the source component. For example
// get bundle object at appropriate place in your code
Bundle extras = getIntent().getExtras();

// extract data using passed keys
String value1 = extras.getString("Key1");
String value2 = extras.getString("Key2");
Intent filters
You have seen how an Intent has been used to call an another activity. Android OS uses intent filters to pinpoint the set of Activities, Services, and Broadcast receivers that can handle the Intent with help of specified set of action, categories, data scheme associated with an Intent. You will use <intent-filter> element in the manifest file to list down actions, categories and data types associated with any activity, service, or broadcast receiver.
Following is an example of a part of AndroidManifest.xml file to specify an activity SecondActivity which can be invoked by either of the two mentioned actions, one category, and one data
<activity
    android:name=".SecondActivity"
    android:label="@string/app_name">

   <intent-filter>
      <action android:name="android.intent.action.VIEW" />
      <action android:name="com.example.My Application.LAUNCH" />
      <category android:name="android.intent.category.DEFAULT" />
      <data android:scheme="http" />
   </intent-filter>
</activity>
Once this activity is defined along with above mentioned filters, other activities will be able to invoke this activity using either the android.intent.action.VIEW, or using the LAUNCH action provided their category is android.intent.category.DEFAULT.
The <data> element specifies the data type expected by the activity to be called and for above example our custom activity expects the data to start with the "http://".
Pending Intents
Android has a variation on an intent called a pending intent. In this variation, Android allows a component to store an intent for future use in a location from which it can be invoked again. PendingIntent is basically an object that wraps another Intent object. Then it can be passed to a foreign application where you’re granting that app the right to perform the operation, i.e., execute the intent as if it were executed from your own app’s process (same permission and identity). For security reasons you should always pass explicit intents to a PendingIntent rather than being implicit.
A PendingIntent itself is a token referencing the original data (Intent action, data, categories, etc.) maintained by the system. Hence if the owning app’s (creator) process is killed, the PendingIntent will still remain usable from other app proesses that had received it. The owning app can later re-retrieve the PendingIntent token if that’s still valid by specifying the same set of data and then even cancel() it.
For example, in an alarm manager, you want to start a service when the alarm goes off. Android does this by creating a wrapper pending intent around a normal corresponding intent and storing it away so that even if the calling process dies off, the intent can be dispatched to its target. At the time of the pending intent creation, Android stores enough information about the originating process that security credentials can be checked at the time of dispatch or invocation.
Let’s see how we can go about creating a pending intent:
Intent regularIntent;
PendingIntent pi = PendingIntent.getActivity(context, 0, regularIntent,...);
A regular intent can be used to start an activity or a service or invoke a broadcast receiver. The nature of using an intent to call these different sorts of components is different. To accommodate this, an Android context (a superclass of Activity) provides three distinct methods:
startActivty(intent)
startService(intent)
sendBroadcast(intent)
Given these variations, if we were to store an intent to be reused later, how would Android know whether to start an activity, start a service, or start a broadcast receiver due to a broadcast? This is why we have to explicitly specify the purpose for which we are creating the pending intent when it’s created, and it explains the following three separate methods:
PendingIntent.getActivity(context, 0, intent, flag)
PendingIntent.getService(context, 0, intent, flag)
PendingIntent.getBroadcast(context, 0, intent, flag)
Android stores away intents and reuses them. If you ask for a pending intent using the same intent object twice, you get the same pending intent. If your goal is to get a different copy of the pending intent, you have to supply a different requestCode.
Two intents are considered identical if their internal parts match except for the extra bundle. The extra bundle is allowed to differ and will not affect the uniqueness of intents. If you want to force uniqueness among two otherwise identical underlying intents, you can vary the request code argument value. This will make the pending intents unique even though the underlying intents are not.
The flags indicate what to do if there is an existing pending intent—whether to return a null, overwrite extras, and so on. Usually, you can pass a zero for requestCode and flags to get the default behavior.
We’ll create an Intent and wrap it into a PendingIntent:
// explicit intent to wrap
Intent intent = new Intent(this, SecondActivity.class);

// create pending intent and wrap our intent
PendingIntent pendingIntent = PendingIntent.getActivity(this, 1, intent, PendingIntent.FLAG_CANCEL_CURRENT);
try {
    // perform the operation associated with our pendingIntent
    pendingIntent.send();
} catch (PendingIntent.CanceledException e) {
    e.printStackTrace();
}
A specific feature of the PendingIntent is that it is not related to the lifecycle of your application. Even if your application was intentionally being closed, or killed by the OS, the PendingIntent will remain and the processes to which it had been given will be able to use it.
Sharing content in Android using ACTION_SEND intent
Very often, you might want to enable the ability for users to share some content (either text, link or an image) from your Android app. Users can share the content using email, twitter, Facebook, sms or through numerous other ways. Android provides a built-in Intent called ACTION_SEND for this purpose. Using it in your app is very easy. All you have to do is to use the following couple of lines.
Intent sharingIntent = new Intent(Intent.ACTION_SEND);
sharingIntent.setType("text/html");
sharingIntent.putExtra(Intent.EXTRA_TEXT, Html.fromHtml("<p>Hello world!.</p>"));
startActivity(Intent.createChooser(sharingIntent,"Share using"));
In addition to supporting text, this intent also supports sharing images or any binary content. All you have to do is to set the appropriate mime type and then pass the binary data by calling the putExtra method.
File photoFile = new File(getFilesDir(), "foo.jpg");
Uri screenshotUri = Uri.fromFile(photoFile);
Intent sharingIntent = new Intent(Intent.ACTION_SEND);
sharingIntent.setType("image/png");
sharingIntent.putExtra(Intent.EXTRA_STREAM, screenshotUri);
startActivity(Intent.createChooser(sharingIntent, "Share image using"));
In certain cases, we might want to send an image along with text. This can be done with:
String text = "Look at my awesome picture";
Uri pictureUri = Uri.parse("file://my_picture");
Intent shareIntent = new Intent();
shareIntent.setAction(Intent.ACTION_SEND);
shareIntent.putExtra(Intent.EXTRA_TEXT, text);
shareIntent.putExtra(Intent.EXTRA_STREAM, imageUri);
shareIntent.setType("image/*");
shareIntent.addFlags(Intent.FLAG_GRANT_READ_URI_PERMISSION);
startActivity(Intent.createChooser(shareIntent, "Share images..."));
Sharing multiple images can be done with:
Intent shareIntent = new Intent(Intent.ACTION_SEND_MULTIPLE);
shareIntent.putParcelableArrayListExtra(Intent.EXTRA_STREAM, imageUris);
shareIntent.setType("image/*");
If you want your app to be listed when this Intent is called, then you have to add an intent filter in your manifest.xml file
<intent-filter>
   <action android:name="android.intent.action.SEND" />
   <category android:name="android.intent.category.DEFAULT" />
   <data android:mimeType="image/*" />
</intent-filter>
android:mimeType specifies the mime type which you are interested in listening.
If you are using Android API 24 or higher, private File URI resources (file:///) cannot be shared. You must instead wrap the File object as a content provider (content://) using the FileProvider class.
First, you must declare this FileProvider in your AndroidManifest.xml file within the <application> tag:
<application>

  <!-- make sure within the application tag, otherwise app will crash with XmlResourceParser errors -->
  <provider
    android:name="android.support.v4.content.FileProvider"
    android:authorities="me.proft.fileprovider"
    android:exported="false"
    android:grantUriPermissions="true">
      <meta-data
            android:name="android.support.FILE_PROVIDER_PATHS"
            android:resource="@xml/fileprovider" />
  </provider>
</application>
Next, create a resource directory called xml and create a fileprovider.xml. Assuming you wish to grant access to the application's specific external storage directory, which requires requesting no additional permissions, you can declare this line as follows:
<?xml version="1.0" encoding="utf-8"?>
<paths>
    <external-files-path
        name="images"
        path="Pictures" />

    <!--Uncomment below to share the entire application specific directory -->
    <!--<external-path name="all_dirs" path="."/>-->
</paths>
Finally, you will convert the File object into a content provider using the FileProvider class:
// getExternalFilesDir() + "/Pictures" should match the declaration in fileprovider.xml paths
File file = new File(getExternalFilesDir(Environment.DIRECTORY_PICTURES), "share_image_" + System.currentTimeMillis() + ".png");

// wrap File object into a content provider. NOTE: authority here should match authority in manifest declaration
bmpUri = FileProvider.getUriForFile(MyActivity.this, "me.proft.fileprovider", file);
Note that there are other XML tags you can use in the fileprovider.xml, which map to the File directory specified.
If you are using API 23 or above, then you'll need to request runtime permissions for Manifest.permission.READ_EXTERNAL_STORAGE and Manifest.permission.WRITE_EXTERNAL_STORAGE in order to share the image as shown above since newer versions require explicit permisions at runtime for accessing external storage.
Quote
Categories
- Android
- AngularJS
- Databases
- Development
- Django
- iOS
- Java
- JavaScript
- LaTex
- Linux
- Meteor JS
- Python
- Science
Archive ↓
- September 2024
- December 2023
- November 2023
- October 2023
- March 2022
- February 2022
- January 2022
- July 2021
- June 2021
- May 2021
- April 2021
- August 2020
- July 2020
- May 2020
- April 2020
- March 2020
- February 2020
- January 2020
- December 2019
- November 2019
- October 2019
- September 2019
- August 2019
- July 2019
- February 2019
- January 2019
- December 2018
- November 2018
- August 2018
- July 2018
- June 2018
- May 2018
- April 2018
- March 2018
- February 2018
- January 2018
- December 2017
- November 2017
- October 2017
- September 2017
- August 2017
- July 2017
- June 2017
- May 2017
- April 2017
- March 2017
- February 2017
- January 2017
- December 2016
- November 2016
- October 2016
- September 2016
- August 2016
- July 2016
- June 2016
- May 2016
- April 2016
- March 2016
- February 2016
- January 2016
- December 2015
- November 2015
- October 2015
- September 2015
- August 2015
- July 2015
- June 2015
- February 2015
- January 2015
- December 2014
- November 2014
- October 2014
- September 2014
- August 2014
- July 2014
- June 2014
- May 2014
- April 2014
- March 2014
- February 2014
- January 2014
- December 2013
- November 2013
- October 2013