Android Animation tutorial with examples Android 05.02.2017
 Android Animation is used to give the UI a rich look and feel. It is the process of creating motion and shape change. Animations in android apps can be performed through XML or android code.
Android supports following types of animation:
- Frame-by-frame animation (API 1+), which occurs when a series of frames is drawn one after the other at regular intervals;
- View animation (API 1+). It calculates animation using start points, end points, rotation, and other aspects of animation. The Android view animation system is older than the property animation system and can only be used for
Views. It's relatively easy to set up and offers enough capabilities for many use cases. - Property animation (API 11+). It changes an object's properties over a specified period of time.The property animation system was introduced in Android 3.0 (API level 11). Property animation is more flexible than view animation, and it offers more features.
- ViewPropertyAnimator (API 12+)
- Transition (API 19+)
- StateListAnimator (API 21+). Tutorial.
- RippleDrawable (API 21+)
- AnimatedVectorDrawable (API 21+). Tutorial 1, Tutorial 2.
Frame-by-Frame animation
Frame-by-frame animation is where a series of images are shown in succession at quick intervals so that the final effect is that of an object moving or changing.
In Android, frame-by-frame animation is implemented through the class AnimationDrawable. This class is a Drawable. These objects are commonly used as backgrounds for views. AnimationDrawable, in addition to being a Drawable, can take a list of other Drawable resources (like images) and render them at specified intervals.
To use this AnimationDrawable class, start with a set of Drawable resources (for example, a set of images) placed in the /res/drawable subdirectory. You will then construct an XML file that defines the AnimationDrawable using a list of these images. This XML file needs to be placed in the /res/drawable/frame_animation.xml subdirectory as well.
<animation-list
    xmlns:android="http://schemas.android.com/apk/res/android"
    android:oneshot="false">
    <item
        android:drawable="@drawable/colored_ball1"
        android:duration="50" />

    <item
        android:drawable="@drawable/colored_ball2"
        android:duration="50" />

    <item
        android:drawable="@drawable/colored_ball3"
        android:duration="50" />
</animation-list>
Each frame points to one of the images you have assembled through their resource IDs. The animation-list tag gets converted into an AnimationDrawable object representing the collection of images. You then need to set this AnimationDrawable as a background resource for our ImageView control in the activity layout. Assuming that the file name for this XML file is frame_animation.xml and that it resides in the /res/drawable subdirectory, you can use the following code to set the AnimationDrawable as the background of the ImageView:
imageView.setBackgroundResource(R.drawable.frame_animation);
With this code, Android realizes that the resource ID R.drawable.frame_animation is an XML resource and accordingly constructs a suitable AnimationDrawable Java object for it before setting it as the background. Once this is set, you can access this AnimationDrawable object by doing a get on the view object like this:
Object backgroundObject = view.getBackground();
AnimationDrawable ad = (AnimationDrawable) backgroundObject;
Once you have the AnimationDrawable object, you can use its start() and stop() methods to start and stop the animation.
You can create moving gradient animation via AnimationDrawable.
View animation
View Animation can be applied on a single view only and, at the end of the animation, the effects are lost.
Through view animation you can animate a view by manipulating its transformation matrix. A transformation matrix is like a lens that projects a view on to the display. A transformation matrix can affect the projected views scale, size, position, and color. Identity transformation matrix preserves the original view. You start with an identity matrix and apply a series of mathematical transformations involving size, position, and orientation. You then set the final matrix as the transformation matrix for the view you want to transform.
Android exposes the transformation matrix for a view by allowing registration of an animation object with that view. The animation object will be passed to the transformation matrix.
View animations are further categorized into tween animation and frame animation.
Tween animations are useful when you want to perform one or more transformations to a single view. The available transformations are rotation, scaling, translation, and fading.
Tween animation uses a different approach that creates an animation by performing a series of transformations on a single View. In Android, it provides access to the following classes that are the basis for all the animations:
AlphaAnimationcontrols transparency changes.RotateAnimationcontrols rotations.ScaleAnimationcontrols growing or shrinking.TranslateAnimationcontrols position changes.

These four animation classes can be used for transitions between activities, layouts, views, and so on. All these can be defined in the layout XML file as <alpha>, <rotate>, <scale> and <translate>. They all have to be contained within an AnimationSet <set>:
<alpha>attributes: android:fromAlpha, android:toAlpha. The alpha value translates the opacity from 0.0 (transparent) to 1.0 (opaque).<rotate>attributes: android:fromDegrees, android:toDegrees, android:pivotX, android:pivotY. Therotatespecifies the angle to rotate an animation around a center of rotation defined as the pivot.<scale>attributes: android:fromXScale, android:toXScale, android:fromYScale, android:toYScale, android:pivotX, android:pivotY. Thescalespecifies how to change the size of a view in the x axis or y axis. The pivot location that stays fixed under the scaling can also be specified.<translate>attributes: android:fromXDelta, android:toXDelta, android:fromYDelta, android:toYDelta. Thetranslatespecifies the amount of translation to perform on a view.
For each animation effect, there are properties such as animation start time, duration, and whether the animation is a sequential or simultaneous animation.
The simplest way apply the animation to view is
Animation animation = AnimationUtils.loadAnimation(context, android.R.anim.slide_in_left);
someView.startAnimation(animation);
Next, we create a resource directory under the res folder names anim to keep all the xml files containing the animation logic.
- Right click on the
resfolder. - Select New / Android resource file.
- Write
sample_animationas the name of the file - Choose the Animation resource type. The directory name field will change to
anim.
Following is a sample_animation.xml xml file showing an android animation code logic.
<?xml version="1.0" encoding="utf-8"?>
<scale xmlns:android="http://schemas.android.com/apk/res/android"
    android:interpolator="@android:anim/accelerate_decelerate_interpolator"
    android:duration="300"
    android:fromXScale="0.0"
    android:fromYScale="0.0"
    android:toXScale="1.0"
    android:toYScale="1.0"
    android:fillAfter="true"/>
Let's examine properties
android:interpolator. It is the rate of change in animation. We can define our own interpolators using the time as the constraint. In the above xml code an inbuilt interpolator is assigned.android:duration. Duration of the animation in which the animation should complete. It is 300ms here. This is generally the ideal duration to show the transition on the screen.
An interpolator is a mathematical tool that takes original time instances as an input, performs operation based on its mathematical equation and provides output as a time instance of a replacement frame for that given input instance.
The start and end of the animation are set using:
android:fromTRANSFORMATION
android:toTRANSFORMATION
TRANSFORMATIONis the transformation that we want to specify. In our case we start with an x and y scale of 0 and end with an x and y scale of 1.android:fillAfterproperty specifies whether the view should be visible or hidden at the end of the animation. We’ve set it visible in the above code. If it sets tofalse, the element changes to its previous state after the animation.android:startOffset. It is the waiting time before an animation starts. This property is mainly used to perform multiple animations in a sequential manner.android:repeatMode. This is useful when you want the animation to be repeat.android:repeatCount. This defines number of repetitions on animation. If we set this value to infinite then animation will repeat infinite times.
Our aim is to show an animation when any widget (lets say Button) is clicked. For that we need to use the Animation Class. The xml file that contains the animation logic is loaded using AnimationUtils class by calling the loadAnimation() function. The below snippet shows this implementation.
Animation animation;
animation = AnimationUtils.loadAnimation(getApplicationContext(), R.anim.sample_animation);
This Animation class has many useful functions which are listed below
- Method
start()starts the animation. - Method
setDuration(long duration)sets the duration of an animation. - Method
getDuration()gets the duration which is set by above method. - Method
end()ends the animation. - Method
cancel()cancels the animation.
To start the animation we need to call the startAnimation() function on the UI element as shown in the snippet below:
tvLabel.startAnimation(animation);
Here we perform the animation on a TextView component by passing the type of Animation as the parameter.
Animation Listeners are useful if we wish to listen to events like start, end or repeat. For this the activity must implement AnimationListener and the following methods need to overridden.
onAnimationStart: This will be triggered once the animation startedonAnimationEnd: This will be triggered once the animation is overonAnimationRepeat: This will be triggered if the animation repeats
Following is a list of animations snippets for most of the common android animations.
Fade In Animation.
File fade_in.xml in res/anim.
<set xmlns:android="http://schemas.android.com/apk/res/android"
    android:fillAfter="true">

    <alpha
        android:duration="1000"
        android:fromAlpha="0.0"
        android:interpolator="@android:anim/accelerate_interpolator"
        android:toAlpha="1.0" />
</set>
Here Alpha references the opacity of an object. An object with lower Alpha values is more transparent, while an object with higher Alpha values is less transparent, more opaque. Fade in animation is nothing but increasing Alpha value from 0 to 1.
Fade Out Animation.
File fade_out.xml in res/anim.
<set xmlns:android="http://schemas.android.com/apk/res/android"
    android:fillAfter="true">

    <alpha
        android:duration="1000"
        android:fromAlpha="1.0"
        android:interpolator="@android:anim/accelerate_interpolator"
        android:toAlpha="0.0" />
</set>
Fade out android animation is exactly opposite to fade in, where we need to decrease the Alpha value from 1 to 0.
Rotate Animation.
File rotate.xml in res/anim.
<set xmlns:android="http://schemas.android.com/apk/res/android">
    <rotate android:fromDegrees="0"
        android:toDegrees="360"
        android:pivotX="50%"
        android:pivotY="50%"
        android:duration="600"
        android:repeatMode="restart"
        android:repeatCount="infinite"
        android:interpolator="@android:anim/cycle_interpolator"/>
</set>
A from/toDegrees tag is used here to specify the degrees and a cyclic interpolator is used.
Move Animation.
File move.xml in res/anim.
<set
    xmlns:android="http://schemas.android.com/apk/res/android"
    android:interpolator="@android:anim/linear_interpolator"
    android:fillAfter="true">

   <translate
        android:fromXDelta="0%p"
        android:toXDelta="75%p"
        android:duration="800" />
</set>
Slide Up Animation.
File slide_up.xml in res/anim.
<set xmlns:android="http://schemas.android.com/apk/res/android"
    android:fillAfter="true">

    <scale
        android:duration="500"
        android:fromXScale="1.0"
        android:fromYScale="1.0"
        android:interpolator="@android:anim/linear_interpolator"
        android:toXScale="1.0"
        android:toYScale="0.0" />
>/set<
It’s achieved by setting android:fromYScale="1.0″ and android:toYScale="0.0″ inside the scale tag.
Slide Down Animation.
File slide_down.xml in res/anim.
<set xmlns:android="http://schemas.android.com/apk/res/android"
    android:fillAfter="true">

    <scale
        android:duration="500"
        android:fromXScale="1.0"
        android:fromYScale="0.0"
        android:toXScale="1.0"
        android:toYScale="1.0" />
</set>
This is just the opposite of slide_up.xml.
Bounce Animation.
File bounce.xml in res/anim.
<set xmlns:android="http://schemas.android.com/apk/res/android"
    android:fillAfter="true"
    android:interpolator="@android:anim/bounce_interpolator">

    <scale
        android:duration="500"
        android:fromXScale="1.0"
        android:fromYScale="0.0"
        android:toXScale="1.0"
        android:toYScale="1.0" />

</set>
Sequential Animation.
File sequential.xml in res/anim.
<set xmlns:android="http://schemas.android.com/apk/res/android"
    android:fillAfter="true"
    android:interpolator="@android:anim/linear_interpolator" >

    <!-- Move -->
    <translate
        android:duration="800"
        android:fillAfter="true"
        android:fromXDelta="0%p"
        android:startOffset="300"
        android:toXDelta="75%p" />
    <translate
        android:duration="800"
        android:fillAfter="true"
        android:fromYDelta="0%p"
        android:startOffset="1100"
        android:toYDelta="70%p" />
    <translate
        android:duration="800"
        android:fillAfter="true"
        android:fromXDelta="0%p"
        android:startOffset="1900"
        android:toXDelta="-75%p" />
    <translate
        android:duration="800"
        android:fillAfter="true"
        android:fromYDelta="0%p"
        android:startOffset="2700"
        android:toYDelta="-70%p" />

    <!-- Rotate 360 degrees -->
    <rotate
        android:duration="1000"
        android:fromDegrees="0"
        android:interpolator="@android:anim/cycle_interpolator"
        android:pivotX="50%"
        android:pivotY="50%"
        android:startOffset="3800"
        android:repeatCount="infinite"
        android:repeatMode="restart"
        android:toDegrees="360" />

</set>
Here a different android:startOffset is used from the transitions to keep them sequential.
From Java code
public void alpha(View view) {
    AlphaAnimation alphaAnimation = new AlphaAnimation(0.0f, 1.0f);
    alphaAnimation.setDuration(1000); // 1 second
    view.startAnimation(alphaAnimation);
}

public void rotate(View view) {
    RotateAnimation rotateAnimation = new RotateAnimation(90, 180);
    rotateAnimation.setDuration(1000); // 1 second
    view.startAnimation(rotateAnimation);
}

public void scale(View view) {
    ScaleAnimation scaleAnimation = new ScaleAnimation(0.0f, 1.0f, 0.0f, 1.0f);
    scaleAnimation.setDuration(1000); // 1 second
    view.startAnimation(scaleAnimation);
}

public void translate(View view) {
    TranslateAnimation translateAnimation = new TranslateAnimation(0.0f, 100.0f, 0.0f, 100.0f);
    translateAnimation.setDuration(1000); // 1 second
    view.startAnimation(translateAnimation);
}
If you want animation to apply its transformation after it ends use following code.
Animation.setFillAfter(true);
AndroidViewAnimations.
If you want apply animation just in few statements than you should use AndroidViewAnimations. It's a collection of different view animations splited in Attension, Special, Bounce, Fade, Flip, Rotate, Slide, Zoom groups.
To compile the AndroidViewAnimations library, we need to add the library in the app's dependencies. Open the app's build.gradle file. Add the project in the dependencies. It will compile the library at run time.
dependencies {
    ...
    compile 'com.nineoldandroids:library:2.4.0'
    compile 'com.daimajia.easing:library:1.0.1@aar'
    compile 'com.daimajia.androidanimations:library:1.1.3@aar'
}
We will call the with(), duration() and playOn() method of YoYo class. These method used to make the animation on your view.
YoYo.with(Techniques.Shake)
    .duration(700)
    .playOn(tvLabel);
Layout animation
LayoutAnimation is used to animate the views in an Android layout. You can use this type of animation for example with common layout controls like ListView and GridView. Unlike frame-by-frame animation, layout animation is not achieved through repeating frames but by changing the transformation matrix of a view. Every view in Android has a transformation matrix that maps the view to the screen. By changing this matrix you can accomplish scaling, rotation, and movement (translation) of the view. This type of animation that relies on changing properties and redrawing an image is referred to as tweening animation. Essentially LayoutAnimation is tweening animation of the transformation matrix of the views in a layout. A LayoutAnimation that is specified on a layout is applied to all the views in that layout.
These are the tweening animation types that can be applied to a layout:
- Scale animation. Used to make a view smaller or larger either along the x axis, on the y axis, or on both. You can also specify the pivot point around which you want the animation to take place.
- Rotate animation. Used to rotate a view around a pivot point by a certain number of degrees.
- Translate animation. Used to move a view along the x axis or the y axis.
- Alpha animation. Used to change the transparency of a view.
These animations are defined as XML files in the /res/anim subdirectory. Create /res/anim/scale.xml file with following content.
<set
    xmlns:android="http://schemas.android.com/apk/res/android"
    android:interpolator="@android:anim/accelerate_interpolator">

    <scale
    android:fromXScale="1"
    android:toXScale="1"
    android:fromYScale="0.1"
    android:toYScale="1.0"
    android:duration="500"
    android:pivotX="50%"
    android:pivotY="50%"
    android:startOffset="100" />
</set>
If your application dynamically adds or removes views from a layout, and you would like those changes to be animated use the LayoutTransition object to customize how modifications to the view hierarchy in a given layout should be animated. In Android 3.0 and later, any ViewGroup can have changes to its layout animated by simply enabling the android:animateLayoutChanges flag in XML or by adding a LayoutTransition object in Java code.
There are five states during a layout transition that each View in the layout may incur. An application can set a custom animation for each one of the following states:
APPEARING. An item that is appearing in the container.DISAPPEARING. An item that is disappearing from the container.CHANGING. An item that is changing because of a layout change, such as a resize, that doesn’t involve views being added or removed.CHANGE_APPEARING. An item changing because of another view appearing.CHANGE_DISAPPEARING. An item changing because of another view disappearing.
Property animation
The animation API is overhauled in 3.0 and 4.0 of Android. This new approach to animations is called property animation. The property animation API is extensive and different enough to refer to the previous animation API (prior to 3.x) as the legacy API even though the previous approach is still valid and not deprecated. The old animation API is in the package android.view.animation. The new animation API is in the package android.animation. Key concepts in the new property animation API are:
- Animators
- Value animators
- Object animators
- Animator sets
- Animator builders
- Animation listeners
- Property value holders
- Type evaluators
- View property animators
- Layout transitions
- Animators defined in XML files
Property animation can be applied to various kinds of objects and the effect persists after the animation is over.
Android property animation system allows you to animate property of an object over a period of time from start value to end value. Animation comes from the change in value of a property.
Property animations work on the idea of changing a view’s property between certain specified values for a specified duration of time.
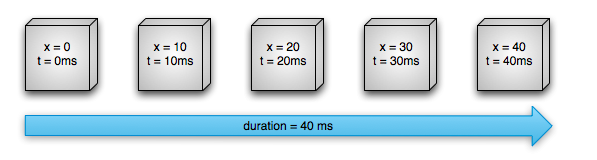
X is a property. T is a time. In property animation, X is updated in given time. This is basically how property animation works. The box can be a view or any object.
Android property animation system uses elapsed time to come up with new property value.
Elapsed time is not directly used to calculate new property value. Instead, elapsed time is passed to time interpolator which returns fraction of elapsed time depending on type of time interpolator used. Time interpolators allow you to get different animation effects. Android property animation system provides various interpolators. You can write your own interpolators to get desired animation behavior.
Android property animation system uses evaluators to calculate property values. Evaluators use starts value, end value and elapsed time returned by interpolators to calculate new value for property.
The basic class in property animation system is Animator class which takes animation time duration, object to be animated, property name and animation property start and end values. Animation works with the given interpolator and value evaluators to provide animations. Android system provides various animators, interpolators and evaluators.
Animators
Android animation framework provides ValueAnimator, ObjectAnimator and AnimatorSet animator classes. As mentioned before, Animator classes are main classes which perform animation work using interpolators and evaluators and contain time, property name and values and listeners information.
ObjectAnimator is subclass of ValueAnimator. The difference between ObjectAnimator and ValueAnimator is that ObjectAnimator updates the target object property with the calculated value. ValueAnimator does not set the calculated value on the target object.
ObjectAnimator is a class that extends from ValueAnimator. You can use ObjectAnimator if you have following conditions;
- You have an object (any class has some property)
- You don’t want to observe value animator listener
- You want to update object’s property automatically
AnimatorSet is used to group animations.
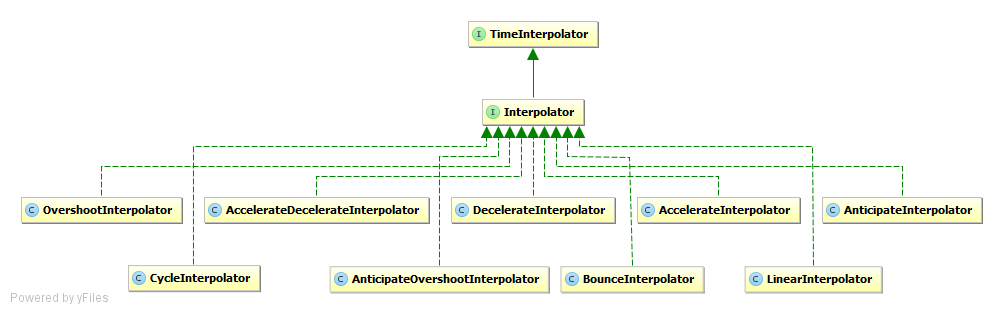
Interpolators
Interpolators return fractions of elapsed time so that you can achieve different animation effects. Android frame work provides several interpolator classes. You can create custom interpolator by implementing TimeInterpolator interface to suit your requirements.
If you want animation to start slowly and then accelerate, you can use AccelerateInterpolator. To get opposite effect meaning start quickly and then decelerate, you can use DecelerateInterpolator. If you want same animation effect throughout the change, you can use LinearInterpolator. Use CycleInterpolator to repeat animation for certain number of times.
Evaluators
Evaluators calculate property value using start value, end value and time data. Android system provides IntEvaluator to calculate values for int type properties, FloatEvaluator for float properties and ArgbEvaluator for color properties. You can create evaluators for different types of properties by implementing TypeEvaluator interface.
Animation Listeners
If you want to perform some action when animation starts, ends, repeats or cancels, you need to implement Animator.AnimatorListener interface. There are call back methods for animation events such as start, end, repeat and cancel.
ValueAnimator class does not update animation property with calculated value. To update property with calculated value, you need to implement ValueAnimator.AnimatorUpdateListener which gets called each time a new value is calculated.
Animation with ValueAnimator
Animations can be defined in code or xml resource file. Xml resource file needs be placed in res/animator/ folder. To define ValueAnimator in xml, use animator element and its properties as shown below. Since ValueAnimator does not update the property of target object with calculated value, we need to set update listener as shown in below code. In the listener callback method, calculated value can be retrieved and set to the property of target object.
In android ValueAnimator class provides a simple timing engine for running animations which calculate animated values and set them on target objects. In other words, ValueAnimator provides a set of numbers that are constantly changing, so using these in drawing will create a smooth animation for you.
Let’s take a look on it and implement a simple value animation, say, from 0 to 100. Here is how it is going to look like:
ValueAnimator animator = ValueAnimator.ofInt(0, 100);
animator.setDuration(2000);
animator.addUpdateListener(new ValueAnimator.AnimatorUpdateListener() {
    @Override
    public void onAnimationUpdate(ValueAnimator animation) {
        int value = (int) animation.getAnimatedValue();
    }
});
animator.start();
As you can see from example above we have a duration set to 2 seconds, that means that during this period of time value will be smoothly growing from 0 to 100.
ValueAnimator xml configuration
<animator xmlns:android="http://schemas.android.com/apk/res/android"
    android:duration="2000"
    android:valueFrom="20"
    android:valueTo="80"
    android:startOffset="100"
    android:repeatCount="4"
    android:repeatMode= "restart"
    android:valueType="intType"></animator>
Using ValueAnimator code
public class PropertyAnimationActivity extends AppCompatActivity {
    private TextView tview;

    @Override
    protected void onCreate(Bundle savedInstanceState) {
        super.onCreate(savedInstanceState);
        setContentView(R.layout.activity_main);

        tview = (TextView) findViewById(R.id.tview);

        ValueAnimator vanimator = ValueAnimator.ofInt(10, 80);
        vanimator.setDuration(2000);
        vanimator.setInterpolator(new CycleInterpolator(5));
        vanimator.setRepeatMode(ValueAnimator.REVERSE);
        vanimator.setStartDelay(200);
        vanimator.start();

        vanimator.addUpdateListener(new ValueAnimator.AnimatorUpdateListener(){
           public void onAnimationUpdate(ValueAnimator animation){
               tview.setTextSize((int)animation.getAnimatedValue());
            }
        });
    }
}
Animation with ObjectAnimator (API 11+)
ObjectAnimator is subclass of ValueAnimator. As ObjectAnimator sets calculated value of animation propery on target object, animator update listener is not required. But in some cases where redraw of object is required, you need to implement update listener to force redraw of object each time animation property is updated by calling invalidate method on view.
And also when you use ObjectAnimator for animation, you need to make sure that the property that is being animated should have getter and setter methods and property type should match to the type of start and end values passed to ObjectAnimator.
ObjectAnimator xml configuration
<objectAnimator xmlns:android="http://schemas.android.com/apk/res/android"
android:propertyName="string"
android:duration="2000"
android:valueFrom="40"
android:valueTo="100"
android:repeatCount="2"
android:repeatMode="reverse"
android:valueType="intType"></objectAnimator>
TextView textView = (TextView) findViewById(R.id.textView);

ObjectAnimator objectAnimator = ObjectAnimator.ofFloat(textView, "translationX", 10, 90);
objectAnimator.setDuration(1500);
objectAnimator.setRepeatMode(ObjectAnimator.REVERSE);
objectAnimator.setInterpolator(new AnticipateInterpolator());
objectAnimator.setEvaluator(new FloatEvaluator());
objectAnimator.start();
ImageView iv = (ImageView) findViewById(R.id.imageView);

PropertyValuesHolder rotationX = PropertyValuesHolder.ofFloat("rotationX", 0, 180, 180, 0, 0);
PropertyValuesHolder rotationY = PropertyValuesHolder.ofFloat("rotationY", 0, 0, 180, 180, 0);
ObjectAnimator animator = ObjectAnimator.ofPropertyValuesHolder(iv, rotationY, rotationX);
animator.setInterpolator(new LinearInterpolator());
animator.setRepeatCount(-1);
animator.setDuration(2500);
animator.start();

PropertyValuesHolder holderA = PropertyValuesHolder.ofFloat("alpha", 0, 1);
PropertyValuesHolder holderY = PropertyValuesHolder.ofFloat("translationY", 0, 300);
ObjectAnimator textAnimator = ObjectAnimator.ofPropertyValuesHolder(iv, holderA, holderY)
    .setDuration(1000);
textAnimator.setInterpolator(new AccelerateDecelerateInterpolator());
textAnimator.setStartDelay(800);
textAnimator.setRepeatCount(-1);
textAnimator.start();

ObjectAnimator popup = ObjectAnimator.ofPropertyValuesHolder(iv,
    PropertyValuesHolder.ofFloat("alpha", 0f, 1f),
    PropertyValuesHolder.ofFloat("scaleX", 0f, 1f),
    PropertyValuesHolder.ofFloat("scaleY", 0f, 1f));
popup.setDuration(2500);
popup.setInterpolator(new OvershootInterpolator());
popup.setRepeatCount(-1);
popup.start();

ObjectAnimator animator = ObjectAnimator.ofPropertyValuesHolder(iv,
    PropertyValuesHolder.ofFloat("alpha", 1.f, 0.f),
    PropertyValuesHolder.ofFloat("scaleX", 1.f, 0.f),
    PropertyValuesHolder.ofFloat("scaleY", 1.f, 0.f),
    PropertyValuesHolder.ofFloat("rotation", 0.f, 270.f));
animator.setDuration(2500);
animator.setRepeatCount(-1);
animator.start();
Color Animation
Animating text color can be done using ObjectAnimator’s ofArgb() method. You need to pass list of colors to be animated through in addition to object and property. In the same way, view’s back ground can be animated. Below code snippet shows how to animate text color and back ground color together using AnimatorSet.
ObjectAnimator anim = ObjectAnimator.ofArgb(textView, "TextColor",
    Color.MAGENTA, Color.BLUE, Color.CYAN, Color.GREEN);
anim.setDuration(5000);

ObjectAnimator animBgr = ObjectAnimator.ofArgb(textView, "BackgroundColor",
    Color.CYAN, Color.GREEN, Color.MAGENTA, Color.BLUE);
animBgr.setDuration(5000);

AnimatorSet animSet = new AnimatorSet();
animSet.play(anim).with(animBgr);
animSet.start();
Shadow Animation
Shadow animation can be achieved by animating elevation property of target view.
ObjectAnimator elevationAnim = ObjectAnimator.ofFloat(textView, "Elevation", 0, 20);
elevationAnim.setDuration(4000);
elevationAnim.start();
Slide Down
Slide down animation can be achieved by animating ScaleY from value 0 to 1.
ObjectAnimator anim = ObjectAnimator.ofFloat(textView, "ScaleY", 0, 1);
anim.setDuration(4000);
anim.start();
Slide Up
Slide up animation can be achieved by animating ScaleY from value 1 to 0.
ObjectAnimator anim = ObjectAnimator.ofFloat(textView, "ScaleY", 1, 0);
anim.setDuration(2000);
anim.start();
Slide In
Slide in animation can be achieved by animating ScaleX from value 1 to 0.
ObjectAnimator anim = ObjectAnimator.ofFloat(textView, "ScaleX", 1, 0);
anim.setDuration(2000);
anim.start();
Slide Out
Slide Out animation can be achieved by animating ScaleX from value 0 to 1.
ObjectAnimator anim = ObjectAnimator.ofFloat(textView, "ScaleX", 0, 1);
anim.setDuration(2000);
anim.start();
Rotate Animation
Rotate animation can be achieved using RotateAnimation class. RotateAnimation’s constructor takes from degree, to degree, x axis and y axis for rotation of target object. You can specify x axis and y axis type also. Axis type RELATIVE_TO_SELF allows you to specify coordinate values as percentage of width and height of target object, setting the both axis values 0.5 makes target object rotate at center point. To use RotateAnimation, you need to set interpolator and set it to target object by calling startAnimation() method.
RotateAnimation rotateAnimation = new RotateAnimation(0, 360, Animation.RELATIVE_TO_SELF, 0.5f,
    Animation.RELATIVE_TO_SELF, 0.5f);
rotateAnimation.setInterpolator(new LinearInterpolator());
rotateAnimation.setDuration(3000);

textView.startAnimation(rotateAnimation);
Fade In Animation
Fade animation can be achieved by animating alpha property.
ObjectAnimator anim = ObjectAnimator.ofFloat(textView, "Alpha", 0, 1);
anim.setDuration(5000);
anim.start();
Fade Out Animation
Fade out animation can be created by animating alpha property from 1 to 0.
ObjectAnimator anim = ObjectAnimator.ofFloat(textView, "Alpha", 1, 0);
anim.setDuration(5000);
anim.start();
Blink Animation
Using alpha property you can create blink animation by setting the duration to few milliseconds and repeating the animation.
ObjectAnimator anim = ObjectAnimator.ofFloat(textView, "Alpha", 0, 1);
anim.setRepeatMode(ObjectAnimator.REVERSE);
anim.setRepeatCount(ObjectAnimator.INFINITE);
anim.setDuration(700);
anim.start();
Move Animation
Position of an object can be animated using TranslateAnimation. TranslateAnimation’s constructor takes delta x and delta y values.
TranslateAnimation translateAnimation = new TranslateAnimation (Animation.RELATIVE_TO_SELF,
    0f,Animation.RELATIVE_TO_SELF,.85f, Animation.RELATIVE_TO_SELF, 0f,
    Animation.RELATIVE_TO_SELF, 0.65f);
translateAnimation.setInterpolator(new AccelerateDecelerateInterpolator());
translateAnimation.setDuration(1200);

textView.startAnimation(translateAnimation);
Bounce Animation
ObjectAnimator anim = ObjectAnimator.ofFloat(textView, "ScaleY", 0, 1);
anim.setInterpolator(new BounceInterpolator());
anim.setDuration(1000);
anim.start();
Multiple properties parallel animation
AnimatorSet can be used to group animations allowing multiple animations either play together or sequentially.
AnimatorSet animatorSet = new AnimatorSet();
animatorSet.play(vanimator).with(objectAnimator);
animatorSet.start();
ViewPropertyAnimator simplifies parallel animation of several properties of a view. To use ViewPropertyAnimator, you need to simply call animation method on view whose properties you want to animate parallel and call property methods passing target value. Instead of using ObjectAnimator, using ViewPropertyAnimator is the efficient way to animate multiple properties of a view.
ViewPropertyAnimator viewPropertyAnimator = tview.animate();
viewPropertyAnimator.translationX(90).translationY(90);
Property Animator
ViewPropertyAnimator Behaves much like an ObjectAnimator, because it modifies the actual values of the view’s properties, but code is more simple and is more efficient when animating many properties at once.
public void rotate(View view) {
    view.animate().rotationX(90).rotationY(90).start();
}

public void alpha(View view) {
    view.animate().alpha(0).start();
}

public void scale(View view) {
    view.animate().scaleX(0).scaleY(0).start();
}

public void translate(View view) {
    view.animate().translationX(100).translationY(100).start;
}
Ripple effect
Let's decorate Button with ripple effect. The RippleDrawable was added in API 21, so it's not available on earlier SDKs. You can move your drawable file to res/drawable-v21/ripple_effect.xml to ensure it doesn't crash on earlier releases.
<?xml version="1.0" encoding="utf-8"?>
<ripple xmlns:android="http://schemas.android.com/apk/res/android"
    xmlns:tools="http://schemas.android.com/tools"
    android:color="#f816a463"
    tools:targetApi="lollipop">
    <item android:id="@android:id/mask">
        <shape android:shape="rectangle">
            <solid android:color="#f816a463" />
        </shape>
    </item>
</ripple>
Create res/drawable/ripple_effect.xml for devices with API 20 and below.
<?xml version="1.0" encoding="utf-8"?>
<selector xmlns:android="http://schemas.android.com/apk/res/android">
    <item android:state_pressed="true">
        <shape android:shape="rectangle">
            <solid android:color="#f816a463" />
        </shape>
    </item>
    <item android:state_focused="true">
        <shape android:shape="rectangle">
            <stroke android:color="#f816a463" />
        </shape>
    </item>
    <item android:drawable="@color/button_ripple" />
</selector>
where
<color name="button_ripple">#E8EAF6</color>
And set background of button to above drawable resource file. Final code of xml layout activity looks like this.
<Button
    android:layout_width="match_parent"
    android:layout_height="wrap_content"
    android:background="@drawable/ripple_effect"
    android:padding="16dp"
    android:text="Start animation" />
Transition animation
Here is a simple snippet how to make transition animation between two Drawable.
Create res/drawable/transition.xml
<?xml version="1.0" encoding="utf-8"?>
<transition xmlns:android="http://schemas.android.com/apk/res/android">
    <item android:drawable="@drawable/position_on" />
    <item android:drawable="@drawable/position_off" />
</transition>
Add ImageView to your layout:
<ImageView
    android:id="@+id/ivPosition"
    android:layout_height="wrap_content"
    android:layout_width="wrap_content"
    android:src="@drawable/transition" />
Add code to your controller
ImageView ivPosition = (ImageView) findViewById(R.id.ivPosition);
TransitionDrawable drawable = (TransitionDrawable) ivPosition.getDrawable();
drawable.startTransition(500);
Also we can create TransitionDrawable in code.
Drawable backgrounds[] = new Drawable[2];
backgrounds[0] = getResources().getDrawable(R.drawable.position_on);
backgrounds[1] = getResources().getDrawable(R.drawable.position_off);

TransitionDrawable crossfader = new TransitionDrawable(backgrounds);

ImageView ivPosition = (ImageView) findViewById(R.id.ivPosition);
image.setImageDrawable(crossfader);

crossfader.startTransition(3000);
Then if you want to transition back to the original image you can call
// make sure the transition occurred
crossfader.startTransition(0);

// reverse transition
crossfader.reverseTransition(3000);
Using TextSwitcher and ImageSwitcher with simple animation
Android provides developers two classes TextSwitcher and ImageSwitcher in order to have a transition animation in an Android View. TextSwitcher is specially designed to contain only TextView as a child. It is used to animate any text on the app page. Whenever the setText(CharSequence) method is called, TextSwitcher animates the current text out and animates the new text in. TextView and TextSwitcher work in a similar way. Similarly, an ImageSwitcher replaces an ImageView. It also contains only ImageView as a child and animates the views in and out.
First we will define our XML file which will contain a TextSwitcher.
<TextSwitcher
    android:id="@+id/tvSwitcher"
    android:layout_width="wrap_content"
    android:layout_height="wrap_content" />
Now in our Activity class we will initialise this TextSwitcher.
final TextSwitcher tvSwitcher = findViewById(R.id.tvSwitcher);
tvSwitcher.setFactory(new ViewSwitcher.ViewFactory() {
    @Override
    public View makeView() {
        TextView t = new TextView(activity);
        t.setGravity(Gravity.TOP | Gravity.CENTER_HORIZONTAL);
        t.setTextAppearance(activity, android.R.style.TextAppearance_Large);
        return t;
    }
});

Animation in = AnimationUtils.loadAnimation(activity, android.R.anim.fade_in);
Animation out = AnimationUtils.loadAnimation(activity, android.R.anim.fade_out);
tvSwitcher.setInAnimation(in);
tvSwitcher.setOutAnimation(out);
tvSwitcher.setCurrentText(String.valueOf("Hello!"));

new Handler().postDelayed(new Runnable() {
    public void run() {
        tvSwitcher.setText(String.valueOf("Bye!"));
    }
}, 3000);
Now we are all set. Now whenever we call the setText function of the TextSwitcher it will change the text according to the animation applied.
That’s all. Just by following these simple steps you can also implement ImageSwitcher.
Quote
Categories
- Android
- AngularJS
- Databases
- Development
- Django
- iOS
- Java
- JavaScript
- LaTex
- Linux
- Meteor JS
- Python
- Science
Archive ↓
- December 2023
- November 2023
- October 2023
- March 2022
- February 2022
- January 2022
- July 2021
- June 2021
- May 2021
- April 2021
- August 2020
- July 2020
- May 2020
- April 2020
- March 2020
- February 2020
- January 2020
- December 2019
- November 2019
- October 2019
- September 2019
- August 2019
- July 2019
- February 2019
- January 2019
- December 2018
- November 2018
- August 2018
- July 2018
- June 2018
- May 2018
- April 2018
- March 2018
- February 2018
- January 2018
- December 2017
- November 2017
- October 2017
- September 2017
- August 2017
- July 2017
- June 2017
- May 2017
- April 2017
- March 2017
- February 2017
- January 2017
- December 2016
- November 2016
- October 2016
- September 2016
- August 2016
- July 2016
- June 2016
- May 2016
- April 2016
- March 2016
- February 2016
- January 2016
- December 2015
- November 2015
- October 2015
- September 2015
- August 2015
- July 2015
- June 2015
- February 2015
- January 2015
- December 2014
- November 2014
- October 2014
- September 2014
- August 2014
- July 2014
- June 2014
- May 2014
- April 2014
- March 2014
- February 2014
- January 2014
- December 2013
- November 2013
- October 2013