Getting started with unit and UI tests in Android Android 26.11.2016

Automated testing is an important topic that helps us ensure quality when building Android apps. There are many different testing tools and frameworks we can use while developing Android apps.
A correct android testing strategy should include the following
- Unit Test include sets of one or more programs which are designed to verify an atomic unit of source code, such as a method or a class. An addition to Unit testing is User Interface (UI) tests. These tests relate to UI components of your target application. UI tests ensure that your application return the correct UI output in response to sequence of user actions on device.
- In integration testing, all unit tested modules, are combined and verified. In Android, integration tests often involve checking integration with Android components such as Service testing, Activity testing, Content Provider testing, etc.
- Operational are also called Functional Tests or Acceptation Tests. They are high level tests designed to check the completeness and correctness of application.
- In System testing the system is tested as a whole and the interaction between the components, software and hardware is checked.
The idea is to write code for each non-trivial function or method. It allows you to relatively quickly check if the latest change in code causes regression, i. e. new errors appear in the part of the program that was already tested, and makes it easy to identify and eliminate such errors. Test is considered to be completed if no mistakes were encountered. And for various types of checks we use supplementary methods like assertXXX.
There're 2 types of unit tests in Android:
- Unit testing is about testing a particular component (i.e. an activity or model object) in isolation of other components. It might be a single class, an interface or just a method. We can consider it as the smallest possible testable piece of code part of an specific independent module. They are meant for testing business logic that is not interacting with the operating system. These tests are typically placed in the
app/src/test/javafolder. Well-known frameworks are Robolectric and JUnit. - Instrumentation testing (UI testing) are tests used for testing logic interconnected with Android API. They are performed on physical device/emulator and thus take more time than unit tests. For example we test the Login feature of our application where different entities works together and and we want to test that the login process is accomplished successfully on different scenarios. Typically placed in the
app/src/androidTest/javafolder. Well-known frameworks are Robotium, Espresso, UIAutomator, Google Android Testing, Selendroid.
Note that the borders between the two are not that strict, for instance you can inject certain Android dependencies into your unit tests with frameworks like mockito et al. Also you can run standard JUnit4 syntax tests inside Android instrumentation testing.
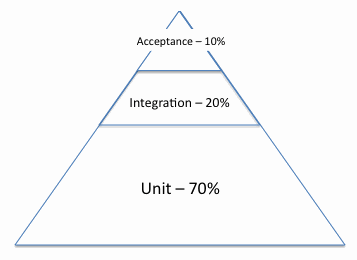
Following are the Test Pyramid concept described by Mike Cohn. Unit tests should be around 60-70% of our test code base and the rest 30% should be implemented as End-to-End tests (integration, functional, UI tests).
When creating tests, pay close attention to package organization. The following structure is practical:
app/src/main/java- app source code.app/src/test/java- for any unit test which can run on the JVM.app/src/androidTest/java- or any test which should run on an Android device (UI tests).
If you follow this conversion, then the Android build system can automatically run your tests on the correct target (JVM or Android device).
I use Android Studio 2.2, if you use Android Studio 2.0 or above, you will see the both androidTest and test enabled. But if you use Android Studio version lower than 2.0, you had to choose one of the two types to enable for a run the tests, that mean you had to switch between local unit tests and instrumented unit tests.
In this article I show how to test business logic of simple application. This application allows to calculate sum of two fields.
Following is layout
<?xml version="1.0" encoding="utf-8"?>
<LinearLayout xmlns:android="http://schemas.android.com/apk/res/android"
    xmlns:tools="http://schemas.android.com/tools"
    android:layout_width="match_parent"
    android:layout_height="match_parent"
    android:orientation="horizontal"
    tools:context="me.proft.sandbox.MainActivity">

    <EditText
        android:id="@+id/edNum1"
        android:layout_width="wrap_content"
        android:layout_height="wrap_content" />

    <TextView
        android:layout_width="wrap_content"
        android:layout_height="wrap_content"
        android:text="+"/>

    <EditText
        android:id="@+id/edNum2"
        android:layout_width="wrap_content"
        android:layout_height="wrap_content" />

    <TextView
        android:layout_width="wrap_content"
        android:layout_height="wrap_content"
        android:text="="/>

    <TextView
        android:id="@+id/tvResult"
        android:layout_width="wrap_content"
        android:layout_height="wrap_content"
        android:text=""/>
</LinearLayout>
Following is MainActivity
public class MainActivity extends AppCompatActivity {
    EditText etNum1, etNum2;
    TextView tvResult;

    @Override
    protected void onCreate(Bundle savedInstanceState) {
        super.onCreate(savedInstanceState);
        setContentView(R.layout.activity_third);

        etNum1 = (EditText) findViewById(R.id.edNum1);
        etNum2 = (EditText) findViewById(R.id.edNum2);
        tvResult = (TextView) findViewById(R.id.tvResult);

        etNum1.setOnKeyListener(new View.OnKeyListener() {
            public boolean onKey(View view, int keyCode, KeyEvent event) {
                if (event.getAction() == KeyEvent.ACTION_UP) {
                    try {
                        double num1 = Double.parseDouble(etNum1.getText().toString());
                        double num2 = Double.parseDouble(etNum2.getText().toString());
                        tvResult.setText(Double.valueOf(num1 + num2).toString());
                    } catch (NumberFormatException e) {
                        Log.d("Error: " + e);
                    }
                    return true;
                }
                return false;
            }
        });

        etNum2.setOnKeyListener(new View.OnKeyListener() {
            public boolean onKey(View view, int keyCode, KeyEvent event) {
                if (event.getAction() == KeyEvent.ACTION_UP) {
                    try {
                        double num1 = Double.parseDouble(etNum1.getText().toString());
                        double num2 = Double.parseDouble(etNum2.getText().toString());
                        tvResult.setText(Double.valueOf(num1 + num2).toString());
                    } catch (NumberFormatException e) {
                        Log.d("Error: " + e);
                    }
                    return true;
                }
                return false;
            }
        });

    }
}
Unit testing using Robolectric

There are many testing frameworks available which can help perform an exhaustive functional, performance, regression and load testing of Android applications.
One of the standard testing frameworks for Android application is Android Testing Support Library (ATSL). Using ATSL is typically slower under Android instrumentation as it relies extensively on packaging and installation of the Android application on a device/emulator. Running Android tests on the JVM usually fails because the Android core libraries included with the SDK, specifically the android.jar file, only contain stub implementations of the Android classes. The actual implementations of the core libraries are built directly on the device or emulator, so running tests usually requires one to be active in order to execute. You can read more about ATSL here.
Robolectric, on the other hand, is faster as it runs on the regular Java Virtual Machine (JVM). It does not require any packaging, deploying, etc. It runs outside the emulator of a JVM. You can read comparison of ATSL and Robolectric here.
Robolectric is an Android unit testing framework that allows you to run tests inside the JVM on your development workstation. Robolectric rewrites Android SDK classes as they're being loaded and makes it possible for them to run on a regular JVM, resulting in fast test times. Furthermore, it handles inflation of views, resource loading, and more stuff that's implemented in native C code on Android devices, making the need for emulators and physical devices to run automated tests obsolete.
Robolectric provides reference to the shadow objects representing the actual Android objects. These shadow objects represent the proxies of the real objects. Example, ShadowButton is a shadow object of Button class. The loading of Android classes is intercepted by Robolectric during testing and blinds shadow objects to the new Android objects.
Add the following to your build.gradle
testCompile "org.robolectric:robolectric:3.1.4"
The testCompile keyword denotes that the dependency will be used for JUnit test and will not be included in the final package.
In your src/test/java folder add the Java class called MainActivityTest.java. It is a good practice to name your test class files after the name of the production class files that they are testing.
To run the test case with Robolectric, annotate the test class using the @RunWith annotation.
@RunWith(RobolectricTestRunner.class)
@Config(constants = BuildConfig.class)
public class MainActivityTest {
}
Annotations are like meta-tags that you can add to your code and apply them to methods, variables, classes. There are many other useful annotations which can be used while writing these test cases: @Before, @After, @withConstant, @Test. Some of these are defined in JUnit 4 package and Robolectric com.xtremelabs.robolectric.annotation package.
Some of useful annotations:
- Several tests need similar objects created before they can run. Annotating a public void method with
@Beforelet’s JUnit that this method to be run before each Test method. - The
@Testannotation tells JUnit that the public void method to which it is attached can be run as a test case. - If you allocate some external resources in a
@Beforemethod you need to release them after the test runs. Annotating a public void method with@Afterallows to do it. - The
@Ignoreannotation is used to ignore the test and that test will not be executed.
Next we have to do some initialization for any test class that we create. Right click anywhere in your class, select Generate > Setup Method to add a setup method like this.
public class MainActivityTest {
    @Before
    public void setUp() throws Exception {
    }
}
Let's fill our test class.
import org.junit.Before;
import org.junit.Test;
import org.junit.runner.RunWith;
import org.robolectric.Robolectric;
import org.robolectric.RobolectricTestRunner;
import org.robolectric.annotation.Config;

import static org.junit.Assert.assertNotNull;
import static org.junit.Assert.assertNull;

@RunWith(RobolectricTestRunner.class)
@Config(constants = BuildConfig.class, sdk = 21)
public class MainActivityTest {
    private MainActivity activity;
    private TextView tvResult;

    @Before
    public void setUp() throws Exception {
        activity = Robolectric.buildActivity(MainActivity.class)
            .create()
            .resume()
            .get();
    }

    @Test
    public void shouldNotBeNull() throws Exception {
        assertNotNull(activity);
    }

    @Test
    public void shouldHaveNum1() throws Exception {
        assertNotNull(activity.findViewById(R.id.edNum1));
    }

    @Test
    public void shouldHaveNum2() throws Exception {
        assertNull(activity.findViewById(R.id.edNum2));
    }

    @Test
    public void shouldHaveResult() {
        tvResult = (TextView) activity.findViewById(R.id.tvResult);
        assertNotNull("TextView could not be found", tvResult);
        assertTrue("TextView is empty", "".equals(tvResult.getText().toString()));
    }
}
You can use any of following assets
- Method
assertEquals(expected, actual)checks that two primitives/Objects are equal. - Method
assertTrue(condition)checks that a condition is true. - Method
assertFalse(condition)checks that a condition is false. - Method
assertNotNull(object)checks that an object isn't null. - Method
assertNull(object)checks that an object is null. - Method
assertSame(expected, actual)tests if two object references point to the same object. - Method
assertNotSame(unexpected, actual)tests if two object references not point to the same object. - Method
assertArrayEquals(expectedArray, actualArray)tests whether two arrays are equal to each other.
There are two ways to run your tests:
- Run a single test through Android Studio: right click on the test class and select
Run. - Open
MainActivityTestfile and hitShift+F10.
Result

You can run all the tests through Gradle: open the Gradle window and find testDebug under Tasks > verification right click on it and select Run. This will generate an html test result report at app/build/reports/tests/debug/index.html.
Following is useful snippets for Robolectric.
Snippet 1. The following code is an example for simulating device rotation.
private ActivityController<MainActivity> controller;

@Before
public void setUp() {
    // call the "buildActivity" method so we get an ActivityController which we can use
    // to have more control over the activity lifecycle
    controller = Robolectric.buildActivity(MainActivity.class);
}

@Test
public void recreatesActivity() {
    Bundle bundle = new Bundle();

    // destroy the original activity
    controller
        .saveInstanceState(bundle)
        .pause()
        .stop()
        .destroy();

    // bring up a new activity
    controller = Robolectric.buildActivity(MainActivity.class)
        .create(bundle)
        .start()
        .restoreInstanceState(bundle)
        .resume()
        .visible();

    activity = controller.get();

    // ... add assertions ...
}

@After
public void tearDown() {
    // destroy activity after every test
    controller
        .pause()
        .stop()
        .destroy();
}
Snippet 2. The following code is an example for testing start new activity by click on Button.
@Test
public void testStartNewActivity() throws Exception {
    Button btn = (Button) activity.findViewById(R.id.btnSubmit);
    btn.performClick();
    Intent intent = Shadows.shadowOf(activity).peekNextStartedActivity();
    assertEquals(SecondActivity.class.getCanonicalName(), intent.getComponent().getClassName());
}
Snippet 3. The following code is an example for testing text of Toast when click on Button.
@Test
public void testButtonClick() throws Exception {
    MainActivity activity = Robolectric.buildActivity(MainActivity.class).create().get();
    Button btn = (Button) activity.findViewById(R.id.btnSubmit);
    assertNotNull(btn);
    btn.performClick();
    assertThat(ShadowToast.getTextOfLatestToast(), equalTo("Completed") );
}
Robolectric is not an UI test framework, i.e., you cannot not test the interaction of Android components with it. These UI tests can be done by using the Espresso testing framework.
UI testing using Espresso

An addition to unit testing is user interface (UI) tests. These tests relate to UI components of your target application. UI tests ensure that your application return the correct UI output in response to sequence of user actions on device.
There're two well-known UI test framework: Robotium and Espresso. You can read comparison and view benchmarks.
My choose is Espresso.
Android Testing Support Library includes a testing framework called Espresso that we can use to write UI tests for devices with Android 2.2 and higher. Espresso works with AndroidJUnitRunner test runner. Espresso is used to simulate user interactions within the test app.
Espresso tests are written based on what user might do while interacting with your app. Basically, you:
- Locate the desired UI element.
- Interact with the UI element or check its state.
Espresso tests are composed of three major components which are:
- Collection of objects
ViewMatchersare used to find the desired view in the current view hierarchy. They are passed to theonViewmethod to locate and return the desired UI element. - Collection of objects
ViewActionsare used to perform actions such click on views. They are passed to theViewInteraction.perform()method. - Collection of objects
ViewAssertionsare used to assert the state of the currently selected view. They can be passed to theViewInteraction.check()method.
Following are examples of ViewMatchers, ViewActions, ViewAssertions.
Let's try to find a View using ViewMatcher whish is a collection of conditions which you can use to identify a specific View in the view hierarchy.
- Method
ViewMatcher.withText(String text)returns a matcher that matchesTextViewbased on its text property value. - Method
ViewMatcher.withId(int id)returns a matcher that matchesTextViewbased on its id property value.
You can easily locate a View in view hierarchy by using onView() with one or many ViewMatcher:
// find the View which has id as tvName
onView(withId(R.id.tvName))

// or

// find the View which has id as tvName AND have text as Bruce Lee
onView(allOf(withId(R.id.tvName), withText("Bruce Lee"))
Next step is perform an action using ViewAction. After found the wanted View, you may want to perform some user interaction on it (like click, double click, press back or type text). In order to do that, you will need the help of ViewAction.
- Method
ViewAction.click()clicks on a specificView. - Method
ViewAction.typeText(String text)types a specific text into anEditText. - Method
ViewAction.scrollTo()scrolls to a specificViewto make sure it is visible before performing any other actions (likeclick()).
Example:
// if the btnSubmit is not visible on screen, scroll to it, then perform a click!
onView(withId(R.id.btnSubmit)).perform(scrollTo(), click());

// simple click on button
onView(withId(R.id.btnSubmit)).perform(click());

// find View with text ABC and click on it
onView(withText(startsWith("ABC"))).perform(click());

// find View with text ABC (ignoring case) and click on it
onView(withText(equalToIgnoringCase("xxYY"))).perform(click())

// type text to field
onView(withId(R.id.btnSubmit)).perform(typeText(mName));
Another action on found View is assert the View/UI by ViewAssertions. ViewAssertions takes responsibility for asserting the View in UI test. You can pass as many ViewAssertions as you want to check if the UI displays properly.
- Method
ViewAssertions.matches(Matcher)matches one or many conditions (Matcher). - Method
ViewAssertions.doesNotExist()checks if aViewis not exist in the view hierarchy.
Example:
// check if the button btnSubmit is displayed on the screen.
onView(withId(R.id.btnSubmit)).check(matches(isDisplayed()));
Following is cheat sheet of Espresso

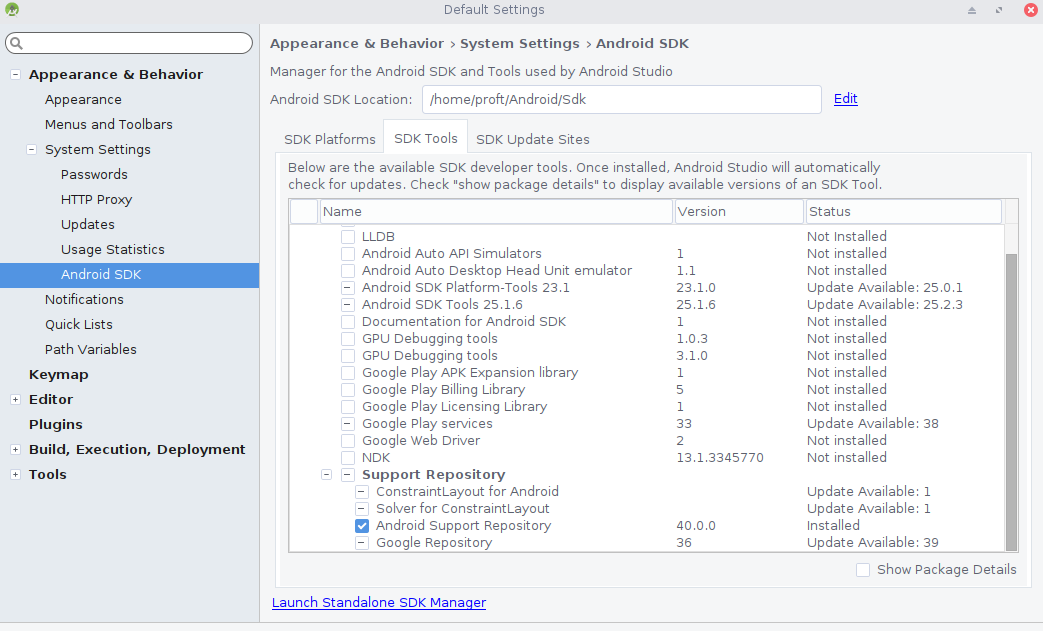
To start testing with Espresso, use the Android SDK manager to install the Android Support Repository.
Next, add the following to the dependencies section of app's build.gradle
androidTestCompile 'com.android.support.test.espresso:espresso-core:3.0.1'
androidTestCompile 'com.android.support.test:runner:1.0.1'
The androidTestCompile keyword denotes that the dependency will be used for instrumentation test and will not be included in the final package.
Inside defaultConfig section, update the testInstrumentationRunner like below:
defaultConfig {
    testInstrumentationRunner "android.support.test.runner.AndroidJUnitRunner"
}
Android UI tests are located in the app/src/androidTest/java folder and this is the location where you will be writing your tests. I'm going to create Java class in androidTest folder with name MainActivityUITest.
import android.support.test.rule.ActivityTestRule;
import android.support.test.runner.AndroidJUnit4;

import org.junit.Before;
import org.junit.Rule;
import org.junit.Test;
import org.junit.runner.RunWith;

import static android.support.test.espresso.Espresso.onView;
import static android.support.test.espresso.action.ViewActions.closeSoftKeyboard;
import static android.support.test.espresso.assertion.ViewAssertions.matches;
import static android.support.test.espresso.matcher.ViewMatchers.withId;
import static android.support.test.espresso.action.ViewActions.typeText;
import static android.support.test.espresso.matcher.ViewMatchers.withText;

@RunWith(AndroidJUnit4.class)
public class MainActivityUITest {
    private Double a, b;

    @Rule
    public ActivityTestRule<MainActivity> activityRule = new ActivityTestRule<>(MainActivity.class);

    @Before
    public void initVariables() {
        a = 2.0;
        b = 2.0;
    }

    @Test
    public void testResult() {
        onView(withId(R.id.edNum1)).perform(typeText(Double.valueOf(a).toString()));
        onView(withId(R.id.edNum2)).perform(typeText(Double.valueOf(b).toString()));

        onView(withId(R.id.tvResult)).check(matches(withText("4.0")));
    }
}
Here I have defined the ActivityTestRule which defines in which activity the tests are performed. Also I have defined the tests to run in MainActivity. Then I have created a initVariables() method and initialised the variables which we will use during test. It should be annotated with @Before.
Then I created a method testResult() for first test case. By calling onView() method by passing layout view id we can perforform operations on the view such as click, type text.
TIP Device settings. It is recommended to turn of the animation on the Android device which is used for testing. Animations might confusing Espressos check for ideling resources.
To run the tests you can create a test configuration in Android Studio, complete the following steps:
- Open Run > Edit Configurations.
- Add a new Android Tests configuration.
- Choose a module.
- Add a specific instrumentation runner:
android.support.test.runner.AndroidJUnitRunner - Run the newly created configuration.
Now you can see the results of the tests, how many failed and succeeded.
Following is useful snippets for Espresso.
Snippet 1. Check if a button is disabled or not after taking some input from EditText and clicking the Button once.
public class testIsButtonDisable {
    @Rule
    public ActivityTestRule<ActivityClassName> activityRule =  new ActivityTestRule<>(ActivityClassName);

    @Test
    public void ensureButtonDisableAfterOneClick() {
        onView(withId(R.id.name))
            .perform(ViewActions.clearText())
            .perform(ViewActions.typeText("Bruce Lee"), closeSoftKeyboard());
        onView(withId(R.id.btnSubmit)).perform(click());
        onView(withId(R.id.btnSubmit)).check(matches(not(isEnabled())));
    }
}
Snippet 2. Find ListView item by string value and click on it.
onData(allOf(is(instanceOf(String.class)), is("Bruce Lee")))
    .inAdapterView(withId(R.id.listView))
    .perform(click());
Snippet 3. Find ListView item by position number and click on it.
onData(anything())
    .inAdapterView(withId(R.id.listView))
    .atPosition(1)
    .perform(click());
Snippet 4. Find RecyclerView item by position number and click on it.
onView(withId(R.id.rvItems)).perform(RecyclerViewActions.actionOnItemAtPosition(2, click()));
You can look at collection of samples demonstrating different Espresso techniques.
INTERESTING. Android Studio provides an Run - Record Espresso Test menu entry which allows you to record the interaction with your application and create a Espresso test from it. The recorder allows you to click through your app UI as normal as it records events and it generates reusable and editable test code for you.
Quote
Categories
- Android
- AngularJS
- Databases
- Development
- Django
- iOS
- Java
- JavaScript
- LaTex
- Linux
- Meteor JS
- Python
- Science
Archive ↓
- September 2024
- December 2023
- November 2023
- October 2023
- March 2022
- February 2022
- January 2022
- July 2021
- June 2021
- May 2021
- April 2021
- August 2020
- July 2020
- May 2020
- April 2020
- March 2020
- February 2020
- January 2020
- December 2019
- November 2019
- October 2019
- September 2019
- August 2019
- July 2019
- February 2019
- January 2019
- December 2018
- November 2018
- August 2018
- July 2018
- June 2018
- May 2018
- April 2018
- March 2018
- February 2018
- January 2018
- December 2017
- November 2017
- October 2017
- September 2017
- August 2017
- July 2017
- June 2017
- May 2017
- April 2017
- March 2017
- February 2017
- January 2017
- December 2016
- November 2016
- October 2016
- September 2016
- August 2016
- July 2016
- June 2016
- May 2016
- April 2016
- March 2016
- February 2016
- January 2016
- December 2015
- November 2015
- October 2015
- September 2015
- August 2015
- July 2015
- June 2015
- February 2015
- January 2015
- December 2014
- November 2014
- October 2014
- September 2014
- August 2014
- July 2014
- June 2014
- May 2014
- April 2014
- March 2014
- February 2014
- January 2014
- December 2013
- November 2013
- October 2013