Getting started with Google Maps for Android Android 06.10.2016
The Google Maps Android API consists of a core set of classes that combine to provide mapping capabilities in Android applications. The key elements of a map are as follows:
GoogleMap. The main class of the Google Maps Android API. This class is responsible for downloading and displaying map tiles and for displaying and responding to map controls. TheGoogleMapobject is not created directly by the application but is instead created whenMapVieworMapFragmentinstances are created. A reference to theGoogleMapobject can be obtained within application code via a call to thegetMap()method of aMapView,MapFragmentorSupportMapFragmentinstance.MapView. A subclass of theViewclass, this class provides the view canvas onto which the map is drawn by theGoogleMapobject, allowing a map to be placed in the user interface layout of an activity.SupportFragmentMap. A subclass of theFragmentclass, this class allows a map to be placed within aFragmentin an Android layout.Marker. The purpose of theMarkerclass is to allow locations to be marked on a map. Markers are added to a map by obtaining a reference to theGoogleMapobject associated with a map and then making a call to theaddMarker()method of that object instance. The position of a marker is defined via Longitude and Latitude. Markers can be configured in a number of ways, including specifying a title, text and an icon. Markers may also be made to be draggable, allowing the user to move the marker to different positions on a map.Shapes. The drawing of lines and shapes on a map is achieved through the use of thePolyline,PolygonandCircleclasses.UiSettings. TheUiSettingsclass provides a level of control from within an application of which user interface controls appear on a map. Using this class, for example, the application can control whether or not the zoom, current location and compass controls appear on a map. This class can also be used to configure which touch screen gestures are recognized by the map.- My Location Layer. When enabled, the My Location Layer displays a button on the map which, when selected by the user, centers the map on the user’s current geographical location. If the user is stationary, this location is represented on the map by a blue marker. If the user is in motion the location is represented by a chevron indicating the user’s direction of travel.
To use Google Maps you need to create a valid Google Maps API key. The key is free, you can use it with any of your applications that call the Maps API, and it supports an unlimited number of users. You can register your application on the Google Developer Console and enable the API. To do this, go to Get API Key, click GET A KEY and create/enable API for your project.
Next, to test your app you need Android emulator with Google Play services or a compatible Android device that runs Android 2.3 or higher and includes Google Play Store.
If you have Android emulator without Google Play services you will get
W/GooglePlayServicesUtil: Google Play Store is missing
To fix it, create Android emulator in Android Studio with Google APIs, for example, Android 6.0 (with Google APIs).
After that you can get :)
Google Play services out of date. Requires 9683000 but found 8489270
It means that you have installed new version in build.gradle, but device has old one. I fix it by downgrading version in build.gradle to 8+.
So, you have the key and Android emulator with Google Play services.
Place the following lines into the dependencies node of the build.gradle file.
// for real device
// compile 'com.google.android.gms:play-services:9.8.0'
// for emulator
compile 'com.google.android.gms:play-services:8+'
compile 'com.google.android.gms:play-services-location:8+'
Once you have your libraries imported, you can close build.gradle and open your AndroidManifest.xml file. Above the application node, you need to declare that the application uses OpenGL ES 2.0 and define the permissions needed by your application.
<uses-feature android:glEsVersion="0x00020000" android:required="true" />

<uses-permission android:name="android.permission.INTERNET" />
<uses-permission android:name="android.permission.ACCESS_FINE_LOCATION" />
<uses-permission android:name="android.permission.ACCESS_COARSE_LOCATION"/>
INTERNET– if we are connected to Internet or not.ACCESS_FINE_LOCATION- to determine user’s location using GPS. It will give us precise location.ACCESS_COARSE_LOCATION– to determine user’s location using WiFi and mobile. It will give us an approximate location.
Within the application node, you need to add metadata Maps API key.
<meta-data android:name="com.google.android.geo.API_KEY" android:value="API_KEY"/>
Next, you need to extend MainActivity by implementing OnMapReadyCallback, GoogleApiClient.ConnectionCallbacks, GoogleApiClient.OnConnectionFailedListener, GoogleMap.OnMarkerClickListener, GoogleMap.OnMapLongClickListener. SupportMapFragment is used here rather than com.google.android.gms.maps.MapFragment in order to add backwards compatibility before API 12.
ConnectionCallbacksandOnConnectionFailedListenerare designed to monitor the state of theGoogleApiClient, which is used in this application for getting the user's current location.OnInfoWindowClickListeneris triggered when the user clicks on the info window that pops up over a marker on the map.OnMapLongClickListenerandOnMapClickListenerare triggered when the user either taps or holds down on a portion of the map.OnMarkerClickListeneris called when the user clicks on a marker on the map, which typically also displays the info window for that marker.
MapFragment is a map component in an app. This fragment is the simplest way to place a map in an application. It's a wrapper around a MapView of a map to automatically handle the necessary life cycle needs. Being a fragment, this component can be added to an activity's layout file simply with the XML below. Open activity_main.xml from your resources folder and change it so that it includes the fragment as a view.
<RelativeLayout xmlns:android="http://schemas.android.com/apk/res/android"
    xmlns:tools="http://schemas.android.com/tools" android:layout_width="match_parent"
    android:layout_height="match_parent"
    tools:context=".MainActivity">

    <fragment
        android:id="@+id/map"
        android:name="com.google.android.gms.maps.SupportMapFragment"
        android:layout_width="match_parent"
        android:layout_height="match_parent"/>

</RelativeLayout>
Returning to our MainActivity class, you need to define some global values at the top of the class for use in your application.
private GoogleMap map;
private GoogleApiClient googleApiClient;
private Location currentLocation;
Here googleApiClient and currentLocation are used for getting the user's location for initializing the map camera. Next, you need to create your GoogleApiClient and initiate LocationServices in order to get your user's current location.
In the moveToMyLocation method, you initialize the camera and some basic map properties. You start by creating a CameraPosition object through the CameraPosition.Builder, with a target set for the latitude and longitude of your user and a set zoom level.
setMyLocationEnabled adds a button to the top right corner of the MapFragment that automatically moves the camera to your user's location when pressed.
setZoomControlsEnabled adds + and - buttons in the lower right corner, allowing the user to change the map zoom level without having to use gestures. There's a few more interesting things that you can set using UiSettings, such as adding a compass or disabling gestures, which you can find in the UiSettings reference.
Alternatively, the map:uiZoomControls property may be set within the map element of the XML resource file: map:uiZoomControls="false".
The compass may be displayed either via a call to the setCompassEnabled() method of the UiSettings instance, or through XML resources using the map:uiCompass property.
onMarkerClick method creates a generic red marker where the user has tapped. Additional options, such as setting a marker as draggable, can be set through the MarkerOptions object. You can find additional attributes in the official MarkerOptions reference.
Full code of MainActivity
public class MainActivity extends FragmentActivity implements OnMapReadyCallback,
GoogleApiClient.ConnectionCallbacks,
GoogleApiClient.OnConnectionFailedListener,
GoogleMap.OnMarkerClickListener,
GoogleMap.OnMapLongClickListener {
private GoogleMap map;
private GoogleApiClient googleApiClient;
private Location currentLocation;
@Override
protected void onCreate(Bundle savedInstanceState) {
super.onCreate(savedInstanceState);
setContentView(R.layout.activity_main);
SupportMapFragment mapFragment = (SupportMapFragment) getSupportFragmentManager()
.findFragmentById(R.id.map);
mapFragment.getMapAsync(this);
googleApiClient = new GoogleApiClient.Builder(this)
.addConnectionCallbacks(this)
.addOnConnectionFailedListener(this)
.addApi(LocationServices.API)
.build();
}
@Override
public void onConnected(@Nullable Bundle bundle) {
if (ContextCompat.checkSelfPermission(this, android.Manifest.permission.ACCESS_COARSE_LOCATION )
!= PackageManager.PERMISSION_GRANTED) {
Toast.makeText(MainActivity.this, "Please allow ACCESS_COARSE_LOCATION persmission.",
Toast.LENGTH_LONG).show();
return;
}
currentLocation = LocationServices.FusedLocationApi.getLastLocation(googleApiClient);
map.setMyLocationEnabled(true);
map.getUiSettings().setZoomControlsEnabled(true);
map.setOnMyLocationButtonClickListener(new GoogleMap.OnMyLocationButtonClickListener() {
@Override
public boolean onMyLocationButtonClick() {
moveToMyLocation();
return false;
}
});
moveToMyLocation();
}
@Override
public void onConnectionSuspended(int i) {}
@Override
public void onConnectionFailed(@NonNull ConnectionResult connectionResult) {}
@Override
public void onMapLongClick(LatLng latLng) {
MarkerOptions options = new MarkerOptions().position(latLng);
options.title(getAddressFromLatLng(latLng));
options.icon(BitmapDescriptorFactory.defaultMarker());
map.addMarker(options);
}
@Override
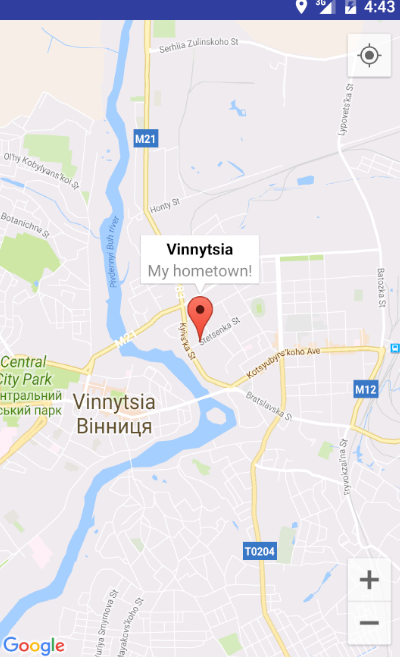
public void onMapReady(GoogleMap googleMap) {
map = googleMap;
LatLng latLng = new LatLng(49.2400, 28.4811);
MarkerOptions marker = new MarkerOptions()
.position(latLng)
.title("Vinnytsia")
.snippet("My hometown!");
map.addMarker(marker);
map.moveCamera(CameraUpdateFactory.newLatLngZoom(latLng, 18));
map.setOnMarkerClickListener(this);
map.setOnMapLongClickListener(this);
}
private String getAddressFromLatLng(LatLng latLng) {
Geocoder geocoder = new Geocoder(MainActivity.this);
String address = "";
try {
address = geocoder.getFromLocation(latLng.latitude, latLng.longitude, 1)
.get(0).getAddressLine(0);
} catch (IOException e ) {
}
return address;
}
@Override
public boolean onMarkerClick(Marker marker) {
marker.showInfoWindow();
return true;
}
@Override
protected void onStart() {
super.onStart();
googleApiClient.connect();
}
@Override
protected void onStop() {
super.onStop();
if( googleApiClient != null && googleApiClient.isConnected() ) {
googleApiClient.disconnect();
}
}
public void moveToMyLocation() {
if (currentLocation != null) {
CameraPosition position = CameraPosition.builder()
.target(new LatLng(currentLocation.getLatitude(),
currentLocation.getLongitude()))
.zoom(16)
.build();
map.animateCamera(CameraUpdateFactory.newCameraPosition(position), null);
} else {
Toast.makeText(this, "Can not get user location!", Toast.LENGTH_LONG).show();
}
}
}
Don’t like the default Android pins? You can also create a marker with a custom icon as the pin. Go back to onMapLongClick() and add the following line of code after the MarkerOptions instantiation:
options.icon(BitmapDescriptorFactory.fromBitmap(BitmapFactory.decodeResource(getResources(), R.mipmap.ic_user_location)));
Download custom pins named ic_user_location from this link and unzip it to res/mipmap.
You can also change the type of the MAP dynamically by making a call to the setMapType() method of the corresponding GoogleMap object, passing through one of the following values:
GoogleMap.MAP_TYPE_NONE. An empty grid with no mapping tiles displayed.GoogleMap.MAP_TYPE_NORMAL. The standard view consisting of the classic road map.GoogleMap.MAP_TYPE_SATELLITE. Displays the satellite imagery of the map region.GoogleMap.MAP_TYPE_HYBRID. Displays satellite imagery with the road maps superimposed.GoogleMap.MAP_TYPE_TERRAIN. Displays topographical information such as contour lines and colors.
Handling map gesture interaction
The Google Maps Android API is capable of responding to a number of different user interactions. These interactions can be used to change the area of the map displayed, the zoom level and even the angle of view (such that a 3D representation of the map area is displayed for certain cities).
Map zooming gestures
Support for gestures relating to zooming in and out of a map may be enabled or disabled using the setZoomControlsEnabled() method of the UiSettings object associated with the GoogleMap instance. For example, the following code enables zoom gestures for our example map:
import com.google.android.gms.maps.UiSettings;
...
UiSettings mapSettings;
mapSettings = mMap.getUiSettings();
The same result can be achieved within an XML resource file by setting the map:uiZoomGestures property to true or false. When enabled, zooming will occur when the user makes pinching gestures on the screen. Similarly, a double tap will zoom in whilst a two finger tap will zoom out. One finger zooming gestures, on the other hand, are performed by tapping twice but not releasing the second tap and then sliding the finger up and down on the screen to zoom in and out respectively.
Map scrolling/panning gestures
A scrolling, or panning gesture allows the user to move around the map by dragging the map around the screen with a single finger motion. Scrolling gestures may be enabled within code via a call to the setScrollGesturesEnabled() method of the UiSettings instance:
UiSettings mapSettings;
mapSettings = mMap.getUiSettings();
mapSettings.setScrollGesturesEnabled(true);
Alternatively, scrolling on a map instance may be enabled in an XML resource layout file using the map:uiScrollGestures property.
Map tilt gestures
Tilt gestures allow the user to tilt the angle of projection of the map by placing two fingers on the screen and moving them up and down to adjust the tilt angle. Tilt gestures may be enabled or disabled via a call to the setTiltGesturesEnabled() method of the UiSettings instance, for example:
UiSettings mapSettings;
mapSettings = mMap.getUiSettings();
mapSettings.setTiltGesturesEnabled(true);
Tilt gestures may also be enabled and disabled using the map:uiTiltGestures property in an XML layout resource file.
Map rotation gestures
By placing two fingers on the screen and rotating then in a circular motion, the user may rotate the orientation of a map when map rotation gestures are enabled. This gesture support is enabled and disabled in code via a call to the setRotateGesturesEnabled() method of the UiSettings instance, for example:
UiSettings mapSettings;
mapSettings = mMap.getUiSettings();
mapSettings.setRotateGesturesEnabled(true);
Rotation gestures may also be enabled or disabled using the map:uiRotateGestures property in an XML layout resource file.
My location button
My location button will be used to move map to your current location. This button can be shown / hidden by calling setMyLocationButtonEnabled(boolean) function.
map.getUiSettings().setMyLocationButtonEnabled(true);
Toolbar buttons
By default, a toolbar appears at the bottom right of the map when a user taps a marker. The toolbar gives the user quick access to the Google Maps mobile app. You can enable and disable the toolbar by calling setMapToolbarEnabled(boolean).
map.getUiSettings().setMapToolbarEnabled(true);
Drawing on the map
The GoogleMap object has a set of methods that make it easy to draw shapes and place images onto the map. To draw a simple circle, you only need to create a CircleOptions object, set a radius and center location, and define the stroke/fill colors and size.
Once you have a CircleOptions object, you can call addCircle to draw the defined circle on top of the map. Just like when placing markers, objects that are drawn on the map return an object of the drawn item type so it can be referenced later if needed.
private void drawCircle(LatLng loc) {
    CircleOptions options = new CircleOptions();
    options.center(loc);

    // radius in meters
    options.radius(10);
    options.fillColor(R.color.colorPrimary);
    options.strokeColor(R.color.colorPrimaryDark);
    options.strokeWidth(10);
    map.addCircle(options);
}
I added drawCircle() to onMapReady() method after map.setOnMapLongClickListener(this);.
To draw a different closed-off shape, you can take multiple LatLng points and create a PolygonOptions object. As you can see below, PolygonOptions are created in a similar fashion to CircleOptions. Instead of using a center and radius method, you use add with a list of points. You can then call addPolygon to draw the shape. For this example, you simply draw a triangle onto the map.
private void drawPolygon(LatLng startPoint) {
    LatLng point2 = new LatLng(startPoint.latitude + .001, startPoint.longitude);
    LatLng point3 = new LatLng(startPoint.latitude, startPoint.longitude + .001);

    PolygonOptions options = new PolygonOptions();
    options.add(startPoint, point2, point3);

    options.fillColor(R.color.colorPrimary);
    options.strokeColor(R.color.colorPrimaryDark);
    options.strokeWidth(10);

    map.addPolygon(options);
}
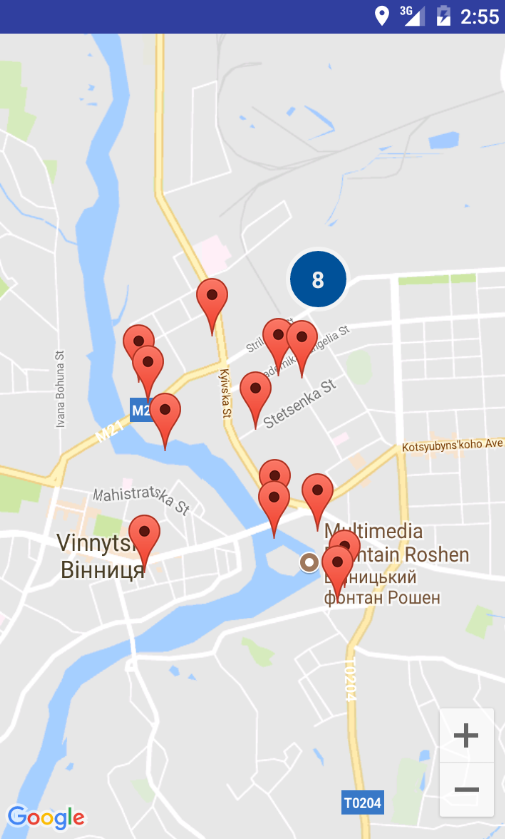
Marker Clustering
By clustering your markers, you can put a large number of markers on a map without making the map hard to read.
Clustering on Google Maps is really simple because there is an awesome library that helps us do this. The Google Maps Android API Utility Library.
Add the following dependency to your app's Gradle build file:
dependencies {
    compile 'com.google.maps.android:android-maps-utils:0.5+'
}
The ClusterManager helps you manage multiple markers at different zoom levels. This means you can put a large number of markers on a map without making the map hard to read. When a user views the map at a high zoom level, the individual markers show on the map. When the user zooms out to a lower zoom level, the markers gather together into clusters, to make viewing the map easier.
The first thing you need to do is create a new model object that implements the ClusterItem interface. This model needs to implement the getPosition, getTitle, getSnippet methods from the ClusterItem.
public class PinCluster implements ClusterItem {
    private LatLng position;
    private String title;
    private String snippet;

    public PinCluster(LatLng latLng, String title, String snippet) {
        this.position = latLng;
        this.title = title;
        this.snippet = snippet;
    }

    @Override
    public LatLng getPosition() {
        return position;
    }

    @Override
    public String getTitle() {
        return title;
    }

    @Override
    public String getSnippet() {
        return snippet;
    }
}
When you initialize your map, you need to create a ClusterManager, associate it with your GoogleMap, and add your LatLng positions as ClusterMarkerLocations to the ClusterManager for the utility to know what to cluster. Take a look at the following implementation to better understand how this works.
public class MainActivity extends AppCompatActivity implements OnMapReadyCallback,
        GoogleApiClient.ConnectionCallbacks,
        GoogleApiClient.OnConnectionFailedListener {

    private GoogleMap map;
    private GoogleApiClient googleApiClient;
    private List<PinCluster> pins;
    private ClusterManager<PinCluster> clusterManager;
    private Activity activity = MainActivity.this;

    @Override
    public void onMapReady(GoogleMap googleMap) {
        map = googleMap;
        pins = new ArrayList<>();
        clusterManager = new ClusterManager<PinCluster>(activity, map);

        map.setOnMapLoadedCallback(new GoogleMap.OnMapLoadedCallback() {
            @Override
            public void onMapLoaded() {
                LatLng centerLatLng = new LatLng(49.2400, 28.4811);

                map.moveCamera(CameraUpdateFactory.newLatLngZoom(centerLatLng, 18));

                pins.add(new PinCluster(centerLatLng, "My town", "Vinnica"));

                LatLngBounds.Builder builder = new LatLngBounds.Builder();
                builder.include(centerLatLng);

                for (int i = 0; i < 20; i++) {
                    LatLng rndLatLng = randomMarker(centerLatLng);
                    builder.include(rndLatLng);
                    pins.add(new PinCluster(rndLatLng, "Title " + i, "Snippet " + i));
                }

                LatLngBounds bounds = builder.build();
                int width = getResources().getDisplayMetrics().widthPixels;
                int padding = (int) (width * 0.05);

                CameraUpdate cu = CameraUpdateFactory.newLatLngBounds(bounds, padding);
                map.moveCamera(cu);

                map.setOnCameraIdleListener(clusterManager);
                map.setOnMarkerClickListener(clusterManager);

                clusterManager.addItems(pins);
            }
        });
    }
}
At this point, you should be able to render default markers that cluster.
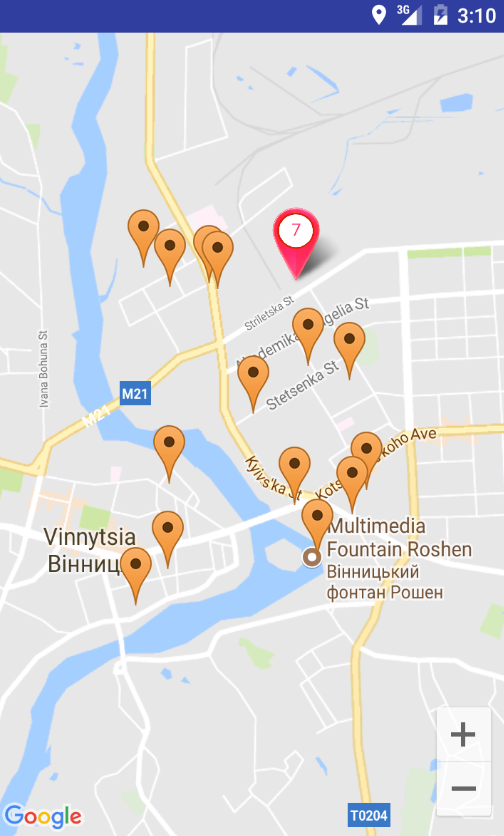
In order use customized markers you will need to extend DefaultClusterRenderer and build your own renderer class:
public class PinRenderer extends DefaultClusterRenderer<PinCluster> {
    Context context;
    int pinWith = 100;
    int pinHeight = 110;

    public PinRenderer(Context context, ClusterManager<PinCluster> clusterManager, GoogleMap map) {
        super(context, map, clusterManager);
        this.context = context;
    }

    @Override
    protected void onBeforeClusterItemRendered(PinCluster myItem, MarkerOptions markerOptions) {
        // Customize the marker here
        markerOptions.icon(BitmapDescriptorFactory.defaultMarker(BitmapDescriptorFactory.HUE_ORANGE));
    }

    @Override
    protected void onBeforeClusterRendered(Cluster<PinCluster> cluster, MarkerOptions markerOptions) {
        // Customize the cluster here
        IconGenerator iconGenerator = new IconGenerator(context.getApplicationContext());
        iconGenerator.setBackground(ContextCompat.getDrawable(context, R.drawable.pin));

        LayoutInflater inflater = (LayoutInflater)context.getSystemService(Context.LAYOUT_INFLATER_SERVICE);
        View iconView = inflater.inflate(R.layout.map_cluster_view, null, false);
        iconGenerator.setContentView(iconView);

        Bitmap bg = iconGenerator.makeIcon(String.valueOf(cluster.getSize()));
        Bitmap resizedBitmap = Bitmap.createScaledBitmap(bg, pinWith, pinHeight, false);

        markerOptions.icon(BitmapDescriptorFactory.fromBitmap(resizedBitmap));
    }
}
Following is map_cluster_view.xml.
<?xml version="1.0" encoding="utf-8"?>
<LinearLayout xmlns:android="http://schemas.android.com/apk/res/android"
    android:orientation="vertical"
    android:layout_width="match_parent"
    android:layout_height="match_parent"
    android:layout_centerHorizontal="true">

    <TextView
        android:id="@+id/amu_text"
        android:layout_width="65dp"
        android:layout_height="60dp"
        android:textSize="23sp"
        android:text="0"
        android:textColor="#FF3C6D"
        android:gravity="center" />

</LinearLayout>
Result
According to google-maps-clustering Google Maps Android API Utility Library is very slow for large amounts of markers, which causes skipping frames and ANRs.
How to disable gestures and events in map
public void onMapReady(GoogleMap googleMap) {
    map = googleMap;

    map.getUiSettings().setAllGesturesEnabled(false);
    map.setOnMarkerClickListener(new GoogleMap.OnMarkerClickListener() {
        @Override
        public boolean onMarkerClick(Marker marker) {
            return true;
        }
    });
}
How to set bounds in map
public void onMapReady(GoogleMap googleMap) {
    map = googleMap;

    map.setOnMapLoadedCallback(new GoogleMap.OnMapLoadedCallback() {
        @Override
        public void onMapLoaded() {
            final LatLngBounds.Builder builder = new LatLngBounds.Builder();

            LatLng latLng1 = new LatLng(49.442403, 28.147860);
            builder.include(latLng1);
            map.addMarker(new MarkerOptions().position(latLng1));

            LatLng latLng2 = new LatLng(49.677570, 27.683688);
            builder.include(latLng2);
            map.addMarker(new MarkerOptions().position(latLng2));

            LatLng latLng3 = new LatLng(49.996429, 28.741122);
            builder.include(latLng3);
            map.addMarker(new MarkerOptions().position(latLng3));

            LatLngBounds bounds = builder.build();

            int width = getResources().getDisplayMetrics().widthPixels;
            int padding = (int) (width * 0.05);

            CameraUpdate cu = CameraUpdateFactory.newLatLngBounds(bounds, padding);
            map.moveCamera(cu);
        }
    });
}
How to generate random marker nearby another marker
private void randomMarker(LatLng startLatLng) {
    Random rand = new Random();
    float minF = 0.0010f;
    float maxF = 0.0099f;
    float incLat = rand.nextFloat() * (maxF - minF) + minF;
    float incLng = rand.nextFloat() * (maxF - minF) + minF;

    int minI = -1;
    int maxI = 1;
    int range = maxI - minI + 1;
    int signLat = rand.nextInt(range) + minI;
    int signLng = rand.nextInt(range) + minI;
    signLat = signLat == 0 ? 1 : signLat;
    signLng = signLng == 0 ? 1 : signLng;

    incLat = incLat * signLat;
    incLng = incLng * signLng;

    LatLng ll = new LatLng(startLatLng.latitude + incLat, startLatLng.longitude + incLng);

    MarkerOptions options = new MarkerOptions()
            .position(ll)
            .icon(BitmapDescriptorFactory.defaultMarker())
            .title("Marker");
    map.addMarker(options);
}
How to add marker on Map click
@Override
public void onMapReady(GoogleMap googleMap) {
    map = googleMap;

    LatLng latLng = new LatLng(49.2349067, 28.399594);
    map.moveCamera(CameraUpdateFactory.newLatLngZoom(latLng, 13));

    map.setOnMapClickListener(new GoogleMap.OnMapClickListener() {
        @Override
        public void onMapClick(LatLng latLng) {
            Geocoder geocoder = new Geocoder(activity);
            List<Address> list;
            try {
                list = geocoder.getFromLocation(latLng.latitude, latLng.longitude, 1);
            } catch (IOException e) {
                return;
            }

            Address address = list.get(0);

            if (marker != null) {
                marker.remove();
            }

            MarkerOptions options = new MarkerOptions()
                    .title(address.getLocality())
                    .position(new LatLng(latLng.latitude, latLng.longitude));
            marker = map.addMarker(options);
        }
    });
}
How to sort list of LatLng objects by distance to some location
Sort list of Person items
ArrayList<Person> items = getPersons();
LatLng startLocation = new LatLng(49.2400, 28.4811);

Collections.sort(items, new Comparator<Person>(){
    public int compare(Person o1, Person o2){
        float distance1 = o1.getDistance(startLocation);
        float distance2 = o2.getDistance(startLocation);

        if(distance1 == distance2)
            return 0;
        return distance1 < distance2 ? -1 : 1;
    }
});
Snippet of getDistance method of Person object
public float getDistance(LatLng to) {
    float distance = 0;
    if (to != null) {
        Location loc1 = new Location("");
        loc1.setLatitude(lat);
        loc1.setLongitude(lng);

        Location loc2 = new Location("");
        loc2.setLatitude(to.latitude);
        loc2.setLongitude(to.longitude);

        distance = loc1.distanceTo(loc2);
    }
    return distance;
}
How to change the position of a marker
MarkerOptions markerOptions = new MarkerOptions().position(new LatLng(50,6)));
Marker marker = map.addMarker(markerOptions);
marker.setPosition(new LatLng(50,5));
How to create custom marker
By default map marker color will be red. Google maps provides some set of predefined colored icons for the marker.
marker.setIcon(BitmapDescriptorFactory.defaultMarker(BitmapDescriptorFactory.HUE_CYAN));
marker.setIcon(BitmapDescriptorFactory.defaultMarker(BitmapDescriptorFactory.HUE_BLUE));
marker.setIcon(BitmapDescriptorFactory.defaultMarker(BitmapDescriptorFactory.HUE_GREEN));
Apart from maps native marker icons, you can use own image to show as a marker. You can load the icon from any kind of supported sources.
fromAsset(String assetName)- loading from assets folder.fromBitmap(Bitmap image)- loading bitmap image.fromFile(String path)- loading from file.fromResource(int resourceId)- loading from drawable resource.
public BitmapDescriptor getMapIcon(int resID, int widthPx, int heightPx) {
    //int resID = getResources().getIdentifier(iconName, "drawable", getPackageName());

    Bitmap imageBitmap = BitmapFactory.decodeResource(getResources(), resID);
    Bitmap resizedBitmap = Bitmap.createScaledBitmap(imageBitmap, widthPx, heightPx, false);
    return BitmapDescriptorFactory.fromBitmap(resizedBitmap);
}

MarkerOptions markerOptions = new MarkerOptions()
    .position(new LatLng(50,5))
    .title("Marker")
    .icon(getMapIcon(R.drawable.girl1, 150, 150));
map.addMarker(markerOptions);
How to create custom marker from view
map.addMarker(new MarkerOptions()
    .position(latLng)
    .icon(BitmapDescriptorFactory
            .fromBitmap(getMarkerBitmapFromView(R.drawable.avatar))));

...

private Bitmap getMarkerBitmapFromView(@DrawableRes int resId) {
    View v = ((LayoutInflater) getSystemService(Context.LAYOUT_INFLATER_SERVICE))
        .inflate(R.layout.view_custom_marker, null);
    ImageView imageView = (ImageView) v.findViewById(R.id.profile_image);
    imageView.setImageResource(resId);
    v.measure(View.MeasureSpec.UNSPECIFIED, View.MeasureSpec.UNSPECIFIED);
    v.layout(0, 0, v.getMeasuredWidth(), v.getMeasuredHeight());
    v.buildDrawingCache();
    Bitmap bmp = Bitmap.createBitmap(v.getMeasuredWidth(), v.getMeasuredHeight(),
        Bitmap.Config.ARGB_8888);
    Canvas canvas = new Canvas(bmp);
    canvas.drawColor(Color.WHITE, PorterDuff.Mode.SRC_IN);
    Drawable drawable = v.getBackground();
    if (drawable != null)
        drawable.draw(canvas);
    v.draw(canvas);
    return bmp;
}
How to rotate map
Bearing - The orientation of the map in degrees measured in a clockwise direction from North.
CameraPosition cameraPosition = map.getCameraPosition();
float bearing = cameraPosition.bearing;
bearing += 90;

map.moveCamera(
    CameraUpdateFactory.newCameraPosition(new CameraPosition.Builder()
        .target(target)
        .zoom(zoom)
        .bearing(bearing)
        .build())
);
How to check if two markers intersect
Projection projection = map.getProjection();
float scale = getResources().getDisplayMetrics().density;

// calc size of first marker

Point screenPositionMarker1 = projection.toScreenLocation(markerLatLng1);

int widthMarker1 = (int) (210 * scale);
int heightMarker1 = (int) (112 * scale);
int halfMarker1 = widthMarker1 / 2;
int leftMarker1 = screenPositionMarker1.x - halfMarker1;
int topMarker1 = screenPositionMarker1.y - heightMarker1;
int rightMarker1 = screenPositionMarker1.x + halfMarker1;
int bottomMarker1 = screenPositionMarker1.y;

Rect rect1 = new Rect(leftMarker1, topMarker1, rightMarker1, bottomMarker1);

// calc size of second marker

Point screenPositionMarker2 = projection.toScreenLocation(markerLatLng2);
int pinMarkerSize = getResources().getInteger(R.integer.pinMarkerSize);
int halfMarker2 = pinMarkerSize / 2;

int leftMarker2 = screenPositionMarker2.x - halfMarker2;
int topMarker2 = screenPositionMarker2.y - pinMarkerSize;
int rightMarker2 = screenPositionMarker2.x + halfMarker2;
int bottomMarker2 = screenPositionMarker2.y;

Rect rect2 = new Rect(leftMarker2, topMarker2, rightMarker2, bottomMarker2);

boolean isIntersect = rect1.intersect(rect2);

// visualize intersection

// ImageView imgRect = new ImageView(activity);
// imgRect.setBackgroundColor(Color.YELLOW);
// RelativeLayout.LayoutParams params = new RelativeLayout.LayoutParams(pinMarkerSize,
//    pinMarkerSize);
// params.leftMargin = leftMarker2;
// params.topMargin = topMarker2;
// rlContent.addView(imgRect, params);
//
// ImageView imgCenter = new ImageView(activity);
// imgCenter.setBackgroundColor(Color.RED);
// RelativeLayout.LayoutParams params2 = new RelativeLayout.LayoutParams(20, 20);
// params2.leftMargin = screenPositionMarker2.x;
// params2.topMargin = screenPositionMarker2.y;
// rlContent.addView(imgCenter, params2);
Moving Camera to a Location with Animation
You may want to move camera to a particular position. Google maps provides set of functions to achieve this.
map.animateCamera(CameraUpdateFactory.newLatLngZoom(latLng, 17));
How to calculate distance between two location
First approach
Location loc1 = new Location("One");
loc1.setLatitude(lat1);
loc1.setLongitude(lon1);

Location loc2 = new Location("Two");
loc2.setLatitude(lat2);
loc2.setLongitude(lon2);

float distanceInMeters = loc1.distanceTo(loc2);
Second approach
float[] distanceInMeters = new float[1];
Location.distanceBetween(lat1, lon1, lat2, lon2, distanceInMeters);
Both approaches return the same result.
How to create custom InfoWindow
First, you should define new InfoWindowAdapter
map.setInfoWindowAdapter(new GoogleMap.InfoWindowAdapter() {
    @Override
    public View getInfoWindow(Marker arg0) {
        return null;
    }

    @Override
    public View getInfoContents(Marker arg0) {
        View v = null;
        try {
            v = getLayoutInflater().inflate(R.layout.custom_infowindow, null);
            TextView tvTitle = (TextView) v.findViewById(R.id.tvTitle);
            tvTitle.setText(arg0.getTitle());
        } catch (Exception e) {
            e.printStackTrace();
        }
        return v;
    }
});
Second, if you want some action on click you should define OnInfoWindowClickListener
map.setOnInfoWindowClickListener(new GoogleMap.OnInfoWindowClickListener() {
    @Override
    public void onInfoWindowClick(Marker marker) {
        Toast.makeText(activity, "Selected", Toast.LENGTH_SHORT).show();
    }
});
Third, define custom layout
<?xml version="1.0" encoding="utf-8"?>
<LinearLayout xmlns:android="http://schemas.android.com/apk/res/android"
    android:orientation="vertical" android:layout_width="match_parent"
    android:layout_height="match_parent">

    <TextView
        android:id="@+id/tvTitle"
        android:layout_width="match_parent"
        android:layout_height="wrap_content" />

    <ImageView
        android:src="@mipmap/ic_launcher"
        android:layout_width="wrap_content"
        android:layout_height="wrap_content" />
</LinearLayout>
If you want InfoWindow with custom action you can use InteractiveInfoWindowAndroid.
How to load image to InfoWindow via Glide 4
map.setInfoWindowAdapter(new GoogleMap.InfoWindowAdapter() {
    Marker marker;

    @Override
    public View getInfoWindow(Marker arg0) {
        marker = arg0;
        return null;
    }

    @Override
    public View getInfoContents(Marker arg0) {
        View v = null;
        try {
            v = getLayoutInflater().inflate(R.layout.infowindow, null);
            TextView tvTitle = (TextView) v.findViewById(R.id.tvTitle);
            ImageView iv = (ImageView) v.findViewById(R.id.iv);
            tvTitle.setText(arg0.getTitle());

            SimpleTarget bs = new SimpleTarget<Bitmap>(){
                @Override
                public void onResourceReady(Bitmap resource, Transition<? super Bitmap> transition) {
                    iv.setImageBitmap(resource);

                    if (marker != null && marker.isInfoWindowShown()) {
                        marker.hideInfoWindow();
                        marker.showInfoWindow();
                    }
                }
            };

            Glide.with(activity.getApplicationContext()).asBitmap()
                    .load(URL)
                    .into(bs);
        } catch (Exception e) {
            e.printStackTrace();
        }
        return v;
    }
});
Google Maps Directions API
The Google Maps Directions API is a service that calculates directions between locations using an HTTP request.
With the Directions API, you can:
- Search for directions for several modes of transportation, including transit, driving, walking or cycling.
- Return multi-part directions using a series of waypoints.
- Specify origins, destinations, and waypoints as text strings (e.g. "Chicago, IL" or "Darwin, NT, Australia"), or as latitude/longitude coordinates, or as place IDs.
The API returns the most efficient routes when calculating directions.
Note: This service is not designed to respond in real time to user input.
Before you start developing with the Directions API, review the authentication requirements (you need an API key) and the API usage limits.
You can look at response from Directions API using following url
https://maps.googleapis.com/maps/api/directions/json
?origin=49.2400,28.4811
&destination=49.22833,28.39866
&key=API_KEY
So, the Google Maps Directions API is a web service that Google provides us to get information about a route. A route is getting from an initial location to a specific destination. This web service provides us with information for different transport modes, waypoints and traveling times.
For Android we can use the Java client library.
To get this library into our app, we need to add the following to our build.gradle file.
implementation 'com.google.maps:google-maps-services:0.2.6'
implementation 'com.google.maps.android:android-maps-utils:0.5+'
Before we start looking at some code, we also need to get a Google Directions API Key.
Now that we have all the configuration out the way, we can start implementing this API in our Android app.
Firstly, we will need to create a GeoApiContext object. This object is where we will set our API key.
GeoApiContext geoApiContext = new GeoApiContext.Builder()
        .apiKey(KEY)
        .build();
Once we have our GeoApiContext, we can now use the DirectionsAPI class (which has a static method called newRequest) to request direction information. This newRequest method takes a GeoApiContext as an argument, which then returns us a DirectionsApiRequest.
On the DirectionsApiRequest object we have some methods that we need to set before we make this request. First we need to set our TravelMode, which can be Driving, Bicycling, Walking or Transit.
We then need to set our origin and our destination points.
Lastly, we can call the departureTime method, so that we know the travel times that are returned are based on the departure time we provided. This method takes a simple DateTime object.
Now we can call the await method on the DirectionsApiRequest. This will make a synchronous call to the web service and return us a DirectionsResult object.
public class MainActivity extends AppCompatActivity implements OnMapReadyCallback,
        GoogleApiClient.ConnectionCallbacks,
        GoogleApiClient.OnConnectionFailedListener {

    private AppCompatActivity activity = MainActivity.this;
    private String TAG = MainActivity.class.getSimpleName();

    private GoogleMap map;
    private GoogleApiClient googleApiClient;
    Polyline polyline;

    TextView tvDuration;

    @Override
    protected void onCreate(Bundle savedInstanceState) {
        super.onCreate(savedInstanceState);
        setContentView(R.layout.activity_main);

        SupportMapFragment mapFragment = (SupportMapFragment) getSupportFragmentManager()
                .findFragmentById(R.id.map);
        mapFragment.getMapAsync(this);

        googleApiClient = new GoogleApiClient.Builder(this)
                .addConnectionCallbacks(this)
                .addOnConnectionFailedListener(this)
                .addApi(LocationServices.API)
                .build();

        tvDuration = findViewById(R.id.tvDuration);
    }

    @Override
    public void onConnected(@Nullable Bundle bundle) {
        if (ContextCompat.checkSelfPermission(this, android.Manifest.permission.ACCESS_COARSE_LOCATION )
                != PackageManager.PERMISSION_GRANTED) {
            Toast.makeText(MainActivity.this, "Please allow ACCESS_COARSE_LOCATION persmission.",
                    Toast.LENGTH_LONG).show();
            return;
        }

        map.getUiSettings().setZoomControlsEnabled(true);
    }

    @Override
    public void onConnectionSuspended(int i) {}

    @Override
    public void onConnectionFailed(@NonNull ConnectionResult connectionResult) {}

    @Override
    public void onMapReady(GoogleMap googleMap) {
        map = googleMap;

        transportMode(TravelMode.DRIVING);
    }

    public void transportDriving(View v) {
        transportMode(TravelMode.DRIVING);
    }

    public void transportWalking(View v) {
        transportMode(TravelMode.WALKING);
    }

    public void transportBicycling(View v) {
        transportMode(TravelMode.BICYCLING);
    }

    public void transportPublic(View v) {
        transportMode(TravelMode.TRANSIT);
    }

    private void transportMode(TravelMode mode) {
        GeoApiContext geoApiContext = new GeoApiContext.Builder()
                .apiKey(KEY)
                .build();

        String ll1 = "49.2400,28.4811";
        String ll2 = "49.22833,28.39866";

        DateTime now = new DateTime();
        try {
            DirectionsResult result = DirectionsApi.newRequest(geoApiContext)
                    .mode(mode).origin(ll1)
                    .destination(ll2)
                    .departureTime(now)
                    .await();

            if (result.routes.length > 0) {
                String distance = result.routes[0].legs[0].distance.humanReadable;
                String duration = result.routes[0].legs[0].duration.humanReadable;

                tvDuration.setText(String.format("%s / %s", distance, duration));

                if (polyline != null) polyline.remove();

                List<LatLng> decodedPath = PolyUtil.decode(result.routes[0].overviewPolyline.getEncodedPath());
                PolylineOptions polylineOptions = new PolylineOptions().width(8)
                    .color(ContextCompat.getColor(getApplicationContext(), R.color.route)).addAll(decodedPath);
                polyline = map.addPolyline(polylineOptions);

                BitmapDescriptor iconStart = BitmapDescriptorFactory
                     .fromResource(R.drawable.nav_start_icon);
                BitmapDescriptor iconDestination = BitmapDescriptorFactory
                     .fromResource(R.drawable.nav_destination_icon);

                DirectionsLeg firstLeg = result.routes[0].legs[0];

                map.addMarker(new MarkerOptions().icon(iconStart)
                     .anchor(0.5f, 0.5f).position(new LatLng(firstLeg.startLocation.lat, firstLeg.startLocation.lng))
                     .title(firstLeg.startAddress));
                map.addMarker(new MarkerOptions().icon(iconDestination)
                     .anchor(0.5f, 0.9f).position(new LatLng(firstLeg.endLocation.lat, firstLeg.endLocation.lng))
                     .title(firstLeg.startAddress));

                LatLngBounds.Builder builder = new LatLngBounds.Builder();
                LatLng b1 = new LatLng(result.routes[0].bounds.northeast.lat, result.routes[0].bounds.northeast.lng);
                builder.include(b1);
                LatLng b2 = new LatLng(result.routes[0].bounds.southwest.lat, result.routes[0].bounds.southwest.lng);
                builder.include(b2);

                LatLngBounds bounds = builder.build();
                int width = getResources().getDisplayMetrics().widthPixels;
                int padding = (int) (width * 0.05);

                CameraUpdate cu = CameraUpdateFactory.newLatLngBounds(bounds, padding);
                map.moveCamera(cu);

            } else {
                Toast.makeText(activity, "Google direction can't build route for your direction!", Toast.LENGTH_SHORT).show();
            }
        } catch (ApiException e) {
            e.printStackTrace();
        } catch (InterruptedException e) {
            e.printStackTrace();
        } catch (IOException e) {
            e.printStackTrace();
        }
    }

    @Override
    protected void onStart() {
        super.onStart();
        googleApiClient.connect();
    }

    @Override
    protected void onStop() {
        super.onStop();

        if( googleApiClient != null && googleApiClient.isConnected() ) {
            googleApiClient.disconnect();
        }
    }
}
Result

How to pass navigation data to Google Map
Using Maps URLs, you can build a universal, cross-platform URL to launch Google Maps and perform searches, get directions and navigation, and display map views and panoramic images. The URL syntax is the same regardless of the platform in use.
See example in browser.
try {
    String origin = "49.2346493,28.3295511";
    String destination = "50.4021368,30.2525068";
    String travelMode = "driving";

    String uri = String.format("https://www.google.com/maps/dir/?
        api=1&origin=%s&destination=%s&travelmode=%s&dir_action=navigate", origin, destination, travelMode);
    Intent intent = new Intent(android.content.Intent.ACTION_VIEW, Uri.parse(uri));
    intent.setClassName("com.google.android.apps.maps", "com.google.android.maps.MapsActivity");
    startActivity(intent);
} catch (ActivityNotFoundException e) {
    try {
        activity.startActivity(new Intent(
                Intent.ACTION_VIEW,
                Uri.parse("market://details?id=com.google.android.apps.maps")));
    } catch (android.content.ActivityNotFoundException anfe) {
        activity.startActivity(new Intent(
                Intent.ACTION_VIEW,
                Uri.parse("http://play.google.com/store/apps/details?id=com.google.android.apps.maps")));
    }

    e.printStackTrace();
}
Google maps example in Kotlin
class MainActivity : AppCompatActivity(), OnMapReadyCallback{
    private var map: GoogleMap? = null

    override fun onCreate(savedInstanceState: Bundle?) {
        super.onCreate(savedInstanceState)
        setContentView(R.layout.activity_main)

        val mapFragment = supportFragmentManager.findFragmentById(R.id.map) as SupportMapFragment
        mapFragment.getMapAsync(this)
    }

    override fun onMapReady(googleMap: GoogleMap) {
        map = googleMap

        val ll = LatLng(23.777176, 90.399452)
        map?.let {
            it.addMarker(MarkerOptions().position(ll).title("Marker"))
            it.moveCamera(CameraUpdateFactory.newLatLng(ll))
        }
    }
}
Useful links
Quote
Categories
- Android
- AngularJS
- Databases
- Development
- Django
- iOS
- Java
- JavaScript
- LaTex
- Linux
- Meteor JS
- Python
- Science
Archive ↓
- December 2023
- November 2023
- October 2023
- March 2022
- February 2022
- January 2022
- July 2021
- June 2021
- May 2021
- April 2021
- August 2020
- July 2020
- May 2020
- April 2020
- March 2020
- February 2020
- January 2020
- December 2019
- November 2019
- October 2019
- September 2019
- August 2019
- July 2019
- February 2019
- January 2019
- December 2018
- November 2018
- August 2018
- July 2018
- June 2018
- May 2018
- April 2018
- March 2018
- February 2018
- January 2018
- December 2017
- November 2017
- October 2017
- September 2017
- August 2017
- July 2017
- June 2017
- May 2017
- April 2017
- March 2017
- February 2017
- January 2017
- December 2016
- November 2016
- October 2016
- September 2016
- August 2016
- July 2016
- June 2016
- May 2016
- April 2016
- March 2016
- February 2016
- January 2016
- December 2015
- November 2015
- October 2015
- September 2015
- August 2015
- July 2015
- June 2015
- February 2015
- January 2015
- December 2014
- November 2014
- October 2014
- September 2014
- August 2014
- July 2014
- June 2014
- May 2014
- April 2014
- March 2014
- February 2014
- January 2014
- December 2013
- November 2013
- October 2013