Asynchronous tasks and jobs in Django with RQ Django 04.10.2016
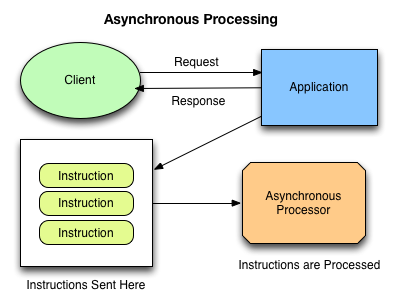
Asynchronous tasks allow move intensive tasks from the web layer to a background process outside the user request/response lifecycle. This ensures that web requests can always return immediately and reduces compounding performance issues that occur when requests become backlogged.
A good rule of thumb is to avoid web requests which run longer than 500ms.
A task queue is a powerful concept to avoid waiting for a resource-intensive task to finish. Instead, the task is scheduled (queued) to be processed later. Another worker process will pick up this task and do it in the background. This is very useful when the outcome of the task is not important in the current context but it must be executed anyway.

RQ (Redis Queue) makes it easy to add background tasks to your Python applications. RQ uses a Redis database as a queue to process background jobs. You should note that persistence is not the main goal of this data store, so your queue could be erased in the event of a power failure or other crash.
RQ is an alternative to Celery, and while not as featureful, does provide a lightweight solution that makes it easy to set up and use. RQ is written in Python and uses Redis as its backend for establishing and maintaining the job queue. There is a great package that provides RQ integration into your Django project, Django-RQ.
To get started using RQ, you need to configure your application and then run a worker process in your application. Obviously, you need to install and run Redis to use RQ.
First you should install django-rq
pip install django-rq
add it to settings.py:
INSTALLED_APPS = (
    # other apps
    "django_rq",
)
Configure the queues in settings.py:
RQ_QUEUES = {
    'default': {
        'HOST': 'localhost',
        'PORT': 6379,
        'DB': 0
    }
}
To start a worker, all we need to do is to run the rqworker custom management command
python manage.py rqworker default
Also you can setup supervisor and start worker on system start or restart after crash. More details about supervisor installation here.
Django-RQ allows you to easily put jobs into any of the queues defined in settings.py.
Create some task
# vim movies/tasks.py

def update_rating(mark):
    # long task for movies update
Use task with default queue
import django_rq
from movies.tasks import update_rating

...

class RatingUpdateView(FormView):
    form_class = RatingForm
    template_name = 'rating.html'

    def form_valid(self, form):
        mark = form.cleaned_data['mark']
        django_rq.enqueue(update_rating, mark)
        messages.info(self.request, 'Task enqueued')
        return redirect(self.get_success_url())
You can use named queue, defined in in settings.py
queue = django_rq.get_queue('high')
queue.enqueue(update_rating, mark)
enqueue() returns a job object that provides a variety of information about the job’s status, parameters, etc. equeue() takes the function to be enqueued as the first parameter, then a list of arguments.
To easily turn a callable into an RQ task, you can also use the @job decorator that comes with django_rq
# vim movies/tasks.py
from django_rq import job

@job
def update_rating(mark):
    # long task for movies update
Now, in your django view, all you need to do is to schedule the task using delay()
...
def form_valid(self, form):
    mark = form.cleaned_data['mark']
    update_rating.delay(mark)
    messages.info(self.request, 'Task enqueued')
    return redirect(self.get_success_url())
...
Now once you execute delay(), a message is stored in Redis and you can return immediately to user without him waiting for long running update. This message will be consumed by one of RQ workers and processed.
Django-RQ also provides a set of views and urls that can provide information about completed and failed jobs. Just add
url(r'^django-rq/', include('django_rq.urls')),
to your site’s urls.py. Enabling these urls will require the use of Django's admin interface, so make sure that is enabled in your installed apps and urls.
You can read about multiple django-apps and single redis db here.
Quote
Categories
- Android
- AngularJS
- Databases
- Development
- Django
- iOS
- Java
- JavaScript
- LaTex
- Linux
- Meteor JS
- Python
- Science
Archive ↓
- September 2024
- December 2023
- November 2023
- October 2023
- March 2022
- February 2022
- January 2022
- July 2021
- June 2021
- May 2021
- April 2021
- August 2020
- July 2020
- May 2020
- April 2020
- March 2020
- February 2020
- January 2020
- December 2019
- November 2019
- October 2019
- September 2019
- August 2019
- July 2019
- February 2019
- January 2019
- December 2018
- November 2018
- August 2018
- July 2018
- June 2018
- May 2018
- April 2018
- March 2018
- February 2018
- January 2018
- December 2017
- November 2017
- October 2017
- September 2017
- August 2017
- July 2017
- June 2017
- May 2017
- April 2017
- March 2017
- February 2017
- January 2017
- December 2016
- November 2016
- October 2016
- September 2016
- August 2016
- July 2016
- June 2016
- May 2016
- April 2016
- March 2016
- February 2016
- January 2016
- December 2015
- November 2015
- October 2015
- September 2015
- August 2015
- July 2015
- June 2015
- February 2015
- January 2015
- December 2014
- November 2014
- October 2014
- September 2014
- August 2014
- July 2014
- June 2014
- May 2014
- April 2014
- March 2014
- February 2014
- January 2014
- December 2013
- November 2013
- October 2013