How to load, process and cache image in Android using Glide Android 12.09.2016
In this tutorial you can read about Glide. The advanced library for image uploading, caching, rotating and small memory usage.
Android SDK does not have a good way to get images from web and display it to android app. To solve this problem, numbers of third party libraries are available.
- Picasso
- Glide
- Fresco
- UImageLoader
You can read some comparison here and here.
Glide features
- supports thumbnail
- supports animations
- animated GIF decoding, you can load GIF animation into
ImageView - supports
OkHttpandVolleylibrary - display video stills
- placeholder can be added before loading the original image
- any custom image can be shown if error occurs while loading the original image
Glide offers some additional advantages over other image loading libraries. For example, when loading an image, Glide will cache both a version of the image in its original size as well as one that’s the size of its intended ImageView. This means Glide loads the image noticeably faster than libraries like Picasso because no resize is necessary. Additionally, Glide works with Android’s ImageView (Facebook’s Fresco uses DraweeView and Volley uses NetworkImageView).
Getting started with Glide is as easy as using Picasso. Their API also look quite similar.
Add the Gradle dependency to your android module build.gradle. Glide also needs android support library v4. Also I'm going to use CircleImageView for circle effect for image.
dependencies {
    implementation 'com.github.bumptech.glide:glide:4.7.1'
    annotationProcessor 'com.github.bumptech.glide:compiler:4.7.1'
    implementation 'com.android.support:support-v4:23.4.0'
    implementation 'de.hdodenhof:circleimageview:2.1.0'
}
The way to load an image to ImageView with Glide is quite the same as Picasso.
Glide.with(context).load(url).into(imageView);
Although it looks quite the same but in details Glide is designed far better since with doesn't accept only Context but also Activity and Fragment. The brilliant benefit from passing Activity/Fragment to Glide is: image loading would be integrated with Activity/Fragment's lifecycle for example, pause loading in Paused state and automatically resume on Resumed state.
Most options in Glide can be applied using the RequestOptions class and the apply() method.
Use request options to apply (among others):
- Placeholders
- Transformations
- Caching Strategies
- Component specific options, like encode quality, or decode Bitmap configurations.
For example, to apply a CenterCrop transformation, you’d use the following:
import static com.bumptech.glide.request.RequestOptions.centerCropTransform;

Glide.with(context)
    .load(url)
    .apply(centerCropTransform(context))
    .into(ivPhoto);
Glide is very customizable. Starting with the 4.0 release Glide creates a custom fluent interface depending on your customization. Glide's developers call this result generated API.
In order to create the generated API, which we'll use in all upcoming tutorials, you'll have to create a class extending AppGlideModule somewhere in your app project:
@GlideModule
public final class MyAppGlideModule extends AppGlideModule {}
Don't forget the @GlideModule! Then, by default, the generated API is accessible via GlideApp. For example:
ImageView ivPhoto = (ImageView) findViewById(R.id.ivPhoto);
GlideApp.with(context).load(url).into(ivPhoto);
Loading image from res/drawable folder
GlideApp.with(context).load(R.drawable.IMAGE_NAME).into(ivPhoto);
Show placeholder image
GlideApp.with(context)
   .load(url)
   .placeholder(R.drawable.placeholder)
   .fitCenter()
   .into(ivPhoto);
Transform image
GlideApp.with(context)
    .load(url)
    .override(WIDTH, HEIGHT)
    .centerCrop()
    .into(ivPhoto);
You can load image to Bitmap via following snippet
GlideApp.with(itemView.getContext())
    .asBitmap()
    .load(data.getImageUrl())
    .into(new SimpleTarget<Bitmap>() {
        @Override
        public void onResourceReady(Bitmap resource, Transition<? super Bitmap> transition) {}
            preparePhoto(resource);
        });
    }
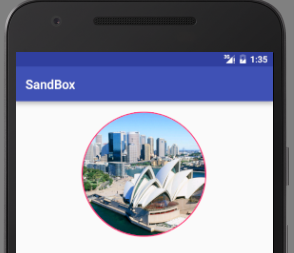
Let's build simple application that will demonstrates Glide usage
Layout file
<?xml version="1.0" encoding="utf-8"?>
<LinearLayout
    xmlns:android="http://schemas.android.com/apk/res/android"
    android:layout_width="match_parent"
    android:layout_height="match_parent"
    android:layout_margin="16dp"
    android:orientation="vertical">

    <de.hdodenhof.circleimageview.CircleImageView
        xmlns:app="http://schemas.android.com/apk/res-auto"
        android:layout_gravity="center_horizontal"
        android:id="@+id/img"
        android:layout_width="200dp"
        android:layout_height="200dp"
        android:src="@drawable/placeholder_img"
        app:civ_border_width="2dp"
        app:civ_border_color="#FFFF4081"/>
</LinearLayout>
In MainActivity file define variable for ImageView and set image URL for load method of Glide. Following is the complete code of java activity file.
public class MainActivity extends AppCompatActivity {
    CircleImageView img;
    String url = "http://snovadoma.ru/media/photos/04f631d079c2171827cae83e2ee61c52.jpg";

    @Override
    protected void onCreate(Bundle savedInstanceState) {
        super.onCreate(savedInstanceState);
        setContentView(R.layout.activity_main);

        img = (CircleImageView) findViewById(R.id.img);
        GlideApp.with(this)
            .load(url)
            .placeholder(R.drawable.placeholder_img)
            .into(img);
    }
}
Result
We can use transformations for crop, blur, color, mask.
Bitmap format
Glide’s default bitmap format is set to RGB_565 so image quality will be poorer compared with Picasso. But the advantage is that it will consume less memory. If you are ok with image quality, don’t change the bitmap format else change it to ARGB_8888 as below.
public class GlideConfiguration implements GlideModule {
    @Override
    public void applyOptions(Context context, GlideBuilder builder) {
        builder.setDecodeFormat(DecodeFormat.PREFER_ARGB_8888);
    }
    @Override
    public void registerComponents(Context context, Glide glide) {
        // register ModelLoaders here.
    }
}
Then, add meta-tag into AndroidManifest.xml
<meta-data android:name="com.example.proft.GlideConfiguration"
           android:value="GlideModule"/>
If you run the app, images will look better now.
Image caching
Glide creates cached images per size while Picasso saves the full image and process it. If you are trying to load image (500x500) into ImageView (200x200). Glide will download full image, then resize it to 200x200, then it will cache and load into ImageView while Picasso will download full image then it will cache full image then resize it to 200x200 and load it into ImageView.
Next time when you request same image (500x500) to load into ImageView (100x100), Glide will again download the full image (500x500) then resize it to 100x100 then cache and load into ImageView. Picasso, unlike Glide, picks up the cached full size image and resize and load it into ImageView (100x100). Picasso doesn’t download same image again.
However, you can configure Glide to cache full size and resized image as below.
Glide.with(this)
    .load(url)
    .diskCacheStrategy(DiskCacheStrategy.ALL)
    .into(imageView);
Loading Image to Target
If you want to do something with the loaded image, you need to load the request into target instead of view. You can use Glide provided SimpleTarget class which implements Target or create custom Target class to capture downloaded image.
Glide.with(this)
.load(productImage)
.into(new SimpleTarget<Drawable>() {
    @Override
    public void onResourceReady(@NonNull Drawable drawable,
        @Nullable Transition<? super Drawable>
                transition) {
       captureDrawable = drawable;
    }
});
Custom Glide Object
In the example above we used default singleton Glide object for loading images. Glide allows you to build custom Glide object using GlideBuilder and set the created Glide object as global singleton object using init() method on Glide class.
GlideBuilder has various methods to set bitmap pool, array pool, request options, transition options, disk cache, memory cache, and executor service.
private void buildGlide(){
    GlideBuilder gb = new GlideBuilder();

    //set mem cache size to 8% of available memory
    LruResourceCache lruMemCache = new LruResourceCache(getMemCacheSize(8));
    gb.setMemoryCache(lruMemCache);

    //set disk cache 300 mb
    InternalCacheDiskCacheFactory diskCacheFactory =
            new InternalCacheDiskCacheFactory(this, 300);
    gb.setDiskCache(diskCacheFactory);

    //set BitmapPool with 1/10th of memory cache's size
    LruBitmapPool bitmapPool = new LruBitmapPool(getMemCacheSize(8)/10);
    gb.setBitmapPool(bitmapPool);

    //set custom Glide as global singleton
    Glide.init(this, gb);
}

private int getMemCacheSize(int percent){
    ActivityManager.MemoryInfo mi = new ActivityManager.MemoryInfo();
    ((ActivityManager)
            getSystemService(ACTIVITY_SERVICE)).getMemoryInfo(mi);

    double availableMemory= mi.availMem;
    return (int)(percent*availableMemory/100);
}
Place Holders
You can set an image as place holder that will be displayed while an image loading request is being processed by Glide or if loading of the image fails. To set placeholder and error images, you need to instantiate RequestOptions object, set placeholder and error images by calling placeholder() and error() methods on it. Then add RequestOptions object to RequestManager by calling applyDefaultRequestOptions() method on RequestManager as shown below.
RequestOptions ro = new RequestOptions();
ro.placeholder(R.drawable.account);
ro.error(R.drawable.account_balance);

Glide.with(this)
    .applyDefaultRequestOptions(ro)
    .load(productImage)
    .into(imgView);
Image Transitions
You can apply transitions to an image loading request by calling transition() method on RequestBuilder, the method takes TransitionOptions as argument. Transition will be shown while image is being downloaded. That is why image transition will be applied to the image when it is being loaded from disk cache, locally from the device or remotely, but not when it is downloaded from memory cache.
In the example below, transition method is used with DrawableTransitionOptions. Other Glide provided TransitionOptions implementations are BitmapTransitionOptions, DrawableTransitionOptions, and GenericTransitionOptions.
Glide.with(this)
    .load(productImage).transition(DrawableTransitionOptions.withCrossFade())
    .into(imgView);
You can use android provided animations with Glide using GenericTransitionOptions.
Glide.with(this)
    .applyDefaultRequestOptions(ro)
    .load(productImage).transition(GenericTransitionOptions
        .with(android.R.anim.slide_in_left))
    .into(imgView);
You can define animation in xml use it with Glide.
<?xml version="1.0" encoding="utf-8"?>
<set xmlns:android="http://schemas.android.com/apk/res/android">
    <translate android:fromXDelta="-50%p" android:toXDelta="0"
        android:duration="@android:integer/config_mediumAnimTime"/>
    <alpha android:fromAlpha="0.0" android:toAlpha="1.0"
        android:duration="@android:integer/config_mediumAnimTime" />
    <rotate
        android:fromDegrees="0"
        android:toDegrees="180"
        android:pivotX="50%"
        android:pivotY="50%" />
</set>
Glide.with(this)
    .applyDefaultRequestOptions(ro)
    .load(productImage).transition(GenericTransitionOptions
        .with(R.anim.image_glide_animation))
    .into(imgView);
You can define custom animation using ViewPropertyTransition.Animator and apply it to image loading request as shown below.
ViewPropertyTransition.Animator rotationAnim = new ViewPropertyTransition.Animator() {
    @Override
    public void animate(View view) {
        ObjectAnimator rotation = ObjectAnimator.ofFloat(view, "rotation", 0f, 90f);
        rotation.setDuration(1000);
        rotation.start();
    }
};

Glide.with(this)
    .applyDefaultRequestOptions(ro)
    .load(productImage).transition(GenericTransitionOptions.with(rotationAnim))
    .into(imgView);
How to add rounded corners to ImageView
RequestOptions glideOptions = new RequestOptions();
glideOptions.placeholder(R.drawable.powered_by_google_light);
//glideOptions.transform(new RoundedCorners(15));
glideOptions.transforms(new CenterCrop(), new RoundedCorners(15));

Glide.with(activity).load(url).apply(glideOptions).into(iv);
Using Glide with Kotlin
Include the Glide dependencies, including the annotation processor:
dependencies {
    implementation 'com.github.bumptech.glide:glide:4.4.0'
    kapt 'com.github.bumptech.glide:compiler:4.4.0'
}
Include the kotlin-kapt plugin in your build.gradle file:
apply plugin: 'kotlin-kapt'
Create a AppGlideModule implementation:
import com.bumptech.glide.annotation.GlideModule
import com.bumptech.glide.module.AppGlideModule

@GlideModule
class AppGlideModule : AppGlideModule()
Build the project and then use the generated API:
GlideApp.with(this)
        .load(URL)
        .into(image)
Quote
Categories
- Android
- AngularJS
- Databases
- Development
- Django
- iOS
- Java
- JavaScript
- LaTex
- Linux
- Meteor JS
- Python
- Science
Archive ↓
- September 2024
- December 2023
- November 2023
- October 2023
- March 2022
- February 2022
- January 2022
- July 2021
- June 2021
- May 2021
- April 2021
- August 2020
- July 2020
- May 2020
- April 2020
- March 2020
- February 2020
- January 2020
- December 2019
- November 2019
- October 2019
- September 2019
- August 2019
- July 2019
- February 2019
- January 2019
- December 2018
- November 2018
- August 2018
- July 2018
- June 2018
- May 2018
- April 2018
- March 2018
- February 2018
- January 2018
- December 2017
- November 2017
- October 2017
- September 2017
- August 2017
- July 2017
- June 2017
- May 2017
- April 2017
- March 2017
- February 2017
- January 2017
- December 2016
- November 2016
- October 2016
- September 2016
- August 2016
- July 2016
- June 2016
- May 2016
- April 2016
- March 2016
- February 2016
- January 2016
- December 2015
- November 2015
- October 2015
- September 2015
- August 2015
- July 2015
- June 2015
- February 2015
- January 2015
- December 2014
- November 2014
- October 2014
- September 2014
- August 2014
- July 2014
- June 2014
- May 2014
- April 2014
- March 2014
- February 2014
- January 2014
- December 2013
- November 2013
- October 2013