Using Core Data iOS 22.11.2019
Core Data is a framework to help you manage data in an app. Core Data lets you define the type of data you want to save and the relationships between these different chunks of data.
Core Data stores data using entities and attributes. An attribute defines a single chunk of data to store such as a name, address, age, gender, e-mail address, and phone number. An entity represents all of these attributes used to define a single chunk of related data such as a person.
Think of a Core Data entity like a database record or table and a Core Data attribute like a database field.
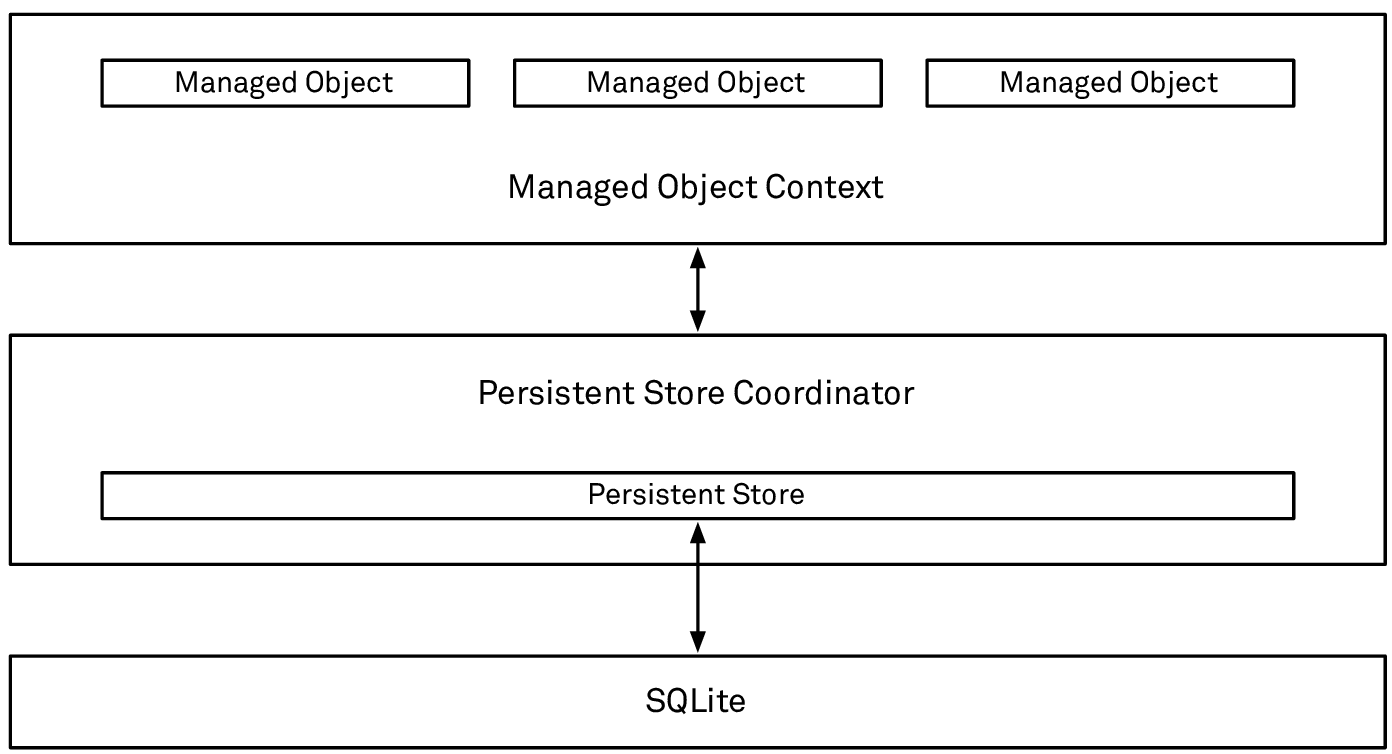
Core Data requires objects to manage your data. These objects are called the Core Data stack:
- Managed object model. Describes the data model in your application.
- Managed object context. Responsible for managing the data model in the memory. The managed object context is the object in the Core Data stack that you will interact with most directly.
- Persistent store coordinator. Persists to and retrieves data from the persistent object store.
- Persistent object store. Maps between the objects in the persistent store and the objects defined in the managed object model of your application.
- Persistent store data file. The data file itself stored on disk. The underlying data file can be stored as different formats: SQLite (the default), XML, or binary data.
Creating a Data Model File
A data model is a Core Data file that lets you define entities and attributes where an entity represents a single object such as a person and attributes represent details such as a name, phone number, and e-mail address. You can manually add a data model file to any project or let Xcode add a data model file when you create a new project.
To add a Core Data file manually to a project, follow these steps:
- Choose File > New > File. A template dialog appears.
- Click the iOS category.
- Scroll down and click the Data Model under the Core Data category.
- Click the Next button. A dialog appears, letting you choose a name that ends with the .xcdatamodeld file extension.
- Choose a name for your Core Data file and click the Create button. Xcode displays your .xcdatamodeld Core Data file in the Navigator pane.
- Add following snippet to AppDelegate.swift file
// MARK: - Core Data stack

lazy var persistentContainer: NSPersistentContainer = {
    let container = NSPersistentContainer(name: "Core_Data")
    container.loadPersistentStores(completionHandler: { (storeDescription, error) in
        if let error = error as NSError? {
            fatalError("Unresolved error \(error), \(error.userInfo)")
        }
    })
    return container
}()

// MARK: - Core Data Saving support

func saveContext() {
    let context = persistentContainer.viewContext
    if context.hasChanges {
        do {
            try context.save()
        } catch {
            let nserror = error as NSError
            fatalError("Unresolved error \(nserror), \(nserror.userInfo)")
        }
    }
}
To create a new project that includes a Core Data file, follow these steps:
- Choose File > New > Project. A template dialog appears.
- Click the iOS category and click the Single View App. Then click the Next button. Another dialog appears.
- Click in the Product Name text field and type CoreDataApp.
- Make sure the Use Core Data check box is selected.
- Click the Next button and then click the Create button.
Customizing a Data Model File
Creating a Core Data file creates a file with the .xcdatamodeld file extension. First, you’ll need to create at least one entity and one or more attributes in each entity where an entity represents a group of related data such as a person that contains data such as a name, age, address, or phone number.
To create an entity in a Core Data file, follow these steps:
- Click the .xcdatamodeld file in the Navigator pane. Xcode displays a data editor.
- Click the Add Entity icon, or choose Editor > Add Entity. Xcode displays an Entity under the ENTITIES category.
- Click this Entity to select it and press Enter to highlight the entire name.
- Type Item and press Enter. Entity names must always begin with an uppercase letter such as Item, Person.
After you’ve created at least one entity, you’ll need to add one or more attributes to hold data. An attribute consists of descriptive name (typed in lowercase) and the type of data the attribute will hold such as a string, integer, or date.
To define an attribute in an entity, follow these steps:
- Click the .xcdatamodeld file in the Navigator pane. The window is divided into two sections. On the left, you have your entities. In more common terms, these are the objects or items that you want to store in the database. The right section will contain the entity’s attributes once a new Entity has been created. Attributes are pieces of information about the entities.
- Click the Entity that you want to modify. Xcode displays an Attributes category.
- Click the Add Attribute button in the bottom of the Xcode window or underneath the Attribute column, or choose Editor > Add Attribute.
- Type name and press Enter. All attribute names must use lowercase letters.
- Click the Type popup menu to display a list of data types the attribute can store. Now, you will need to select a data type. Selecting the correct data type is important. It will affect how your data is stored and retrieved from the database. The list has 13 items in it and can be daunting. The most common options are String, Integer 32, Decimal, and Date.
- Choose String.
- Click the Add Attribute button in the bottom of the Xcode window. Type price and press Enter. Click the Type popup menu and choose Decimal.
If you are used to working with databases, you will notice that you did not add a primary key. A primary key is a field (usually a number) that is used to uniquely identify each record in a database. In Core Data databases, there is no need to create primary keys. The framework will manage all of that for you.
Designing the User Interface
For our CoreDataApp project, we’ll design a simple user interface that will consist of two text fields, two buttons, and a label. The two text fields will allow us to input data, the label will display all stored data, and the two buttons will let us add or delete data.
To design the user interface for the CoreDataApp project, follow these steps:
- Click the Library icon and drag and drop two text fields (one above the other), two buttons, and a label onto the view.
- Click the label and choose View > Inspectors > Show Attributes Inspector. Click in the Lines text field and change the value to 0. This will allow the label to display multiple lines of text.
Under the import UIKit line, add the following:
import Foundation
import CoreData
Add two outlets and connect them
@IBOutlet var myLabel: UILabel!
@IBOutlet var myProductTextField: UITextField!
@IBOutlet var myPriceTextField: UITextField!
Under the IBOutlets, add the following two lines:
var dataManager: NSManagedObjectContext!
var listArray = [NSManagedObject]()
We need to write Swift code to add data from the two text fields when the user clicks the Add Data button.
Edit the viewDidLoad method as follows:
override func viewDidLoad() {
    super.viewDidLoad()
    let appDelegate = UIApplication.shared.delegate as! AppDelegate
    dataManager = appDelegate.persistentContainer.viewContext
    myLabel.text?.removeAll()
    fetchData()
}

func fetchData() {
    let fetchRequest: NSFetchRequest<NSFetchRequestResult> = NSFetchRequest(entityName: "Item")
    do {
        let result = try dataManager.fetch(fetchRequest)
        listArray = result as! [NSManagedObject]
        for item in listArray {
            let product = item.value(forKey: "name") as! String
            let cost = item.value(forKey: "price") as! String
            myLabel.text! += product + " " + cost + ", "
        }
    } catch {
        print ("Error retrieving data")
    }
}

@IBAction func addDataButton(_ sender: UIButton) {
    let newEntity = NSEntityDescription.insertNewObject(forEntityName: "Item", into: dataManager)
    newEntity.setValue(myProductTextField.text!, forKey: "name")
    newEntity.setValue(myPriceTextField.text!, forKey: "price")
    do {
        try self.dataManager.save()
        listArray.append(newEntity)
    } catch {
        print ("Error saving data")
    }
    myLabel.text?.removeAll()
    myProductTextField.text?.removeAll()
    myPriceTextField.text?.removeAll()
    fetchData()
}
Next we need more Swift code to delete data when the user clicks the Delete Data button.
@IBAction func deleteDataButton(_ sender: UIButton) {
    let deleteItem = myProductTextField.text!
    for item in listArray {
        if item.value(forKey: "name") as! String == deleteItem {
            dataManager.delete(item)
        }
    }
    do {
        try self.dataManager.save()
    } catch {
        print ("Error deleting data")
    }
    myLabel.text?.removeAll()
    myProductTextField.text?.removeAll()
    fetchData()
}
Adding relationships
- Add a new entity and call it
Vendor. - To this entity, add
titleandphone, both of which are strings.
Once this is done, you should have two entities in your entity list. Now you need to add the relationships.
- Click the
Itementity, and then click and hold on the Add Attribue button that is located on the bottom right of the screen. Select Add Relationship. (You can also click the plus under the Relationships section of the Core Data model.) - You will be given the opportunity to name your relationship. You usually give a relationship the same name as the entity that you are referencing. Type in
vendoras the name and select Vendor from the Destination drop-down menu. - You have created one-half of your relationship. To create the other half, click the
Vendorentity. Click and hold the Add Attribute button located at the bottom right of the screen and select Add Relationship. You will use the entity name that you are connecting to as the name of this relationship, so you will call ititems. Under Destination, select Item, and under Inverse, select the vendor relationship you made in the previous step. In the Utilities window on the right side of the screen, select the Data Model Inspector. Select To Many for the type of the relationship.
By default, Xcode will now know and be able to use your new entities. If you need to customize your Core Data objects such as adding validation or custom calculated properties, you will need to tell Xcode to generate NSManagedObject subclasses for you.
When Xcode generates the Class Definitions for your entities, it will then make subclasses of NSManagedObject. NSManagedObject is an object that handles all of the Core Data database interaction. It provides the methods and properties you will be using in this example.
Managed Object Context
Xcode will create a managed object class called Item. In Core Data, every managed object should exist within a managed object context. The context is responsible for tracking changes to objects, carrying out undo operations, and writing the data to the database. This is helpful because you can now save a bunch of changes at once rather than saving each individual change. This speeds up the process of saving the records. As a developer, you do not need to track when an object has been changed. The managed object context will handle all of that for you.
The following steps will assist you in setting up your interface:
- Click Main.storyboard file and Xcode will open it in the editing window.
- There should be a blank window. To add some functionality to your window, you need to add some objects from the Object Library. Click the Object Library button and type table into the search field. This should narrow the objects, and you should see Table View Controller and Table View. Drag the Table View to the view.
- You now have a Table View. You will need to stretch the Table View to fill your view. Drag all four corners of the Table View so that it covers your entire view.
- To create cells in your Table View, you need to add a UITableViewCell. Your current search of table should show a Table View Cell beneath the Table View object. Drag a Table View Cell to your table. You now have a table and a cell on your view.
- Select the cell, and in the Attributes Inspector in the utilities section set Style to Basic. Also, set the Identifier to Cell. The identifier is used for when your Table View contains multiple styles of cells. You will need to differentiate them with unique identifiers. For simple projects, you can set this to Cell and not worry about it.
- When using a Table View, it is usually a good idea to put it in a Navigation Controller. You will be using the Navigation Controller to give you space to put an Add button on your Table View. To add a Navigation Controller, select your View Controller in the Scene list, which is the window to the left of your storyboard that shows your View Controllers (your View Controller will have a yellow icon next to it). From the Application menu, select Editor > Embed In > Navigation Controller,
- You will now have a navigation bar at the top of your view. You will now add a button to the bar. This type of button is called a
UIBarButtonItem. Search for bar button in your Object Library and drag aBar Buttonitem to the top right of your view on the navigation bar - Select the Bar Button Item and change the System Item from Custom to Add. This will change the look of your Bar Button Item from the word Item to a plus icon.
- Now you have created the interface, you need to hook it up to your code. Hold down the Control key and drag your Table view to the View Controller in the Document Outline
- A pop-up will appear allowing you to select either the
dataSourceor thedelegate. You will need to assign both to the View Controller. The order in which you select the items does not matter, but you will have to Control-drag the Table View twice. - Now your Table View should be ready to go. You need to hook up your button to make it do something. In the top right of your Xcode window, click the Assistant Editor button (it looks like two circles). This will open your code on the right side and your storyboard on the left side. Now Control-drag your Add button to the View Controller code on the right.
- It does not matter where you place the Add button in your code as long as it is in your class and outside of any methods. It should be after your class properties just for organization. When you let go, you will be prompted for the type of connection you are creating. Set Connection to Action. Then add a name for your new method, such as
addNew. Click Connect to finish the connection. - You also need to create an outlet for your Table View. Drag your Table View from the View Controller scene to the top of the code (just under the class definition). Make sure the connection is set to Outlet and name the Table View
myTableView. You will need this outlet later to tell your Table View to refresh. Click Connect to finish the connection.
The interface is complete now, but you still need to add the code to make the interface do something. Go back to the Standard editor (click the list icon to the left of the two circles icon in the top right of the Xcode toolbar) and select the ViewController.swift file from the file list on the left side. Because you now have a Table View that you have to worry about, you need to tell your class that it can handle a Table View. We'll add extenstion to your class:
extension ViewController: UIViewController, UITableViewDelegate,
UITableViewDataSource {
You added UITableViewDelegate and UITableViewDataSource to your declaration. This tells your controller that it can act as a table view delegate and data source. These are called protocols. Protocols tell an object that they must implement certain methods to interact with other objects. For example, to conform to the UITableViewDataSource protocol, you need to implement the following method:
func tableView(_ tableView: UITableView, numberOfRowsInSection section:
Int) -> Int
Without this method, the Table View will not know how many rows to draw. Before continuing, you need to tell your ViewController.swift file about Core Data. To do this, you add the following line to the top of the file just under import UIKit:
import CoreData
You also need to add a managed object context to your ViewController class. Add the following line right after the class ViewController line:
var managedObjectContext: NSManagedObjectContext!
Now that you have a variable to hold your NSManagedObjectContext, you need to instantiate it so you can add objects to it. To do this, you need to add the following lines to your override func viewDidLoad() method:
let appDelegate: AppDelegate = UIApplication.shared.delegate as! AppDelegate
managedObjectContext = appDelegate.persistentContainer.viewContext as NSManagedObjectContext
The first line creates a constant that points to your application delegate. The second line points your managedObjectContext variable to the application delegate’s managedObjectContext. It is usually a good idea to use the same managed object context throughout your app.
The first new method you are going to add is one to query your database records. Call this method loadItems.
func loadItems() -> [Item] {
    let fetchRequest: NSFetchRequest<Item> = Item.fetchRequest()
    var result: [Item] = []
    do {
        result = try managedObjectContext.fetch(fetchRequest)
    } catch {
        NSLog("My Error: %@", error as NSError)
    }
    return result
}
You will now need to add the data source methods for your Table View. These methods tell your Table View how many sections there are, how many rows are in each section, and what each cell should look like. Add the following code to your ViewController.swift file:
extension ViewController: UIViewController, UITableViewDelegate, UITableViewDataSource {
    func tableView(_ tableView: UITableView, numberOfRowsInSection section:Int) -> Int {
        return loadItems().count
    }

    func tableView(_ tableView: UITableView, cellForRowAt indexPath: IndexPath) -> UITableViewCell {
        guard let cell = tableView.dequeueReusableCell(withIdentifier: "Cell") else { return UITableViewCell() }
        let item: Item = loadItems()[indexPath.row]
        cell.textLabel?.text = item.title
        return cell
    }
}
This is all you need to do to display the results of your loadItems method in the Table view. You still have one problem. You do not have any items in your database yet.
To fix this issue, you will add code to the addNew method that you created earlier. Add the following code inside the addNew method you created:
@IBAction func addNew(_ sender: UIBarButtonItem) {
    let item: Item = NSEntityDescription.insertNewObject(forEntityName: "Item",
        into: managedObjectContext) as! Item
    item.title = "My Item" + String(loadItems().count)
    do {
        try managedObjectContext.save()
    } catch let error as NSError {
        NSLog("My Error: %@", error)
    }
    myTableView.reloadData()
}
Example of create data
func createData(){
    guard let appDelegate = UIApplication.shared.delegate as? AppDelegate else { return }
    let managedContext = appDelegate.persistentContainer.viewContext

    let item = NSEntityDescription.insertNewObject(forEntityName: "Item", into: managedContext)
    item.setValue("Item 1", forKey: "name")
    item.setValue(9.99, forKey: "price")

    do {
        try managedContext.save()
    } catch let error as NSError {
        print("Could not save. \(error), \(error.userInfo)")
    }
}
Example of retrieve data
func retrieveData() {
    guard let appDelegate = UIApplication.shared.delegate as? AppDelegate else { return }
    let managedContext = appDelegate.persistentContainer.viewContext

    let fetchRequest = NSFetchRequest<NSFetchRequestResult>(entityName: "Item")

//  fetchRequest.fetchLimit = 1
//  fetchRequest.predicate = NSPredicate(format: "name = %@", "Item 1")
//  fetchRequest.sortDescriptors = [NSSortDescriptor.init(key: "price", ascending: false)]

    do {
        let result = try managedContext.fetch(fetchRequest)
        for data in result as! [NSManagedObject] {
            print(data.value(forKey: "name") as! String)
        }
    } catch {
        print("Error retrieving data: \(error)")
    }
}
Example of update data
func updateData(){
    guard let appDelegate = UIApplication.shared.delegate as? AppDelegate else { return }
    let managedContext = appDelegate.persistentContainer.viewContext

    let fetchRequest:NSFetchRequest<NSFetchRequestResult> = NSFetchRequest.init(entityName: "Item")
    fetchRequest.predicate = NSPredicate(format: "name = %@", "Item 1")

    do {
        let test = try managedContext.fetch(fetchRequest)

        let objectUpdate = test[0] as! NSManagedObject
        objectUpdate.setValue("New item!", forKey: "name")
        do {
            try managedContext.save()
        } catch {
            print("Error updating data: \(error)")
        }
    } catch {
        print("Error retrieving data: \(error)")
    }
}
Example of delete data
func deleteData(){
    guard let appDelegate = UIApplication.shared.delegate as? AppDelegate else { return }
    let managedContext = appDelegate.persistentContainer.viewContext

    let fetchRequest = NSFetchRequest<NSFetchRequestResult>(entityName: "Item")
    fetchRequest.predicate = NSPredicate(format: "name = %@", "New item!")

    do {
        let test = try managedContext.fetch(fetchRequest)

        let objectToDelete = test[0] as! NSManagedObject
        managedContext.delete(objectToDelete)

        do{
            try managedContext.save()
        } catch {
            print("Error deleting data: \(error)")
        }
    } catch {
        print("Error retrieving data: \(error)")
    }
}
How to get path to sqlite file in Simulator
You can get path to sqlite file in Simulator using following snippet
let container = NSPersistentContainer(name: "xx")
var defaultURL: URL?
if let storeDescription = container.persistentStoreDescriptions.first, let url = storeDescription.url {
    defaultURL = FileManager.default.fileExists(atPath: url.path) ? url : nil
}

print(defaultURL)
You can get path to sqlite file inside group identifier (for example, if you use Today Extension) in Simulator using following snippet
let storeURL = FileManager.default.containerURL(forSecurityApplicationGroupIdentifier: "group.xx")!.appendingPathComponent("xx.sqlite")
print(storeURL)
Quote
Categories
- Android
- AngularJS
- Databases
- Development
- Django
- iOS
- Java
- JavaScript
- LaTex
- Linux
- Meteor JS
- Python
- Science
Archive ↓
- September 2024
- December 2023
- November 2023
- October 2023
- March 2022
- February 2022
- January 2022
- July 2021
- June 2021
- May 2021
- April 2021
- August 2020
- July 2020
- May 2020
- April 2020
- March 2020
- February 2020
- January 2020
- December 2019
- November 2019
- October 2019
- September 2019
- August 2019
- July 2019
- February 2019
- January 2019
- December 2018
- November 2018
- August 2018
- July 2018
- June 2018
- May 2018
- April 2018
- March 2018
- February 2018
- January 2018
- December 2017
- November 2017
- October 2017
- September 2017
- August 2017
- July 2017
- June 2017
- May 2017
- April 2017
- March 2017
- February 2017
- January 2017
- December 2016
- November 2016
- October 2016
- September 2016
- August 2016
- July 2016
- June 2016
- May 2016
- April 2016
- March 2016
- February 2016
- January 2016
- December 2015
- November 2015
- October 2015
- September 2015
- August 2015
- July 2015
- June 2015
- February 2015
- January 2015
- December 2014
- November 2014
- October 2014
- September 2014
- August 2014
- July 2014
- June 2014
- May 2014
- April 2014
- March 2014
- February 2014
- January 2014
- December 2013
- November 2013
- October 2013