Getting started with UITableViewController in iOS iOS 30.08.2019
- Introduction
- Data source and Delegate
- Table view with predefined cell style
- Creating Grouped Tables
- Adding search
- Customizing Table View Cells
- Swipe to Add and Delete a Row
- Sort items
- Making an object equatable
- Editing Table Views
- Dynamic Cell Heights
- Static TableView
- Example of simple UITableView
If you have a list of items to display, Apple provides a convenient object for you to use called a table view. Table views manage a list of data and display it in a simple one-column table. Table view controllers are view controllers that contain a table and handle part of the boilerplate setup for you.
To use a table view, you need to do the following:
- Define a cell that contains the information you want the table view to display.
- Define a data source that will put information into each cell of a table view.
- Define a delegate that contains methods to define the number of sections and rows in addition to defining the cell that will make up the table view.
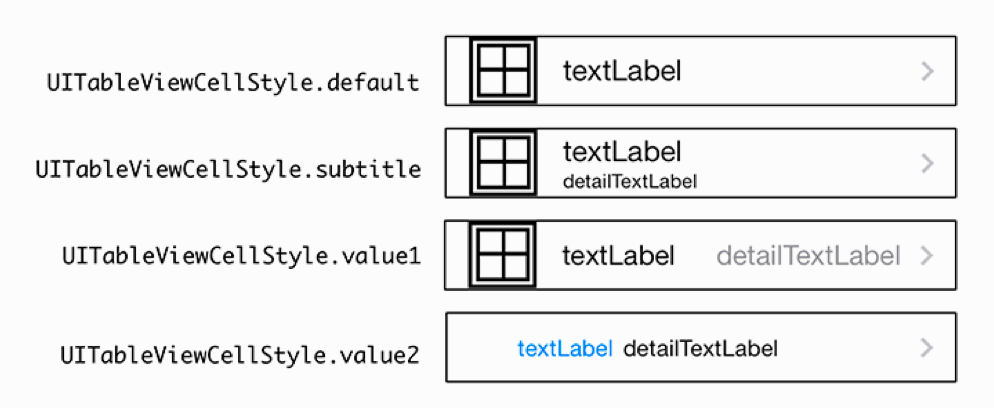
Apple provides several different styles of default table view cells. You could also create your own completely customized look for table view cells.
Each cell also has a UITableViewCellStyle that determines which subviews are used and their position within the contentView.
You have two main ways to set up a table view using Interface Builder:
- You could drag a table view object onto your scene’s root view. You’d then need to connect the view controller to the table view - you’d make your scene’s view controller the delegate and data source for the table view and implement any required delegate methods.
- You can drag a special type of view controller called a table view controller onto the storyboard. The table view controller comes with a table view ready to go and connected to the table view. All you need to focus on is customizing the table view to display your data.
Find the Table view controller in the Object Library and drag it onto the storyboard. A table view controller will appear in the storyboard with a table view already loaded as the root view of the scene.
Select the table view in the Document Outline. Notice in the Attributes Inspector that the content of the table view is using Dynamic Prototypes by default.
Table views can use one of two types of cells:
- Static cells. Use table views with static cells to build up a static design using a table. The number of rows in a table with static cells is set at design time, and each cell has its own unique design. A list of customizable settings in an app could be a good candidate for a table using static cells.
- Dynamic prototypes. Use table views with dynamic prototypes to build a table with content that can change at runtime and/or where cells have the same layout. A table view set to dynamic prototypes will automatically give you a prototype cell to customize the look of the cells in the table.
Select the white rectangle at the top of the table view, underneath the title Prototype Cells. This special table view cell is like a template that cells in your table will emulate.
Find Style in the Attributes Inspector for the cell and select Subtitle.
Find Identifier in the Attributes Inspector for the cell. Give the table view cell a reuse identifier - let’s call it theCell. You’ll use this to identify the cell template when you generate cells.
Now that you have the table view controller set up in the storyboard, you’ll need to customize the table view in code. Select the table view controller and open the Identity Inspector. Note that the view controller’s base class is UITableViewController.
You’re going to subclass UITableViewController to manage its table view.
- Select File > New > File. A selection of templates will appear. In the iOS > Source category, select Cocoa Touch Class.
- Give your class a name, and specify which class you want it to subclass. You want to subclass
UITableViewController, and you could call your classMyTableViewController.
You need to connect the table view controller in the storyboard with the subclass you created. Open the main storyboard again, and select your table view controller. Under Custom Class, replace the base class with your subclass.
In certain UIKit views, your view controller can directly request a view to display data. For example, you could tell a UILabel to display "Hello World" by the following:
label.text = "Hello world"
Table views work a little differently. Instead of passing the table’s data directly into the table and letting the table view manage its data, table views use the delegation pattern, and request information on demand. This way ensures separation of the view (table view in this case) and the model (the table view’s data), and maintains a good MVC structure.
Table views divide their delegation responsibilities in two:
- The data source provides the table view with all the information necessary to display the data in the table. For example, when a table view needs to know how many rows it should display in the table, it asks its data source. When it needs to display a cell for a specific row, it asks the data source for it.
- The delegate handles additional responsibilities such as selecting and deleting rows or specifying the height of a specific row. The table view will also notify the delegate of certain events, such as when the user selects or edits a row.
If you drag a table view object into a regular view controller in the storyboard, you have to configure the data source and delegate yourself. However, because you’re using a table view controller, the UITableViewController class comes automatically preconfigured to be both the table view’s delegate and data source
Stubs for delegate and data source methods are also already implemented in the UITableViewController class. To customize your subclass, you’ll need to override any delegate or data source methods you wish to implement. In fact, if you’re subclassing UITableViewController, it doesn’t really matter whether you override a method from the data source or the delegatethe main takeaway here is that you have several methods to override to manage your table view.
You’ll implement three methods in MyTableViewController that will answer three important data source questions that the table view needs to know to display the table. Here are the three questions and your answers in plain English:
- How many sections are there in the table? Just the one.
- How many rows are there in this section of the table? I’ll say ten!
- What cell goes in this row? I’d like cells based on the
theCellreuse identifier I set up earlier, and I want to display the text "Row #"" with the row number.
Replace the following methods in your MyTableViewController class:
override func numberOfSections(in tableView: UITableView) -> Int {
    return 1
}

override func tableView(_ tableView: UITableView, numberOfRowsInSection section: Int) -> Int {
    return 10
}

override func tableView(_ tableView: UITableView, cellForRowAt indexPath: IndexPath) -> UITableViewCell {
    let cell = tableView.dequeueReusableCell(withIdentifier: "theCell", for: indexPath)
    cell.textLabel?.text = "Row # \(indexPath.row)"
    return cell
}
The first two methods are straightforward. The number of sections in the table or rows in each section is returned from the methods. If multiple sections exist, you can check the section number the table view was asking about before returning the number of rows.
The third method is interesting. It receives an IndexPath parameter, which contains the number of the section and the row of the cell it’s interested in. It then gets a table view cell for this index path, based on the reuse identifier you defined earlier in Interface Builder.
Run the app, and you should see 10 cells appear in the simulator.
Table view with predefined cell style
Open the storyboard and add a new table view controller (use the object library). Drag the gray/blue arrow (the one on the left) from the default view controller to the new view controller. This arrow defines which scene (screen) is the app's initial view controller. You can remove the other view controller, which we won't use.
Before defining the table cells, which should be used to render each item in the table, we need to sort out where the data will come from. For simplicity, the app will use a hardcoded list of countries. Each of them will have one or more cities and exactly one of those cities, will be the capital of that country.
We will define the model classes which will be used in our app. We need a class that represents a country, another that defines a city, and a special class that represents a capital. It will inherit from the City class. Here is the Swift code that defines this hierarchy:
class Country {
    var name = ""
    var cities: [City] = []
    init(name: String) {
        self.name = name
    }
    init(name: String, cities: [City]) {
        self.name = name
        self.cities = cities
    }
}

class City {
    var name: String
    var population: Int
    init(name: String, population: Int) {
        self.name = name
        self.population = population
    }
}

class Capital: City {
    var isActive = true
}
All the building blocks are already implemented. In a separate extension, we will define a static function that returns a list of countries. The data here can be extended:
extension Country {
    static public func getData() -> [Country] {
        var countries: [Country] = []
        let germany = Country(name: "Germany")
        germany.cities += [Capital(name: "Berlin", population: 3_426_355)]
        germany.cities += [Capital(name: "Munich", population: 1_739_117)]
        countries.append(germany)
        let italy = Country(name: "Italy")
        italy.cities += [Capital(name: "Rome", population: 2_426_856)]
        italy.cities += [Capital(name: "Milan", population: 1_305_592)]
        countries.append(italy)
        return countries
    }
}
Open ViewController.swift and replace the current implementation with the following code:
class ViewController: UITableViewController {
    var countries: [Country] = []
    override func viewDidLoad() {
        super.viewDidLoad()
        countries = Country.getData()
    }
}
Now, we should update the code, so we can see the name of the cities on the screen. First, we have to update the storyboard. Then, we should write some code to feed the data into the UITableViewController
- Open the Main.storyboard
- Select Table View Controller
- Open the Identity Inspector
- Select the class value to be
ViewController. This visual component will use our previous table's implementation. - Expand the Table View and select the Table View Cell. Open the Utilities panel and select the Attributes Inspector.
You have to set the cell identifier so that we can create as many copies as we need in the future. Set it to Cell. Then, change the cell style to Subtitle. We will display the city name at the top and its population.
It's good to add a title to the TableViewController. To do that, we will add a navigation view controller. This can be easily achieved like this:
- Select the view controller.
- Then, click on Editor | Embed In | Navigation Controller.
Then, we have to set a title for the TableViewController. We have to select the Navigation toolbar and change the title text to Cities.
To start serving the real data, we need a couple of extra functions. First, we should define the number of all sections - this is equal to the number of all countries. Here is the function which you should add to the ViewController:
override func numberOfSections(in tableView: UITableView) -> Int {
    return countries.count
}
Then, every section should know how many items are in it. Thus, we should return the number of cities in each country object:
override func tableView(_ tableView: UITableView, numberOfRowsInSection section: Int) -> Int {
    return countries[section].cities.count
}
Each section should have a name. This name will be the name of the country. The string returned by the following function will be used to label the separators of each section:
override func tableView(_ tableView: UITableView, titleForHeaderInSection section: Int) -> String? {
    return countries[section].name
}
We have to update the content of each cell.
override func tableView(_ tableView: UITableView, cellForRowAt indexPath: IndexPath) -> UITableViewCell {
    let cell: UITableViewCell = self.tableView.dequeueReusableCell(withIdentifier: "Cell", for: indexPath)
    let country = self.countries[indexPath.section]
    let city = country.cities[indexPath.row]

    cell.textLabel?.text = city.name
    cell.detailTextLabel?.text = "Population: \(city.population)"
    return cell
}
We will print the selected city into the console. To do so, we should override a method which is implemented by the table controller, because it confirms the UITableViewDelegate:
override func tableView(_ tableView: UITableView, didSelectRowAt indexPath: IndexPath) {
    let country = self.countries[indexPath.section]
    let city = country.cities[indexPath.row]
    print("City \(city.name) was selected")
}
Usualy table simply list data in endless rows, which is known as a plain table style. To help organize data displayed in a table view, you can create a grouped table style that divides data into sections where each section has a header title.
Creating a grouped table involves several additional steps:
- Define the table view as a grouped style.
- Write a
numberOfSectionsfunction that defines how many sections the table view contains. - Write a
numberOfRowsInSectionfunction that defines how many rows appear in each section. - Write a
titleForHeaderInSectionfunction that defines the header that appears for each section.
To define sections, data must be arranged differently. To display data in sections, we need an array of arrays. Each array of strings represents a different section such as:
let petArray = [["Mammal", "cat", "dog", "hamster", "gerbil", "rabbit"],
["Bird", "parakeet", "parrot", "canary", "finch"],
["Fish", "tropical fish", "goldfish", "sea horses"],
["Reptile", "turtle", "snake", "lizard"]]
The preceding array contains four arrays of strings where the first item in each array defines a header for that section.
When determining the number of rows in each section, we need to subtract 1 because the section header appears at the beginning of each array. So the numberOfRowsInSection function subtracts 1 to accurately count the rows in each section like this:
func tableView(_ tableView: UITableView, numberOfRowsInSection section: Int) -> Int {
    return petArray[section].count - 1
}
Displaying data in a table view involves identifying the section and then the row. However, since the first element of each array contains a section header, we need to skip over this header by adding 1 to the array index like this line, which appears inside the cellForRowAt function:
cell?.textLabel?.text = petArray[indexPath.section][indexPath.row + 1]
In addition, we need to identify the item the user tapped on with this code in the didSelectRowAt function:
let selectedItem = petArray[indexPath.section][indexPath.row + 1]
Identifying the number of sections is simply a matter of counting all the elements (arrays) in the petArray like this:
func numberOfSections(in tableView: UITableView) -> Int {
    return petArray.count
}
To display the header, we need to retrieve the first element from each section like this:
func tableView(_ tableView: UITableView, titleForHeaderInSection section: Int) -> String? {
    return petArray[section][0]
}
To see how to create a grouped table, follow these steps:
- Click the Main.storyboard file in the Navigator pane. Xcode displays the single view.
- Click the Library icon to open the Object Library window.
- Drag and drop a table view anywhere on the view.
- Resize the table view so it fills the entire screen.
- Choose Editor > Resolve Auto Layout Issues > Reset to Suggested Constraints. Xcode adds constraints to the table view.
- Choose View > Inspectors > Show Attributes Inspector, or click the Attributes Inspector icon in the upper right corner of the Xcode window.
- Click the Style popup menu and choose Grouped.
- Choose View > Assistant Editor > Show Assistant Editor, or click the Assistant Editor icon in the upper right corner of the Xcode window.
- Move the mouse pointer over the table view, hold down the Control key, and Ctrl-drag under the
class ViewControllerline in theViewController.swiftfile. - Release the Control key and the left mouse button. A popup window appears.
- Click in the Name text field, type
petTable, and click the Connect button. Xcode creates an IBOutlet as follows:
@IBOutlet var petTable: UITableView!
- Choose View > Standard Editor > Show Standard Editor, or click the Standard Editor icon in the upper right corner of the Xcode window.
- Click the ViewController.swift file in the Navigator pane.
- Modify the class
ViewControllerline by addingUITableViewDelegate,UITableViewDataSourceas follows:
class ViewController: UIViewController, UITableViewDelegate, UITableViewDataSource { ... }
The purpose of this code is to identify the ViewController.swift file as both the delegate and data source for the table view.
Underneath the class ViewController line, add the following array:
let petArray = [["Mammal", "cat", "dog", "hamster", "gerbil", "rabbit"],
["Bird", "parakeet", "parrot", "canary", "finch"],
["Fish", "tropical fish", "goldfish", "sea horses"],
["Reptile", "turtle", "snake", "lizard"]]
Underneath this array, add the following line:
let cellID = "cellID"
The purpose of this code is to create an arbitrary constant name for a cell. A table view consists of rows of cells, so we need to identify the cells for storing data in later.
Modify the viewDidLoad method as follows:
override func viewDidLoad() {
    super.viewDidLoad()
    petTable.dataSource = self
    petTable.delegate = self
    ...
}
The purpose of this code is to define that the table (IBOutlet petTable) gets its data from the ViewController.swift file that it’s stored in (self). In addition, the delegate is defined as the ViewController.swift file (self). This means the ViewController.swift file needs to contain functions that define how many rows the table needs and where to find its data, which is the petArray.
Underneath the viewDidLoad method, add the following function to count the number of rows in each section:
func tableView(_ tableView: UITableView, numberOfRowsInSection section: Int) -> Int {
    return petArray[section].count - 1
}
Underneath the previous function, add the following function to fill the table view with data:
func tableView(_ tableView: UITableView, cellForRowAt indexPath: IndexPath) -> UITableViewCell {
    var cell = tableView.dequeueReusableCell(withIdentifier: cellID)
    if (cell == nil) {
        cell = UITableViewCell(style: UITableViewCell.CellStyle.default,
            reuseIdentifier: cellID)
    }
    cell?.textLabel?.text = petArray[indexPath.section] [indexPath.row + 1]
    return cell!
}
Underneath the previous function, add the following function to identify which item the user selected:
func tableView(_ tableView: UITableView, didSelectRowAt indexPath: IndexPath) {
    let selectedItem = petArray[indexPath.section][indexPath. row + 1]
    let alert = UIAlertController(title: "Your Choice", message: "\(selectedItem)",
        preferredStyle: .alert)

    let okAction = UIAlertAction(title: "OK", style: .default, handler: { action -> Void in
            //Just dismiss the action sheet
        })
    alert.addAction(okAction)
    self.present(alert, animated: true, completion: nil)
}
Underneath the previous function, add the following function to count the number of sections to display in the table view:
func numberOfSections(in tableView: UITableView) -> Int {
    return petArray.count
}
Underneath the previous function, add the following function to display the first item in each array as the header for that group:
func tableView(_ tableView: UITableView, titleForHeaderInSection section: Int) -> String? {
    return petArray[section][0]
}
In this section, we will try to upgrade the latest on-screen app to support a search.
Let's define a UISearchController property in our ViewController:
let searchController = UISearchController(searchResultsController: nil)
You have two options for adding it to a table view controller.
Table views have optional header and footer views available for additional content. One approach is to add the search controller’s search bar to the table view’s header view.
tableView.tableHeaderView = searchController.searchBar
A second, newer approach is to embed the search controller into the navigation bar.
navigationItem.searchController = searchController
The search controller in the navigation bar looks more tightly integrated into the interface, but is only available from iOS 11, meaning that your app would be unavailable to devices on earlier versions of iOS.
Let’s use the #available keyword to specify that if the user has iOS 11, the searchController will be added to the navigationBar, using the newer API. If the user is still running a version of iOS lower than 11, the search controller would be added to the table view’s header view.
if #available(iOS 11.0, *) {
    self.navigationItem.searchController = searchController
} else {
  tableView.tableHeaderView = searchController.searchBar
}
Then, we should update the viewDidLoad function to display the search UI in the table. It should contain the following code:
override func viewDidLoad() {
    super.viewDidLoad()
    countries = Country.getData()

    searchController.searchResultsUpdater = self
    searchController.dimsBackgroundDuringPresentation = false
    searchController.definesPresentationContext = true
    tableView.tableHeaderView = searchController.searchBar
}
The final step is to implement updateSearchResults function but we should declare that the view controller conforms to the UISearchResultsUpdating protocol. To keep our implementation clean, we will add this functionality in a separate extension:
extension ViewController: UISearchResultsUpdating {
    func updateSearchResults(for searchController: UISearchController) {
        let searchText = searchController.searchBar.text!.localizedLowercase
        if searchText.count > 0 {
            var filteredCountries: [Country] = []
            for country in countries {
                if let filteredCountry = filteredCities(in: country, searchText: searchText) {
                    filteredCountries.append(filteredCountry)
                }
            }
            countries = filteredCountries
        } else {
            countries = Country.getData()
        }
        tableView.reloadData()
    }

    func filteredCities(in country: Country, searchText: String) -> Country? {
        let c = Country(name: country.name)
        c.cities = country.cities.filter { $0.name.localizedLowercase.contains(searchText)}
        return c.cities.count > 0 ? c : nil
    }
}
The function is triggered when the text in the search box is updated. Based on the text, we should provide a different country list. This is why we need a helper function, which creates a new country object that contains only the cities which match the search text.
You can verify that our click handler here is working properly with the new filtered collection. In fact, the new collection and the old collection are the only sources that are used from the table view.
Example with UISearchBarDelegate
class CountriesViewController: UIViewController {
    @IBOutlet var searchBar: UISearchBar!

    @IBOutlet var tableView: UITableView!

    var countryList = [String]()

    var searchedCountry = [String]()
    var searching = false

    var selected: String?

    override func viewDidLoad() {
        super.viewDidLoad()
        self.tableView.delegate = self
        self.tableView.dataSource = self

        self.searchBar.delegate = self

        // Change the Tint Color
        self.searchBar.barTintColor = UIColor.colorFromHex("#BC214B")
        self.searchBar.tintColor = UIColor.white

        // Show/Hide Cancel Button
        self.searchBar.showsCancelButton = true

        // Change TextField Colors
        let searchTextField = self.searchBar.searchTextField
        searchTextField.textColor = UIColor.white
        searchTextField.clearButtonMode = .never
        searchTextField.backgroundColor = UIColor.colorFromHex("#9E1C40")

        // Change Glass Icon Color
        let glassIconView = searchTextField.leftView as! UIImageView
        glassIconView.image = glassIconView.image?.withRenderingMode(.alwaysTemplate)
        glassIconView.tintColor = UIColor.colorFromHex("#BC214B")

        self.tableView.separatorStyle = .none
        self.tableView.tintColor = UIColor.white
        self.tableView.backgroundColor = UIColor.colorFromHex("#9E1C40")

        self.listOfCountries()
    }

    func listOfCountries() {
        for code in NSLocale.isoCountryCodes as [String] {
            let id = NSLocale.localeIdentifier(fromComponents: [NSLocale.Key.countryCode.rawValue: code])
            let name = NSLocale(localeIdentifier: "en").displayName(forKey: NSLocale.Key.identifier, value: id) ?? "Country not found for code: \(code)"
            countryList.append(name + " " + countryFlag(country: code))
            tableView.reloadData()
        }
    }

    func countryFlag(country: String) -> String {
        let base: UInt32 = 127397
        var s = ""
        for v in country.unicodeScalars {
            s.unicodeScalars.append(UnicodeScalar(base + v.value)!)
        }
        return String(s)
    }

    override func prepare(for segue: UIStoryboardSegue, sender: Any?) {
        if segue.identifier == "detailsviewcontrollerseg" {
            let DestViewController = segue.destination as! DetailsViewController
            DestViewController.selectedCountry = selected
        }
    }
}

extension TableView: UITableViewDelegate, UITableViewDataSource {
    func tableView(_ tableView: UITableView, numberOfRowsInSection section: Int) -> Int {
        if searching {
            return searchedCountry.count
        } else {
            return countryList.count
        }
    }

    func tableView(_ tableView: UITableView, cellForRowAt indexPath: IndexPath) -> UITableViewCell {
        let cell = UITableViewCell()
        if searching {
            cell.textLabel?.text = searchedCountry[indexPath.row]
        } else {
            cell.textLabel?.text = countryList[indexPath.row]
        }
        cell.textLabel?.textColor = UIColor.white
        cell.backgroundColor = UIColor.clear
        let myCustomSelectionColorView = UIView()
        myCustomSelectionColorView.backgroundColor = UIColor.colorFromHex("#BC214B")
        cell.selectedBackgroundView = myCustomSelectionColorView
        return cell
    }

    func tableView(_ tableView: UITableView, didSelectRowAt indexPath: IndexPath) {
        if searching {
            let selectedCountry = searchedCountry[indexPath.row]
            selected = selectedCountry
        } else {
            let selectedCountry = countryList[indexPath.row]
            selected = selectedCountry
        }
        performSegue(withIdentifier: "detailsviewcontrollerseg", sender: self)
        // Remove highlight from the selected cell
        tableView.deselectRow(at: indexPath, animated: true)
        // Close keyboard when you select cell
        self.searchBar.searchTextField.endEditing(true)
    }
}

extension TableView: UISearchBarDelegate {

    func searchBar(_ searchBar: UISearchBar, textDidChange searchText: String) {
        searchedCountry = countryList.filter { $0.lowercased().prefix(searchText.count) == searchText.lowercased() }
        searching = true
        tableView.reloadData()
    }

    func searchBarCancelButtonClicked(_ searchBar: UISearchBar) {
        searching = false
        searchBar.text = ""
        tableView.reloadData()
    }
}
There are four ways that you can make table view cells:
- Using prototype cells. This is the simplest and quickest way.
- Using static cells. Static cells are limited to screens where you know in advance which cells you’ll have. The big advantage with static cells is that you don’t need to provide any of the data source methods.
- Using a nib file. A nib (also known as a XIB) is like a mini storyboard that only contains a single customized UITableViewCell object. This is very similar to using prototype cells, except that you can do it outside of a storyboard.
- By hand. This is fairly similar to how you were supposed to do it in the early days of iOS, but you can get a little bit more closer to the metal, so to speak.
So far, we’ve only used a simple cell that displays a single line of text. For more flexibility, we can also design a custom Table View Cell by dragging and dropping objects from the Object Library window onto the Table View Cell. To see how to create a custom Table View Cell, follow these steps:
- Click the Main.storyboard file in the Navigator pane.
- Click the Library icon to open the Object Library window.
- Drag and drop a table view anywhere on the view.
- Resize the table view so it fills the entire screen.
- Choose Editor > Resolve Auto Layout Issues > Reset to Suggested Constraints. Xcode adds constraints to the table view.
- Click the Library icon to open the Object Library window.
- Drag and drop a Table View Cell, on the table view.
- Click the Library icon to open the Object Library window and drag and drop an image view to the far left of the Table View Cell.
- Click the Library icon to open the Object Library window and drag and drop two labels onto the Table View Cell.
- Move one label to the top right of the image view.
- Move the second label underneath the first label and indented to the right.
- Click the Table View Cell in the Document Outline and choose View > Inspectors > Show Attributes Inspector, or click the Attributes Inspector icon in the upper right corner of the Xcode window.
- Click in the Identifier text field, type
customCell. - Choose File > New > File. A template window appears.
- Choose Cocoa Touch Class and click the Next button. Another dialog appears asking for a name and subclass for your file.
- Click in the Class text field and type TableViewCell.
- Click in the Subclass of popup menu and choose UITableViewCell
- Click the Next button. Xcode asks for a location to store your file. Click the Create button. Xcode displays the TableViewCell.swift file in the Navigator pane.
- Click the Main.storyboard file in the Navigator pane.
- Click
customCellin the Document Outline and then choose View ➤ Inspectors ➤ Show Identity Inspector, or click the Identity Inspector icon in the upper right corner of the Xcode window. - Click in the Class popup menu and choose TableViewCell, which is the .swift file you just created
- Choose View > Assistant Editor > Show Assistant Editor, or click the Assistant Editor icon in the upper right corner of the Xcode window. This displays the Main.storyboard file on the left and a .swift file on the right.
- Click the icon that looks like two circles intertwined at the top of the Assistant Editor. A popup menu appears.
- Choose Manual > TableViewCellVisualApp > TableViewCellVisualApp > TableViewCell.swift. Xcode now displays the TableViewCell.swift file to the right of the Main.storyboard file.
- Move the mouse pointer over the top label, hold down the Control key, and Ctrl-drag under the
class TableViewCellline in the TableViewCell.swift file. - Release the Control key and the left mouse button. A popup window appears.
- Click in the Name text field, type
mainText, and click the Connect button. Xcode creates an IBOutlet as follows:
@IBOutlet var mainText: UILabel!
- Move the mouse pointer over the bottom label, hold down the Control key, and Ctrl-drag under the IBOutlet line.
- Release the Control key and the left mouse button. A popup window appears.
- Click in the Name text field, type
detailText, and click the Connect button. Xcode creates an IBOutlet as follows:
@IBOutlet var detailText: UILabel!
- Move the mouse pointer over the image view, hold down the Control key, and Ctrl-drag under the IBOutlet line.
- Release the Control key and the left mouse button. A popup window appears.
- Click in the Name text field, type cellImage, and click the Connect button. Xcode creates an IBOutlet as follows:
@IBOutlet var cellImage: UIImageView!
The entire TableViewCell.swift file should look like this:
import UIKit

class TableViewCell: UITableViewCell {

    @IBOutlet var mainText: UILabel!
    @IBOutlet var detailText: UILabel!
    @IBOutlet var cellImage: UIImageView!

    override func awakeFromNib() {
        super.awakeFromNib()
    }
    override func setSelected(_ selected: Bool, animated: Bool) {
        super.setSelected(selected, animated: animated)
    }
}
- Choose View > Standard Editor > Show Standard Editor, or click the Standard Editor icon in the upper right corner of the Xcode window.
- Click the ViewController.swift file in the Navigator pane.
- Modify the class ViewController line as follows:
class ViewController: UIViewController, UITableViewDelegate, UITableViewDataSource {
Underneath the class ViewController line, add the following three arrays:
let mainArray = ["Shuttle bus", "Hierarchy", "Exchange", "Padlock"]
let detailArray = ["6am - 10pm", "Acme corporation", "Ideas worth sharing", "Access denied"]
let imageArray = ["shuttle.png", "hierarchy.png", "exchange. png", "padlock.png"]
Underneath the viewDidLoad method, add the following function to count the number of rows in each section:
func tableView(_ tableView: UITableView, numberOfRowsInSection section: Int) -> Int {
    return mainArray.count
}
Underneath the previous function, add the following function to fill the table view with data:
func tableView(_ tableView: UITableView, cellForRowAt indexPath: IndexPath) -> UITableViewCell {
    let cell: TableViewCell = tableView.dequeueReusableCell (withIdentifier: "customCell") as! TableViewCell
    cell.mainText?.text = self.mainArray[indexPath.row]
    cell.detailText?.text = self.detailArray[indexPath.row]
    cell.imageView?.image = UIImage(named: self. imageArray[indexPath.row])
    return cell
}
Table views can display large amounts of data in multiple rows. However, besides viewing data, you might also want to be able to add or delete data to a table view. One way to modify a table view to add or delete items is to use a left swiping gesture. When the user swipes left on a table view row, one or more buttons can appear, letting the user choose an option such as adding a new item or deleting the existing item.
To allow a left swiping gesture on a table view, row, we need an editActionsForRowAt function such as:
func tableView(_ tableView: UITableView, editActionsForRowAt indexPath: IndexPath)
-> [UITableViewRowAction]? {
}
Inside this function, we can define one or more buttons such as:
let addAction = UITableViewRowAction(style: UITableViewRowAction.Style.normal,
title: "Add", handler: {(action: UITableViewRowAction, indexPath: IndexPath) in
})

let deleteAction = UITableViewRowAction(style: UITableViewRowAction. Style.destructive,
title: "Delete", handler: {(action: UITableViewRowAction, indexPath: IndexPath) in
})
return [deleteAction, addAction]
The preceding code defines two buttons labeled Add and Delete. The Add button appears with the .normal style, which makes it appear light gray. The Delete button appears with the .destructive style so it appears as bright red. The last line returns the two UITableViewRowAction constants that represent the Add and Delete buttons.
To see how to add and delete items in a table view using a swiping gesture, follow these steps:
- Click the Main.storyboard file in the Navigator pane. Xcode displays the single view.
- Click the Library icon to open the Object Library window.
- Drag and drop a table view anywhere on the view.
- Resize the table view so it fills the entire screen.
- Choose Editor > Resolve Auto Layout Issues > Reset to Suggested Constraints. Xcode adds constraints to the table view.
- Choose View > Inspectors > Show Attributes Inspector, or click the Attributes Inspector icon in the upper right corner of the Xcode window.
- Choose View > Assistant Editor > Show Assistant Editor, or click the Assistant Editor icon in the upper right corner of the Xcode window.
- Move the mouse pointer over the table view, hold down the Control key, and Ctrl-drag under the
class ViewControllerline in the ViewController.swift file. - Release the Control key and the left mouse button. A popup window appears.
- Click in the Name text field, type
tableView, and click the Connect button. Xcode creates an IBOutlet as follows:
@IBOutlet var tableView: UITableView!
- Choose View > Standard Editor > Show Standard Editor, or click the Standard Editor icon in the upper right corner of the Xcode window.
- Click the ViewController.swift file in the Navigator pane.
- Modify the class ViewController line by adding
UITableViewDelegate,UITableViewDataSourceas follows:
class ViewController: UIViewController, UITableViewDelegate, UITableViewDataSource {
Underneath the class ViewController line, add the following array:
var petArray = ["cat", "dog", "parakeet", "parrot", "canary", "finch", "tropical fish",
"goldfish", "sea horses", "hamster", "gerbil", "rabbit", "turtle"]
Add the following line underneath the petArray:
let cellID = "cellID"
Modify the viewDidLoad method as follows:
override func viewDidLoad() {
    super.viewDidLoad()
    tableView.dataSource = self
    tableView.delegate = self
}
Underneath the viewDidLoad method, add the following function to define how many rows appear in the table view, which consists of only one section:
func tableView(_ tableView: UITableView, numberOfRowsInSection section: Int) -> Int {
    return petArray.count
}
Underneath the previous function, add the following function to fill the table view with data from the petArray:
func tableView(_ tableView: UITableView, cellForRowAt indexPath: IndexPath) -> UITableViewCell {
    var cell = tableView.dequeueReusableCell(withIdentifier: cellID)
    if (cell == nil) {
        cell = UITableViewCell(
            style: UITableViewCell.CellStyle.default,
            reuseIdentifier: cellID)
    }
    cell?.textLabel?.text = petArray[indexPath.row]
    return cell!
}
Underneath the previous function, add the following function to display an alert controller with a text field, letting the user type in data to add a new row to the table view:
func displayAlert(location: Int) {
    let alert = UIAlertController(title: "Add", message: "New Pet", preferredStyle: .alert)
    alert.addTextField(configurationHandler: {(textField) in
        textField.placeholder = "Pet type here"
    })

    let okAction = UIAlertAction(title: "OK", style: .default, handler: { action -> Void in
        let savedText = alert.textFields![0] as UITextField
        self.petArray.insert(savedText.text ?? "default", at: location)
        self.tableView.reloadData()
    })

    let cancelAction = UIAlertAction(title: "Cancel", style: .default, handler: { action -> Void in
        // Do nothing
    })
    alert.addAction(okAction)
    alert.addAction(cancelAction)
    self.present(alert, animated: true, completion: nil)
}
Underneath the previous function, add the following function to display two buttons when the user swipes on the table view row:
func tableView(_ tableView: UITableView, editActionsForRowAt indexPath: IndexPath)
-> [UITableViewRowAction]? {
    let addAction = UITableViewRowAction(style: UITableViewRowAction.Style.normal,
        title: "Add", handler: {(action: UITableViewRowAction, indexPath: IndexPath) in
        self.displayAlert(location: indexPath.row)
    })
    let deleteAction = UITableViewRowAction(style: UITableViewRowAction.Style.destructive,
        title: "Delete", handler: {(action: UITableViewRowAction, indexPath: IndexPath) in
        self.petArray.remove(at: indexPath.row)
        tableView.deleteRows(at: [indexPath], with: UITableView.RowAnimation.fade)
    })
    return [deleteAction, addAction]
}
Let's sort our items by title then rating fields
func sort(movies: inout [Movie]) {
    movies.sort(by: {
        return ($0.title.localizedLowercase, $0.rating) <
            ($1.title.localizedLowercase, $1.rating)
    })
}
Overload the == operator for the object type to explain how to determine if two objects are equal. Because two countries are equal if all their properties are equal, compare each property in the overloaded == operator for Country.
func ==(lhs: Movie, rhs: Movie) -> Bool {
    return (
        lhs.title == rhs.title &&
        lhs.rating == rhs.rating)
}
The object must adopt the Equatable protocol. That’s easy enough! All you need to do is add an extension to the Country structure:
extension Movie: Equatable {}
One of the great features of table views is their built-in support for editing. This includes inserting new rows, deleting existing rows, and rearranging rows.
Editing mode
UITableView has an editing property, and when this property is set to true, the UITableView enters editing mode. Once the table view is in editing mode, the rows of the table can be manipulated by the user. Depending on how the table view is configured, the user can change the order of the rows, add rows, or remove rows. (Editing mode does not allow the user to edit the content of a row.)
But first, the user needs a way to put the UITableView in editing mode. You could toggle the editing property of UITableView directly. However, UIViewController also has an editing property. A UITableViewController instance automatically sets the editing property of its table view to match its own editing property. By setting the editing property on the view controller itself, you can ensure that other aspects of the interface also enter and leave editing mode.”
To set the isEditing property for a view controller, you call the method setEditing(_:animated:).
@IBAction func toggleEditingMode(_ sender: UIButton) {
    if isEditing {
        sender.setTitle("Edit", for: .normal)
        setEditing(false, animated: true)
    } else {
        sender.setTitle("Done", for: .normal)
        setEditing(true, animated: true)
    }
}
Moving rows
To change the order of rows in a UITableView, you will use another method from the UITableViewDataSource protocol tableView(_:moveRowAt:to:).
Usually, the cells have a fixed height of some points. It is much better to allow the content of the cell to drive its height. That way, if the content ever changes, the table view cell’s height can change automatically.
You can achieve this goal, as you have probably guessed, with Auto Layout. The UITableViewCell needs to have vertical constraints that will exactly determine the height of the cell. Imagine, you have a cell with two labels. You need to add a constraint between the two labels that fixes the vertical spacing between them.
First, open Main.storyboard. Control-drag from the nameLabel to the ageLabel and select Vertical Spacing.
Next, open ViewController and update viewDidLoad() to tell the table view that it should compute the cell heights based on the constraints.
override func viewDidLoad() {
    super.viewDidLoad()

    tableView.rowHeight = 65
    tableView.rowHeight = UITableView.automaticDimension
    tableView.estimatedRowHeight = 65
}
UITableView.automaticDimension is the default value for rowHeight, so while it is not necessary to add, it is useful for understanding what is going on. Setting the estimatedRowHeight property on the table view can improve performance. Instead of asking each cell for its height when the table view loads, setting this property allows some of that performance cost to be deferred until the user starts scrolling. Ultimately, though, setting an estimated row height value is what triggers the dynamic row height system.
Static table views have a specific number of table sections and a specific number of rows in each section set at design time. They are easy to set in the storyboard. As table row cells are views, you can place any control you want in a cell and format using Auto layout.
Drop Table View Controller into the project, it's necessary for a static TableView. The only thing we have to do now is to select the TableView and set Content to Static Cells in the Attributes Inspector. Then you can set the number of sections. Every section can have its own title and footer. Select the sections and set everything needed, including the individual rows.
We also need a new class for our new controller. We'll add a new file, but choose Cocoa Touch Class instead of a Swift file. A dialog pops up. In it, we'll set the new class to be a subclass of UITableViewController and name it e.g. SettingsTableViewController. Now, we'll just select our new TableViewController in Main.storyboard and set its Class to SettingsTableViewController in Identity Inspector.
We'll finish our static TableView by reacting to selecting a cell. We only have to implement the didSelectRowAt method. We'll mark the method by override so we can provide our own implementation:
override func tableView(_ tableView: UITableView, didSelectRowAt indexPath: IndexPath) {
    print("Selected row \(indexPath.row) in section \(indexPath.section)")
}
Again, let's just print something to test it. In a real-life app, a switch would be quite useful (one of few places where it's actually useful), especially if you had a lot of sections and rows. In this method, switch could only handle sections and the individual sections would have its own methods, such as handleFirstSection(row: Int) and so on. It could look like this:
override func tableView(_ tableView: UITableView, didSelectRowAt indexPath: IndexPath) {
    print("Selected row \(indexPath.row) in section \(indexPath.section)")

    switch indexPath.section {
        case 0:
            handleFirstSection(rowIndex: indexPath.row)
        case 1:
            handleSecondSection(rowIndex: indexPath.row)
        default:
            break
    }
}

func handleFirstSection(rowIndex: Int) {
    switch rowIndex {
        case 0:
            // Show account detail
            break
        case 1:
            // Navigate to settings
            break
        default:
            break
    }
}

func handleSecondSection(rowIndex: Int) {}
Example of UITableView created in Storyboard with Prototype Cell which has "cellId" id and IBOutlet.
import UIKit

class TblViewController: UIViewController, UITableViewDataSource, UITableViewDelegate {

    @IBOutlet weak var tbl: UITableView!

    var items: [String] = ["Item 1", "Item 2", "Item 3"]
    var cellId = "cellId"

    override func viewDidLoad() {
        super.viewDidLoad()

        tbl.delegate = self
        tbl.dataSource = self
    }

    func tableView(_ tableView: UITableView, numberOfRowsInSection section: Int) -> Int {
        return items.count;
    }

    func tableView(_ tableView: UITableView, cellForRowAt indexPath: IndexPath) -> UITableViewCell {
        let cell = tableView.dequeueReusableCell(withIdentifier: cellId, for: indexPath)
        cell.textLabel?.text = items[indexPath.row]
        return cell
    }
}
Example of UITableView created programmatically.
class TblViewController: UIViewController, UITableViewDataSource, UITableViewDelegate {

    var items: [String] = ["Item 1", "Item 2", "Item 3"]
    var cellId = "cellId"

    let tbl: UITableView = {
        let tv = UITableView()
        tv.backgroundColor = UIColor.white
        tv.translatesAutoresizingMaskIntoConstraints = false
        return tv
    }()

    override func viewDidLoad() {
        super.viewDidLoad()
        setupTable()
    }

    func setupTable() {
        tbl.delegate = self
        tbl.dataSource = self

        tbl.register(UITableViewCell.self, forCellReuseIdentifier: "cellId")

        view.addSubview(tbl)

        NSLayoutConstraint.activate([
            tbl.topAnchor.constraint(equalTo: self.view.topAnchor),
            tbl.bottomAnchor.constraint(equalTo: self.view.bottomAnchor),
            tbl.rightAnchor.constraint(equalTo: self.view.rightAnchor),
            tbl.leftAnchor.constraint(equalTo: self.view.leftAnchor)
        ])
    }

    func tableView(_ tableView: UITableView, numberOfRowsInSection section: Int) -> Int {
        return items.count;
    }

    func tableView(_ tableView: UITableView, cellForRowAt indexPath: IndexPath) -> UITableViewCell {
        let cell = tableView.dequeueReusableCell(withIdentifier: cellId, for: indexPath)
        cell.textLabel?.text = items[indexPath.row]
        return cell
    }

}
Example of UITableView with sections created programmatically.
class TnlViewController: UIViewController, UITableViewDataSource, UITableViewDelegate {
    var items: [String] = ["Item 1", "Item 2", "Item 3"]
    var cellId = "cellId"

    let tbl: UITableView = {
        let tv = UITableView()
        tv.backgroundColor = UIColor.white
        tv.translatesAutoresizingMaskIntoConstraints = false
        return tv
    }()

    override func viewDidLoad() {
        super.viewDidLoad()
        setupTable()
    }

    func setupTable() {
        tbl.delegate = self
        tbl.dataSource = self
        tbl.register(UITableViewCell.self, forCellReuseIdentifier: "cellId")

        view.addSubview(tbl)

        NSLayoutConstraint.activate([
            tbl.topAnchor.constraint(equalTo: self.view.topAnchor),
            tbl.bottomAnchor.constraint(equalTo: self.view.bottomAnchor),
            tbl.rightAnchor.constraint(equalTo: self.view.rightAnchor),
            tbl.leftAnchor.constraint(equalTo: self.view.leftAnchor)
        ])
    }

    func numberOfSections(in tableView: UITableView) -> Int {
        return 2
    }

    func tableView(_ tableView: UITableView, titleForHeaderInSection section: Int) -> String? {
        if section == 0 {
            return "Setup"
        }
        return "Items"
    }

    func tableView(_ tableView: UITableView, numberOfRowsInSection section: Int) -> Int {
        if section == 0 {
            return 2
        }
        return items.count;
    }

    func tableView(_ tableView: UITableView, cellForRowAt indexPath: IndexPath) -> UITableViewCell {
        let cell = tableView.dequeueReusableCell(withIdentifier: cellId, for: indexPath)
        let section = indexPath.section

        if section == 0 {
            switch indexPath.row {
            case 0: cell.textLabel?.text = "Option 1"
            case 1: cell.textLabel?.text = "Option 2"
            default:
                break
            }
        } else {
            cell.textLabel?.text = items[indexPath.row]
        }

        return cell
    }

    func tableView(_ tableView: UITableView, didSelectRowAt indexPath: IndexPath) {
        let section = indexPath.section
        if section == 1 {
            //performSegue(withIdentifier: "segue", sender: nil)
        }
        tableView.deselectRow(at: indexPath, animated: true)
    }
}
Adding image
class ViewController: UIViewController, UITableViewDataSource, UITableViewDelegate {
    ...
    func tableView(_ tableView: UITableView, cellForRowAt indexPath: IndexPath) -> UITableViewCell {
        ...
        cell?.detailTextLabel?.text = items[indexPath.row]

        let image = UIImage(named: "photo")
        cell?.imageView?.image = image
        let highlightedImage = UIImage(named: "photo2")
        cell?.imageView?.highlightedImage = highlightedImage

        return cell!
    }
}
Handling row selection
func tableView(_ tableView: UITableView, didSelectRowAt indexPath: IndexPath) {
    // Get data from model
    let textLabel = items[indexPath.row]
    let selectedCell = tableView.cellForRow(at: indexPath)
    // Get data from cell
    let detailTextLabel = selectedCell?.detailTextLabel?.text
    let message = "You selected \(textLabel) (\(detailTextLabel ?? "no details"))"

    let alert = UIAlertController(title: "Information",
        message: message,
        preferredStyle: .alert)
    let cancelAction = UIAlertAction(title: "Close",
        style: .default,
        handler: nil)

    alert.addAction(cancelAction)
    self.present(alert, animated: true)

    tableView.deselectRow(at: indexPath, animated: true)
}
Delete row on swipe
func tableView(_ tableView: UITableView, canEditRowAt indexPath: IndexPath) -> Bool {
    return true
}

func tableView(_ tableView: UITableView, commit editingStyle: UITableViewCellEditingStyle,
               forRowAt indexPath: IndexPath) {
    if editingStyle == .delete {
        items.remove(at: indexPath.row)
        tableView.deleteRows(at: [indexPath], with: .fade)
        //tableView.reloadData()
    }
}
Quote
Categories
- Android
- AngularJS
- Databases
- Development
- Django
- iOS
- Java
- JavaScript
- LaTex
- Linux
- Meteor JS
- Python
- Science
Archive ↓
- September 2024
- December 2023
- November 2023
- October 2023
- March 2022
- February 2022
- January 2022
- July 2021
- June 2021
- May 2021
- April 2021
- August 2020
- July 2020
- May 2020
- April 2020
- March 2020
- February 2020
- January 2020
- December 2019
- November 2019
- October 2019
- September 2019
- August 2019
- July 2019
- February 2019
- January 2019
- December 2018
- November 2018
- August 2018
- July 2018
- June 2018
- May 2018
- April 2018
- March 2018
- February 2018
- January 2018
- December 2017
- November 2017
- October 2017
- September 2017
- August 2017
- July 2017
- June 2017
- May 2017
- April 2017
- March 2017
- February 2017
- January 2017
- December 2016
- November 2016
- October 2016
- September 2016
- August 2016
- July 2016
- June 2016
- May 2016
- April 2016
- March 2016
- February 2016
- January 2016
- December 2015
- November 2015
- October 2015
- September 2015
- August 2015
- July 2015
- June 2015
- February 2015
- January 2015
- December 2014
- November 2014
- October 2014
- September 2014
- August 2014
- July 2014
- June 2014
- May 2014
- April 2014
- March 2014
- February 2014
- January 2014
- December 2013
- November 2013
- October 2013