A complete guide to integrating AdMob in your Android App Android 16.05.2018

So you have developed an android application and now you want to make some money from your application. In this article you will learn how to integrate AdMob in your application.
Google provides tools for advertisers to create ads and define the targeting criteria for their ads. For an example of targeting criteria, an ad might be targeted to be shown to people in a specific location. Google has a huge inventory of ads to display on both websites and mobile apps. You can display ads from this inventory in your app by using AdMob (which stands for Ads on Mobile).
How ads help you make money? Google pays you when users click ads in your app. The exact amount you get paid depends on the ads that get shown, and how much the advertisers were willing to pay for their ads. The total amount paid by the advertisers is distributed between Google and the publisher of the website or app where the ad appears.
There are 3 different types of ads in your application
- Banners ads,
- Interstitial ads
- Rewarded Video ads
To display an ad in your app, add an AdView in the layout of an activity and write a small amount of boilerplate code to load the ad. When a user runs your app and goes to that activity, an ad appears in the AdView.
You do not need to worry about finding an ad to display because Google handles that for you.
Don't click on ads in your own app. Google has policies that prevent website publishers and app publishers from clicking ads in their own websites and apps. The advertisers pay when people click their ads, so it would not be fair for you to display an ad in your app, then click the ad, and cause the advertiser to pay you for clicking the ad in your own app.
Create an AdMob account
Before you can experiment with running ads in your app, you need to enable AdMob for that app. To enable AdMob use these steps:
- In the Firebase console, select AdMob in the left hand navigation, then select Sign Up For AdMob. You will be re-directed to the AdMob console.
- Follow the sign up wizard to create your AdMob account and add your app to AdMob.
To display an ad in your app, you need your AdMob app ID and an ad unit ID. You can get both of these in the AdMob console.
Implement AdMob in your app
To display an ad in your app:
- Make sure you have added your app to your Firebase project.
- If you're using the latest version of Android Studio (version 2.2 or later), it's recommend using the Firebase Assistant to connect your app to Firebase. The Firebase Assistant can connect your existing project or create a new one for you and automatically install any necessary gradle dependencies.
- Click Tools > Firebase to open the Assistant window.
- Click Admob to expand, then click Add a banner ad to your app.
- Click the Connect to Firebase button to connect to Firebase and add the necessary code to your app.
- Click the Add AdMob to your app button and then click Accept Changes.
- Add an
AdViewto the layout for the activity that will display the ad. - Initialize AdMob ads at app launch, by calling
MobileAds.initialize()in theonCreate()method of your main activity. - Update the
onCreate()of that activity to load the ad into theAdView.
Get ready to run test ads
While you are developing and testing your app, you can display and test ads to make sure your app is setup correctly to display ads. When testing ads you need:
- Your device ID (IMEI) for running test ads. To get the device ID either:
- Go to Settings > About phone > status> IMEI.
- Dial *#06#.
- Your AdMob app ID. Get this in the AdMob console.
- An ad unit ID. Get this in the AdMob console.
Add the AdView to display the ad
In the activity's layout file where you want the ad to appear, add an AdView:
<com.google.android.gms.ads.AdView
    android:id="@+id/adView"
    android:layout_width="wrap_content"
    android:layout_height="wrap_content"
    android:layout_marginLeft="16dp"
    android:layout_centerHorizontal="true"
    ads:adSize="BANNER"
    ads:adUnitId="ca-app-pub-3940256099942544/6300978111">
</com.google.android.gms.ads.AdView>
There are two different parameters that you should notice here, adUnitId and adSize.
adUnitId is the unique ID that identifies your single ad unit. Here the ID that we have used is a test ID provided by Google. Always use test ID when your are developing/testing an app. A real ID should only be used in production. In the end of this tutorial I will show you how to create original ID’s for your ad units.
adSize defines the size of your banner, there are various banner sizes available which must have a look at here.
You also need to add the ads namespace to the root view of the layout:
<android.support.constraint.ConstraintLayout
    xmlns:android="http://schemas.android.com/apk/res/android"
    xmlns:ads="http://schemas.android.com/apk/res-auto"
    ...>
You can also add an AdView dynamically from your code.
AdView adView = new AdView(this);
adView.setAdSize(AdSize.BANNER);
adView.setAdUnitId("ca-app-pub-3940256099942544/6300978111");
viewGroup.addChild(adView);    //Or any other way your like
Initialize MobileAds
The MobileAds class provides methods for initializing AdMob ads in your app. Call MobileAds.initialize() in the onCreate() method of your main activity, passing the context and your app ID (which you get from the AdMob console).
// Initialize AdMob
MobileAds.initialize(this, "ca-app-pub-1234");
Write the code to load the ad
In the onCreate() method of the activity that displays the ad, write the code to load the ad.
While you are developing and testing your app you can display ads in test mode by specifying specific test devices. To show ads on your own device, you need to device ID (IMEI), which you can get from Settings > About phone > Status> IMEI or by dialling *#06#.
To load an ad:
- Get the
AdViewwhere the ad will appear. - Create an
AdRequestto request the ad. - Call
loadAd()on theAdViewto load the ad into theAdView.
Here's the code to write in onCreate() in the activity:
// Get the AdView
AdView adView = (AdView) findViewById(R.id.adView);

// Create an AdRequest
AdRequest adRequest = new AdRequest.Builder()
  // allow emulators to show ads
  .addTestDevice(AdRequest.DEVICE_ID_EMULATOR)
  // allow your device to show ads
  .addTestDevice("1234") // your device id
  .build();

// Load the ad into the AdView
adView.loadAd(adRequest);
Following is the full code
public class MainActivity extends AppCompatActivity {
    private AdView adView;

    protected void onCreate(Bundle savedInstanceState) {
        super.onCreate(savedInstanceState);
        setContentView(R.layout.activity_main);
        MobileAds.initialize(this,"ca-app-pub-3940256099942544~3347511713");

        adView = findViewById(R.id.adView);
        AdRequest adRequest = new AdRequest.Builder().build();
        adView.loadAd(adRequest);
    }
}
Result
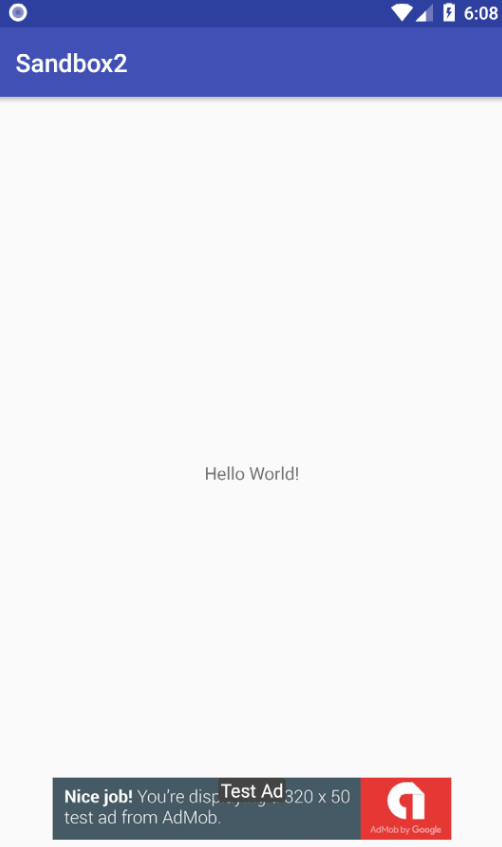
Always use test Ad ID while you are testing your application, you should never use original Ad ID in your application when in testing/developing phase. If you do so you might get blocked from AdMob.
Handling ad events
Ad is loaded using internet so it is very likely that the user might not have proper internet connection or any type of error occurs. Also you might want to know when the ad is completely loaded. AdMob provides a set of callbacks for all type of ads.
You can use an AdListener to listen to various events.
adView.setAdListener(new AdListener() {
    @Override
    public void onAdLoaded() {
        // Code to be executed when an ad finishes loading.
    }

    @Override
    public void onAdFailedToLoad(int errorCode) {
        // Code to be executed when an ad request fails.
    }

    @Override
    public void onAdOpened() {
        // Code to be executed when an ad opens an overlay that
        // covers the screen.
    }

    @Override
    public void onAdLeftApplication() {
        // Code to be executed when the user has left the app.
    }

    @Override
    public void onAdClosed() {
        // Code to be executed when when the user is about to return
        // to the app after tapping on an ad.
    }
});
Getting real ad unit ID’s
When your application is in production, it must use real ad unit ID’s created in the Admob dashboard. Don’t leave test ad unit ID’s in your production application, else you won’t earn any money.
- Go to AdMob dashboard > Select your application user Apps > Click on Ad Units > Click Get Started. Now it ask you what kind of AdUnit do you want to create.
- Select the type of AdUnit you want create.
- Once the ad unit is created successfully it will show you the AdUnitId which you will use instead of the test ID that you used previously.
Quote
Categories
- Android
- AngularJS
- Databases
- Development
- Django
- iOS
- Java
- JavaScript
- LaTex
- Linux
- Meteor JS
- Python
- Science
Archive ↓
- September 2024
- December 2023
- November 2023
- October 2023
- March 2022
- February 2022
- January 2022
- July 2021
- June 2021
- May 2021
- April 2021
- August 2020
- July 2020
- May 2020
- April 2020
- March 2020
- February 2020
- January 2020
- December 2019
- November 2019
- October 2019
- September 2019
- August 2019
- July 2019
- February 2019
- January 2019
- December 2018
- November 2018
- August 2018
- July 2018
- June 2018
- May 2018
- April 2018
- March 2018
- February 2018
- January 2018
- December 2017
- November 2017
- October 2017
- September 2017
- August 2017
- July 2017
- June 2017
- May 2017
- April 2017
- March 2017
- February 2017
- January 2017
- December 2016
- November 2016
- October 2016
- September 2016
- August 2016
- July 2016
- June 2016
- May 2016
- April 2016
- March 2016
- February 2016
- January 2016
- December 2015
- November 2015
- October 2015
- September 2015
- August 2015
- July 2015
- June 2015
- February 2015
- January 2015
- December 2014
- November 2014
- October 2014
- September 2014
- August 2014
- July 2014
- June 2014
- May 2014
- April 2014
- March 2014
- February 2014
- January 2014
- December 2013
- November 2013
- October 2013