How to create custom View in Andriod Android 28.07.2017
Sometimes, the widgets available in the SDK just aren’t enough to provide the output you need. Or perhaps you want to reduce the number of views you have in your hierarchy by combining multiple display elements into a single view to improve performance. For these cases, you may want to create your own View subclass. In doing so, there are two main interaction points between your class and the framework that need to be observed: measurement and drawing.
The View class can be easily extended to produce many different effects, but there are a few things that are worth knowing before you tackle it:
- The rendering for a
Viewis expected to happen in theonDrawmethod. - When rendering the graphics for the
View, you'll use aCanvasto send the drawing instructions. - Each
Viewis responsible for calculating the offsets for its padding, and by default, the graphics will be clipped to these dimensions. - You should avoid any object allocation (including arrays, if possible) in the
onDrawmethod. TheonDrawmethods are probably the most time-sensitive method calls in any application, and need to produce as little garbage as possible. Any object allocations should be done in other methods and just used in theonDrawimplementation.
Measurement
The first requirement that a custom view must fulfill is to provide a measurement for its content to the framework. Before a view hierarchy is displayed, Android calls onMeasure() for each element (both layouts and view nodes), and passes it two constraints the view should use to govern how it reports the size that it should be. Each constraint is a packed integer known as a MeasureSpec, which includes a mode flag and a size value. The mode will be one of the following values:
AT_MOST. This mode is typically used when the layout parameters of the view arematch_parent, or there is some other upper limit on the size. This tells the view it should report any size it wants, as long as it doesn’t exceed the value in the spec.EXACTLY. This mode is typically used when the layout parameters of the view are a fixed value. The framework expects the view to set its size to match the spec - no more, no less.UNSPECIFIED. This value is often used to figure out how big the view wants to be if unconstrained. This may be a precursor to another measurement with different constraints, or it may simply be because the layout parameters were set towrap_contentand no other constraints exist in the parent. The view may report its size to be whatever it wants in this case. The size in this spec is often zero.
Once you have done your calculations on what size to report, those values must be passed in a call to setMeasuredDimension() before onMeasure() returns. If you do not do this, the framework will be quite upset with you.
Measurement is also an opportunity to configure your view’s output based on the space available. The measurement constraints essentially tell you how much space has been allocated inside the layout, so if you want to create a view that orients its content differently when it has, say, more or less vertical space, onMeasure() will give you what you need to make that decision.
During measurement, your view doesn’t actually have a size yet; it has only a measured dimension. If you want to do some custom work in your view after the size has been assigned, override onSizeChanged() and put your code there.
Drawing
The second, and arguably most important, step for your custom view is drawing content. Once a view has been measured and placed inside the layout hierarchy, the framework will construct a Canvas instance, sized and placed appropriately for your view, and pass it via onDraw() for your view to use. The Canvas is an object that hosts individual drawing calls so it includes methods such as drawLine(), drawBitmap(), and drawText() for you to lay out the view content discretely. Canvas uses a painter’s algorithm, so items drawn last will go on top of items drawn first.
Drawing is clipped to the bounds of the view provided via measurement and layout, so while the Canvas element can be translated, scaled, rotated, and so on, you cannot draw content outside the rectangle where your view has been placed.
Finally, the content supplied in onDraw() does not include the view’s background, which can be set with methods such as setBackgroundColor() or setBackgroundResource(). If a background is set on the view, it will be drawn for you, and you do not need to handle that inside onDraw().
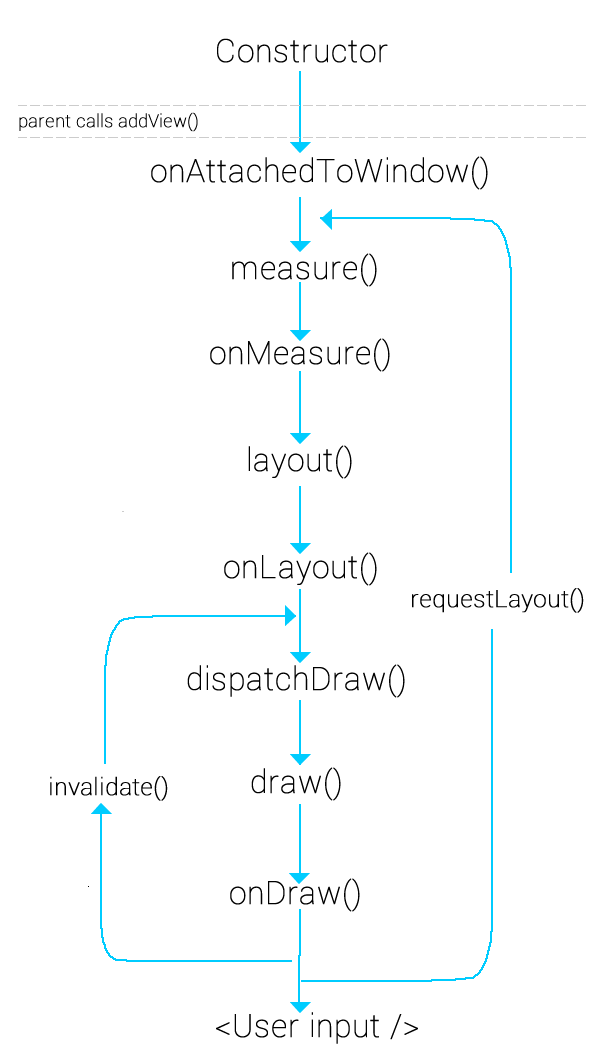
Let's look at diagram with lifecycle of View.
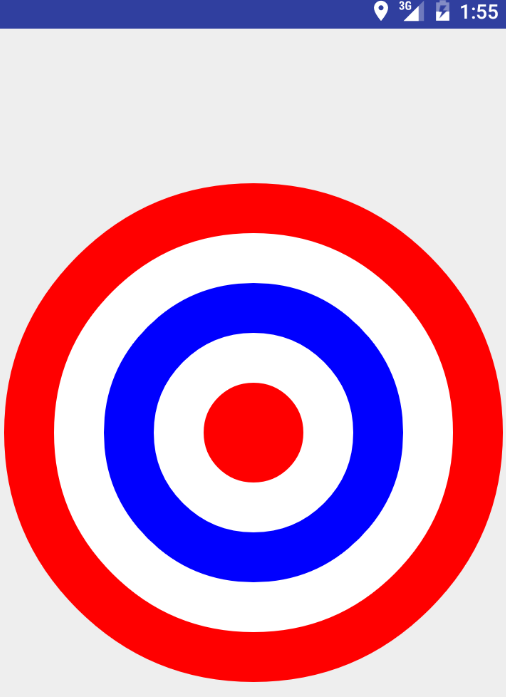
Following listing shows a very simple custom view template that your application can follow. For content, we are drawing a series of concentric circles to represent a bull’s-eye target.
public class BullsEyeView extends View {
    private Paint paint;
    private Point center;
    private float radius;

    public BullsEyeView(Context context) {
        this(context, null);
    }

    public BullsEyeView(Context context, AttributeSet attrs) {
        this(context, attrs, 0);
    }

    public BullsEyeView(Context context, AttributeSet attrs, int defStyle) {
        super(context, attrs, defStyle);
        // create a paintbrush to draw with
        paint = new Paint(Paint.ANTI_ALIAS_FLAG);
        // we want to draw our circles filled in
        paint.setStyle(Style.FILL);
        // create the center point for our circle
        center = new Point();
    }

    @Override
    protected void onMeasure(int widthMeasureSpec, int heightMeasureSpec) {
        int width, height;
        // determine the ideal size of your content, unconstrained
        int contentWidth = 200;
        int contentHeight = 200;
        width = getMeasurement(widthMeasureSpec, contentWidth);
        height = getMeasurement(heightMeasureSpec, contentHeight);
        // must call this method with the measured values!
        setMeasuredDimension(width, height);
    }

    // helper method to measure width and height
    private int getMeasurement(int measureSpec, int contentSize) {
        int specSize = MeasureSpec.getSize(measureSpec);
        switch (MeasureSpec.getMode(measureSpec)) {
            case MeasureSpec.AT_MOST:
                return Math.min(specSize, contentSize);
            case MeasureSpec.UNSPECIFIED:
                return contentSize;
            case MeasureSpec.EXACTLY:
                return specSize;
            default:
                return 0;
        }
    }

    @Override
    protected void onSizeChanged(int w, int h, int oldw, int oldh) {
        if (w != oldw || h != oldh) {
            // if there was a change, reset the parameters
            center.x = w / 2;
            center.y = h / 2;
            radius = Math.min(center.x, center.y);
        }
    }

    @Override
    protected void onDraw(Canvas canvas) {
        // draw a series of concentric circles,
        // smallest to largest, alternating colors

        paint.setColor(Color.RED);
        canvas.drawCircle(center.x, center.y, radius, paint);

        paint.setColor(Color.WHITE);
        canvas.drawCircle(center.x, center.y, radius * 0.8f, paint);

        paint.setColor(Color.BLUE);
        canvas.drawCircle(center.x, center.y, radius * 0.6f, paint);

        paint.setColor(Color.WHITE);
        canvas.drawCircle(center.x, center.y, radius * 0.4f, paint);

        paint.setColor(Color.RED);
        canvas.drawCircle(center.x, center.y, radius * 0.2f, paint);
    }
}
The first thing you may notice is that View has three constructors:
View(Context). This version is used when a view is constructed from within Java code.View(Context, AttributeSet). This version is used when a view is inflated from XML.AttributeSetincludes all the attributes attached to the XML element for the view.View(Context, AttributeSet, int). This version is similar to the previous one, but is called when a style attribute is added to the XML element.
It is a common pattern to chain all three together and implement customizations in only the final constructor, which is what we have done in the example view.
From onMeasure(), we use a simple utility method to return the correct dimension based on the measurement constraints. We basically have a choice between the size we want our content to be (which is arbitrarily selected here, but should represent your view content in a real application) and the size given to us. In the case of AT_MOST, we pick the value that is the lesser of the two; thus saying the view will be the size necessary to fit our content as long as it doesn’t exceed the spec. We use onSizeChanged(), called after measurement is finished, to gather some basic data we will need to draw our target circles. We wait until this point to ensure we use the values that exactly match how the view is laid out.
Inside onDraw() is where we construct the display. Five concentric circles are painted onto the Canvas with a steadily decreasing radius and alternating colors. The Paint element controls information about the style of the content being drawn, such as stroke width, text sizes, and colors. When we declared the Paint for this view, we set the style to FILL, which ensures that the circles are filled in with each color. Because of the painter’s algorithm, the smaller circles are drawn on top of the larger, giving us the target look we were going for.
Adding this view to an XML layout is simple, but because the view doesn’t reside in the android.view or android.widget packages, we need to name the element with the fully qualified package name of the class. So, for example, if our application package were me.proft.sandbox, the XML would be as follows:
<me.proft.sandbox.BullsEyeView
    android:layout_width="match_parent"
    android:layout_height="match_parent" />
Result
Get TextView width and height programmatically
// Get the width and height of TextView
textView.measure(0,0);

// size in pixels
int width = textView.getMeasuredWidth();
int height = textView.getMeasuredHeight();
Get absolute coordinates of a View
// Initialize a new integer array two hold the TextView x y position
int[] location = new int[2];

// Get the absolute coordinates of Button widget
button.getLocationOnScreen(location);

// Display the Button location to TextView
textView.setText("Button location\nx = "+location[0]+"\ny = "+ location[1]);
Quote
Categories
- Android
- AngularJS
- Databases
- Development
- Django
- iOS
- Java
- JavaScript
- LaTex
- Linux
- Meteor JS
- Python
- Science
Archive ↓
- September 2024
- December 2023
- November 2023
- October 2023
- March 2022
- February 2022
- January 2022
- July 2021
- June 2021
- May 2021
- April 2021
- August 2020
- July 2020
- May 2020
- April 2020
- March 2020
- February 2020
- January 2020
- December 2019
- November 2019
- October 2019
- September 2019
- August 2019
- July 2019
- February 2019
- January 2019
- December 2018
- November 2018
- August 2018
- July 2018
- June 2018
- May 2018
- April 2018
- March 2018
- February 2018
- January 2018
- December 2017
- November 2017
- October 2017
- September 2017
- August 2017
- July 2017
- June 2017
- May 2017
- April 2017
- March 2017
- February 2017
- January 2017
- December 2016
- November 2016
- October 2016
- September 2016
- August 2016
- July 2016
- June 2016
- May 2016
- April 2016
- March 2016
- February 2016
- January 2016
- December 2015
- November 2015
- October 2015
- September 2015
- August 2015
- July 2015
- June 2015
- February 2015
- January 2015
- December 2014
- November 2014
- October 2014
- September 2014
- August 2014
- July 2014
- June 2014
- May 2014
- April 2014
- March 2014
- February 2014
- January 2014
- December 2013
- November 2013
- October 2013