Scheduling operations via AlarmManager in Android Android 07.05.2017

Introduction
Scheduling and repeating alarms are generally used as a local reminder to notify user about some event.
Android provides AlarmManager to create and schedule alarms. AlarmManager class provides access to the system alarm service. This allow you to schedule your application to be run at some point in the future. When an alarm goes off, the Intent that had been registered for it is broadcast by the system, automatically starting the target application if it is not already running.
AlarmManager runs outside the lifetime of your application. Once an alarm is scheduled, it will invoke even when your application is not running or in sleep mode.
An scheduled alarm will execute unless it is stopped explicitly by calling cancel() method, or until device reboots. This means, you need to re-schedule them explicitly when device boot completes.
Alarms offer the following features:
- Schedule alarms for a set time or interval.
- Maintained by the OS, not your application, so alarms are triggered even if your application is not running, or the device is asleep.
- Can be used to trigger periodic tasks (such as an hourly news update), even if your application is not running.
- Your app does not use resources (such as timers or background services), since the OS manages the scheduling.
Alarms are not the best solution if you need a simple delay while your application is running, for example, a short delay for a UI event. For short delays, it's easier and more efficient to use the postAtTime() and postDelayed() methods of a Handler.
Alarm have three properties, as follows:
- Alarm type (see in the following list).
- Trigger time (if the time has already passed, the alarm is triggered immediately).
- Pending Intent.
A repeating alarm has the same three properties, plus an Interval:
- Alarm type (see in the following list).
- Trigger time (if the time has already passed, it triggers immediately).
- Interval.
- Pending Intent.
There are four alarm types:
- RTC (Real Time Clock). The alarm times are referenced to UTC time. This does not wake the device. Fires the pending intent at a specified time. If the device is asleep, it will not be delivered until the next time the device wakes up.
- RTC_WAKEUP. The alarm times are referenced to UTC time and will wake the device to trigger if it is asleep. Fires the pending intent at a specified time, waking up the device if asleep.
- ELAPSED_REALTIME. This is based on the time elapsed since the device boot. This does not wake the device. It is better for time interval alarms-such as every 30 minutes. Fires the pending intent after the specified length of time since device boot. If the device is asleep, it fires when the device is next awake.
- ELAPSED_REALTIME_WAKEUP. This is based on the time elapsed since the device boot. This wakes the device if it is sleeping. Fires the pending intent after the specified length of time since device boot. It wakes up the device if it is asleep.
RTC is most commonly used for setting alarm service in Android.
If you choose a wake-up alarm type, Android will wake the device from sleep but will not keep the device awake for you. You must obtain a WakeLock from PowerManager while doing your background work from a wake-up event. Otherwise, Android is likely to put the device back to sleep quickly, which will halt what you may be doing.
Thera are some methods which are used to schedule alarms. These methods are based on exact, inexact time of execution and repeating or single execution.
- set(int type, long triggerAtMillis, PendingIntent operation). Schedules the alarm and if there is already an alarm by the intent then previous one will be canceled. It allows executing only one time.
- setExact(int type, long triggerAtMillis, PendingIntent operation). It behaves same as
set()but it does not allow OS to adjust time. The alarm will fire on exact time. - setRepeating(int type, long triggerAtMillis, long intervalMillis, PendingIntent operation). It behaves same as
set()but repeats for the given interval of time. - setInexactRepeating(int type, long triggerAtMillis, long intervalMillis, PendingIntent operation). Same as
setRepeating()but the executing time will not be exact. - setWindow(int type, long windowStartMillis, long windowLengthMillis, PendingIntent operation). Executes within a given window of time and works same as
set(). It can be used for strict ordering of execution in case of multiple alarms.
After android API 19 (KitKat) all the alarms are inexact, this is done to save battery life and disable multiple wakeups. By doing so all the alarms are bundled to its near about time and triggered at once. There are new APIs to support applications which need strict delivery guarantees; see setWindow() and setExact(). Applications whose targetSdkVersion is earlier than API 19 will continue to see the previous behavior in which all alarms are delivered exactly when requested.
One-time alarm
The following recipe will demonstrate how to create alarms with AlarmManager.
Setting an alarm requires a Pending Intent, which Android sends when the alarm is triggered. This intent can point to any system component, such as a BroadcastReceiver or Service, that can be executed when the alarm triggers. Therefore, we need to set up a Broadcast Receiving to capture the alarm intent. Our UI will consist of just a simple button to set the alarm. To start, open the Android Studio and follow these steps:
- Add the following
<receiver>to the<application>element at the same level as the existing<activity>element:
<receiver android:name=".AlarmBroadcastReceiver">
    <intent-filter>
        <action android:name="me.proft.alarms.ACTION_ALARM" />
    </intent-filter>
</receiver>
Open activity_main.xml and add the following button:
<LinearLayout
    xmlns:android="http://schemas.android.com/apk/res/android"
    android:orientation="vertical"
    android:padding="5dp"
    android:layout_width="match_parent"
    android:layout_height="match_parent">
    <Button
        android:id="@+id/btnAlarm"
        android:layout_width="wrap_content"
        android:layout_height="wrap_content"
        android:text="Set Alarm"
        android:layout_centerInParent="true"
        android:onClick="setAlarm"/>
</LinearLayout>
Create a new Java class called AlarmBroadcastReceiver using the following code:
public class AlarmBroadcastReceiver extends BroadcastReceiver {
    public static final String ACTION_ALARM = "en.proft.alarms.ACTION_ALARM";
    @Override
    public void onReceive(Context context, Intent intent) {
        if (ACTION_ALARM.equals(intent.getAction())) {
            Toast.makeText(context, ACTION_ALARM, Toast.LENGTH_SHORT).show();
        }
    }
}
Open ActivityMain.java and add the method for the button click:
public void setAlarm(View view) {
    Intent intentToFire = new Intent(getApplicationContext(), AlarmBroadcastReceiver.class);
    intentToFire.setAction(AlarmBroadcastReceiver.ACTION_ALARM);

    // pass something
    // Bundle bundle = new Bundle();
    // bundle.putString("TAG", "FOO");
    // intentToFire.putExtra("BUNDLE", bundle);

    PendingIntent alarmIntent = PendingIntent.getBroadcast(getApplicationContext(),
        0, intentToFire, 0);
    AlarmManager alarmManager = (AlarmManager)getApplicationContext().
        getSystemService(Context.ALARM_SERVICE);

    Calendar c = Calendar.getInstance();
    c.add(Calendar.MINUTE, 2);
    long afterTwoMinutes = c.getTimeInMillis();

    alarmManager.set(AlarmManager.RTC, afterTwoMinutes, alarmIntent);
}
Creating the alarm is done with this line of code:
alarmManager.set(AlarmManager.ELAPSED_REALTIME, twoMinutes, alarmIntent);
Here's the method signature:
set(AlarmType, Time, PendingIntent);
To set the alarm, we create a Pending Intent with our previously defined alarm action:
public static final String ACTION_ALARM = "en.proft.alarms.ACTION_ALARM";
This is an arbitrary string and could be anything we want, but it needs to be unique, so we prepend our package name. We check for this action in the Broadcast Receiver's onReceive() callback.
If you click the Set Alarm button and wait for two minutes, you will see the Toast when the alarm triggers. If you are too impatient to wait and click the Set Alarm button again before the first alarm is triggered, you wouldn't get two alarms. Instead, the OS will replace the first alarm with the new alarm, since they both use the same Pending Intent. If you need multiple alarms, you need to create different Pending Intents, such as using different Actions.
If you want to cancel the alarm, call the cancel() method by passing the same Pending Intent you have used to create the alarm. If we continue with our recipe, this is how it would look:
alarmManager.cancel(alarmIntent);
Repeating alarm
If you want to create a repeating alarm, use the setRepeating() method. The signature is similar to the set() method, but with an interval. This is shown as follows:
setRepeating(AlarmType, Time (in milliseconds), Interval, PendingIntent);
For the Interval, you can specify the interval time in milliseconds or use one of the predefined AlarmManager constants:
- INTERVAL_DAY
- INTERVAL_FIFTEEN_MINUTES
- INTERVAL_HALF_DAY
- INTERVAL_HALF_HOUR
- INTERVAL_HOUR
Let's write a very basic service that will simply display the current time as a Toast every time it is triggered.
public class AlarmService extends Service {
    @Override
    public int onStartCommand(Intent intent, int flags, int startId) {
        // display the current time
        Calendar now = Calendar.getInstance();
        DateFormat formatter = SimpleDateFormat.getTimeInstance();
        Toast.makeText(this, formatter.format(now.getTime()), Toast.LENGTH_SHORT).show();
        return START_NOT_STICKY;
    }
    @Override
    public IBinder onBind(Intent intent) {
        return null;
    }
}
That service must be registered in the AndroidManifest.xml with a <service> tag. Otherwise, AlarmManager which is external to your application will not be aware of how to trigger it.
<application>
    ...
    <service android:enabled="true" android:name=".AlarmService"/>
</application>
Below is layout to control our AlarmService.
<?xml version="1.0" encoding="utf-8"?>
<LinearLayout xmlns:android="http://schemas.android.com/apk/res/android"
    android:orientation="vertical"
    android:layout_width="match_parent"
    android:layout_height="match_parent">
    <Button
        android:id="@+id/start"
        android:layout_width="match_parent"
        android:layout_height="wrap_content"
        android:text="Start Periodic Task" />
    <Button
        android:id="@+id/stop"
        android:layout_width="match_parent"
        android:layout_height="wrap_content"
        android:text="Cancel Periodic Task" />
</LinearLayout>
Following is the Activity to register/unregister alarm.
public class AlarmActivity extends AppCompatActivity implements View.OnClickListener {
    private PendingIntent alarmIntent;

    @Override
    public void onCreate(Bundle savedInstanceState) {
        super.onCreate(savedInstanceState);
        setContentView(R.layout.main);

        // attach the listener to both buttons
        findViewById(R.id.start).setOnClickListener(this);
        findViewById(R.id.stop).setOnClickListener(this);

        // create the launch sender
        Intent launchIntent = new Intent(this, AlarmService.class);
        alarmIntent = PendingIntent.getService(this, 0, launchIntent, 0);
    }

    @Override
    public void onClick(View v) {
        AlarmManager manager = (AlarmManager)getSystemService(Context.ALARM_SERVICE);
        long interval = 60 * 1000; // 1 minute

        switch(v.getId()) {
            case R.id.start:
                Toast.makeText(this, "Scheduled", Toast.LENGTH_SHORT).show();

                Calendar c = Calendar.getInstance();
                c.add(Calendar.SECOND, 10);
                long afterTenSeconds = c.getTimeInMillis();

                manager.setRepeating(AlarmManager.RTC_WAKEUP, afterTenSeconds, interval, alarmIntent);
                break;

            case R.id.stop:
                Toast.makeText(this, "Canceled", Toast.LENGTH_SHORT).show();
                manager.cancel(alarmIntent);
                break;
            default:
            break;
        }
    }
}
As of Android 5.1 (API version 22) there is a minimum period of 1 minute for repeating alarms. If you need to do work within one minute, just set the alarm directly, then set the next one from that alarm's handler, etc. If you need to do work within 5 seconds (for example), post it to a Handler instead of using the AlarmManager.
The sample activity presents two buttons: one to begin firing regular alarms, and the other to cancel them. The operation to trigger is referenced by a PendingIntent, which will be used to both set and cancel the alarms. We create an intent referencing the service directly, and then we wrap that intent inside a PendingIntent obtained with getService().
The alarm in the example is registered to trigger 1 minute after the button is pressed, and then every 1 minute after that. Every 1 minute, a Toast will come onscreen with the current time value, even if the application is no longer running or in front of the user. When the user displays the activity and presses the Stop button, any pending alarms matching our PendingIntent are immediately canceled and will stop the flow of Toasts.
Precision alarm
What if we wanted to schedule an alarm to occur at a specific time? Perhaps exactly at 14:00? Setting AlarmManager with some slightly different parameters could accomplish this.
// get a Calendar and set the time to 14:00:00
Calendar startTime = Calendar.getInstance();
startTime.set(Calendar.HOUR_OF_DAY, 14);
startTime.set(Calendar.MINUTE, 0);

// get a Calendar at the current time
Calendar now = Calendar.getInstance();

if (now.before(startTime)) {
    // it's not 14:00 yet, start today
    time = startTime.getTimeInMillis();
} else {
    // start 14:00 tomorrow
    startTime.add(Calendar.DATE, 1);
    time = startTime.getTimeInMillis();
}

// set the alarm
if (Build.VERSION.SDK_INT < Build.VERSION_CODES.KITKAT) {
    alarmManager.set(AlarmManager.RTC, time, alarmIntent);
} else {
    alarmManager.setExact(AlarmManager.RTC, time, alarmIntent);
}
This example uses an alarm that is referenced to real time. A determination is made whether the next occurrence of 14:00 will be today or tomorrow, and that value is returned as the trigger time for the alarm.
Starting in Android 4.4, the AlarmManager defaults all alarms to be inexact, meaning there is a small window within which they will trigger. Along with this new behavior, the setExact() API method was added to allow developers to declare that the following alarm cannot fall within an inexact window. Prior to 4.4, simply calling set() with the appropriate start time was sufficient.
Setting alarms in Android API Level 23 and above
If our application targets an API level below 19 (KitKat), scheduled alarms will run exactly at the alarm time. For applications targeting KitKat or later, the schedule is considered inexact and the system may re-order or group alarms to minimize wake-ups and save battery.
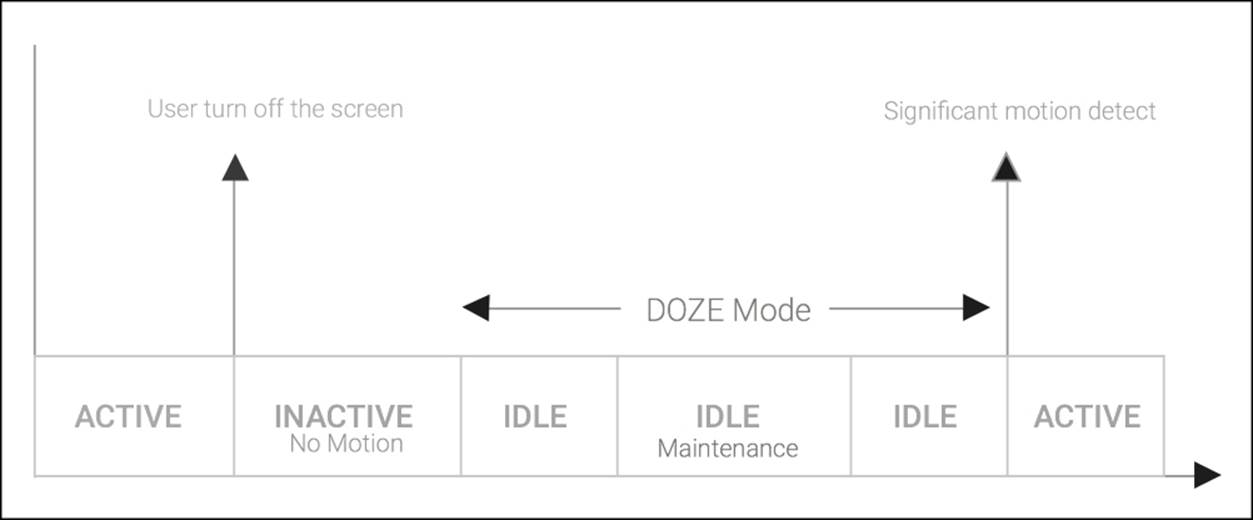
After API Level 23, the Android Development team went a little further and Doze mode was introduced on the Android System to reduce battery consumption when the device is unplugged from the power adapter, motionless, and not used by the user for a long period of time.
The Doze system will try to decrease the device's wake-up frequency deferring background jobs, network updates, syncs, and our precious alarm until the device exits Doze mode or a recurring maintenance window runs to execute pending jobs, certain alarms, or synchronization with the network. After the maintenance window finishes, the device would enter Doze mode again if it was not used in the meantime:
Doze mode is likely to impact your application and will defer your alarms until a maintenance window comes in, unless you use the methods setAndAllowWhileIdle() and setExactAndAllowWhileIdle() to allow the execution of your alarms in a deep idle state.
Moreover, the number of times that the Doze Mode maintenance window runs will be less frequent in cases of long-term inactivity, so the impact of this new mechanism on our scheduling will increase, hence causing more unpredictable jitters at the alarm time.
During the doze mode the applications are also not allowed to access the network, the WakeLocks are ignored and Wi-Fi scans are not executed.
If we need precision scheduling and you are targeting Marshmallow or later, we shall use the new setExactAndAllowWhileIdle() method introduced at API level 23:
am.setExactAndAllowWhileIdle(AlarmManager.RTC, time, pending);
The Android system has protection that prevents abuse for exact alarms that fire off too frequently. AlarmManager only wakes up the device and dispatches one alarm per minute, and in low power mode it can be as low as one every 15 mins.
If your application targets a version between KitKat (API Level 19) and Marshmallow (API Level 23), the setExact method is enough for timing precision:
am.setExact(AlarmManager.RTC, time, pending);
But we'll need to check that the methods exist before we try to call it; otherwise, our app will crash when run under earlier API levels. Lets sketch out our new exact alarm code:
if (Build.VERSION.SDK_INT >= Build.VERSION_CODES.M) {
    // Wakes up the device in Doze Mode
    am.setExactAndAllowWhileIdle(AlarmManager.RTC, time, pending);
} else if (Build.VERSION.SDK_INT >= Build.VERSION_CODES.LOLLIPOP) {
    // Wakes up the device in Idle Mode
    am.setExact(AlarmManager.RTC_WAKEUP, time, pending);
} else {
    // Old APIs
    am.set(AlarmManager.RTC, time, pending);
}
This will deliver our alarm at exactly the specified time on all platforms.
Don't forget that you should only use exact scheduling when you really need it, for example, to deliver alerts to the user at a specific time. For most other cases, allowing the system to adjust our schedule a little to preserve battery life is usually acceptable.
Android Marshmallow API Level 23 also comes with the setAndAllowWhileIdle function, which allows us to create an alarm to sound in Doze mode, but with less exactness compared to setExactAndAllowWhileIdle().
The system will try to batch these kinds of alarm across the entire system, minimizing the number of times the device wakes up, and hence reducing the energy consumption of the system. Here is the code to create an alarm that triggers, even in Doze mode, 10 hours from now:
long delay = TimeUnit.HOURS.toMillis(10L);
long time = System.currentTimeMillis() + delay;

if (Build.VERSION.SDK_INT >= Build.VERSION_CODES.M) {
    am.setAndAllowWhileIdle(AlarmManager.RTC, time, pending);
}
In order to test your application's behavior in doze mode, the Android SDK team added some new commands to the dumpsys tool to manually change the device's power state from the command line.
It is also important to remember that Doze mode requires that your device is unplugged from the charger. To force the device to a state where it is disconnected from the charger, we should run the following command on a command line with access to SDK Tools:
# Emulate a charger unplug
adb shell dumpsys battery unplug

# Emulate a charger plug in
adb shell dumpsys battery set ac 1
Then, to enter idle mode, we should turn off the screen and run the following commands:
// Enable the doze mode, step required on Android Emulator
adb shell dumpsys deviceidle enable

// To goes directly go IDLE mode
adb shell dumpsys deviceidle force-idle
After the device is put in idle mode, we can enable the maintenance window by running the following command:
// Goes from IDLE -> IDLE_MAINTENANCE state
adb shell dumpsys deviceidle step
If we run the same step again the device goes back to an idle state; however, if we want to go back to an active state, we should run the next command:
// Goes from IDLE,IDLE_MAINTENANCE -> ACTIVE state
adb shell dumpsys deviceidle disable
With these handy commands we are able to verify that the alarm sounds even in deep idle states.
Re-starting Alarm Service on device reboot
As discussed earlier, once an alarm service is started, it execute until it is explicitly stopped or until device reboots. This means that, if your device is restarted then your alarm is stopped. To avoid such situation, you have to restart your alarm service as soon as device boot completes. Below code snippet will help you to start alarm service once device reboots.
public class DeviceBootReceiver extends BroadcastReceiver {
    @Override
    public void onReceive(Context context, Intent intent) {
        if (intent.getAction().equals("android.intent.action.BOOT_COMPLETED")) {
            Intent alarmIntent = new Intent(context, AlarmReceiver.class);
            PendingIntent pendingIntent = PendingIntent.getBroadcast(context, 0, alarmIntent, 0);

            AlarmManager manager = (AlarmManager) context.
                getSystemService(Context.ALARM_SERVICE);

            int interval = 8000;

            manager.setInexactRepeating(AlarmManager.RTC_WAKEUP,
                System.currentTimeMillis(), interval, pendingIntent);

            Toast.makeText(context, "Alarm Set", Toast.LENGTH_SHORT).show();
        }
    }
}
To start your alarm on device reboot, you have to register your above declared DeviceBootReciever class in your application manifest. This also need android.permission.RECEIVE_BOOT_COMPLETED.
<application>
    <uses-permission android:name="android.permission.RECEIVE_BOOT_COMPLETED"/>
    ...
    <receiver android:name=".DeviceBootReceiver" android:enabled="false">
        <intent-filter>
            <action android:name="android.intent.action.BOOT_COMPLETED"/>
        </intent-filter>
    </receiver>
</application>
How to check that alarm has been scheduled already or not?
Create an equivalent PendingIntent which you used with setRepeating() with PendingIntent.FLAG_NO_CREATE flag.
Intent intent = new Intent(context, WidgetUpdateReceiver.class); PendingIntent pendingIntent = PendingIntent.getBroadcast(context, 0, intent, PendingIntent.FLAG_NO_CREATE);
if (pendingIntent != null) {
    Log.d(TAG, "Alarm is already active");
}
While using PendingIntent.FLAG_NO_CREATE, if the described PendingIntent does not already exists, it simply return null.
How to get WakeLock
WAKE_LOCK permission is required because the wake lock is being used while processing in onReceive() method present in BroadcastReceiver class.
<uses-permission android:name='android.permission.WAKE_LOCK'/>

<application>
    ...
    <receiver android:name='.AlarmBroadcastReceiver'></receiver>
</application>
Example of WakeLock for BroadcastReceiver.
public class AlarmBroadcastReceiver extends BroadcastReceiver {
    @Override
    public void onReceive(Context context, Intent intent) {
        PowerManager pm = (PowerManager) context.getSystemService(Context.POWER_SERVICE);
        PowerManager.WakeLock wl = pm.newWakeLock(PowerManager.PARTIAL_WAKE_LOCK, "TAG");

        // acquire the lock
        wl.acquire();

        // you can do the processing here.
        // ...

        // release the lock
        wl.release();
    }
}
List all alarms in device
You can know the alarm has been set and when are they going to alarmed and interval. Also how many times this alarm has been invoked.
# from terminal
adb devices

# connect to emulator
adb connect emulator-5554

# list alarms
adb -s emulator-5554 shell dumpsys alarm
Job Scheduler
AlarmManager is a great candidate for scheduling if an application needs to perform a local event at an exact time or inexact interval. Alarm clock or reminder applications are great examples for AlarmManager usage. However, the documentation discourages using AlarmManager for scheduling network-related tasks. For this tasks you can use JobScheduler which is an API for scheduling various types of jobs against the framework that will be executed in your application's own process.
Quote
Categories
- Android
- AngularJS
- Databases
- Development
- Django
- iOS
- Java
- JavaScript
- LaTex
- Linux
- Meteor JS
- Python
- Science
Archive ↓
- September 2024
- December 2023
- November 2023
- October 2023
- March 2022
- February 2022
- January 2022
- July 2021
- June 2021
- May 2021
- April 2021
- August 2020
- July 2020
- May 2020
- April 2020
- March 2020
- February 2020
- January 2020
- December 2019
- November 2019
- October 2019
- September 2019
- August 2019
- July 2019
- February 2019
- January 2019
- December 2018
- November 2018
- August 2018
- July 2018
- June 2018
- May 2018
- April 2018
- March 2018
- February 2018
- January 2018
- December 2017
- November 2017
- October 2017
- September 2017
- August 2017
- July 2017
- June 2017
- May 2017
- April 2017
- March 2017
- February 2017
- January 2017
- December 2016
- November 2016
- October 2016
- September 2016
- August 2016
- July 2016
- June 2016
- May 2016
- April 2016
- March 2016
- February 2016
- January 2016
- December 2015
- November 2015
- October 2015
- September 2015
- August 2015
- July 2015
- June 2015
- February 2015
- January 2015
- December 2014
- November 2014
- October 2014
- September 2014
- August 2014
- July 2014
- June 2014
- May 2014
- April 2014
- March 2014
- February 2014
- January 2014
- December 2013
- November 2013
- October 2013