How to notify user in Android by NotificationCompat Android 26.07.2016
Notifications provide an excellent means to send information to your user in the titlebar, and the user can click on this notfication to move another activity.
Creating Android notification
Android notification consists of three major components:
- Small Icon (often our app logo)
- Title
- Content Text
A notification is created using the NotificationManager class as shown below:
NotificationManager notificationManager = (NotificationManager)
    getSystemService(NOTIFICATION_SERVICE);
The Notification.Builder provides an builder interface to create an Notification object as shown below:
NotificationCompat.Builder bld = new NotificationCompat.Builder(this);
Once you have the Builder object, you can set Notification properties using the Builder object according to your requirements.
setSmallIcon(R.drawable.icon). Set the small icon to use in the notification layouts.setContentTitle("Title"). Set the text (first row) of the notification, in a standard notification.setContentText("Text"). Set the text (second row) of the notification, in a standard notification.addAction(R.drawable.ic_launcher, "View", IntentOBJ). Set thePendingIntentfor action on click.setAutoCancel(true). Setting this flag will make it so the notification is automatically canceled when the user clicks it in the panel.
To issue notification we use of NotificationManager object and call notify method on this object by passing Notification ID and Builder Object.
The action is defined by a PendingIntent containing an Intent that starts an Activity in your application. You can add a button (up to three) using the addAction() method on the notification builder. An Action requires three parameters - the image, the text, and a PendingIntent. The first two items are for the visual display, while the third item, the PendingIntent, is called when the user presses the button.
Content of activity_main.xml layout
<?xml version="1.0" encoding="utf-8"?>
<RelativeLayout
    xmlns:android="http://schemas.android.com/apk/res/android"
    xmlns:tools="http://schemas.android.com/tools"
    android:layout_width="match_parent"
    android:layout_height="match_parent">

    <Button
        android:id="@+id/btnSend"
        android:layout_width="wrap_content"
        android:layout_height="wrap_content"
        android:text="Show"
        android:onClick="showNotification"
        android:layout_centerInParent="true"/>

    <Button
        android:layout_width="wrap_content"
        android:layout_height="wrap_content"
        android:text="Cancel"
        android:onClick="cancelNotification"
        android:layout_below="@+id/btnSend"
        android:layout_centerHorizontal="true"/>

</RelativeLayout>
Open MainActivity.java and add the following
public class MainActivity extends AppCompatActivity {
private AppCompatActivity activity = MainActivity.this;
private String TAG = MainActivity.class.getSimpleName();
int notificationId = 1;
@Override
protected void onCreate(Bundle savedInstanceState) {
super.onCreate(savedInstanceState);
setContentView(R.layout.activity_main);
}
public void showNotification(View v) {
Uri notificationSoundUri = RingtoneManager.getDefaultUri(RingtoneManager.TYPE_NOTIFICATION);
NotificationCompat.Builder builder = new NotificationCompat.Builder(this);
Intent intent = new Intent(Intent.ACTION_VIEW, Uri.parse("https://en.proft.me"));
PendingIntent pendingIntent = PendingIntent.getActivity(this, 0, intent, 0);
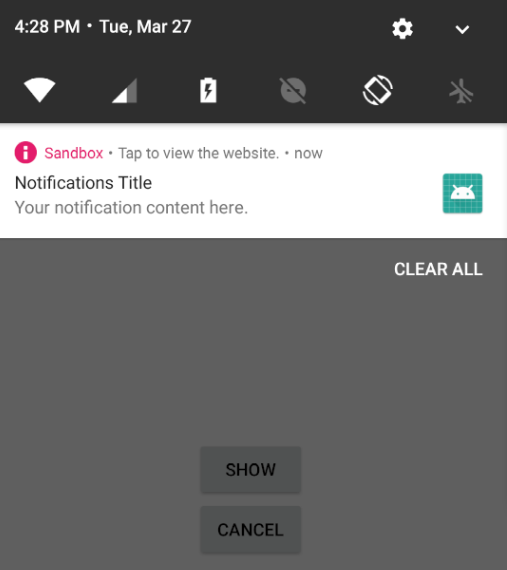
builder.setContentIntent(pendingIntent);
builder.setContentTitle("Notifications Title");
builder.setContentText("Your notification content here.");
builder.setSubText("Tap to view the website.");
builder.setSound(notificationSoundUri);
// builder.setPriority(NotificationCompat.PRIORITY_MAX);
// builder.setLights(Color.BLUE, 500, 500);
if (android.os.Build.VERSION.SDK_INT >= Build.VERSION_CODES.LOLLIPOP) {
builder.setSmallIcon(android.R.drawable.ic_dialog_info);
builder.setColor(getResources().getColor(R.color.colorAccent));
builder.setLargeIcon(BitmapFactory.decodeResource(getResources(), R.drawable.logo));
} else {
builder.setSmallIcon(R.drawable.logo);
}
NotificationManager notificationManager = (NotificationManager) getSystemService(NOTIFICATION_SERVICE);
notificationManager.notify(notificationId, builder.build());
}
public void cancelNotification(View v) {
String ns = Context.NOTIFICATION_SERVICE;
NotificationManager mgr = (NotificationManager) getApplicationContext().getSystemService(ns);
mgr.cancel(notificationId);
}
}
Post android Lollipop release Android has changed the guidelines for displaying notification icons in the Notification bar. The official documentation says "Update or remove assets that involve color. The system ignores all non-alpha channels in action icons and in the main notification icon. You should assume that these icons will be alpha-only. The system draws notification icons in white and action icons in dark gray". Now what that means in lay man terms is "Convert all parts of the image that you don’t want to show to transparent pixels. All colors and non transparent pixels are displayed in white".
Result
Android PendingIntent
Android PendingIntent is an object that wraps up an intent object and it specifies an action to be taken place in future. In other words, PendingIntent lets us pass a future Intent to another application and allow that application to execute that Intent as if it had the same permissions as our application, whether or not our application is still around when the Intent is eventually invoked.
For security reasons, the base Intent that is supplied to the PendingIntent must have the component name explicitly set to ensure it is ultimately sent there and nowhere else. Each explicit intent is supposed to be handled by a specific app component like Activity, BroadcastReceiver or a Service. Hence PendingIntent uses the following methods to handle the different types of intents:
PendingIntent.getActivity()- retrieve aPendingIntentto start anActivityPendingIntent.getBroadcast- retrieve aPendingIntentto perform aBroadcastPendingIntent.getService- retrieve aPendingIntentto start aService
An example implementation of PendingIntent is given below.
Intent intent = new Intent(this, SomeActivity.class);

// Creating a pending intent and wrapping our intent
PendingIntent pendingIntent = PendingIntent.getActivity(this, 1, intent,
    PendingIntent.FLAG_UPDATE_CURRENT);
try {
    // Perform the operation associated with our pendingIntent
    pendingIntent.send();
} catch (PendingIntent.CanceledException e) {
    e.printStackTrace();
}
The operation associated with the pendingIntent is executed using the send() method.
The parameters inside the getActivity() method and there usages are described below :
this (context). This is the context in which thePendingIntentstarts the activityrequestCode: "1" is the private request code for the sender used in the above example. Using it later with the same method again will get back the same pending intent. Then we can do various things like cancelling the pending intent withcancel(), etc.intent. Explicit intent object of the activity to be launchedflag. One of thePendingIntentflag that we’ve used in the above example isFLAG_UPDATE_CURRENT. This one states that if a previousPendingIntentalready exists, then the current one will update it with the latest intent. There are many other flags likeFLAG_CANCEL_CURRENTetc.
Notification priority
Android allows you to assign a priority level to each notification to influence how the Android system will deliver it. Notifications have a priority between MIN (-2) and MAX (2) that corresponds to their importance. The following table shows the available priority constants defined in the Notification class.
| Priority Constant | Use |
|---|---|
| PRIORITY_MAX | For critical and urgent notifications that alert the user to a condition that is time-critical or needs to be resolved before they can continue with a time-critical task. |
| PRIORITY_HIGH | Primarily for important communication, such as messages or chats. |
| PRIORITY_DEFAULT | For all notifications that don't fall into any of the other priorities described here. |
| PRIORITY_LOW | For information and events that are valuable or contextually relevant, but aren't urgent or time-critical. |
| PRIORITY_MIN | For nice-to-know background information. For example, weather or nearby places of interest. |
To change the priority of a notification, use the setPriority() method on the NotificationCompat.Builder object, passing in one of the above constants.
bld.setPriority(Notification.PRIORITY_HIGH);
Notifications can be intrusive. Using notification priority correctly is the first step in making sure that your users don't uninstall your app because it's too distracting.
Android Notification Channel
Starting with Android 8.0 you can separate your app’s notifications into notification channels. All notifications that are posted to the same channel have the same behaviour, for example you could create a channel for your app’s most urgent notifications, where each notification is announced with an alert sound, vibration and a notification light, and then create "quieter" channels for the rest of your app’s notifications.
Android Oreo also gives users more control over notifications than ever before, as in Android 8.0 users can modify the settings for any notification channel that’s present on their device. Thanks to this feature the user can do the following things from the Apps Settings:
- Block notifications from a particular channel.
- Set priority/silent on different notification channels.
Without configuring Notification Channels, you cannot build notification for applications with Android API >=26. Notification Channels would be ignored for older applications with the Android API < 26.Let's get down to the creation part.
To create a notification channel, you need to construct a NotificationChannel object and pass it the following:
- An ID. This must be unique to your package.
- The channel’s name. This label will be displayed in the channel’s settings screen.
- An importance level. In Android Oreo you can no longer set the priority level for individual notifications. Instead, you need to specify the channel’s importance level, which is then applied to every notification that’s posted to this channel.
Following code creates a notification channel:
String channelId = "1";
String channelName = "Main channel";

NotificationManager notificationManager =
    (NotificationManager) getSystemService(Context.NOTIFICATION_SERVICE);

if (android.os.Build.VERSION.SDK_INT >= android.os.Build.VERSION_CODES.O) {
    NotificationChannel nc = new NotificationChannel(channelId, channelName,
        NotificationManager.IMPORTANCE_LOW);

    nc.enableLights(true);
    nc.setLightColor(Color.RED);
    nc.setShowBadge(true);
    //nc.enableVibration(true);
    //nc.setVibrationPattern(new long[]{100, 200, 300, 400, 500, 400, 300, 200, 400});

    notificationManager.createNotificationChannel(nc);
}

NotificationCompat.Builder builder = new NotificationCompat.Builder(this, channelId);
The above code snippet is valid for Android version Oreo and above only. Hence it must be enclosed in the following condition.
if (android.os.Build.VERSION.SDK_INT >= android.os.Build.VERSION_CODES.O) {}
From Android Oreo, it is mandatory to specify the NotificationChannel id in the Builder constructor itself.
The NotificationChannel constructor requires us to specify the channelId and channelName strings. The Importance argument is an int which specifies the level of interruption by the notification. It can be one of the following values:
IMPORTANCE_DEFAULT– Shows up in the system tray. Makes sound. Doesn’t visually pop up.IMPORTANCE_HIGH– Visually pops up too.IMPORTANCE_LOW– Shows in the tray. No pop up. No sound.IMPORTANCE_NONE– Doesn’t show up. Kind of blocked notifications.
Besides the public methods specified above, following are some handy methods that come with NotificationChannels.
setGroup()/getGroup()– Setters and getters for the channel.setBypassDnd()- Set theINTERRUPTION_PRIORITY_VALUEto bypass do not disturb.canBypassDnd()– Check whether the notification channel can display notification in DND mode.setLockScreenVisibility()– Set whether notifications from this channel should be displayed on the lock screen or not.canShowBadge()– Can show the badge/notification dot on the application icon.getName()/getId()– Retrieve the channel name and id respectively.
You then need to submit this NotificationChannel object to the NotificationManager, using createNotificationChannel(). Note that once you’ve submitted the channel object, you can no longer edit that channel’s settings (with the exception of updating the channel name and channel description) so make sure you’re happy with your channel’s configuration before calling the createNotificationChannel() method.
The following code snippet creates a Notification from NotificationChannel.
NotificationCompat.Builder builder = new NotificationCompat.Builder(this, channelId);
    .setContentTitle("Test Title")
    .setContentText("Test Message")
    .setSmallIcon(R.drawable.logo);

notificationManager.notify(1, builder.build());
Reading And Deleting Notification Channels
To retrieve a notification channel we can call the method getNotificationChannel() on the NotificationManager. We need to pass the channelId of the relevant channel.
Also, to retrieve a list of all NotificationChannels we can invoke the method getNotificationChannels().
List<NotificationChannel> notificationChannels = notificationManager.getNotificationChannels();
To delete a NotificationChannel, the following snippet is used.
notificationManager.deleteNotificationChannel("channelId");
Notification Channel Groups
A NotificationChannelGroup is used to created different categories for NotificationChannels. The same NotificationChannels can be used in different circumstances depending on the group from which they are invoked. You can have two groups named Hourly, Daily. All the Notification Channels would be present in both the groups. It’s your choice from which group you want to use the channel to create Notifications.
Following is one way to create NotificationChannelGroups.
List<NotificationChannelGroup> list = new ArrayList<>();
list.add(new NotificationChannelGroup(group_id_1, group_name_2));
list.add(new NotificationChannelGroup(group_id_2, group_name_2));

notificationManager.createNotificationChannelGroups(list);
You need to set the group_id and group_name. Furthermore, you need to set the group on the NotificationChannel too using setGroup(). Pass in the group_id in the setGroup() method.
Modifying Notification from Settings
The end user can modify the Notification Channel from the Settings > Apps > App Name > App Notifications.
Alternatively we can redirect them from the app itself using Intents.
Intent intent = new Intent(Settings.ACTION_CHANNEL_NOTIFICATION_SETTINGS);
intent.putExtra(Settings.EXTRA_CHANNEL_ID, notificationChannel.getId());
intent.putExtra(Settings.EXTRA_APP_PACKAGE, getPackageName());
startActivity(intent);
We pass the channel id and app package name. This specifically opens the particular channel ID.
Android Notification Dots
Notification Dots/Badges are displayed on the app icon if there are unread notifications. We can use the method setShowBage() on the notification to display/hide the dot for the particular channel. Thanks to Notification Dots, long pressing the app icon can now display/cancel the pending notifications too.
Android Bundled Notifications
Android Bundled Notifications are handy when you have too many notifications stacked vertically. Bundled Notifications collapse them all into a single notification with a group summary set on the group notification. This saves us from scrolling through all the notifications. Also, if you receive many single notifications at once, instead of getting multiple noisy notification sounds, bundled notifications would give a single notification sound.
A Bundle Notification is of the format:
- 1 Summary Notification
- N enclosed Single Notifications
We can set a separate tone for every single notification. Every notification of a bundle would have the same group key.
When a new notification is added, it gets merged in the bundle with the matching group key.
We can add a separate action on each notification click as well as a separate action on bundle notification click. The Bundle Notification can exist without any enclosed notifications.
First of all it works only on Android N (API level 24) and above. So you may have to add a check everywhere.
A Bundle Notification is defined in the following way.
NotificationManager notificationManager = (NotificationManager) getSystemService(Context.NOTIFICATION_SERVICE);

if (android.os.Build.VERSION.SDK_INT >= android.os.Build.VERSION_CODES.O) {
    NotificationChannel groupChannel = new NotificationChannel("bundle_channel_id",
        "bundle_channel_name", NotificationManager.IMPORTANCE_LOW);
    notificationManager.createNotificationChannel(groupChannel);
}

NotificationCompat.Builder summaryNotificationBuilder = new NotificationCompat.Builder(this, "bundle_channel_id")
    .setGroup(bundle_notification_id)
    .setGroupSummary(true)
    .setContentTitle("Bundled Notification. " + bundleNotificationId)
    .setContentText("Content Text for bundle notification")
    .setSmallIcon(R.drawable.logo);

notificationManager.notify(bundleNotificationId, summaryNotificationBuilder.build());
A Bundle Notification must have the setGroupSummary() set to true.
The group key set in the setGroup() method must be set in all the notifications that are to be enclosed in the bundle.
We’ve set the importance of the bundle notification channel to LOW in order to avoid simultaneous sounds from the Bundle and single notifications. We’ll create a separate channel for single notifications.
In the sample application, we’ll be implementing the Bundle Notifications feature. We’ll be using a Button to create a new Bundle and another button to add new Single Notifications in the current Bundle.
public class MainActivity extends AppCompatActivity {
    private AppCompatActivity activity = MainActivity.this;
    private String TAG = MainActivity.class.getSimpleName();

    NotificationManager notificationManager;
    int bundleNotificationId = 100;
    int singleNotificationId = 100;
    String groupNotificationId;
    NotificationCompat.Builder summaryNotificationBuilder;
    Intent resultIntent;
    PendingIntent resultPendingIntent;
    String NOTIFICATION_BUNDLE_CHANNEL_ID = "1";
    String NOTIFICATION_BUNDLE_CHANNEL_NAME = "Bundle channel";

    String NOTIFICATION_SINGLE_CHANNEL_ID = "2";
    String NOTIFICATION_SINGLE_CHANNEL_NAME = "Single channel";

    @Override
    protected void onCreate(Bundle savedInstanceState) {
        super.onCreate(savedInstanceState);
        setContentView(R.layout.activity_main);

        notificationManager = (NotificationManager) getSystemService(Context.NOTIFICATION_SERVICE);
    }

    public void showBundleNotification(View v) {
        if (android.os.Build.VERSION.SDK_INT >= android.os.Build.VERSION_CODES.O) {
            NotificationChannel groupChannel = new NotificationChannel(NOTIFICATION_BUNDLE_CHANNEL_ID,
                NOTIFICATION_BUNDLE_CHANNEL_NAME, NotificationManager.IMPORTANCE_LOW);
            notificationManager.createNotificationChannel(groupChannel);
        }

        bundleNotificationId += 100;
        singleNotificationId = bundleNotificationId;

        groupNotificationId = "group_notification_" + bundleNotificationId;

        resultIntent = new Intent(activity, MainActivity.class);
        resultIntent.putExtra("notification", "Summary Notification Clicked");
        resultIntent.putExtra("notification_id", bundleNotificationId);
        resultIntent.setFlags(Intent.FLAG_ACTIVITY_SINGLE_TOP | Intent.FLAG_ACTIVITY_CLEAR_TOP);

        resultPendingIntent = PendingIntent.getActivity(activity, bundleNotificationId, resultIntent,
            PendingIntent.FLAG_UPDATE_CURRENT);

        summaryNotificationBuilder = new NotificationCompat.Builder(activity, NOTIFICATION_BUNDLE_CHANNEL_ID)
                .setGroup(groupNotificationId)
                .setGroupSummary(true)
                .setContentTitle("Bundled notification. ID " + bundleNotificationId)
                .setContentText("Content for bundle notification")
                .setSmallIcon(R.drawable.img)
                .setContentIntent(resultPendingIntent);

        notificationManager.notify(bundleNotificationId, summaryNotificationBuilder.build());
    }

    public void showSingleNotification(View v) {
        groupNotificationId = "group_notification_" + bundleNotificationId;

        resultIntent = new Intent(activity, MainActivity.class);
        resultIntent.putExtra("notification", "Summary Notification Clicked");
        resultIntent.putExtra("notification_id", bundleNotificationId);
        resultIntent.setFlags(Intent.FLAG_ACTIVITY_SINGLE_TOP | Intent.FLAG_ACTIVITY_CLEAR_TOP);
        resultPendingIntent = PendingIntent.getActivity(activity, bundleNotificationId,
            resultIntent, PendingIntent.FLAG_UPDATE_CURRENT);

        // we need to update the bundle notification every time a new notification comes up

        if (android.os.Build.VERSION.SDK_INT >= android.os.Build.VERSION_CODES.O) {
            NotificationChannel groupChannel = new NotificationChannel(NOTIFICATION_BUNDLE_CHANNEL_ID,
                NOTIFICATION_BUNDLE_CHANNEL_NAME, NotificationManager.IMPORTANCE_LOW);
            notificationManager.createNotificationChannel(groupChannel);

            NotificationChannel channel = new NotificationChannel(NOTIFICATION_SINGLE_CHANNEL_ID,
                NOTIFICATION_SINGLE_CHANNEL_NAME, NotificationManager.IMPORTANCE_DEFAULT);
            channel.setShowBadge(true);
            notificationManager.createNotificationChannel(channel);
        }

        summaryNotificationBuilder = new NotificationCompat.Builder(activity, NOTIFICATION_BUNDLE_CHANNEL_ID)
                .setGroup(groupNotificationId)
                .setGroupSummary(true)
                .setContentTitle("Bundle notification. ID  " + bundleNotificationId)
                .setContentText("Content for group summary")
                .setSmallIcon(R.drawable.img)
                .setContentIntent(resultPendingIntent);

        if (singleNotificationId == bundleNotificationId)
            singleNotificationId = bundleNotificationId + 1;
        else
            singleNotificationId++;

        resultIntent = new Intent(activity, MainActivity.class);
        resultIntent.putExtra("notification", "Single notification clicked");
        resultIntent.putExtra("notification_id", singleNotificationId);
        resultIntent.setFlags(Intent.FLAG_ACTIVITY_SINGLE_TOP | Intent.FLAG_ACTIVITY_CLEAR_TOP);

        resultPendingIntent = PendingIntent.getActivity(activity, singleNotificationId,
            resultIntent, PendingIntent.FLAG_UPDATE_CURRENT);

        NotificationCompat.Builder notification = new NotificationCompat.Builder(activity, NOTIFICATION_SINGLE_CHANNEL_ID)
                .setGroup(groupNotificationId)
                .setContentTitle("New notification " + singleNotificationId)
                .setContentText("Content for the notification")
                .setSmallIcon(R.drawable.img)
                .setGroupSummary(false)
                .setContentIntent(resultPendingIntent);

        notificationManager.notify(singleNotificationId, notification.build());
        notificationManager.notify(bundleNotificationId, summaryNotificationBuilder.build());
    }

    @Override
    protected void onNewIntent(Intent intent) {
        super.onNewIntent(intent);

        Bundle extras = intent.getExtras();
        if (extras != null) {
            int notification_id = extras.getInt("notification_id");
            Toast.makeText(getApplicationContext(), "Notification with ID " + notification_id + " is cancelled",
                Toast.LENGTH_LONG).show();
            notificationManager.cancel(notification_id);
        }
    }
}
showSingleNotification adds a Single Notification in the current bundle notification. If the current bundle notification doesn't exist it creates one first.
showBundleNotification creates a new Bundle Notification and updates the group key by incrementing the id.
We set a bundleNotificationId equal to the singleNotificationId initially. Every time a new bundle notification is created, we increment the bundleNotificationId by 100.
Every time a single notification is created inside the bundle notification, we increment the singleNotificationId by 1 on the current bundleNotificationId.
We've created separate channels for Bundle and Single Notifications. onNewIntent is triggered on Notification click. It gets the notification id from the intent data and cancels the respective notification.
Android Notification Styling
Android Notification have plenty of powerful features that when used correctly would significantly improve the UX and user engagement.
Let's look at most interested of them:
- Notification Actions
- Heads Up Notification
- Big Text Style Notification
- Big Picture Style Notification
- Inbox Style Notification
- Message Style Notification
Android Notification Actions
Android Notification actions are basically buttons placed below the body of the notification. A Notification action must include an icon, a label, and a PendingIntent to be fired when the action is selected by the user.
With the introduction of Android N, the icons are omitted from the action buttons to give space to other components.
String channelId = "1";
String channelName = "Main channel";

...

public PendingIntent getLaunchIntent(int notificationId, Context context) {
    Intent intent = new Intent(context, MainActivity.class);
    intent.setFlags(Intent.FLAG_ACTIVITY_NEW_TASK | Intent.FLAG_ACTIVITY_CLEAR_TASK);
    intent.putExtra("notificationId", notificationId);
    return PendingIntent.getActivity(context, 0, intent, PendingIntent.FLAG_CANCEL_CURRENT);
}

private void clearNotification() {
    int notificationId = getIntent().getIntExtra("notificationId", 0);

    NotificationManager manager = (NotificationManager) getSystemService(Context.NOTIFICATION_SERVICE);
    manager.cancel(notificationId);
}
The method clearNotification() is used to clear any existing notifications from the notification bar.
The method getLaunchIntent() returns an instance of PendingIntent which when triggered from the notification, will relaunch the application.
We can declare BroadcastReceiver to dismiss notification. Don't forget to update the AndroidManifest.xml file with the receiver.
public class NotificationReceiver extends BroadcastReceiver {
    @Override
    public void onReceive(Context context, Intent intent) {
        int notificationId = intent.getIntExtra("notificationId", 0);
        NotificationManager manager = (NotificationManager) context.getSystemService(Context.NOTIFICATION_SERVICE);
        manager.cancel(notificationId);
    }
}

private void notificationActions() {
    int NOTIFICATION_ID = 1;

    NotificationManager notificationManager = (NotificationManager) getSystemService(NOTIFICATION_SERVICE);
    if (android.os.Build.VERSION.SDK_INT >= android.os.Build.VERSION_CODES.O) {
        NotificationChannel nc = new NotificationChannel(channelId, channelName, NotificationManager.IMPORTANCE_LOW);
        notificationManager.createNotificationChannel(nc);
    }

    NotificationCompat.Builder builder = new NotificationCompat.Builder(this, channelId);

    builder.setSmallIcon(R.drawable.logo);
    builder.setColor(ContextCompat.getColor(this, R.color.colorPrimaryDark));
    builder.setLargeIcon(BitmapFactory.decodeResource(getResources(), R.drawable.logo));
    builder.setContentTitle("Notification actions");
    builder.setContentText("Tap View to launch website");
    builder.setAutoCancel(true);
    PendingIntent launchIntent = getLaunchIntent(NOTIFICATION_ID, getBaseContext());

    Intent intent = new Intent(Intent.ACTION_VIEW, Uri.parse("https://en.proft.me"));
    PendingIntent pendingIntent = PendingIntent.getActivity(this, 0, intent, 0);

    Intent buttonIntent = new Intent(getBaseContext(), NotificationReceiver.class);
    buttonIntent.putExtra("notificationId", NOTIFICATION_ID);
    PendingIntent dismissIntent = PendingIntent.getBroadcast(getBaseContext(), 0, buttonIntent, 0);

    builder.setContentIntent(launchIntent);
    builder.addAction(android.R.drawable.ic_menu_view, "VIEW", pendingIntent);
    builder.addAction(android.R.drawable.ic_delete, "DISMISS", dismissIntent);

    notificationManager.notify(NOTIFICATION_ID, builder.build());
}
Result

Big Text Style Notification
Android allows us to add rich styles to our application with the introduction of Android L. Using these styles would make the notification look more appealing than ever.
We know that notifications on Android N can be expanded using the arrows. To expand notifications on pre-Nougat versions, you can swipe down over the notification using two fingers.
Not all Android versions would support the above styles. In case an Android OS doesn’t support the rich style, that style would simply be ignored.
A notification can be customised into a big text style notification by setting the style as NotificationCompat.BigTextStyle(). The string to be displayed is entered inside the method bigText().
private void bigTextStyleNotification() {
    int NOTIFICATION_ID = 1;

    PendingIntent launchIntent = getLaunchIntent(NOTIFICATION_ID, getBaseContext());
    Intent buttonIntent = new Intent(getBaseContext(), NotificationReceiver.class);
    buttonIntent.putExtra("notificationId", NOTIFICATION_ID);
    PendingIntent dismissIntent = PendingIntent.getBroadcast(getBaseContext(), 0, buttonIntent, 0);

    NotificationManager notificationManager = (NotificationManager) getSystemService(NOTIFICATION_SERVICE);
    if (android.os.Build.VERSION.SDK_INT >= android.os.Build.VERSION_CODES.O) {
        NotificationChannel nc = new NotificationChannel(channelId, channelName, NotificationManager.IMPORTANCE_LOW);
        notificationManager.createNotificationChannel(nc);
    }

    NotificationCompat.Builder builder = new NotificationCompat.Builder(this, channelId);
    builder.setSmallIcon(R.drawable.logo);
    builder.setLargeIcon(BitmapFactory.decodeResource(getResources(), R.drawable.logo));
    builder.setContentTitle("Big Text Style");
    builder.setStyle(new NotificationCompat.BigTextStyle().bigText(getResources().getString(R.string.lorem_ipsum)));
    builder.setAutoCancel(true);
    builder.setContentIntent(launchIntent);
    builder.addAction(android.R.drawable.ic_delete, "DISMISS", dismissIntent);
    builder.addAction(android.R.drawable.ic_menu_send, "OPEN APP", launchIntent);

    notificationManager.notify(NOTIFICATION_ID, builder.build());
}
Result
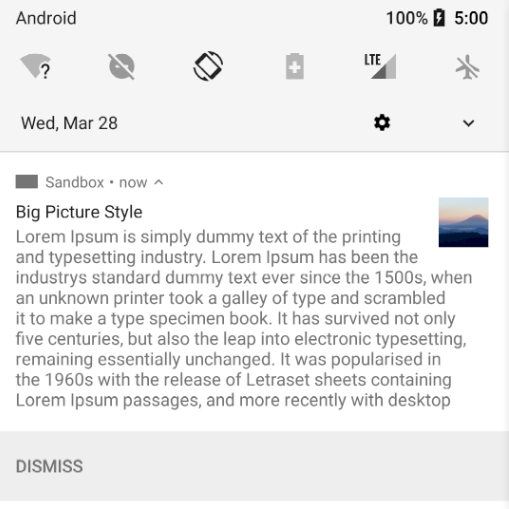
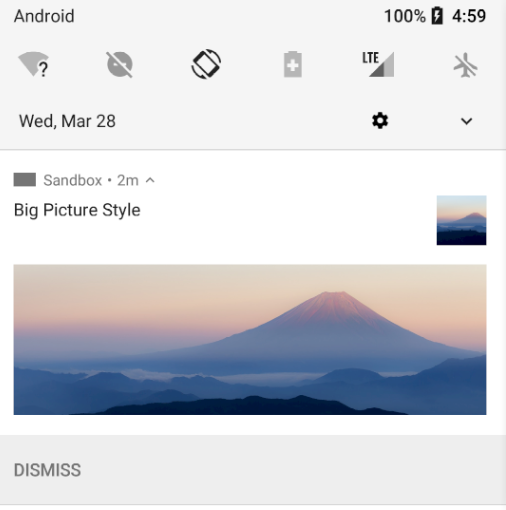
Big Picture Style Notification
For BigPicture to be displayed inside a notification the style is set as NotificationCompat.BigPictureStyle().bigPicture(bitmap)).
private void bigPictureStyleNotification() {
    int NOTIFICATION_ID = 1;
    Bitmap pic = BitmapFactory.decodeResource(getResources(), R.drawable.logo);

    Intent buttonIntent = new Intent(getBaseContext(), NotificationReceiver.class);
    buttonIntent.putExtra("notificationId", NOTIFICATION_ID);
    PendingIntent dismissIntent = PendingIntent.getBroadcast(getBaseContext(), 0, buttonIntent, 0);
    PendingIntent launchIntent = getLaunchIntent(NOTIFICATION_ID, getBaseContext());

    NotificationManager notificationManager = (NotificationManager) getSystemService(NOTIFICATION_SERVICE);
    if (android.os.Build.VERSION.SDK_INT >= android.os.Build.VERSION_CODES.O) {
        NotificationChannel nc = new NotificationChannel(channelId, channelName, NotificationManager.IMPORTANCE_LOW);
        notificationManager.createNotificationChannel(nc);
    }

    NotificationCompat.Builder builder = new NotificationCompat.Builder(this, channelId);
    builder.setSmallIcon(R.drawable.logo);
    builder.setLargeIcon(BitmapFactory.decodeResource(getResources(), R.drawable.logo));
    builder.setContentTitle("Big Picture Style");
    builder.setStyle(new NotificationCompat.BigPictureStyle().bigPicture(pic));
    builder.setAutoCancel(true);
    builder.setContentIntent(launchIntent);
    builder.addAction(android.R.drawable.ic_delete, "DISMISS", dismissIntent);

    notificationManager.notify(NOTIFICATION_ID, builder.build());
}
Result
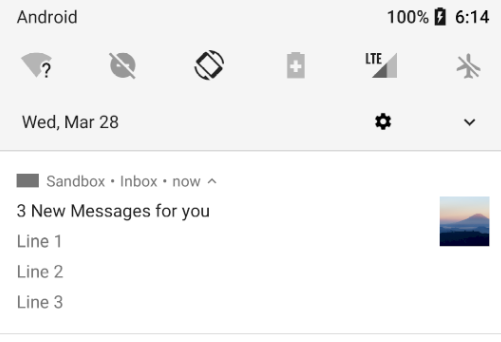
Inbox Style Notification
An inbox style notification is set by using the style new NotificationCompat.InboxStyle().
Each message is placed inside the method addLine(). The summary text of all the messages is placed inside the method setSummaryText(). setContentTitle() is replaced with setBigContentTitle() in this style.
private void inboxStyleNotification() {
    int NOTIFICATION_ID = 1;

    PendingIntent launchIntent = getLaunchIntent(NOTIFICATION_ID, getBaseContext());

    NotificationManager notificationManager = (NotificationManager) getSystemService(NOTIFICATION_SERVICE);
    if (android.os.Build.VERSION.SDK_INT >= android.os.Build.VERSION_CODES.O) {
        NotificationChannel nc = new NotificationChannel(channelId, channelName, NotificationManager.IMPORTANCE_LOW);
        notificationManager.createNotificationChannel(nc);
    }

    NotificationCompat.Builder builder = new NotificationCompat.Builder(this, channelId);
    builder.setSmallIcon(R.drawable.logo);
    builder.setLargeIcon(BitmapFactory.decodeResource(getResources(), R.drawable.logo));
    builder.setStyle(new NotificationCompat.InboxStyle().addLine("Line 1")
        .addLine("Line 2").addLine("Line 3").setBigContentTitle("3 New Messages for you").setSummaryText("Inbox"));
    builder.setAutoCancel(true);
    builder.setContentIntent(launchIntent);

    notificationManager.notify(NOTIFICATION_ID, builder.build());
}
Result
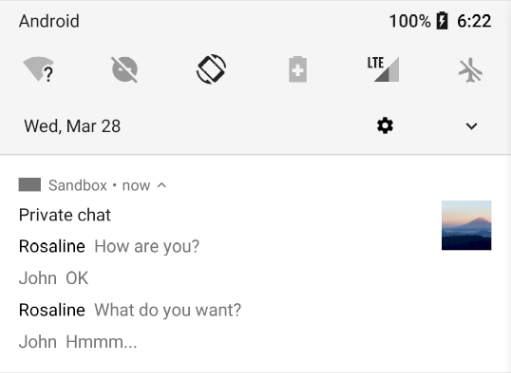
Message Style Notification
Message Style is introduced with Android N. Typically used for chats.
In the following code NotificationCompat.MessagingStyle(String) contains a string that represents the current user (typically in a chat its you). Each message is added in the method addMessage() with the timestamp as well as sender name. If the sender name is set to null it signifies that the message is from the current user (you) and the name is taken from the constructor.
private void messageStyleNotification() {
    int NOTIFICATION_ID = 1;

    PendingIntent launchIntent = getLaunchIntent(NOTIFICATION_ID, getBaseContext());

    NotificationManager notificationManager = (NotificationManager) getSystemService(NOTIFICATION_SERVICE);
    if (android.os.Build.VERSION.SDK_INT >= android.os.Build.VERSION_CODES.O) {
        NotificationChannel nc = new NotificationChannel(channelId, channelName, NotificationManager.IMPORTANCE_LOW);
        notificationManager.createNotificationChannel(nc);
    }

    String from = "Rosaline";
    String to = "John";

    NotificationCompat.Builder builder = new NotificationCompat.Builder(this, channelId);
    builder.setSmallIcon(R.drawable.img);
    builder.setLargeIcon(BitmapFactory.decodeResource(getResources(), R.drawable.logo));
    builder.setContentTitle("Messages");
    builder.setStyle(new NotificationCompat.MessagingStyle(to).setConversationTitle("Private chat")
            .addMessage("How are you?", 0, from)
            .addMessage("OK", 0, null)
            .addMessage("What do you want?", 0, from)
            .addMessage("Hmmm...", 0, null));
    builder.setAutoCancel(true);
    builder.setContentIntent(launchIntent);

    notificationManager.notify(NOTIFICATION_ID, builder.build());
}
Result
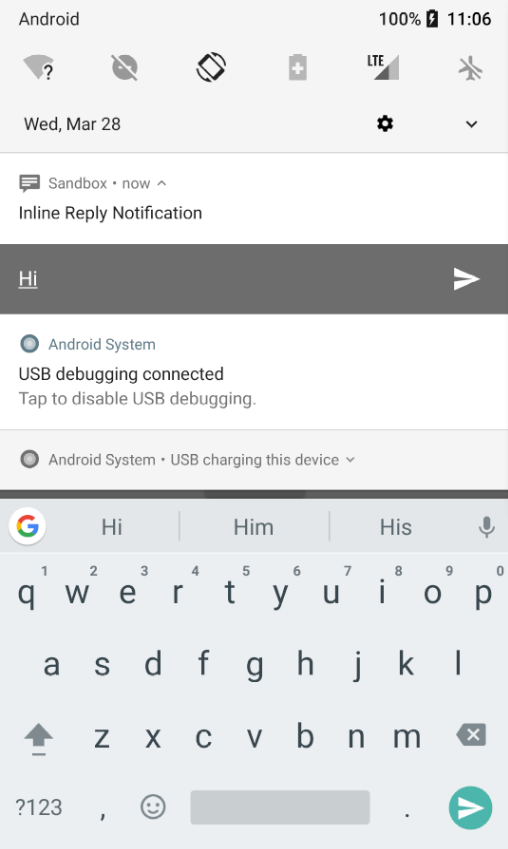
Direct Reply Notification
Android Notification Direct Reply action lets us reply to the notification message, it’s very popular with chat notifications such as Whatsapp and Facebook messenger notification messages.
Android Nougat has introduced several new features. It offers some awesome features such as Inline Reply Actions and Bundled Notifications.
Inline Reply Actions (also known as Direct Replies) allows us to reply to messages from the notifications itself. It makes life easier by removing the need to open applications for providing input. Such features are commonly seen in messaging applications. Direct Replies uses a combination of Notification Actions and Remote Input. Remote Input API provides a mechanism to access the entered text from the notification in our application.
RemoteInput requires the following Strings as input.
- Unique Key. This is used to correctly identify the text entered from the inline notification later on.
- Label. This is displayed to the user as a hint text.
Let’s implement a basic application that triggers a Notification with Inline Reply set as the Action.
public class MainActivity extends AppCompatActivity {
    private AppCompatActivity activity = MainActivity.this;
    private String TAG = MainActivity.class.getSimpleName();
    String channelId = "1";
    String channelName = "Main channel";

    String KEY_REPLY = "key_reply";
    public static final int NOTIFICATION_ID = 1;

    @Override
    protected void onCreate(Bundle savedInstanceState) {
        super.onCreate(savedInstanceState);
        setContentView(R.layout.activity_main);
    }

    @Override
    protected void onNewIntent(Intent intent) {
        super.onNewIntent(intent);

        Bundle remoteInput = RemoteInput.getResultsFromIntent(intent);
        if (remoteInput != null) {
            String reply = remoteInput.getCharSequence(KEY_REPLY).toString();

            Toast.makeText(activity, "Reply is "+reply, Toast.LENGTH_SHORT).show();

            //Update the notification to show that the reply was received.
            NotificationManager notificationManager = (NotificationManager) getSystemService(NOTIFICATION_SERVICE);
            if (android.os.Build.VERSION.SDK_INT >= android.os.Build.VERSION_CODES.O) {
                NotificationChannel nc = new NotificationChannel(channelId, channelName, NotificationManager.IMPORTANCE_LOW);
                notificationManager.createNotificationChannel(nc);
            }

            NotificationCompat.Builder builder = new NotificationCompat.Builder(this, channelId)
                .setSmallIcon(android.R.drawable.stat_notify_chat)
                .setContentText("Inline Reply received");

            notificationManager.notify(NOTIFICATION_ID, builder.build());
        }
    }

    public void showNotification(View v) {
        int NOTIFICATION_ID = 1;

        NotificationManager notificationManager = (NotificationManager) getSystemService(NOTIFICATION_SERVICE);
        if (android.os.Build.VERSION.SDK_INT >= android.os.Build.VERSION_CODES.O) {
            NotificationChannel nc = new NotificationChannel(channelId, channelName, NotificationManager.IMPORTANCE_LOW);
            notificationManager.createNotificationChannel(nc);
        }

        NotificationCompat.Builder builder = new NotificationCompat.Builder(this, channelId)
            .setSmallIcon(android.R.drawable.stat_notify_chat)
            .setContentTitle("Inline Reply Notification");

        String replyLabel = "Enter your reply here";

        //Initialise RemoteInput
        RemoteInput remoteInput = new RemoteInput.Builder(KEY_REPLY)
                .setLabel(replyLabel)
                .build();

        //PendingIntent that restarts the current activity instance.
        Intent resultIntent = new Intent(this, MainActivity.class);
        resultIntent.setFlags(Intent.FLAG_ACTIVITY_NEW_TASK | Intent.FLAG_ACTIVITY_SINGLE_TOP);
        PendingIntent resultPendingIntent = PendingIntent.getActivity(this, 1, resultIntent, PendingIntent.FLAG_UPDATE_CURRENT);

        //Notification Action with RemoteInput instance added.
        NotificationCompat.Action replyAction = new NotificationCompat.Action.Builder(
                android.R.drawable.sym_action_chat, "REPLY", resultPendingIntent)
                .addRemoteInput(remoteInput)
                .setAllowGeneratedReplies(true)
                .build();

        //Notification.Action instance added to Notification Builder.
        builder.addAction(replyAction);

        Intent intent = new Intent(this, MainActivity.class);
        intent.putExtra("notificationId", NOTIFICATION_ID);
        intent.setFlags(Intent.FLAG_ACTIVITY_NEW_TASK | Intent.FLAG_ACTIVITY_CLEAR_TASK);
        PendingIntent dismissIntent = PendingIntent.getActivity(getBaseContext(), 0, intent, PendingIntent.FLAG_CANCEL_CURRENT);


        builder.addAction(android.R.drawable.ic_menu_close_clear_cancel, "DISMISS", dismissIntent);

        notificationManager.notify(NOTIFICATION_ID, builder.build());
    }
}
Result
We can use notifications with reply history.
Quote
Categories
- Android
- AngularJS
- Databases
- Development
- Django
- iOS
- Java
- JavaScript
- LaTex
- Linux
- Meteor JS
- Python
- Science
Archive ↓
- September 2024
- December 2023
- November 2023
- October 2023
- March 2022
- February 2022
- January 2022
- July 2021
- June 2021
- May 2021
- April 2021
- August 2020
- July 2020
- May 2020
- April 2020
- March 2020
- February 2020
- January 2020
- December 2019
- November 2019
- October 2019
- September 2019
- August 2019
- July 2019
- February 2019
- January 2019
- December 2018
- November 2018
- August 2018
- July 2018
- June 2018
- May 2018
- April 2018
- March 2018
- February 2018
- January 2018
- December 2017
- November 2017
- October 2017
- September 2017
- August 2017
- July 2017
- June 2017
- May 2017
- April 2017
- March 2017
- February 2017
- January 2017
- December 2016
- November 2016
- October 2016
- September 2016
- August 2016
- July 2016
- June 2016
- May 2016
- April 2016
- March 2016
- February 2016
- January 2016
- December 2015
- November 2015
- October 2015
- September 2015
- August 2015
- July 2015
- June 2015
- February 2015
- January 2015
- December 2014
- November 2014
- October 2014
- September 2014
- August 2014
- July 2014
- June 2014
- May 2014
- April 2014
- March 2014
- February 2014
- January 2014
- December 2013
- November 2013
- October 2013