An introduction to directive in AngularJS AngularJS 22.07.2015
A directive is a rule for defining how your UI interacts with data binding.
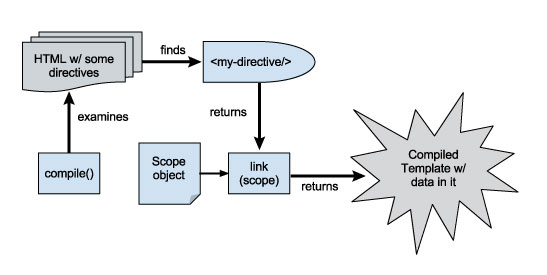
An AngularJS module has a directive function that allows you to attach a directive to a module. You can use this function in several different ways, but the simplest way is to pass the name of the directive in camel case and a factory function that returns the link function.
The link function is invoked on each element you attach the directive to. This function takes the DOM element, its associated scope, and a map of the element’s attributes.
var app = angular.module('MyApp', []);
app.directive('myNgClick', function() {
    return function(scope, element, attributes) {
        element.click(function() {
            scope.$eval(attributes.myNgClick);
            scope.$apply();
        });
    };
});
In HTML you access this directive using the hyphenated version of the directive name, which is my-ng-click in this case.
<div my-ng-click="counter = counter + 1">Increment Counter</div>
Indeed, the factory function, which up until now you used only to return a single function, can return a rich configuration object that enables you to tweak more under-the-hood parameters.
app.directive('myNgClick', function() {
    return {
        template: 'Value is {{counter}}',
        controller: CounterCtrl,
        link: function(scope, element, attributes) {
            element.click(function() {
                scope.$eval(attributes.myNgClick);
                scope.$apply();
            });
        };
    }
});
In addition to running the link function on every element that has the directive attribute, this directive inserts the HTML specified in the template setting as a child of every element with the directive attribute. Also, this directive runs CounterCtrl on the scope that the template HTML will be in.
As an alternative to the template setting, you can also use templateURL. The templateURL setting tells AngularJS to make an HTTP GET request to the specified templateURL and use the contents of the server response as the directive’s template. In practice, using templateURL is generally preferred because of cleaner separation of concerns and easier template reuse. However, there is a performance cost. The performance overhead from templateURL is limited by the fact that AngularJS only sends one request to templateURL, even if multiple directives use the same templateURL.
Creating Separate Scopes for Directives
As you saw before, directives can manage their own internal state. But, to do so effectively, such a directive needs its own scope to provide encapsulation for its internal state. Luckily, AngularJS provides several powerful settings in the directive object for creating a new scope for your directive. Your directive object can specify a scope setting that can be used in one of three ways:
{ scope: true }creates a new scope for each instance of the directive.{ scope: {} }creates a new isolate scope for each instance of the directive.{ scope: false }is the default. With this setting, no scope is created for the directive.
The difference between the first and second ways is that the second option creates an isolate scope for each instance of the directive. Recall that an isolate scope doesn’t inherit from its parent scope, so the directive template in an isolate scope can’t access any variables outside the directive’s scope.
The second way creates a new scope for the directive that does not have a parent scope, but AngularJS provides a slick way to pull outside variables into the isolate scope.
Isolate scope is a way to pass individual things from the parent scope into the directive scope, without inheriting everything. There are three methodologies for passing scope properties. The first is attribute binding also known as one way binding, and is done with an @ sign
scope: {
    oneWay: '@'
}
then calling this directive like so
<some-directive one-way='outerValue'/>
Will bind a variable scope.oneWay in the directive to the value of scope.$parent.outerValue, at directive compilation time and will not propagate changes to the value out onto the outer scope. The important thing to realize with one way bindings, is that they will always occur as a string.
The second method of passing variables onto an isolate scope is commonly referred to as either reference or two-way binding.
scope: {
    twoWay: '='
}
then calling this directive like so
<some-directive two-way='outerValue'/>
There are several things to note here. The first is that unlike in the attribute example, interpolation is unnecessary as object references are passed directly. The second is that any changes to scope.twoWay in the directive will propagate to scope.$parent.outerValue (the outer scope), while any other changes to the directive scope not also listed on the isolate scope will not.
The third and final method of passing information into a directive's isolate scope is known as expression binding. It is represented by the & symbol and is used to pass function references in the parent scope.
scope: {
    outerFunction: '&'
}
then calling this directive like so
<some-directive outer-function='myClickHandler' ng-click='outerFunction()'/>
The restrict and replace settings
You will see the restrict and replace settings used heavily in many directive libraries. These settings primarily function as syntactic sugar, making HTML that uses directives more intuitively pleasing.
AngularJS supports four ways of using a directive in HTML
- by attribute (
restrict: 'A') - by CSS class (
restrict: 'C') - by comment (
restrict: 'M') - by element (
restrict: 'E')
You can specify which of these usages your directive supports using the restrict setting. The restrict setting takes a string that lists which of the four usages the directive allows. Each of the four usages is represented by a single character.
The replace setting is a Boolean value (false by default) that determines whether the template is inserted as a child of the DOM element or replaces the DOM element entirely.
Transclusion
Transclusion allows you to parameterize your directive’s template, enabling you to modify some HTML in the template based on your needs.
Similar to the scope setting, the transclude setting can take one of three different values. The transclude setting is false by default, but you can set it to either true or the string 'element'.
Here’s a basic example of how transclude: true works in action. First, here’s a simple directive that introduces a person with a specified name:
app.directive('ngGreeting', function() {
    return {
        restrict: 'E',
        transclude: true,
        template: 'Hi, my name is ' + '<span ng-transclude></span>',
    };
});
Note that the template HTML has an element with an ng-transclude attribute. The ng-transclude attribute means that the contents of the span will be replaced with the contents of the original HTML element. Here’s how the ngGreeting directive can be used in HTML
<ng-greeting>
John
</ng-greeting>
<br>
<ng-greeting>
<b>John </b>
<ng-greeting>
Congratulations! You now have a directive with a parameterized template! AngularJS pulls any HTML you put into the directive element into the directive’s template.
Tips and tricks
Sometimes you have dynamic template (for example, infowindow in gmaps) and want to keep event action on click. You may use this snippet
app.directive("myDirective", function($compile) {
    var template = "<button ng-click='doSomething()'>{{label}}</button>";

    return{
        link: function(scope, element){
            element.on("click", function() {
                scope.$apply(function() {
                    var content = $compile(template)(scope);
                    element.append(content);
               })
            });
        }
    }
});
Simple directive that convert latitude/longitude into an address (reverse geocoding) using the Google Maps API.
Snippet
app.directive('reverseGeocode', function () {
    return {
        restrict: 'E',
        template: '<div></div>',
        link: function (scope, element, attrs) {
            var geocoder = new google.maps.Geocoder();
            var latlng = new google.maps.LatLng(attrs.lat, attrs.lng);
            geocoder.geocode({ 'latLng': latlng }, function (results, status) {
                if (status == google.maps.GeocoderStatus.OK) {
                    if (results[1]) {
                        element.text(results[1].formatted_address);
                    } else {
                        element.text('Location not found');
                    }
                } else {
                    element.text('Geocoder failed due to: ' + status);
                }
            });
        },
        replace: true
    }
})
Usage
<reverse-geocode lat="49.2338721" lng="28.4667907" />
Quote
Categories
- Android
- AngularJS
- Databases
- Development
- Django
- iOS
- Java
- JavaScript
- LaTex
- Linux
- Meteor JS
- Python
- Science
Archive ↓
- September 2024
- December 2023
- November 2023
- October 2023
- March 2022
- February 2022
- January 2022
- July 2021
- June 2021
- May 2021
- April 2021
- August 2020
- July 2020
- May 2020
- April 2020
- March 2020
- February 2020
- January 2020
- December 2019
- November 2019
- October 2019
- September 2019
- August 2019
- July 2019
- February 2019
- January 2019
- December 2018
- November 2018
- August 2018
- July 2018
- June 2018
- May 2018
- April 2018
- March 2018
- February 2018
- January 2018
- December 2017
- November 2017
- October 2017
- September 2017
- August 2017
- July 2017
- June 2017
- May 2017
- April 2017
- March 2017
- February 2017
- January 2017
- December 2016
- November 2016
- October 2016
- September 2016
- August 2016
- July 2016
- June 2016
- May 2016
- April 2016
- March 2016
- February 2016
- January 2016
- December 2015
- November 2015
- October 2015
- September 2015
- August 2015
- July 2015
- June 2015
- February 2015
- January 2015
- December 2014
- November 2014
- October 2014
- September 2014
- August 2014
- July 2014
- June 2014
- May 2014
- April 2014
- March 2014
- February 2014
- January 2014
- December 2013
- November 2013
- October 2013